NOTE (2021): This topic has turned into a process that with help of others, has successfully modded (unlocked advanced options + updated a bunch of BIOS firmwares) the BIOS.
The final version that you can use for your own laptop has been uploaded HERE (https://www.dropbox.com/s/jf13hk5fnnnw0gu/Acer%20V3-571G-_2.21-Q5WV1221-UnlockUpdate_ModFinal.zip?dl=1
Another note: someone has confirmed that this modded BIOS doesn’t work only on Acer V3-571G but also on models like these:
Acer Aspire E1-531 - G - E1- 571 - G - V3-571 - G - TM-P253-E - M - PB EN TE11HC - PB EN TV44HC - GWNE56R
… See his post (klodfor) for more information and caution.
But basically, this is the case because they all use the same motherboard.
----------------------------------------------------------------------------------------------------------------------------------------------------------------------------------------------------------------------------------------------------------------------------------
Original post:
Hi,
I have been trying to mod the BIOS of my Acer V3-571G laptop (more specifically, v3-571g-73636G50Makk) and tried modifying both the .bin file that I BIOS-dumped using fptw / fptw64.exe, and the Q5WV1X64.fd that is the BIOS file shipped with the latest update from Acer’s driver page for this laptop (which is universal to V3-571G and isn’t tied to my hardware configuration, the more detailed model number, or hw serial/private info). I became stuck in the process of finding what to modify in order to unlock the advanced menu, as I’m a novice.
I would appreciate help by either;
1) Receiving the data segment name, or location, of the thing that needs to be patched in order to unlock the BIOS. I am currently trying to identify it with UEFITool.
This is the location I estimate it should be somewhere;
Any hints?
or 2) someone willing to just mod the BIOS for me. I prefer learning it with some help, though. I would share the final result publicly anyways.
The product page of Acer V3-571G is at https://www.acer.com/ac/en/US/content/support-product/4077 and the driver support tab for BIOS update redirects to https://global-download.acer.com/GDFiles/BIOS/BIOS/BIOS_Acer_2.21_A_A.zip?acerid=635264178355568077
This is BIOS rev 2.21 from release date 2014/01/27, the latest one, which I’m trying to mod. I really want to get the latest version modded rather than use existing BIOS mods.
NOTE: If you download the official BIOS update, you won’t see Q5WV1X64.fd BIOS rom that it upgrades to, in the clear; Acer hides it from the tool files folder. To get it, you’d need to run InsydeFlash.exe, then (from Task manager > Insyde Flash process > Open File Location > to open where it caches itself in Windows Temp folder, there will be a duplicate of the tool folder but there will be additionally that .fd ROM file.
If you want to spare yourself the hassle, then here is the .fd file as I uploaded it: [removed as irrelevant & outdated, see “2021 Update” at beginning of topic]
Also, if needed, I don’t care to provide my BIOS dump (yes, I understand the risks). Here it is: [removed as irrelevant & outdated, see “2021 Update” at beginning of topic]. Please note that this BIOS dump, unlike the basic BIOS update file, is specific to my hardware configuration (the v3-571g-73636G50Makk, a high-end variant of V3-571 with i7 processor and more powerful stuff). While preparing to dump it, I re-flashed the latest update, reset CMOS (settings and checksums), and proceeded to dump it within minutes, so it’s the cleanest dump you can get.
I’d really appreciate getting help with this sooner than later, I purchased a few RAM sticks last week (DDR3L) that won’t boot because of a memory voltage issue (1.35v versus 1.5v).
I expected to have a chance getting it to work by controlling the settings before inserting them, after BIOS unlocking, or at least experimenting before returning them to the seller.
And i just got a limited timeframe to return them…
Is it really that hard to identify where the lock is located in a BIOS structure? For me so far, yes it has been.
@DvL - 1.5v voltage applied to 1.35V memory wouldn’t stop it from booting, it would just apply 1.5V to the memory and carry on. Either that memory is damaged, or is not compatible for some reason such as density or other random incompatibility problem
The main issue here may be flashing a mod BIOS, not unlocking it.
While yes the unlock is not easy for a novice to do, requires assembly edits at first to figure it out, and yes you have the correct module selected in above image, it’s the flashing part that may not be easily possible (Never mind, I see recovery method works for this model).
Do you have a flash programmer, such as CH341A and a SOIC8 test clip cable? If not, order those now, it’s too cheap not to own in case you need later ($2.50 + $3.50 on ebay)
Here is the unlock edits to make, extract that "DriverSampleDXE-SetupUtility PE32 “BODY” Edit body at two bytes as follows
8DE: 59 >> Change to >> 00
8E8: 4F >> Change to >> 00
In case you can’t get it, here is unlocked general 5MB stock BIOS, cut from 6.64MB Q5WV1X64.fd (The one extracted from the EXE as you mentioned), this way it’s not specific to your laptop it will work for all users later that find this thread
To cut 5MB BIOS from 6.44MB stock FD, go to 0x10C80 and select 500000 byte block (Or select 0x10C80 to 0x510C7F), cut and paste as new, save as BIOS file name. This is the actual stock BIOS file.
Don’t program this in with programmer, it’s only meant to be used by flasher or recover method, if you want to use programmer or FPT, modify your dumped backup instead and then use that as source instead of this stock edit
http://s000.tinyupload.com/index.php?fil…228902921394628
Recovery method has been tested and proven to work on this model, here is flash recovery/flash mod BIOS instruction for this model I found at BIOS-mods forum -
Prepare USB
1. Format a USB flash drive to use the FAT32
2. Copy modified Q5WV1X64.fd to root of the newly formatted USB drive
Performing the flash
1. Shutdown the netbook
2. Remove all peripheral devices
3. Remove AC power cord
4. Put the USB stick in the USB port
5. Hold FN + ESC
6. Now press the power button (whilst still holding FN + ESC), then release all keys
7. Wait until the fan will run, then release “Fn” + “Esc” keys - The fan will run for about 2-4 minutes and the USB drive activity LED will blink
8. I think the netbook rebooted automatically. If it doesn’t, unplug the AC power cord once the fan has turned off
9. Your netbook should be updated BIOS, and boot as per normal
Thanks a lot, yes I’m not experienced enough to figure out this edit so it helped. And yeah even if it won’t solve my RAM problem I’d still have benefit from the advanced options, I had this mod planned for a while already.
Another question: do you believe that (un)locks for other InsydeH20 BIOSes have a similarly named lock section (DriverSampleDXE-SetupUtility) or if not, that Acer ones do?
Is there a trick you use to identify its location, or is it just due to having a nose for it?
I will flash it using the method you provided and let you know the results tomorrow or in a few days.
Btw, are you interested in helping me to further improve the BIOS by updating a few things? I saw that you’ve done that for other models too.
Examples:
- CPU microcode
- vBios
- ME firmware
- maybe other drivers like AHCI
Because the Acer v3-571G is a very common model, I’m sure further improvements would help a lot of others just like the advanced menu alone does.
We could do a modded BIOS release topic if it succeeds (of course with full credits to you!) and I would test everything on the spot.
@DvL - You’re welcome. I agree, even if you find out the ram isn’t working or not compatible, having more BIOS options is always nice. That BIOS module is in all BIOS, it’s the “Setup” module, some BIOS call is Setup, other BIOS it’s DriverSampleDXE or SetupUtility etc.
So yes, all BIOS have this, and often with Insyde BIOS yes this is the module you need to edit to unlock, but it’s never going to be those exact same bytes to edit. To find what you need to edit, there’s several ways, some better/easier than others, and not all work on all BIOS even if it’s still Insyde BIOS
Here is a general method to figure it out for many Insyde based BIOS - http://web.archive.org/web/2016111807325…power-tabs.html
Do you have flash programmer (hardware, like CH341A or other) + SOIC8 test clip cable? If yes, then we can easily update all that, if not then it may not be possible, at least not easily (mainly talking ME FW there)
Rest, yes I/we can update the other stuff easily if you want (except legacy vBIOS will be huge pain to update all of them because there’s 12x orom in there, EFI vBIOS only two)
On ME FW, since you are using recovery method to flash in, it may go ahead and reflash the updated ME without issue, I’m not sure we’d have to test that and find out.
I don’t have a flash programmer, and to be honest, despite being a developer, I think I might limit my BIOS modding activities to this laptop model, so I won’t get it. Thanks for the advise though.
About updating the rest: I can test all changes, like ME FW to see if it flashes easily because it’s the recovery method. If it doesn’t, then we can next try a BIOS that has only other easy stuff updated (microcode etc) or maybe, if you have time for that, also the "12x orom" vBios. If you would rather start it slowly, I will test a ROM that lacks both ME and vBios, after which we can test other updates with small steps.
And yes I really appreciate your help in actually making these edits, as I would probably break my back over figuring out how to update these; I saw some tools for easy updating on this forums, but not for Insyde BIOSes, so it’s manual work.
They are so cheap $2.50 + $3.50 it’s a crime to not own a set, they can really be a lifesaver later on because anytime you flash a BIOS (or even change a setting), then BIOS can corrupt or brick etc. So, since they are so cheap, I suggest everyone should have a set.
ME FW was the only one I thought might not update, easily, without a programmer, but since you’re doing recovery it may also be writing the ME in too.
We’ll know right away if it updates or not, you can check ME FW Version with HWINFO64 in the large window, expand motherboard section and then go to ME section.
Yes, I don’t think there is tools specifically for Insyde, maybe UBU can do the microcodes but I’m not sure.
Did you test the unlocked BIOS yet? Once you do let me know, and I’ll carry on editing with that if it’s OK and unlocked.
I haven’t had the chance to visit the location of my laptop again, I will for sure in a couple of days and reply back with the results.
I apologize for the delay!
@Lost_N_BIOS now I flashed the modded ROM you provided me, and it works perfectly. The amount of advanced options is really insane! I never saw it like that, not even on highly customisable desktop gaming boards.
Note: the BIOS recovery flash method you provided is nearly accurate, but not completely; I had to also plug the AC cable back in while actively holding FN + ESC (after previously taking it out), and then power on while still holding these keys down. If you just take the cable out, hold FN + ESC and power on, then it will boot normally (not work). I found that detail elsewhere on the web. After that, the flash completed in under a minute, with the fan sounding.
I am just noting this as it may help others trying to do the same in future.
So can we proceed now? I will continue testing any changes (updates) you make after this. If I fail, then I will purchase a flash programmer to recover.
I’d suggest the ME FW would be the last thing on the list… maybe first work on CPU microcode and GPU vBios? Or all at once, tbh I don’t care to risk it.
@DvL - no worries about a delay, I’m behind badly right now too 
Great to hear it’s all unlocked now, perfect! Many BIOS have 100’s of settings often hidden from users Usually a good chunk is shown, but not always, I’m surprised you’ve not seen a lot like that on some gaming systems  (They hid a lot there too though)
So, no missing settings that you could see so far? If any still missing I can still make visible for you, but I need to know exactly what submenu or settings by name etc.
Here is a textual list of all possible settings, you’ll have to scroll through and see if you see anything missing, or send me some images of all sections/submenus etc if you want (Put in zip or 7zip if you do, and please no 3-5MB per image )
http://s000.tinyupload.com/index.php?fil…213404355550562
And thank you for the added flash recovery method tip, I grabbed that off the web too and added a step or two from one post that another was missing, so your tip I probably would have seen in a third outline but I stopped looking since the two I found were nearly the same.
But yes, you are correct, it’s good you add the info here because it will probably help someone in the future 
I will look over BIOS again tonight, and update all I can for you. I’ll do it all at once, it’s quicker for me to just do it all at once while I’m in there.
Then you can check ME FW in windows and see if it’s changed or not, if not and it’s not corrupted currently, then you can still update it manually in windows using MW FW Update tool (I’ll show you how)
* Edit - ME + Ucodes done, so all that’s left is vBIOS.
If you want me to do vBIOS, and you are using onboard GFX, please get me the device ID from device manager. If you are not using onboard graphics we can skip this.
This BIOS has 7 different vBIOS roms for Nvidia, I don’t think I can update those unless you know where NVidia vBIOS oroms are, then maybe I can look into that. But, I can update the Intel GOP and vBIOS modules (4 total) and don’t need device ID on these as it’s standard Intel
I could maybe do the Broadcom PXE LAN ROM, but that’s only used if you use “boot from LAN”
I will post a video (or slideshow) of the available options soon, this will also help others that wanted to open up specific possibilities to see if the mod would help them.
But from what I remember, the only thing I was missing, ironically enough, was RAM voltage (and other advanced options like timing, etc). I can’t seem to find anything related in your list either.
Alright, thanks a lot for the effort. I am using the dedicated Nvidia GPU as preferred for applications, but the Intel HD is also present at the same time.
I will get you the device ID as soon I can (tomorrow), but I already recorded what is listed in main screen (of the modded BIOS setup) with GPU and vBios details, maybe it helps:
GOP version: Intel (R) GOP Driver [3.0.12.2012]
VGA BIOS Version (PEG): nVidia N14M-GL REV75.17.48.00.0A
*Note about this ^ version information at the bottom of this post: perhaps GeForce 710M-specific!
Interestingly enough, I found GPU options like this after the unlock:
Note: they do sound tricky ![]()
I will post a video (or slideshow) of the available options soon, this will also help others that wanted to open up specific possibilities to see if the mod would help them.
But from what I remember, the only thing I was missing, ironically enough, was RAM voltage (and other advanced options like timing, etc). I can’t seem to find anything related in your list either.
I see, I’ll try finding a source while waiting to get the device ID tomorrow. Feel free to already update the Intel HD vBios and GOP, (and yeah, please, also PXE LAN ![]() in addition to ME + Ucodes in the meanwhile
in addition to ME + Ucodes in the meanwhile
Also please note that my specific model of the V3-571G has an GeForce 710M, because it’s the high end model of this laptop line (v3-571g-73636G50Makk).
So I’m not sure if the GPU’s of all submodels (like, an GT 640M is also very common) use the same vBios. I think they do, because the Acer support page for V3-571G base model (the BIOS we used) offer just 1 ROM, with a single vBios.
Or not? Maybe there is "7 Nvidia ROMs" to support all GPU variations in the V3-571G line?
If my thought isn’t accurate, this may impact usability for others interested in using the modded BIOS after we finish the job… so perhaps, if I can get the orom, you can make 2 flavours: first one without vBios update, and the other with?
I would suggest (to be safe in both scenarios) to do that, so you can even just leave the Nvidia vBios update out for now, and wait until I; A) found the oroms, and B) we figured out about this compatibility matter.
Then we also have the safe flavour of modded ROM, and you can finish it now without waiting for my device ID or orom searching…
I assume they don’t use the same vBIOS, that would be why there is so many in the same BIOS, for the various GPU options presented at sale model end point. So yes, your later assumption is correct 
I will know your device ID from the vBIOS info you gave above, sorry I didn’t think to check main page of BIOS.
Do not try to enable/disable certain graphic cards (Internal, dGPU, iGPU etc) until you have a flash programmer in your hands and a validated and verified backup of your BIOS made so you can recover if needed.
Often on many laptops, trying do this leaves you with a black screen and no way to recovery BIOS except blind reflash, Clear CMOS when it works, or flash programmer recovery.
I’ll see what, if any, NVidia vBIOS oroms are posted here, there might be some I’m not sure.
I know where to find for regular desktop type cards, at techpowerup, but you need for laptop and taken from a BIOS, which is much more rarely posted around forums, but I’ll try to find.
If I can’t find, then I can only update the Intel stuff.
I found it.
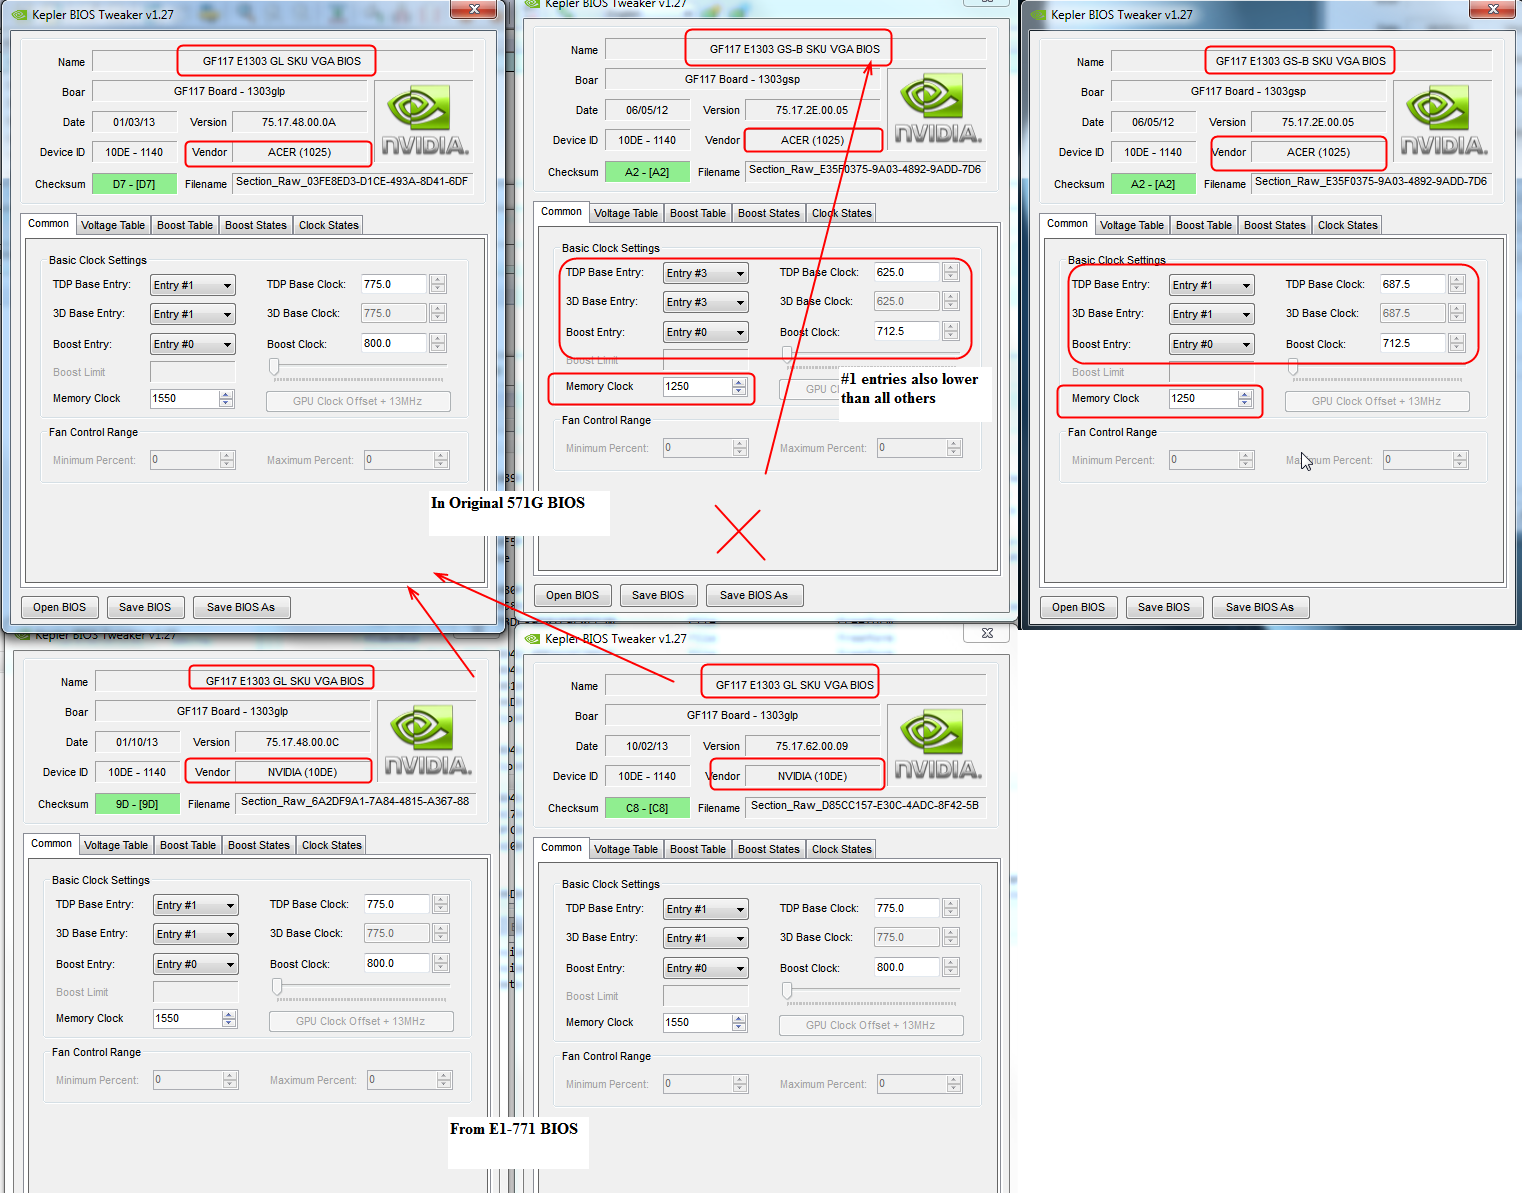
There is a version with ver number 75.17.48.00.0C making it nVidia N14M-GL REV75.17.48.00.0C (opposed to what we have right now; nVidia N14M-GL REV75.17.48.00.0A available from the E1-771 laptop BIOS (which also contains multiple vBios ROMs).
I extracted the whole section (GUID containing the ROM) as (click for download) File_Freeform_6A2DF9A1-7A84-4815-A367-88492F2AD18A.ffs (GUID 6A2DF9A1-7A84-4815-A367-88492F2AD18A), I hope I did that right as I never exported a vBios in the way you say they are usually posted around the forums. If I didn’t do it right, just read below and export it ;p
Method I used (inspired by what you said): find latest laptop models released with GeForce 710M, an interesting one (aspire E1-771) was released mid-2014. OEM’s usually ship the latest versions of everything when they release a new model, so there’s a chance they started off with a newer version vBios than the V3-571G (released much earlier).
So I opened the latest BIOS update for Aspire E1-771 and for sanity renamed the isflash.bin to the ‘original’ filename (VAG70X64.fd) revealed by PhoenixTool (click for download: VAG70X64.fd) or else just get it from E1-771 driver page or directly from https://global-download.acer.com/GDFiles/BIOS/BIOS/BIOS_Acer_2.30_A_A.zip?acerid=635357212748337751 and then use 7-Zip to "open inside" the VAGV230.exe BIOS utility, to find isflash.bin (or let it run and go to temp folder where it extracted itself, like usual).
Now I opened the ROM with UefiTool, and found the Intel vBios (segment "VideoRom") and underneath that, the Nvidia ROMs, just titled as GUIDs. Like with the V3-571G, there are multiple ROMs to support all GPU’s that the laptop model range ships with.
I opened body hex view for each Nvidia ROM, looking for the chip name in each. I saw like; GK107, GF108… but then I checked what chip the GeForce 710M uses (according to notebookcheck, the GF117 chip) and skipped through these ROMs to find the one listing GF117 inside its body. So basically now I found the 710M vBios of E1-771. Which is newer than ours currently is.
Although, there is only 1 problem with this approach: I found not a single, but 2 ROMs of a few chip names, also GF117, in that ROM. One is the new 75.17.48.00.0C, but the other one is 75.17.62.00.09.
I wonder if 710M supports both, I think so (same chip, and both from a laptop that has this GPU) but the safest option sounds like 0C because it’s a similar version number as the original (75.17. > jump to .62 with the other ROM, while this line just has a "C" difference in the updated vbios).
So to make a long story short, I think it’s the safest to update to this 75.17.48.00.0C first, and perhaps test vbios 75.17.62.00.09 later (once I got a flash programmer just in case).
I will upload it anyways (in advance): D85CC157-E30C-4ADC-8F42-5B82C7C8DDAA-vBios75.17.62.00.09.ffs
Note: when I was comparing both of these vBioses, I cleaned up a HEX section to compare;
versus
Maybe they were just preparing for a next generation driver, reserving the newer BIOS (for what would be nVidia N14M-GL REV75.17.62.00.09) for the same 710M models… I guess it’s safe.
But still, let’s start with the 0C update to be even safer ![]()
@DvL - good find, and great inspecting work!
I’ll download the BIOS and extract myself (so I can extract as-is + Body) and compare all the vBIOS in that to your current and see if it looks compatible. So you do have the 710M, correct? If yes, and in case it matters, how many GB memory on it? Add GPU-z image too, thanks
You are correct, and I would assume the same >> REV75.17.48.00.0C Is update to >> REV75.17.48.00.0A ---- 75.17.62.00.09 may be update as well, but since both 09 and 0C in that BIOS, I assume these are for different model cards, either due to slight chipset variant, memory amount, or some other major spec difference
I’ll have to look around and see if I can figure out in google, it not maybe I can with the vBIOS themselves.
For the PXE Broadcom - see this thread - Actual PCI ROM modules (not AHCI/RAID related)
I need to confirm your device ID is the 16xx shown there (Check in device manager), and then follow the two links in that info, especially the first one and confirm your LAN Chipset is one in that long list
Thanks for getting back to me!
Yes, i got the 710M version with 2GB dedicated vram. I’m not sure, but I guess it doesn’t matter.
Just for the record, my GPU’s device ID is PCI\VEN_10DE&DEV_1140&SUBSYS_06911025&REV_A1
Here is the requested GPU-Z screenshot:
It’s an "Broadcom NetLink ™ Gigabit Ethernet" with device ID PCI\VEN_14E4&DEV_16B5&SUBSYS_06471025&REV_10
In addition to my last post from 1 hour ago:
I just updated the unlocked ROM to vBios 75.17.48.00.0C by myself, and it works just fine! (also shows the updated version in BIOS setup menu).
So i think you could just wrap up on the rest of those updates without that, ill just re-update it ontop of it, spares you some time.
By now, I also successfully updated & flashed vbios to 75.17.62.00.09 which so far works without issues.
I will comment on its stability again soon.
@DvL - Thanks for the video info, I’ll get into this again shortly.
N14M-GL variant of GF117 card supports DirectX 12.0, maybe some other variants do not, and some have only 1GB memory. So this may be why there is the two vBIOS for the same GPU
That, or it’s due to one 710M variant is Fermi GF117 and another is Kepler GF208 https://www.techpowerup.com/gpu-specs/geforce-710m.c2017 & https://www.techpowerup.com/gpu-specs/geforce-710m.c2433
Some of the vBIOS in there are for GK107 and GK108, I assume you noticed that, but in case not I’ll drop here for you or anyone else reading later.
I see when comparing the two original GF117 vBIOS and the new ones from the E1-771 BIOS, both in the E1 are same SKU but different vendor ID (This doesn’t matter), but in the original two vBIOS from 571G BIOS, those two have different SKU’s
On this one with other SKU, it also opens to Base Entries #3 instead of #1 (And all clock # entries have lower speeds too, core and Mem), so that may be for some lesser/budget SKU
So, my best guess is both/either of those from E1-771 could be used, and Vendor ID could be left as-is or changed later if found it needs to be changed.
Thanks for the LAN ID string. I also need you to confirm your LAN Chip is one of the ones in the list at the link I provided earlier, follow the links from that link to the two other threads linked with it’s info/description about the mod, once has a long list of chip ID’s.
Tell me which chip you have.
* Edit, looks like you replied again while I was typing out my reply, got ninja’d, and you confirmed my thoughts about those two 771 vBIOS
* Edit @DvL - on the Broadcom are you sure that’s DEV_16B5 (b5) not DEV_16B5 (85)? I see 85 in the actual file in BIOS.
* Edit 2 - @DvL - Never mind the above, I confirmed that’s what it’s set as correctly being the Dev ID, so made update match current
All done!!
Change Log >>
Unlocked BIOS
Unlock FD - This only applies if flashed in via programmer, unsure if recovery flash will put this in, FPT will not without having unlocked FD first and using -desc flag or no flags and flashing entire BIOS (FPTw.exe -f bios.bin << Will fail with locked FD onboard, unless pinmod first)
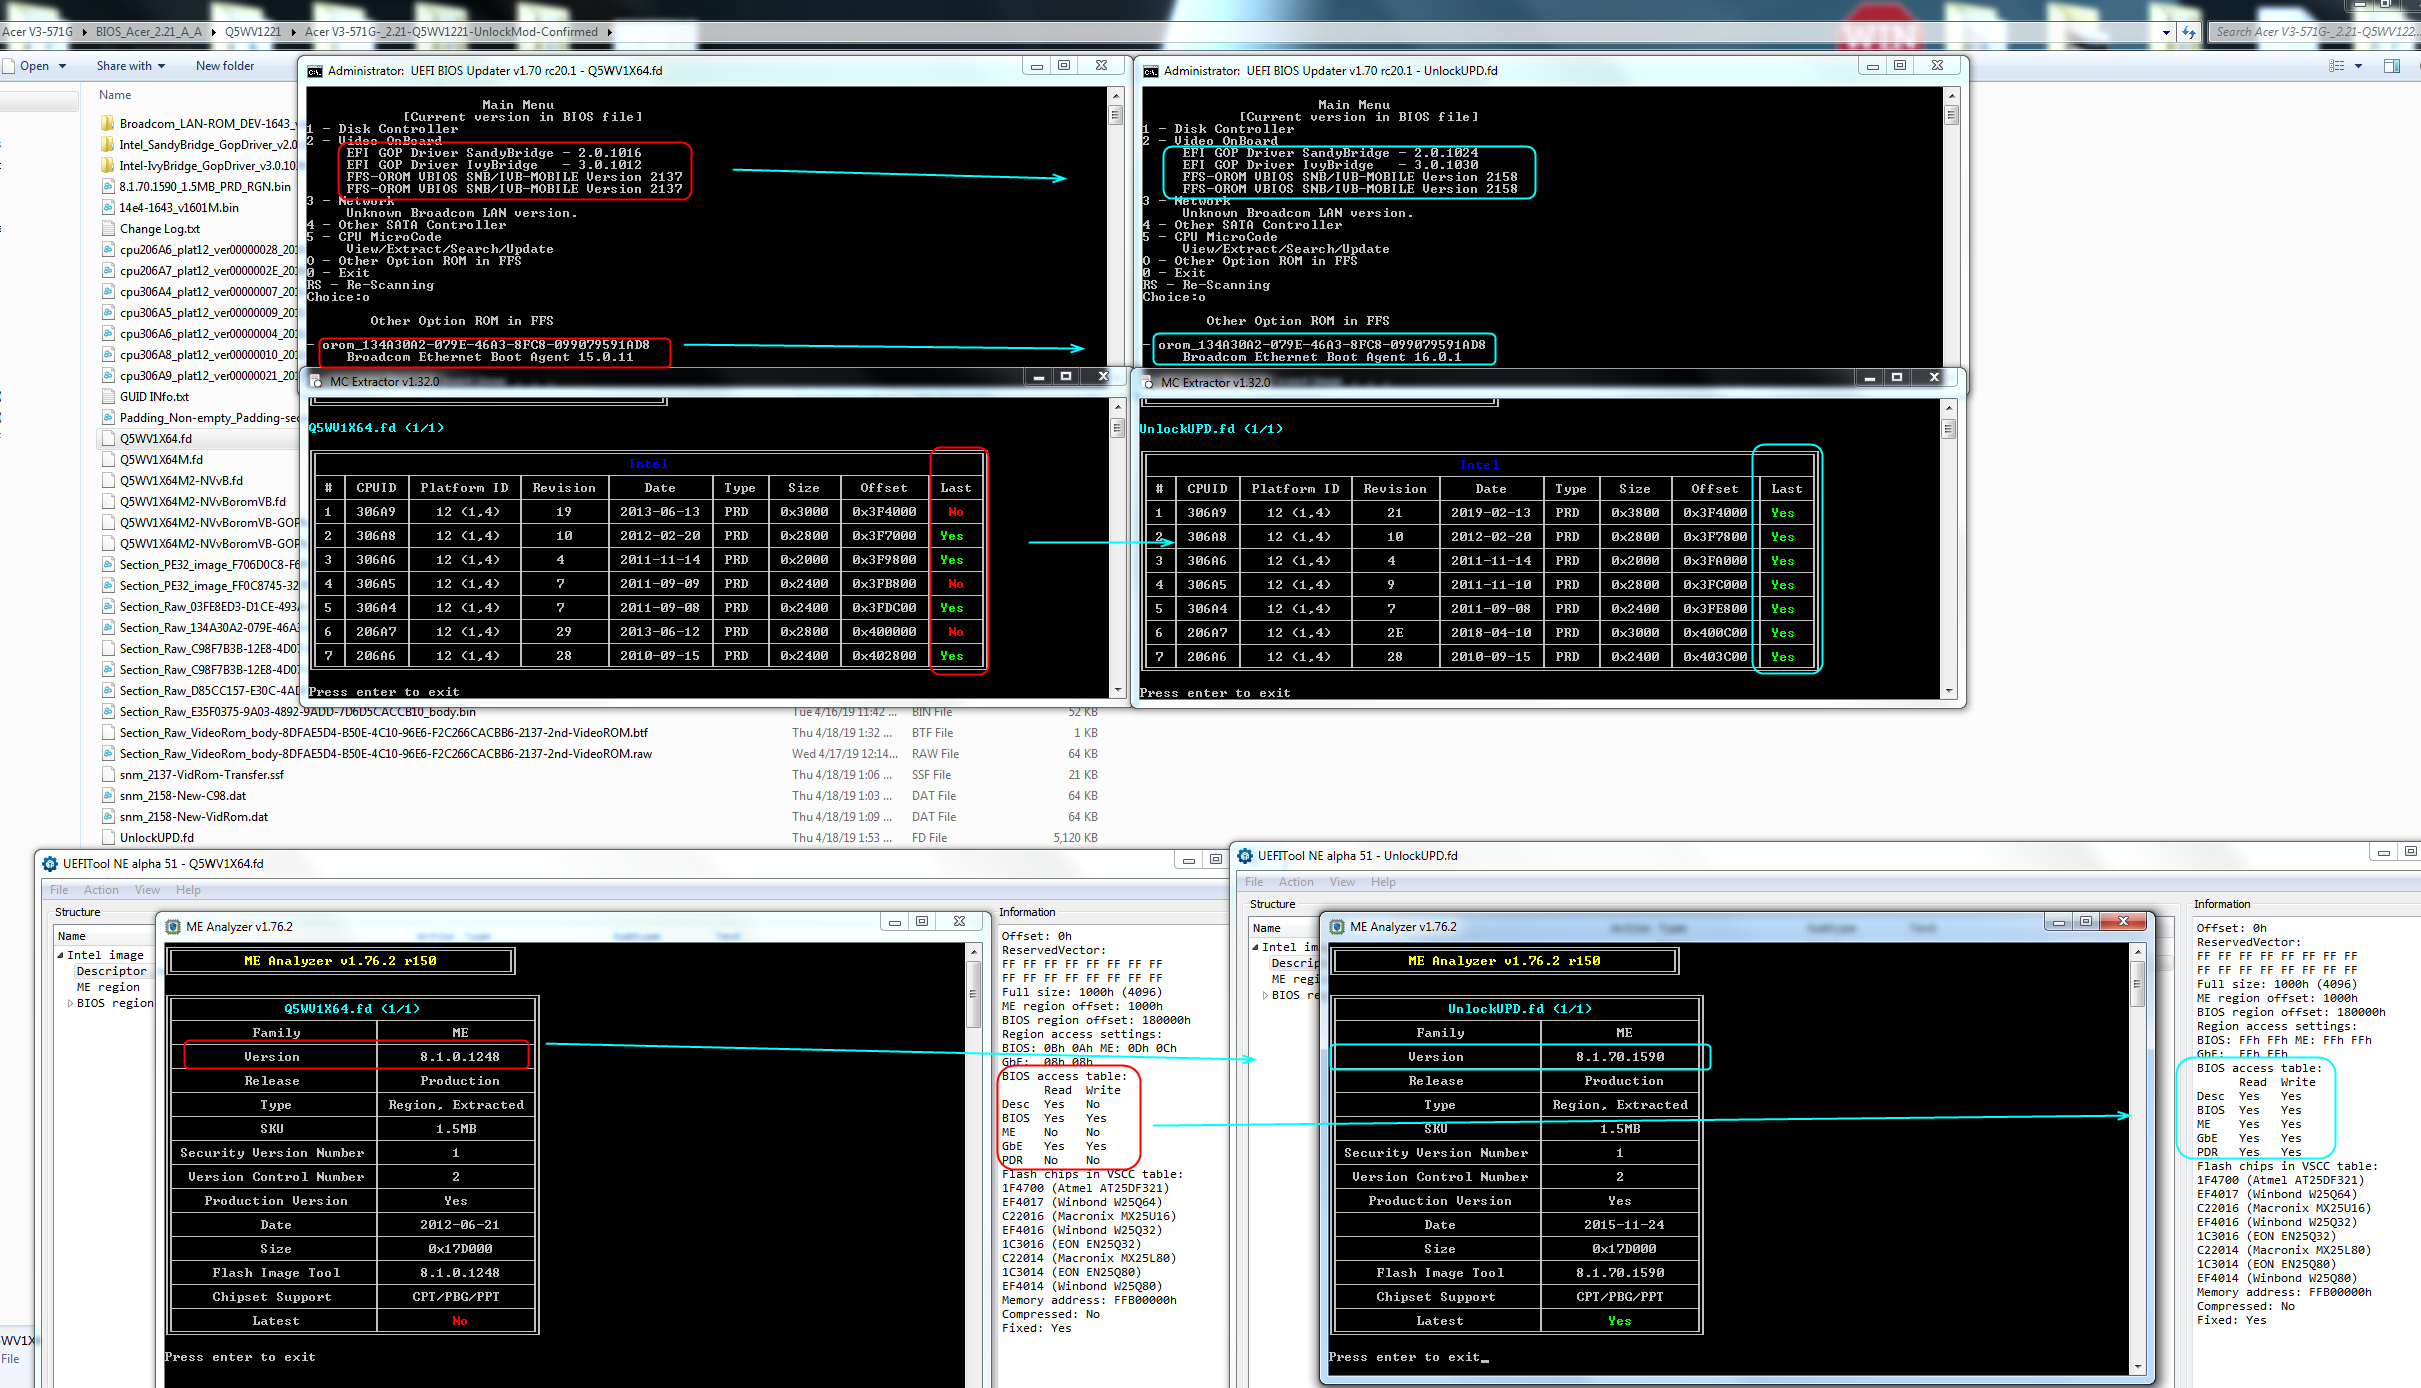
Update ME >> 8.1.0.1248 >> Updated to 8.1.70.1590
Updated microcodes
306A9 Rev 19 (2013) >> Update to Rev 21 (2019)
306A5 Rev 07 (2011) >> Update to Rev 09 (2011)
206A7 Rev 29 (2013) >> Update to Rev 2E (2018)
Nvidia GF117 vBIOS 75.17.48.00.0A (1/03/13) >> updated to >> 75.17.62.00.09 (10/02/13)
Intel
EFI GOP Driver SandyBridge - 2.0.1016 >> updated to >> 2.0.1024
EFI GOP Driver IvyBridge - 3.0.1012 >> updated to >> 3.0.1030
FFS-OROM VBIOS SNB/IVB-MOBILE Version 2137 >> updated to >> 2158 - (Platform - ChieRiver | MahoBay)
FFS-OROM VBIOS SNB/IVB-MOBILE Version 2137 >> updated to >> 2158 - (latform - HuronRiver | SugarBay)
Broadcom UNDI PXE-2.1 v15.0.11 >> Update to >> v16.0.1
http://s000.tinyupload.com/index.php?fil…925284914857613
Sorry to kind of ask kind of an unrelated thing, but this is the exact thing I need help with. I have extracted the SetupUtility module and the SetupBrowser module(These ones: https://ibb.co/3TrJ4qq and https://ibb.co/2jMVFrm ), but I don’t know which one to edit and what to search for(The codes given here are different for my bios), so if you could provide the unlock edits to make(or how to find them), I’d really really appreciate it, thank you. Here is my bios ROM(the one I got off Sony’s website for my VAIO model which is a SVE1512Q1E): https://www.mediafire.com/file/agyl19d3y…0200D5.ROM/file . (The 9MB file size is not an issue, i could flash the file just fine)
Also, does this unlock BCLK overclocking and if not, is there a way I can add a BCLK overclocking module to the BIOS(i hope what i said makes sense). Even if not, I’d be grateful for all the other options unlocked.
I apologize again for this huge delay; I relied on e-mail notification for new posts and didn’t get one. The user that posted now alerted me to it ![]()
Actually, that makes me get lucky, because I verified that after updating to both BIOS versions (made sure they were GF117), my GPU clocks and available memory remained the same. There’s also no deterioration with a benchmark. So if that’s true, then apparently the firmware applies the intended config again.
There’s been no issues with the new vBios, in fact I think the GPU is faster now.
Thanks! I really appreciate it, finally we’re done. I couldn’t have updated this all alone (yet).
I’m going to flash it in the next hour, and will let you know of the results. If it then runs stable, we’re set for a public modded BIOS release.
The updated BIOS flashed successfully and seems to work just fine. Updated dependencies are showing the new version numbers.
I will comment on its stability soon!