@thamir - You’re welcome, I suspected impact is minimal. From what I’ve seen reported, most noticeable change is sometimes at SSD performance loss around 5%
Hi, I’m trying to integrate Intel Microcode for CPUID 206D7 and NVMeDriver on Asrock Rack EP2C602-4L-D16 BIOS 1.90.
I was able to get the NVMe driver integrated using UEFITool_v0.26.0, the amount of free space exceeds the NVMe driver file so hopefully it is OK.
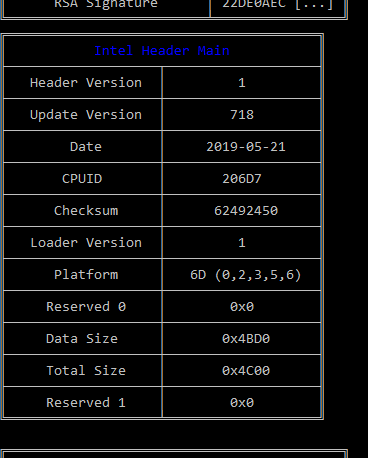
Then, using UEFITool_NE_A55, I can see the individual Microcodes in the 1.90 BIOS, the 2019-05-21 microcode found at https://github.com/platomav/CPUMicrocode…RD_62492450.bin is the exact same size as the 206D7 microcode found in the 1.90 BIOS and its dated 2018-01-26.
To check if its different, I extracted the Body of the microcode section, grepped for the header, I found it @ 0000c400 (50176) with only the date changed. In UEFITool of the 206d7 microcode: Full size: 4C00h (19456)
Used:
dd if=raw_body.bin out=microcode-206d7.bin bs=1 skip=50176 count=19456
and compared it to cpu206D7_plat6D_ver00000718_2019-05-21_PRD_62492450.bin – the first two lines nearly the same except the dates, lines 18-22 identical, so it looks like it infact a different/newer microcode.
Two questions: did I do this right? and if so, how to replace the microcode into the bios? The A55 version does not go to the containing section when I click on it. It does in A40, since they are the same size can I overwrite the microcode section with the new file and reinsert it somehow?
Please attach your NVME Mod BIOS, and a link to your stock BIOS, I will check out your NVME Mod and make sure it’s OK. Then update your 206D7 microcode if you want, if you do not want that done but rather do yourself I will tell you how once I look at BIOS.
Your comments are confusing, since none of that is proper way to do or check any of that, so I’m not going to comment about your thoughts.
If you want to check dates or if microcode is latest etc, drop BIOS or microcode itself onto MC Extractor it will show you
https://github.com/platomav/MCExtractor/releases
Latest microcodes are here
https://github.com/platomav/CPUMicrocodes/tree/master/Intel
Thank you kindly @Lost_N_BIOS !
Using MCExtractor I was able to verify the BIOS using my unorthodox methods ![]()
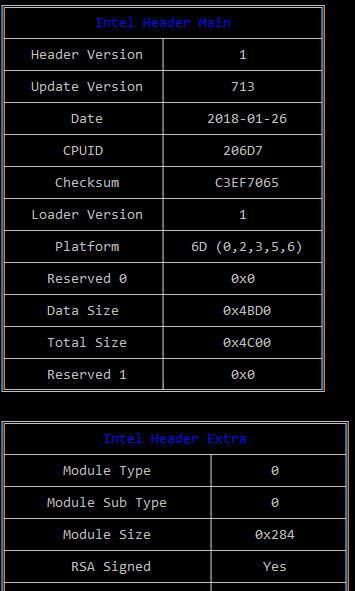
microcode from BIOS:
[[File:Screenshot (22)-bios.png|none|auto]]
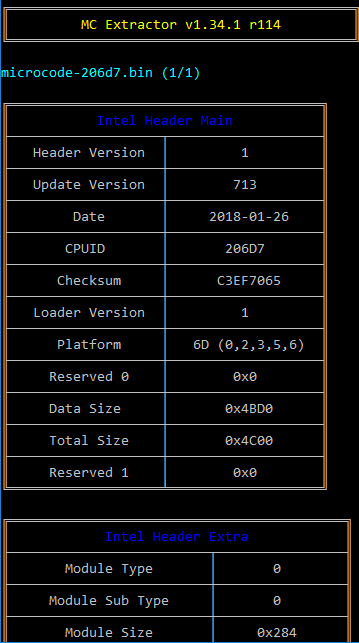
microcode from dd:
[[File:Screenshot (24)-dd-206d7-2018.png|none|auto]]
The microcode in the BIOS and dd extracted microcode match
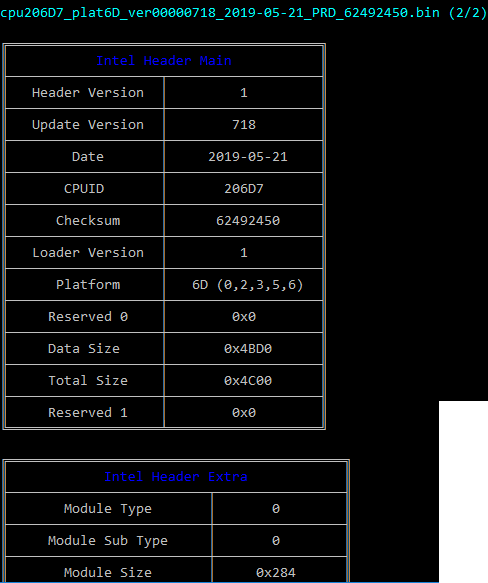
The new microcode:
[[File:Screenshot (21)-cpu206d7.png|none|auto]]
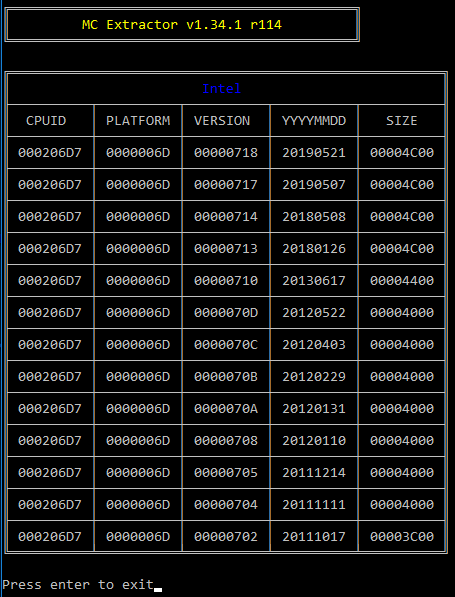
206D7 microcode table for reference:
[[File:Screenshot (23)-206d7-table.png|none|auto]]If its not too much trouble, I’d appreciate it if you can update the microcode and share the BIOS and also post instructions. Then I can learn how by trying to replicate it and verify I did it correctly.
NVMe:
For the NVMe update, I took the original BIOS and added in the NVMe driver - no errors.
Microcodes update
Since the microcodes are the exact same size, I tried to update them by overwriting them in the original BIOS. It looks good in MC Extractor:
[[File:Screenshot (25)-BIOS-updated-mc.png|none|auto]]
But UEFITool 0.26.0 shows:
1
parseFile: invalid data checksum DBh, should be E7h
[[File:Screenshot (25)-checksum-error.png|none|auto]]
I'm not sure how to correct the checksum error.
Combined
To make the combined BIOS image, I used the updated microcode BIOS and then added in the updated NVMe driver.
If its not too much trouble, please share the proper way to do this. This method does not work, especially when the microcodes are not the same size. Thanks again!
Link to original BIOS: http://asrock.pc.cdn.bitgravity.com/BIOS...16(1.90)ROM.zip
Site link in case its broken: https://www.asrockrack.com/general/produ...4L/D16#Download
1 - 1.90 Original BIOS
2 - Original BIOS => added NVMe [OK]
3 - Original BIOS => updated microcode [checksum error]
4 - Original BIOS => updated microcode [checksum error] => added NVMe [saved successfully, ??]
deleted because it doesnt work, check the last post for a working BIOS!
Had some time to take a another crack at it by trying to follow the guide on the first page but changed the process a little.
Opened the original BIOS with UEFITool_NE_A40, located the microcode and found the containing ROM module GUID.
Then I opened the BIOS with UEFITool_v0.26.0. Found the ROM module GUID.
Extracted the body: File_Raw_17088572_377F_44EF_8F4E_B09FFF46A070_body.raw => body.raw
new cpu microcode: cpu206D7_plat6D_ver00000718_2019-05-21_PRD_62492450.bin => microcode.bin
Find the header of the new microcode (similar to the old microcode)
1
2
3
4
5
6
7
2
3
4
5
6
7
#  xxd microcode.bin | head
00000000: 0100 0000 1807 0000 1920 2105 d706 0200  ......... !.....
00000010: 5024 4962 0100 0000 6d00 0000 d04b 0000  P$Ib....m....K..
00000020: 004c 0000 0000 0000 0000 0000 0000 0000  .L..............
00000030: 0000 0000 a100 0000 0100 0200 1807 0000  ................
00000040: 0000 0000 0000 0000 1705 1920 1112 0000  ........... ....
...
search for the header by CPUID in the extracted RAW body
1
2
3
2
3
# xxd body.raw | grep -H "d706 0200"
(standard input):0000c400: 0100 0000 1307 0000 1820 2601 d706 0200  ......... &.....
(standard input):0000c450: 0100 0000 d706 0200 0000 0000 0000 0000  ................
Replace the old microcode with the new microcode. Only works if its the same size!
1
# dd conv=notrunc if=microcode.bin of=body.raw bs=1 seek=50176
Aside: I think if its smaller, the same process will work if you fill in the extra space with FF, dont think FIT table update is required. If its larger, you have to split the file, insert, recombine, and then update the FIT table. This maybe easier with the Hxd tool if you are not comfortable with command line.
In UEFITool_v0.26.0, replace the same GUID body with the modified body.raw. Save it and re-open => no errors. Check with MC Extractor, looks good.
Then add NVMe as usual.

Gave it a try. BIOS flashed successfully. System rebooted, then gave me Dr. Debug Error 06 (Memory Error) ![]()
winbond 25Q64FVAIQ 1552
Pulled BIOS IC and now trying to re-flash with SPI programmer
Got the system back up and running thanks to [Guide] Recover from failed BIOS flash using Raspberry PI
I also wonder if my flash procedure was wrong, the board was running 1.80 and I tried flashing the modified 1.90 . Maybe it will work if I flash to 1.90 original first, reset to BIOS defaults and then modified 1.90 it may work. I will give it a try – if not I can pull chip and reflash again ![]()
@Lost_N_BIOS can you please explain how to do this properly?
Recently we came across a case where Uefitool removed a needed pad file that existed prior to the microcode file on a Z390 bios and if that file was flashed it would have caused a brick. The solution was to compare the structure of the mod and see if anything is missing and instead of using Uefitool manually add the microcodes in a hex editor and if the file size changes to sacrifice one microcode and FF out the extra space. Then correct the fit table. Its also suggested to use another version of uefitool. Lost_N_Bios can explain further.
Thanks for the info @davidm71
From this guide [Tool Guide+News] “UEFI BIOS Updater” (UBU) I decided to use UBU to update all the microcodes and then added in the NVMe driver using UEFITool 0.26.0 … and SUCCESS!
It booted and everything looks good.
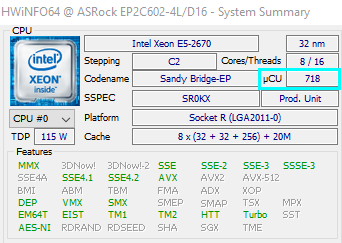
[[File:Screenshot (27)-mc_ver.png|none|auto]]
Attached is the file for anyone else with an EP2C602-DL/D16 = BIOS 1.90 + updated microcodes (as of today) + NVMe driver
edit: updated filename
P602_4D+mc+nvme-1.90.zip (3.96 MB)
@e97 - Yes, this happens often, far more than you’d expect ( @davidm71 - a lot actually)
From now on, please edit your posts if you want to add more info and no one has replied yet, thanks 
I can’t follow along with your posts above e97, it’s too spread out and too much info in too many posts.
But, looks like you got it now. Did you confirm microcode you inserted is the one being used in windows? You can check with HWINFO64, if it doesn’t match then that could be due to Win8-10 loading whatever it wants to do, or broken BIOS mod (FIT Table) so microcode not loaded.
If you do find issue with wrong microcode being used, please package up stock BIOS from manufacturer and your mod BIOS, I will check it for you.
If you want to know proper way to edit microcodes in this BIOS, this is how I would do it. First, if your BIOS has FIT Table, and you update microcodes, if you change anything, you will have to fix FIT Table.
Anything means if any one is larger or smaller, or count changes, or you re-arrange etc. Always check FIT tab in UEFITool NE of before/after file, you’ll see right away when FIT Breaks.
Two things to note right up front on this mod, there is two “Microcode” GUID’s, one has padding file above it (Watch that, make sure it remains before/after) and that one contains no actual microcodes, do not edit this.
Second thing both have a footer at end of file, this needs to be put back once you are done modifying the actual microcode module. You can add/remove whatever size microcodes you want, but if you add more, or remove, you need to also correct the FIT Table for microcode count when you fix the FIT Table addresses.
If you add, you need to make a new entry line directly below the last microcode entry, push everything else down and remove that same amount of FF’s from the bottom. If you remove microcode, remove that same amount of entry lines, and add that same amount of FF’s at the bottom (keep file size same)
Extract body of second microcode GUID 17088572-377F-44EF-8F4E-B09FFF46A070 with UEFITool, go to bottom and copy out footer to be replaced once done (4D 50 44 54 00 01 00 00 10 00 00 00 00 00 10 00)
Each microcode must land on a multiple of 400h in this BIOS, that is 400, 800, C00, 1000 and so on. If microcode you add is less than one of those multiples, use FF as filler to next 400h multiple.
I extract all with MC Extractor, grab updated, get all into same folder, then open all in hex in numerical order, and build new file in hex copy/paste each in order until done, then put in footer
Then replace body with UEFITool, check padding same before and after for microcode GUID’s and all other volumes too (Check before/after with UEFITool NE for best info on this) If padding missing, redo the build with V25 instead of V26, if both break it, then you need to use MMTool or straight hex possibly.
After all that, extract FIT body, and fix via hex for your new microcode count and locations. Use UEFITool NE 55 for FIT addresses, I need to update my guide on that, but it’s much easier now with NE 55, due to each microcode gives you exact Header Address to use in FIT table
[GUIDE] Update CPU Microcode + Fix FIT Using UEFITool / Hex
I checked your file above vs stock, looks good, nice work
You/UBU got lucky this time, all files same size and all is left in same exact place, so no FIT table correction needed 
You did forget to put .90 extension on your file, this will confuse some people (is it bin, is it rom, why is it not .90 etc  )
)
Now, you need to redo manually, so you can learn how to do it yourself, how you originally intended
Hi guys, can anybody update bios microcode for HP 620 to run CPU T7700.
https://drive.google.com/open?id=1K2yzHA…cqBntSysv7bIT99 this is bios update from site, but update dont include this microcode.<br /><br />---------------<br /><br />I have hex editor, i have uefi tool. I can program bios directly with programer ezp2010, but dont know how to add microcode. Can help?
@minigonzo - dump BIOS with EZP2010 and upload for me, I will update it for you, then you program back with EZP2010
Thanks.
old.zip (1.17 MB)

Same shit: BIOS does not support the current stepping for processorFB.
i read that theres 2 versions of t7700
mine is
SLAF7 G0 06FB
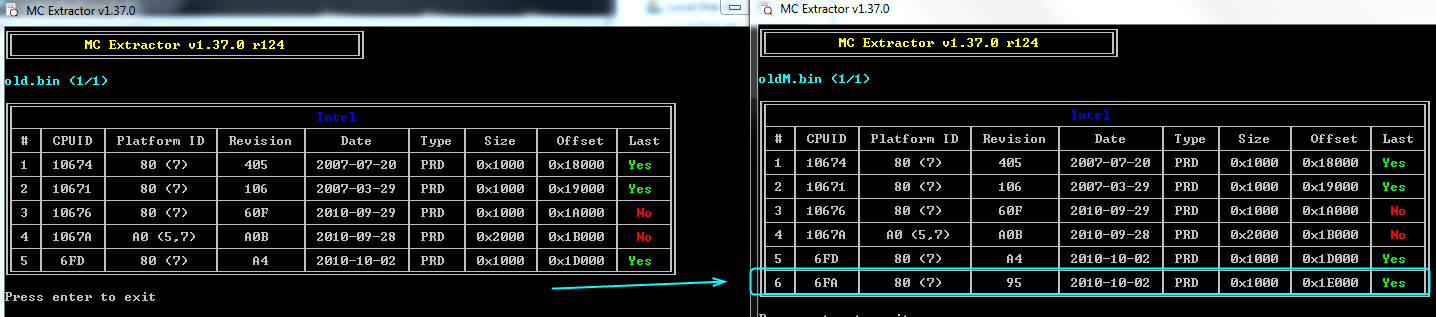
@minigonzo - Sorry for not asking, or inserting both, I just assumed 6FA 
6FB Added instead of 6FA - http://www.filedropper.com/minigonzo-6fb-upd
Thank you. Can i ask something else? We repair motherboard asus TP300LA. Have problem with PCH and we changed the cpu. Originaly Cpu is I7-5500U, we changed with i7-5600U with Vpro. When trying to start with clear me region, can`t start correctly. 100mA and do nothing. Is this possible that bios microcode or unsupported Vpro is the problem?
@minigonzo - You’re welcome! Does that BIOS/CPU combo work now for T7700?
Clear ME region never makes sense to me, even when someone tries to explain what they think this means.  What does “Clear ME” mean to you?
Do you have a programmer dump from this BIOS before you did anything to it? If yes, send to me, I will update and fix the ME FW and add microcode to the BIOS.
This CPU supports vPRO, so either there is a ME FW issue, or CPU microcode needed in BIOS. Since you changed PCH, does that 5500U work, I mean, did you test with this CPU after PCH change to make sure that was done OK and is not part of the issue?
Note to self 306D4
Yes i have old bios. 5500U is cpu and pch in one, thats the reason we change cpu. Now CPU is 5600U with Vpro.
old.zip (3.34 MB)
Can help?
@minigonzo - I am confused, you asked to mod for T7700 - and then never confirmed, does the BIOS at 274 with 6FB work with T7700?
For other system BIOS - here is mod with fixed updated ME FW (since I’m still not sure what you mean about “Clear ME”) + Microcode 306D4 for i7-5600U = BIOS Mod to enable MEBx >> MiniMEBx (Default was None) -
I’m pretty sure you need MEBx for vPRO, if not we can put this back to default later if necessary
* Edit -
Hey! I see ONLY 40650/40651 microcodes in default BIOS, this means it was never 5500U CPU either, since it has same 306D4 CPUID as 5600U - if it was 5500U before, then no mods would be needed!
So, vPRO/ME FW aside, this is not the reason the system will not start, this system never compatible with 5500U either, so may not work at all with 306D4 (5500U/5600U)
40651 = Haswell ULT - 4th Generation Intel® Core™ Mobile Processor Family, Intel® Pentium® Mobile Processor Family, Intel® Celeron® Mobile Processor Family
306D4 = Broadwell U/Y - Intel® Core™ Processor i7-5650U,i7-5600U, i7-5557U, i7-5550U, i7-5500U, Intel® Core™ Processor i5-5350U, i5-5350,i5-5300U, i5-5287U,i5-5257U, i5-5250U, i5-5200U, Intel® Core™ Processor i3-5157U, i3-5020U, i3-5015U
i3-5010U, i3-5006U, i3-5005U, i3-5010U, i5-5350U, i7-5650U, Intel® Core™ Processor M-5Y71, M-5Y70, M-5Y51, M-5Y3, M-5Y10c, M -5Y10a, M-5Y10, Intel® Pentium® Processor 3805U, 3825U, 3765U, 3755U, 3215U, 3205U, Intel® Celeron® 3765U
I stop modding here for now, I don’t think this is compatible attempt (Haswell >> Broadwell), not possible to make this CPU run on this BIOS without a lot of modification from a manufacturer
plutomaniac ^^ Correct, about MEBx? Additionally - AMT, MEBx need enabled at ME FW, correct?
Never mind, see my last thoughts, well I would like to know this info about vPRO/MEBx so I can know in the future I guess.
You can configure AMT via MEBx at Corporate/5MB SKUs. It should exist at vPro compatible systems if the OEM intended for the functionality to be present.