BIOS Mod Asus K55A Laptop... Possible???

@@JSebastian

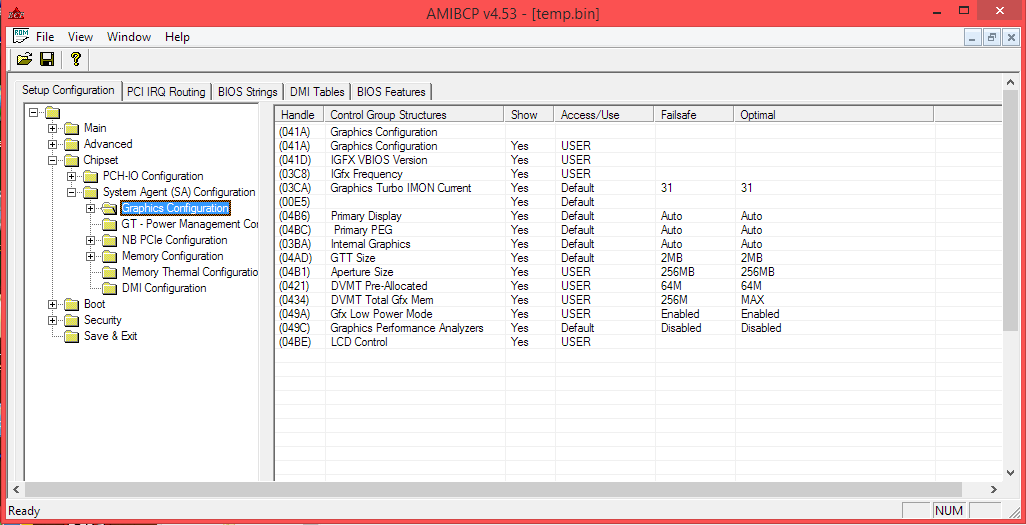
I have attached a last test for Chipset tab unlocking. If this doesn’t work, I don’t know where else to look. Now for the rest of unlocking. Open your biosbck.bin in AMIBCP, click on the settings you want to unlock and set Access/Use to USER. Save this as a temp.bin and use MMTool to extract AMITSE. I have compared a before/after case and it is the only module that gets changed. As you have already found out, AMIBCP has the potential of bricking your board, especially when the input is a .cap file. Just extract (uncompressed, to avoid any corruption) AMITSE from temp.bin and replace in your biosbck.bin. Flash and test.

Some notes:
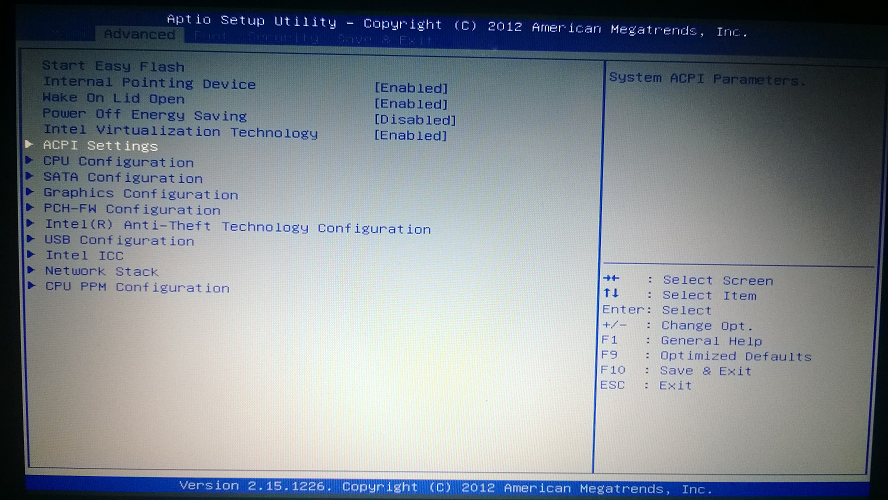
- sometimes just unlocking a parent option also unlocks its connections, just as you have seen in CPU-PPM. If you want to avoid changing all to USER, try unlocking only parent nodes. If you want to avoid mutiple tests, set all needed options to USER.
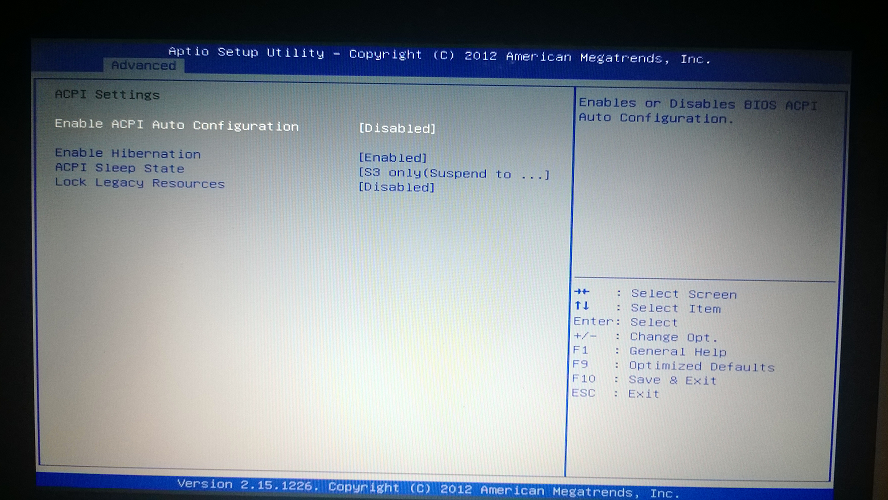
- some options are temporarly hidden when the parent is disabled. Ex: when “Launch CSM” is disabled, “Launch PXE opRom” should be hidden, as it is expected.
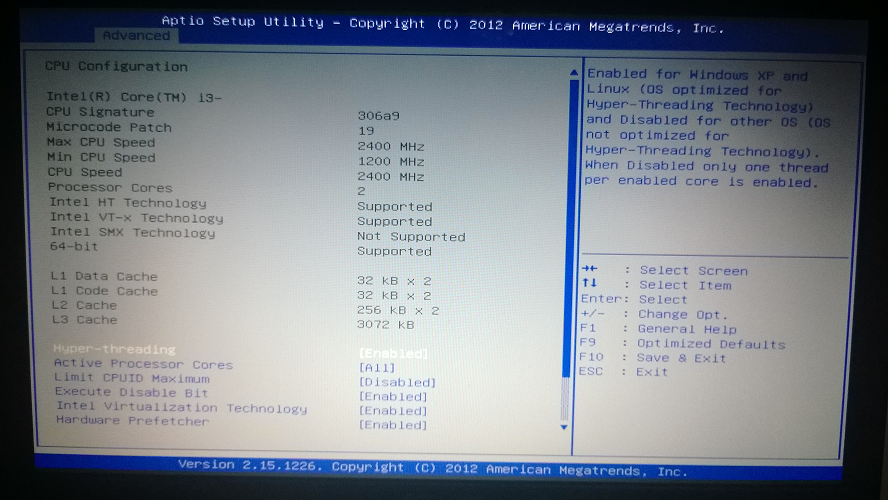
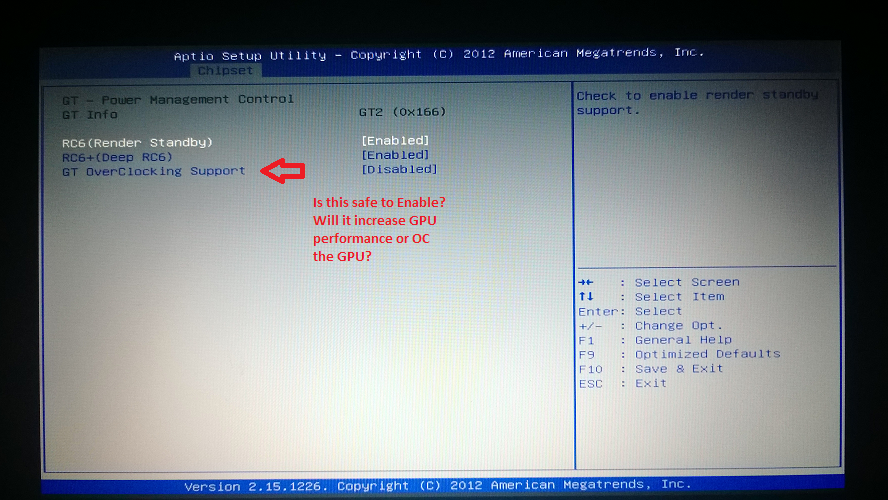
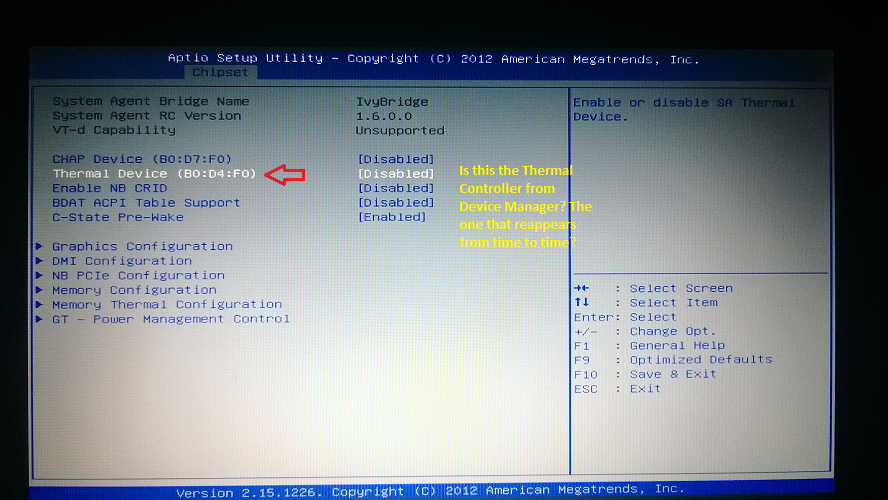
- not all options are safe/working. Manufacturers often start with a generic BIOS that gets customized. Like you promised, read ahead what each option does and see if it is supported by your hardware. Pay close attention to thermal configuration, as this is how I bricked my laptop after a successful modding.
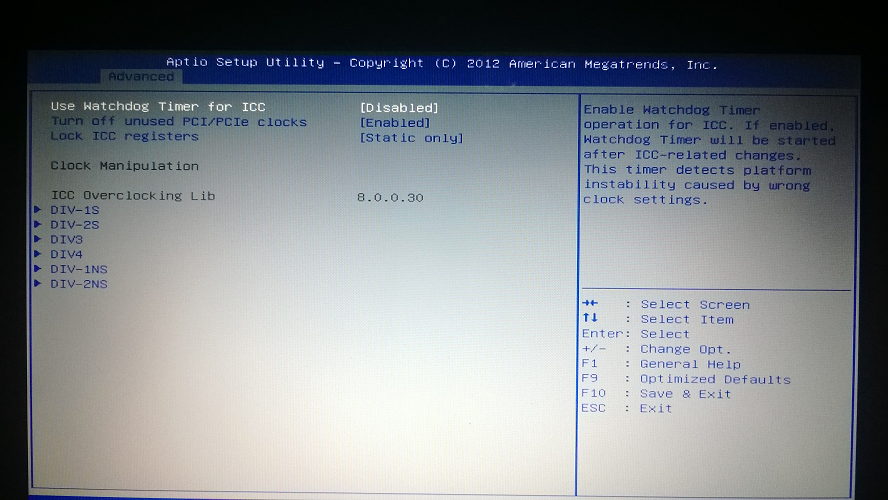
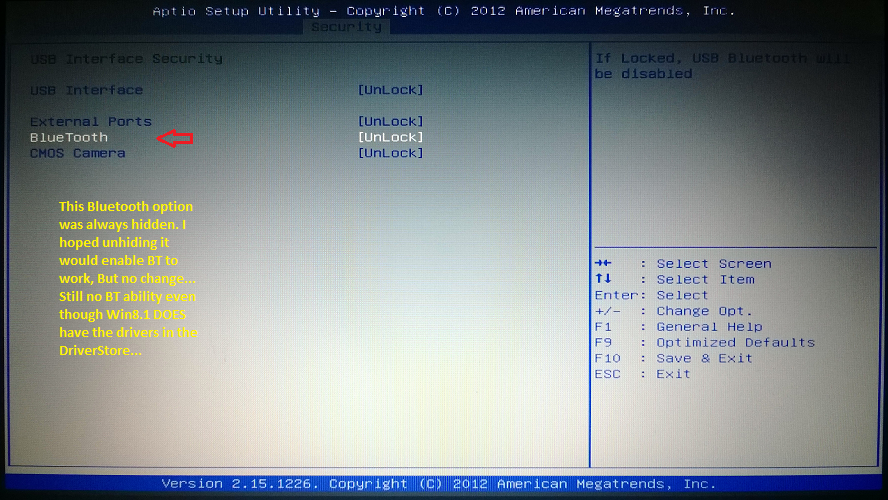
- as you have seen in the case of “UEFI Boot”, some options are locked with “Suppress if…” in Setup Utility. If you can’t get them to appear with AMIBCP, just post a list here and I will see if they are suppressed in Setup.

K55 unlock test2.rar (314 KB)

@lordkag


- I decided to try this method to further unlock my BIOS before I tested the new Chipset mods you provided… In the most part I unlocked quite a bit with no issues… I will post some screenshots shortly… I’m just monitoring my laptop’s handling and behavior with these recent mods… I have noticed that the PCH Diode Temp jumped to 65ºC - 68ºC… But I assume it’s caused by connecting a 19" LCD Monitor by D-Sub(VGA) and the CPU is running at 5V… Are the 2 related??? I also HAVE NOT unlocked the Thermal Configurations yet…


- I am and will keep my promise and continue researching what these functions do and how they may affect my system BEFORE ACTUALY changing any settings around…

- I have noticed that I don’t have the Intel® MEBx installed but I did manage to unlock the PCH Config and I have a bunch of ME info… The question is… HWinfo64 shows my ME Firmware as being 4MB ok… BUT the BIOS shows a 1.5MB FW… Which is what I flashed a while back … Did Asus for some reason have a 5MB ME FW loaded before I flashed the 1.5MB??? Or am I ok???

- One off topic question… short question… Concerning the Asus drivers and software… Should I install the LATEST VERSIONS available for my model??? Or should I install the LATEST versions available on the Support Download Site in general??? Ex: Asus Power4Gear Hybrid and ATK Package (ACPI Driver + HotKeys) The thing is Asus hasn’t published any drivers for Win8.1 other than GPU, Bluetooth, LAN and WLAN… So do I stick with the Win8 versions OR can I use the LATEST Win8.1 versions of the general drivers in question???

- I’m including my latest BIOSBCK.BIN If you can look it over… I will shortly post the screenshots in this post with the list of items that didn’t show up…

UPDATE
Here are some screenshots… I did unlock a few more options but I still have NO CHIPSET TAB… Which I assume is why I still can’t see many of the other features I unlocked… That fall under Chipset Tab…


I tried unlocking iGFX features unsuccessfully… Like Allocation MB = MAX… DVMT additional settings… Memory Clock, Frequencies… For RAM and GPU… In the included BIOSBCK.BIN check out all the features I set to USER… Mainly in Chipset… But no luck…

biosbck.rar (2.52 MB)

The unlocking simply makes the setting visible, nothing more. If you haven’t messed with the settings and the high temps are something new, you should first try to look the problem elsewhere, like software running in the background, CPU forced to continuously run at full speed… If it will continue to be a problem, just resort to last working biosbck.bin.

I don’t know what you mean with CPU running at 5V. It will be a barbecue. You have different software to measure this, but ThrottleStop is the most reliable one.

HWiNFO is wrong with the ME size. You have 1.5M, just like other H7x chipsets. Only business Q7x have a 5M ME firmware.

You can test Win8 drivers and see how they work. You should try to get the latest version for Win8.1, no matter if it is for your laptop or not. They won’t get installed if the ID of the device is not included; but it is possible that some of them won’t work.

I don’t see a way to unlock Chipset tab. The solution must be found in the same AMITSE, but I can only get a partial disassembly of this module, leaving the interesting parts out. Maybe I will investigate deeper, but I don’t see this as an urgent task. Do you have anything important in Chipset tab to unlock?

It is hard to keep track with all the changes in your BIOS, without having full access to the screen. That is why I asked you to make a list of pending hidden options, starting with important ones you need. Example:

Advanced →
- option1

- optionx

Boot →
- option1

- optionx

If you are happy with the current state, no need to push things further. But if you want more settings, I won’t spend hours on comparing partial screens with the full blown list in AMIBCP, when I could use that time to unlock only the requested settings. You must understand that I already went beyond the “help a fellow in need” scenario. Some boundaries must be set.

@lordkag


- You see, not too long ago I noticed the PCH Diode and Samsung SSD temps where a lot higher than normal… This is what started this whole BIOS Mod/Unlock quest… Seeking the end result of somehow stabilizing those temps… The SSD used to always run at 25ºC - 27ºC under load… Like downloading large files or transferring large amounts to and from the SSD to a USB 3.0 HDD or Memory stick… When idle it usually even dropped to 21ºC - 19ºC… Now it’s always around 34ºC - 38ºC with me just being on IE or running AMIBCP, MMTool… I have very very few background processes running… Disk activity normally never rises above 7% during normal use and idle shows 0%… Same for CPU load… I don’t even have the iaSTOR Service running… My main system load is caused by ESET Smart Security 7… Mainly consumes 90 MB of Memory… Maybe elevated I/O Reads/Writes… But that never caused the +10ºC SSD temp increase until about 2 months ago when I noticed the change… I’m even running a Cooler Master cooling fan base… I used ThrottleStop ONCE just to disable Halt-State seeing if that eliminated my SSD 4K bottleneck, but it didn’t help… Still researching cause & effects of further uses…
- I have one question about your last Chipset Unlock mods you provided… Included is a "Compressed" mod for unlocking the chipset tab… Should I have used that one??? I only tried the regular file when "Replacing" AMITSE with MMTool… Is the process the same or how do add the "Compressed" mod???


- Here’s what interests me for unlocking…

I want to have access to these GPU settings under the Chipset Tab… I want a bit more control to my GPU settings included in this section… This should conclude my BIOS mods… We’re just needing to unlock the Chipset tab…

Chipset
>System Agent (SA) Configuration
>Graphics Configuration

- I also have a doubt as to why the GPU is running at a 350 MHz Clock when it should be at 650 MHz according to tech specs from Intel®


- Here are some screenshots of what I mean by the 5 V…

@@JSebastian

By reading some of the leaked source code, I managed to locate the locking code, in the form of a boolean array. Just replace the Setup utility with the file attached, like you did with “UEFI Boot” option. This will only unhide the Chipset tab (also kept UEFI Boot visible), so you should still use AMIBCP to unlock its sub-nodes.


The high temps are likely caused by dust accumulating in the cooling system, in the heat sink. The other possibility is that some capacitors are failing. For the first problem you have two solutions:
- first one is to disassemble the laptop and re-paste with a good quality thermal paste, clean every bit of dust around the fans and from the heat sink.
- a second and only a temporarily one is to blow compressed air from outside the heat sink. The air should again flow naturally, but the dust will remain in the system and will eventually do more damage.

There is no difference between the compressed ffs and the other file I provided, except the compression. The compressed one was provided in case you needed some extra space, but it is not worth it. There is plenty of free space and it is better to avoid any compression errors.

A big rule of thumb: don’t use one software to measure things and avoid taking the result for granted. Use CPU-Z, GPU-Z, AIDA64, HWiNFO, ThrottleStop etc… If they all report the same thing, then you need to search for solutions. The high temps can determine the CPU throttling, thus causing performance drop and lower frequencies. Run some tests and check ThrottleStop logs. Run a game and check the clocks with GPU-Z or GPU Caps Viewer; run a H.264 video with LAVFilters set to every hardware decoding possible (all but CUVID) and check the clocks. Only then can you conclude that there is a problem.

What you see as 5V is probably the line to CPU, not the real consumption. Use the above softwares to determine this.

K55A unlock test3.rar (58.8 KB)

@lordkag @Fernando
Honestly I have to thank you guys for guiding me… and teaching me so much!!! I appreciate all the patience you have given me… This forum is truly the BEST OF THE BEST!!! This thread is the latest example of the knowledgeable support I have received on this forum!!! My hats off to you both!!!

Chipset_Unlocked.png


[quote="lordkag, post:65, topic:30519"] By reading some of the leaked source code, I managed to locate the locking code, in the form of a boolean array. Just replace the Setup utility with the file attached, like you did with "UEFI Boot" option. This will only unhide the Chipset tab (also kept UEFI Boot visible), so you should still use AMIBCP to unlock its sub-nodes.
[/quote]
- YOU ARE TRULY A GRAND MASTER!!!!!! The Chipset Tab IS NOW UNLOCKED!!!!! This latest Setup mod did the trick!!! I'm in your debt... I'm going to keep researching what all the unlocked features do and how they work, before I start switching settings around... As I promised... Now that these areas are unlocked I can learn as much as I can and make the correct modifications if needed... My initial goal was the actual unlocking of the BIOS... Now it's full on research!!!
- I do have a few remaining questions concerning the now unlocked Chipset nodes... just a few... Mainly how the Graphics Config section under the (SA) node... How exactly changing these settings affect my system??? i.e.

Chipset_Graphics_Config.png


GTT Size - (1 MB or 2 MB to choose)
Aperture Size - (It’s at 256 MB but I have up to 512 MB to select)
DVMT Pre-Allocated - (I know this part, but now I have up to 1024 MB I can select + many more starting at 32 MB… BEFORE I only had 32 MB, 64 MB, 128 MB, 256 MB & 512 MB)
DVMT Total GFX Memory - (I have 128 MB, 256 MB or MAX)

- LCD Control

LCD_Control.png


- And the GT Power Management Control… How that works and how can I benefit from enabling the Overclock Support and adjacent options…

GT - Power_OC.png


- I will add a question on a “Thermal Device” option now unlocked as well in the Chipset node that is disabled by default… I will add a screenshot of it in a bit… I had a doubt if that’s the Thermal Control that hides and unhides in Device Manager???

Thermal_Device_Chipset.png


[quote="lordkag, post:65, topic:30519"] The high temps are likely caused by dust accumulating in the cooling system, in the heat sink. The other possibility is that some capacitors are failing. For the first problem you have two solutions:
- first one is to disassemble the laptop and re-paste with a good quality thermal paste, clean every bit of dust around the fans and from the heat sink.
- a second and only a temporarily one is to blow compressed air from outside the heat sink. The air should again flow naturally, but the dust will remain in the system and will eventually do more damage.
[/quote]
- I agree... That was my thought as well... Even though I regularly blow the compressed air into the heat sink... Sometimes helps... times doesn't... I will follow your advice and disassemble & re-pasting... I've had this laptop since July and have yet to fully open her up to clean.... Only thru the vents and intakes... Not including updating to the SSD and adding a second ram module...

***Some additional screenshots***

xHCI_Fixed.png

Bluetooth_Interface_Unhidden.png

@@JSebastian

You must understand that I am not an infinite source of knowledge and that some answers can be easily found with a search. I have helped you with the difficult things (and even more than so), but I can’t step in your shoes and do all the work with a hardware that I don’t own. One must exercise moderation and also discover the virtue of patience when it comes to the learning process.

I can however help with a few steps. Some fast answers can be found in this place. But when dealing with such a critical component - BIOS, the foundation of machine-software-user experience, it will be a foolish mistake not to search in depth.

Some of the graphic settings are inherited from the AGP era, not sure if they are still useful. Others will have an impact and can be visually checked (like so); in principle it should be the more the merrier. The real testing must be done like in the previous examples: game, synthetic benchmark, video processing.

I once tested the bithdepth of the panel and got distorted colors. This is the internal hardware level of processing and it should already be at its best, but there is no one stopping you to test - it was easily to revert the change, despite the awful colours. Apparently your monitor does 6-bit with dithering to match 8-bit support. Since your graphic card is only feeding 8 bits of colour information (luma + chroma) per channel and most commercial stuff is encoded at this level, there is no point going higher with the current configuration. Maybe if you had a professional card with 10-bit support and a 10-bit IPS panel you could aim higher, but this is already decided at the manufacturing level. You should instead look at its dithering power and 4:4:4 chroma support. Do this with madVR and this image at fullscreen, not from browser. I tested my laptop’s monitor for this exact scenario: disabled dithering in madVR, in “devices → monitor → properties → native display bithdepth” I lowered the number, started some of the madshi’s included tests and checked for banding. For the chroma is much simpler - the number you see is the level your panel has. I got lucky and had both 8-bit and 4:4:4 chroma. Of course this is just a fraction of what madVR has to offer and I don’t see any respectable movie viewer who would go for something less. I use MPC-HC + LAVFilters + ReClock + madVR and have achieved the best that it is possible for my configuration/needs/taste. I won’t give any advice on how to set them, because it is too much to cover.

I already stated that the thermal configuration is something to be avoided. The Thermal Monitors are already activated in your CPU and only fired when needed. I already stated that you should check for throttling when the system is stressed (ex: AIDA64 stress test) and you should see many things: performance drops, lower frequencies, thermal device, maybe flaws in the cooling system etc…

Does your laptop come with a bluetooth device? The specs give it as optional. If you don’t have a dedicated button or a special combination of keys to toggle bluetooth, then there is no way to have it, just like with RAID. It seems I’m repeating myself for no reason and I actually spend more time on reading about your laptop than the owner himself. You might find that my patience is not unlimited and that my passion for (sharing) knowledge is neither. I do find myself often to be more critical than needed, but if the user hasn’t even tried to search the simplest things about his configuration, what is the point in helping them? It would be hypocritical to not admit that it was fun to search this information and to test some patches with no risk involved from my part. But it will also be hypocritical to not admit that I am at least disappointed to see that your gratitude can not be extended to cover the first promise of searching before asking or testing things.

@lordkag
Hey! I do have to apologize for expecting you to provide me with ALL THE ANSWERS… I do get a bit carried away… I don’t want to give the impression that I haven’t kept my promise and gotten my hands dirty by not doing my part… I have, in addition to posting here… I may have went about it the wrong way, with the intention of getting the correct information that supported my own findings… I am very grateful and I will take over from here… And I will stay away from anything “Thermal” in my BIOS!!! I didn’t even unlock that Node as you may have noticed…
Oh, BTW… concerning the “Clean” install of my HD 4000 drivers… Unless I’m really ignorant, having done this many many times successfully up to Win8… I can’t seem to get the drivers installed “Correctly” I still get the v3308 weird driver offered in Windows Update… No WDDM driver btw… And WinSAT still aborts the D3D DX10 Assessment… Here’s the comparison between WinSAT on Win8 OEM (HDD) & WinSAT Win8.1 Pro (SSD)

WinSAT_Win8_OEM.png

WinSAT_Win81.png


Notice the differences… And DxDiag report shows driver as being WDDM 1.3 BUT Win8.1 doesn’t pick that up… Here’s what I did: I uninstalled HD 4000 driver using Windows remove program option… Restarted… Uninstalled driver thru Device Manager CHECKING “Delete Driver Software” box… Restarted… Uninstalled driver until I was at the generic “Basic Display Driver” ALL OF THIS WHILE OFFLINE!!! Restarted once more… THEN installed driver v3496 by way of Device Manger and restarted… Any ideas?

Here’s my WinSAT log file… It’s short but does show an error and that the driver is not WDDM…

- As for the Bluetooth… If I remember correctly right out of the box I DID have BT… But right away I flashed my BIOS and upgraded to the SSD installing Win7 Ultimate x64… That’s when I noticed the BT had disappeared… What I don’t understand is why then is Win8.1 updating numerous BT related drivers in the DriverStore and they show up in Services.msc… If I install the Atheros BT drivers they install fine and the device shows up in Device Manager… I even get the Send To… Bluetooth Device context menu option… But that’s as far as it goes… My research indicates that Asus needs a BT Patch for Win8.1… Similar to what Lenevo and others have done…

winsat.rar (6.75 KB)

@@JSebastian

I don’t want you to think that I’m avoiding questions for some reason. But this is the only way of keeping track of the real problems: if I ignore the questions -> it will seem disrespectful; if I answer the question or simply input “I don’t know” -> I will encourage more of them; if I answer only those that are important and encourage the user to search himself for the unrelated ones -> I will have more time and fun with the conundrums, while the user learns something else in the process.

Could I have a picture with Display adapters from your Device Manager, but also the full string of the hardware ID? And to avoid downloading the full package, could you post only the .inf files from latest 3496?
I think this is more of a Windows or Intel “feature” (read bug) of not supporting the retired WinSAT, which you seem to value as the ultimate reporting tool, when it was from the beginning just for whistles and bells. If it works in Win8 but not in Win8.1, then it is improper coding. The only errors from WinSAT are from the program itself, nothing with WDDM. Even so, the WDDM is not some feature, but the whole model of the driver and it is linked with the OS = WDDM 1.1 on Win7, WDDM 1.2 on Win8, WDDM 1.3 on Win8.1. Could you post the DXDiag test instead?

You should start with real world testing, like a DX10 game (or the game’s benchmarking tool), then go with 3DMark, PassMark PerformanceTest and for the fun with this and maybe this. I wouldn’t trust Windows updates when it comes to video drivers, because they have a history of forgetting parts like MediaSDK (needed for hardware decoding/encoding) or OpenCL. Another test, even though it is time consuming, it is to install a clean non-OEM Win8. It will show if it is just the new OS to blame or something else. And if you add that the Graphic Control Panel is unable to show the version of VBIOS/GOP (Intel’s tool = Intel’s fault), I think you got a front seat to the movie “when things are rushed and we only care about the money, not what the user needs”.

You did the right steps of installing the driver, except the last part. Always install the video driver from the package and NOT with Device Manager. It needs more then just some .inf and .sys, it also needs the MediaSDK and OpenCL, the audio driver.

The same thing for Bluetooth - post a screenshot of the device and a string of the actual hardware ID. There is a new driver here, but maybe it is not for your device. Also, read the full manual of your laptop. On page 72 it says to “press FN+F2 repeatedly until wireless and bluetooth icon are shown”. It as also possible that the wireless driver has control over bluetooth, so you should check its settings. But I don’t see how ASUS would have locked Bluetooth in BIOS in the first place if it was not missing.

@lordkag


I’m including the DxDiag report… You misunderstand my obsession with WinSAT… I know it’s just for show and I’m not relying on WinSAT for ANY determining factors… OTHER THAN THE SOLE PURPOSE of getting Win8.1 WinSAT to properly detect system features and thus allowing Win8.1 to function as correctly as possible… An example of this is having to run WinSAT after a clean install so Win8.1 correctly detects its installed on an SSD… thus adapting the necessary system adjustments accordingly…
I know that WDDM 1.x is only a driver model and not a function… But thru my research when dealing with Win8/8.1 "Non-OEM" installations, users have a smoother experience by using WDDM drivers provided by Windows Update opposed to generic manufacturer provided drivers… Reports of smoother display graphics and overall better display quality within Windows/Metro apps… Remember I’m referring to a NON-OEM install… I assume that since WinSAT doesn’t correctly detect the driver as being WDDM and aborting DX10 tests… It’s causing Dx10/11 not to function correctly… I tried to play PCSX2 emulator and it keeps crashing due to a Dx runtime error… I’m running it in DX10/11 mode and have already updated the needed DX9 components with no change…
I have very distorted display quality on icons. text… etc… Also in Metro interface and apps… Plus blurry and fuzzy icons…


[quote="lordkag, post:69, topic:30519"] And if you add that the Graphic Control Panel is unable to show the version of VBIOS/GOP (Intel's tool = Intel's fault), I think you got a front seat to the movie "when things are rushed and we only care about the money, not what the user needs".
[/quote]
I AGREE!!!!

[quote="lordkag, post:69, topic:30519"] The same thing for Bluetooth - post a screenshot of the device and a string of the actual hardware ID. There is a new driver here, but maybe it is not for your device. Also, read the full manual of your laptop. On page 72 it says to "press FN+F2 repeatedly until wireless and bluetooth icon are shown". It as also possible that the wireless driver has control over bluetooth, so you should check its settings. But I don't see how ASUS would have locked Bluetooth in BIOS in the first place if it was not missing. [/quote]

Atheros_BT.png


I think that the Asus Wireless Radio Control driver does have some control over BT… As well as Wireless Adapter… I will try reinstalling WLAN drivers using the latest available from Qualcomm Atheros… See if it helps anything…
I do have to tell you that I’ve always had issues getting the Asus ATK Package (WMIACPI+HotKey+Fn) drivers to work properly on Win8.1… I still haven’t updated to the latest Asus drivers for Win8.1… I’m still running the latest Win8 Asus drivers available for my model… Let me update to the latest for Win8.1 drivers even though they’re not for my model…


I just clean installed the drivers again… This time correctly using the package… but my issues remain the same… WinSAT still fails… etc…

DxDiag_3496_b.rar (12.7 KB)

igdlh64.rar (19.8 KB)

I still say the same, the problem is WinSAT related. There is nothing in WinSAT or DXDiag logs which would show any abnormality with the drivers itself. You will see the problem immediately in the normal usage, if it were so. But I will add a few more things to clarify this.

The graphic’s ID is fully supported by the new drivers. I thought that maybe it could be a problem with a wrong ID, but everything is normal. The driver is WDDM 1.3, also pointed by DXDiag, otherwise it won’t install on Win8.1. There is no such thing as “WDDM drivers provided by Windows Update opposed to generic manufacturer provided drivers”. Windows just receives the driver from manufacturers, slices parts until it gets to the bare minimum required for working, then adds a WHQL stamp after some tests.

Your problem is likely self-made. You have a 150% scaling on a 1366x768 display! While this is a user setting, there are some limits, some of them determined by Windows’ implementation of scaling. I myself only use 125% on a 1920x1080p display. You should read this and this instead, then experiment with different scalings. But start with a 100% control test to rule out scaling problems. For your screen I would recommend 110% at most.

There are some errors reported by DXDiag, not (entirely) graphic related. Some of them with MEI drivers, so you should update to latest 9.5.24.1790 or downgrade to latest 8.x. Other lines report problems with igdlh12.inf and displayoverride.inf, but since they were not found in 3496 package, then it isn’t Intel related. You should search them (use Everything) on your Windows or system32 folder and upload them here. The first might be a leftover from older Intel HD drivers, the other is to be investigated.

You should have more then one entry for Bluetooth devices and a more particular string for hardware ID. I think you have installed the driver without an actual device. At least this is what I get for my Broadcom device: many entries with specific functions and also a clear string in the form USB\VID_xxxx&PID_xxxx.

@lordkag


- I arrived at the same conclusion… What interests me is that the WinSAT log detects 2 Display devices (adapters): Device0 & Device1… Obviously one device being the HD 4000 & the other being the Basic Display Adapter…Right… Now, I think for some reason WinSAT is picking up (Possibly Win8.1 too) the Basic Display Driver as the driver being used… I got to this conclusion because MSinfo32 & Aida64 show the Basic Display Driver (basicdisplay.sys) & Basic Renderer Driver (basicrender.sys) as being STARTED & RUNNING… Now I also see that the IGFX driver is set to "MANUAL" but is also RUNNING… Device Manager shows the MS Basic Display & Basic Renderer Drivers as "Hidden" devices… Working properly, drivers loaded and started… Is it possible that Win8.1 is falling back to the Basic Drivers? Using them instead of the Intel® HD 4000 drivers? I assume the Basic Drivers shouldn’t even be started or running once the HD 4000 driver package is installed… Or am I completely wrong here???


- Side-note… As I mentioned last post, I correctly cleanly reinstalled HD 4000 driver package and Dx11 doesn’t crash anymore when playing PCSX2!


- You misunderstand, I am referring to the Windows Update drivers that ARE provided by the manufacturer, i.e Intel®… Only that MS offers them as "WDDM1.1 WDDM1.2 WDDM1.3" In fact being the stripped down versions of the Generic Manufacturer drivers… I’m still at a loss as to why WU is forcing me to use this HD 4000 driver v3308… Which is not offered as being a WDDM1.3 driver… And on Win8 OEM WU does offer the LATEST Intel® drivers offered as WDDM… No issues with WinSAT on Win8 OEM either… You should know I have also asked Intel® Communities Forum for help as well… Here And still no luck…
- I guess my main problem is the distorted, blurry, fuzzy & overall poor Win8.1 graphics quality specially in Windows MetroUI… The only upside I can report is that I have no issues when it comes to video playback… Netflix… Movies… Etc… Aside from a lag and frequent buffering… I have 30 Mbps internet service too…


- Yeah I noticed those errors too… As to the MEI errors… I think the issue was being caused when I installed the latest MEI package 9.5.x and not uninstalling the package when I downgraded and ONLY installing the 8.x drivers… So I had 9.5.x components installed along with a 8.x MEI driver… I have corrected the issue by reinstalling the full MEI 1.5M v8.x driver package… DxDiag Log doesn’t detect anymore MEI errors… Also the displayoverrride.inf error is gone along with the igdlh12.inf error… They are as you mentioned left-overs from my many driver installations attempting to solve this problem… The Displayoverride.inf I copied from the OEM Win8 installation manually installing it using Pnputil cmd-line… Since it was part of the OEM Win8 DriverStore BUT NOT in Win8.1 DriverStore I assumed that it was included in the OEM Win8 and must serve a purpose related to display functionality… Due to that Win8.1 updated said driver with a Win8.1 compatible version but only after I updated Win8.1 with the "Leaked" Win8.1.1 Spring-Realease Update Package…
- Is it safe or recommended for me to uninstall Driver INF Packages from the DriverStore by using the Pnputil method??? Only if it concerns removing previous left-over drivers???


- I uninstalled the Atheros BT drivers for now… Until I can figure out 100% what can cause the Bluetooth device and functionality to mysteriously vanish… Honestly… When I bought this laptop, I got home, turned it on ONCE… Just to go thru the "First-time" setup process inherent to booting a new PC right out-of-the-box… I then gave the OEM Win8 a "Once-over" primarily having a look at device manager… I remember telling my Wife that this laptop had Bluetooth so she could backup our Daughter’s photos & videos from her mobile phone to my laptop… I remember seeing the BT icon in the SysTray… I then finally copied the Asus "eSupport" folder & the stock K55A.BIN BIOS file from the Root of C: Drive backing them up to a 500 GB USB 3.0 drive.
- Right after that I swapped out the OEM HDD to my 250 GB Samsung 840 SSD… I clean installed Win7 Ultimate x64 from a bootable USB 3.0 stick… I don’t recall if I installed in UEFI mode that 1st time… I think so… I think Win7 Setup DID format & partition the SDD in GPT with EFI partition… I proceeded with installing the OEM drivers (Chipset INF, GFx, MEI, LAN, WLAN…Etc…) & Asus "Bloatware" then continued by flashing the BIOS with the latest from Asus using Asus WinFlash.exe… I hadn’t installed the BT drivers from the backed-up eSupport folder because I found it contains 2 different BT driver software packages… 1st is Atheros and 2nd is Intel… I sadly didn’t & can’t remember which was present in Win8… I put that issue aside for a while… One day I swapped back to the OEM Win8 HDD… For some reason the OS was corrupted and was forced to Restore to factory state, effectively going thru the first-time setup once more…
- Actually I just now remembered something… On my 1st attempt to update the BIOS something went wrong and couldn’t boot… I was able to recover by re-flashing using Easy Flash interface… Which it directly booted in to while I was going crazy pressing F8, F9, F2… Fn+F keys… Praying that something would happen… THAT’S the precise moment I noticed ALL traces of Bluetooth had vanished… from the BIOS & subsequently Win7/8/8.1… How is it possible then for Win8.1 to install various Bluetooth device drivers??? In the DriverStore directory Win8.1 automatically updates the BT related drivers… And their respective Services are listed in the Snap-in Console…


- I noticed that too… But for some unknown reason the last time I connected to my Samsung SmartTV by HDMI and adjusted the Display Scaling… It locked up at 150% for my built-in display!!! Here are some screenshots:

I don’t have a similar configuration to test, but I think those are just monitor/display drivers. What you can do is set iGFX to automatic and remove the grey-out devices under “Microsoft Basic Display Driver”. They are not currently used and they are pre-installed drivers, so you won’t permanently remove them from the system, just remove some strings that might hook the used ones from Intel.

It is possible that the drivers are not fully Win8.1 compatible, which is why they haven’t received the WDDM 1.3 stamp. Maybe the problems in Metro is also a sign.

If you never used the Bluetooth, it is likely that it never worked. Windows has generic drivers for every common device and it has the Bluetooth services on any PC, if I’m not mistaken, to be prepared for any usage. This is my take: read the full manual of your device, locate any combination or setting that might affect Bluetooth functionality. Remove any Bluetooth device from Device Manager and restart. Activate bluetooth with the given combination and check for new devices in Device Manager. If you don’t get a real device with a proper hardware ID, then you don’t have it. Windows should detect any unknown device and install it or flag it as not working/installed.

Your pictures show a normal 100% scaling, but your DXDiag says you have a 150% scaling. Did you run DXDiag with the Samsung TV connected? It is OK for Samsung to switch to a bigger scaling, since it probably has a bigger resolution, but your laptop’s display should stay on 100%. Use the registry method of changing the scaling and remove any marketing “features” Intel Graphic panel has to offer.

@lordkag


Ok I removed the greyed-out devices… Now forgive my ignorance but which strings should I remove? Additionally, in the registry I set iGFX REG_DWORD "Start" Value from "3" to "2". I checked and the REG_DWORD "Start" Values for both "BasicDisplay" & "BasicRender" are set to "1" Should I leave them like they are? Or can I set them to a different value?

EDIT
When I restarted after setting iGFX REG_DWORD "Start" Value to "2" Device Manager showed a yellow bang for Intel® HD 4000 saying driver could not be loaded… Operation not allowed… I had set it to "0" and got the same thing… Also iGFX disappeared from MSinfo32… I manually reinstalled only the HD 4000 driver in Device Manager successfully but doing so Win8.1 set the registry iGFX "Start" Value back to "3"… MSinfo32 confirms it’s back to "Manual" Am I doing something wrong???


No the Samsung TV wasn’t connected when I ran DxDiag but I found the cause as to why DxDiag was showing 150% scaling… In "Screen Resolution" there’s that option box to "Let me choose one scaling level for all my displays" The last time I connected to the Samsung TV which is 32" 1920 x 1080 I had checked that option box and set it to 150%. When I disconnected the TV I unchecked that option-box but I left the scaling at 150% I guess that DxDiag was detecting that I left it at 150% even though I had unchecked the option… Here’s how it was set when I checked the option-box just now…


I have set it back to Default 100% and then unchecked the option-box… Let me log-off & on and run DxDiag report again…

Removing the greyed-out devices under “Microsoft Basic Display Driver” is enough, all the related registry keys are removed. You can then use Services (services.msc or compmgmt.msc → services) to set iGFX to “Automatic” (in registry is 1), which should have been default. If it doesn’t like this state, just switch back to original state, no need to reinstall anything. Don’t touch the services for BasicDisplay and BasicRender, as you will remove the monitor driver from starting.

It seems logical that when checking “Let me choose…” it will use the same level for all displays, which is bad for different display types. It also seems logical that when scaling is set to x%, that is the scaling that will be used, no matter the display. I don’t know if they could have written it with a greater simplicity than this. For your case: it was set and locked at 100% with original display. When connecting the TV, it detected the higher resolution and enabled higher scaling levels. Checking “Let me choose…” was a bad choice from the start, as you force one level for all displays and it would poorly scale for one of them, which it did for your laptop’s display. Unckecking the option and leaving at 150% for laptop’s display is another bad choice, since you force a higher scaling on a low-end display. What you should do is avoid “Let me choose…” and set the level of scaling per display, restart in between. If Win8.1 can remember the setting, which is the smart thing to do, then you are set. If it can’t set it on its own, then use a reg file to switch the display scaling when connecting the device. And no, I won’t do it for you. It is pretty simple to do one.

@lordkag
Hey I have a huge problem!!! I think I bricked my laptop!!! Here’s how it happened… I entered the BIOS only to enable CSM and I set SATA port 2 (ATAPI TSST-DVDRW) speed to “Gen2” which does support from what I’ve researched… I also Disabled “Enable PCH to aggressively use LPM” for the SATA Configuration section… That’s IT!!! I DIDN’T TOUCH ANYTHING ELSE!!! I never even Unlocked the Thermal node & I decided to follow your advice by staying away from any Thermal related settings… Now when I press the Power Button, the LEDs flash on and the DVDRW powers up… Immediately my laptop turns off!!! There’s no POST… No Asus Logo… NOTHING!!! I tried removing the CMOS battery for about 5 minutes and also holding down the Power Button for a long time… And nothing worked… Now when I plug in the Power Cord the Battery LED doesn’t turn on… How bad is the damage??? Could it be that I just shorted out the power supply? Or something that can be fixed???

UPDATE!!! I HAD COMPLETELY FORGOTTEN ABOUT THE “CTRL + HOME” METHOD… I HAD BACKED UP THE ORIGINAL K55A.BIN ALONG WITH EACH MODDED BIOS FILES ON A USB STICK… AND I SUCCESSFULLY RECOVERED THE BIOS!!! I WAS FREAKING OUT!!! I JUST NOW RE-FLASHED AND WAS ABLE TO BOOT MY WIN8 OEM HDD… THAT WAS A CLOSE CALL!!!

If I were to blame you for not reading ahead, I would be a hypocrite who acts like he never made mistakes. Here is the story: in HWiNFO summary’s you would have seen that your DVDRW is only working at 1.5 Gb/s (I always say SATA I, but it is wrong according to this), but since the SATA connector is backward compatible with older revisions, you have no problems with connecting it to a SATA 3.0 port. The reason for this is that your DVDRW will not even reach the 150 MB/s of the SATA 1.0 / SATA I, so why go further?

For disabling “Enable PCH to aggressively use LPM” I assume you wanted to investigate the performance drop. I already pointed where to tweak this: C states, core parking, HPET, power options, ThrottleStop, APM (for HDD). The first 3 options should only be for debugging, not a permanent solution, the last doesn’t apply in your case. For the power options I have a script to enable all the hidden settings, but I haven’t yet tested on Win8/Win8.1, only on Win7. For ThrottleStop you have the guide which will give more knowledge than you initially needed. If you are still trying to cut corners instead of dwelling in the river of informations, then it is your choice, but I won’t stick around to see you ruining the hardware.

You were lucky that this recovery method worked. I feared that it will only work on older Non-UEFI models, thus avoiding to give you false hopes.

@lordkag
I know you’re absolutely right about the SATA DVD-RW mistake I made… I looked in to it further after recovering… And yes I’m very lucky that the AMI BIOS Recovery method worked!!! I’m not going to continue messing with settings that I have no business changing… I have researched a bit deeper trying to figure out what is causing my SSD bottleneck… And I believe what’s causing it is that NCQ isn’t enabled for some reason… Aida64 & HWinfo64 both show that NCQ is supported but NOT enabled…
If you don’t mind me asking you a question… After recovering my BIOS I re-flashed the modded BIOS again but returning many areas back to default… The point is, that now I can only select up to 512 MB fixed DVMT Memory… From the Chipset Tab… Before I bricked my BIOS I was able to select up to 1024 MB… Now, if I set the 1024 MB I get a Boot Loop… Can you help me as to the possible cause???

Did it worked before with 1024 MB option? If yes, try reseting to defaults, reset EC. If still problems, flash an original BIOS first and reset+shutdown. Maybe even reflash ME firmware.

The NCQ option should be in either your Magician software or in BIOS. Set to AHCI.

How big is the drop in performance? Would be nice some comparison pictures between expected and result.

@lordkag


Yeah, resetting the EC did the trick… I thought I had already tried that before… But I guess not correctly… But now I can select the 1024 MB… The ONLY speed bump is the fact that Intel® HD 4000 drivers have the "Max Memory 512 MB" limitation in the INF file… So I assume it doesn’t matter that I set the Max GPU memory to 1024 MB because I’m being limited by the driver or Windows to only 512 MB… Do you know a way around that??? Maybe edit the INF???


Mainly my issue concerns my 4K Read/Write speeds… EVERY Benchmark tool gives me the SAME results for 4K… AS SSD, Anvil, CrystalDisk, ATTO… Only Samsung Magician I assume shows accurate results but how can I be sure… Here’s an example:
Samsung Magician Results:


Now this is what I get with AS SSD:


I should be getting 4K Read about 35 MB/s and about 120 MB/s 4K Write… As well as higher 4K-QD64… And a faster Read Acc. Time… From what I have found online anyways… I have disabled Eset Smart Security 7 when I run benchmarks… And disabled write cache-flushing… I do have Hibernation enabled though as well as System Restore… But I have read that those don’t make much an impact… I also have indexing unchecked for C: & D: including subfolders and files… But Windows Search IS enabled ok…