@fender - then yes, the one you mentioned Platform 12 0x2E is latest
@juanete - I did not see it, only said you/we need to find it 
 in some BIOS
I have i3 3240 Ivy Bridge, can i change microcode to unlock multi ?
@laranje - no, CPU multiplier is locked by Intel, for this CPU that is 3.4Ghz is the max
hi lostnbios can you unlock a bios full acces on a laptop Lenovo e560?and if you can another one with microcode update and me firmware update .I send you the dump bios I make it with CH341A_programmer https://www.sendspace.com/file/cd9u5e thank you
@juanete - Is bootguard active on this system? Please run MEInfoWin from ME V11 system tools package, show me end of report, or check yourself does it show Measured and Verified boot “Enabled” on FPF/Left side?
Never mind, I see it’s not set at the ME level, so even if enabled at the FPF it’s not setup correctly, so cannot be active.
Measured and Verified boot are disabled, can you do something?thank you
@juanete - Yes, sorry if I was not clear above, after I asked about Measured/Verified Boot, I edited post after seeing Bootguard is not setup as enabled anyway, so even if Measured/Verfied boot was burned into FPF (Enabled) it wouldn’t matter, bootguard could not be active.
So yes! I can do some things 
I unlocked some things, overclock/memory menu, but this BIOS is not easy one click enable and all setup items is broken up and spread out through BIOS in many different files (half of which are empty IFR descriptions/names, so only value to enable/disable but no names to what they are).
But, there is a lot of settings from two menus in one setup IFR, I can send you if you want to dig through it and make a list one by one of things you want enabled?
If yes, you want to look through list and pick more settings, it’s included with BIOS below, few setup changes and w/ update microcodes and ME
Microcode 406E2 Rev 28 - 4/15/2014 >> Update to Rev 2C - 5/21/2015
ME 11.8.50.3460 - 2/19/2018 >> Update to 11.8.59.3560 - 10/3/2018
But! After mod I see “checkProtectedRanges: Phoenix protected range [340000h:610000h] hash mismatch, opened image may refuse to boot” So be ready to recover May be OK, may not be OK
http://s000.tinyupload.com/index.php?fil…186901760711837
If it’s not OK and doesn’t boot, then we can only update ME/Microcodes, but not BIOS settings changes
Sorry, can i find bios modding for cpu coffeelake run on skylake mobo here? (giga z170)
@yeumanu - yes, see this threads - Revlaay’s AIO Tool - [TOOL] Easy automated Mod tool for Coffee Lake bios
Svarmod’s CoffeeTime AIO Tool - [GUIDE] Coffee Lake CPUs on Skylake and Kaby Lake motherboards (47)
I am having trouble understanding a couple of things with updating the microcode of the GA-Z97X-Gaming 7 beta bios (F9b). The problems are:
1. I cannot update the microcode with UBU as it runs out of space so I am trying to update them manually using the guides on here.
2. The guide says to use the FIT table, but in UEFITool (tried A55 and A40), the Fit table tab never becomes selectable. What am I missing?
3. I do not understand how to find the correct microcode in the BIOS file to replace. I have tried extracting the microcode section as a body and updating it, and just updating directly in the BIOS as they are shown as distinct microcodes in the BIOS. I try to search for the proper header of the old microcode in the source BIOS (since the offsets are off, starting with 00000000, in the extracted file and not in the source BIOS) but I never find the same HEX header I am using as a search.
4. Lastly, since the new microcodes are bigger, I assume I have to change the offset pointer for the section after the microcode. Since the file will be bigger, will it cause a problem flashing later?
Can someone point me in the right direction and help fill in the parts of the guide I am not understanding?
Here is the BIOS I am trying to mod - http://www.mediafire.com/file/dl08r98vo0irb2x/Z97XGAMING7.9b.zip
@digitalMedic - I think you already solved this, but I’ll answer some of that for others reading later. #2 - FIT table only needs to be corrected once you are done with updating the microcodes, here is a guide on how to do that
If FIT tab is not selectable for you in UEFITool NE Alpha then FIT table is not used in the BIOS you’re working on right then. I checked Z97X-Gaming 7, this BIOS does not utilize the FIT Table, so nothing to do here
#3, also see above guide. For Z97X-Gaming 7, and many other BIOS, but not all, you can search via GUID >> 17088572-377F-44EF-8F4E-B09FFF46A070 - extract body, and then edit. Before you edit, check end of file for footer, sometimes there is a footer that needs to be put back once you are done (not in this BIOS)
For this GUID Search, in this instance, only 2nd and 3rd results are actual microcode files, first one contains a header only (many BIOS like this too, but not all). Edit 2 microcode body, replace both bodies at search result 2-3. Watch pad-file above microcode at each location, this must be in place on your edited BIOS after saving, if you see it’s gone then try other UEFITool for the re-insert (ie if 26 removes a padding file use version 25 instead) If both remove a padding file, then do not use UEFITool for this mod, use MMTool instead.
#4, nothing to do there, since FIT is not used in this BIOS, otherwise yes you’d need to correct some things relating to what you asked
@Lost_N_BIOS
I am still confused I guess. I am not sure where or in what tool I would search for the GUID. I can see the microcode section in UEFITool and I extracted it as a body and got a file called File_Raw_Microcode_body.raw
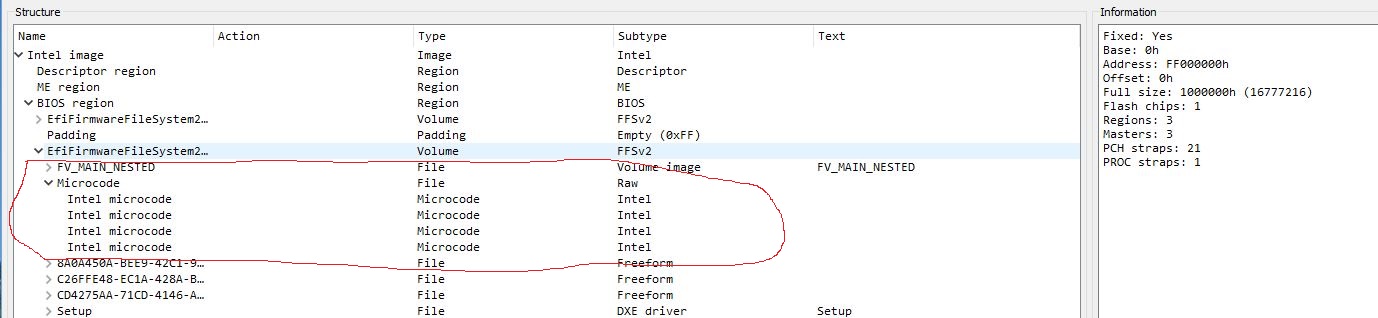
So, the first and last microcode section showing in the picture above are not really microcodes and do not get updated?
When I view the .raw file in HxD, I cannot find where each microcode section is so that I can cut out the old one and paste in the new one.
@digitalMedic - GUID search can be ran via search on UEFITool, or manually/visually found via MMTool.
When you run a search for the microcode GUID 17088572-377F-44EF-8F4E-B09FFF46A070 in UEFITool, you will get results x3 in different volumes (three actual and separate GUID Modules, 2x that contain microcodes, 1x header only)
What you showed in the image above is actual microcodes individually shown, but this is only one microcode GUID Module, there is two others (one only contains a header), the other contains what should be an exact copy of the one you’re looking at now
Here is example in UEFITool 51 NE, so individual microcodes are not shown, so it’s less confusing and easier to see what I’m talking about.
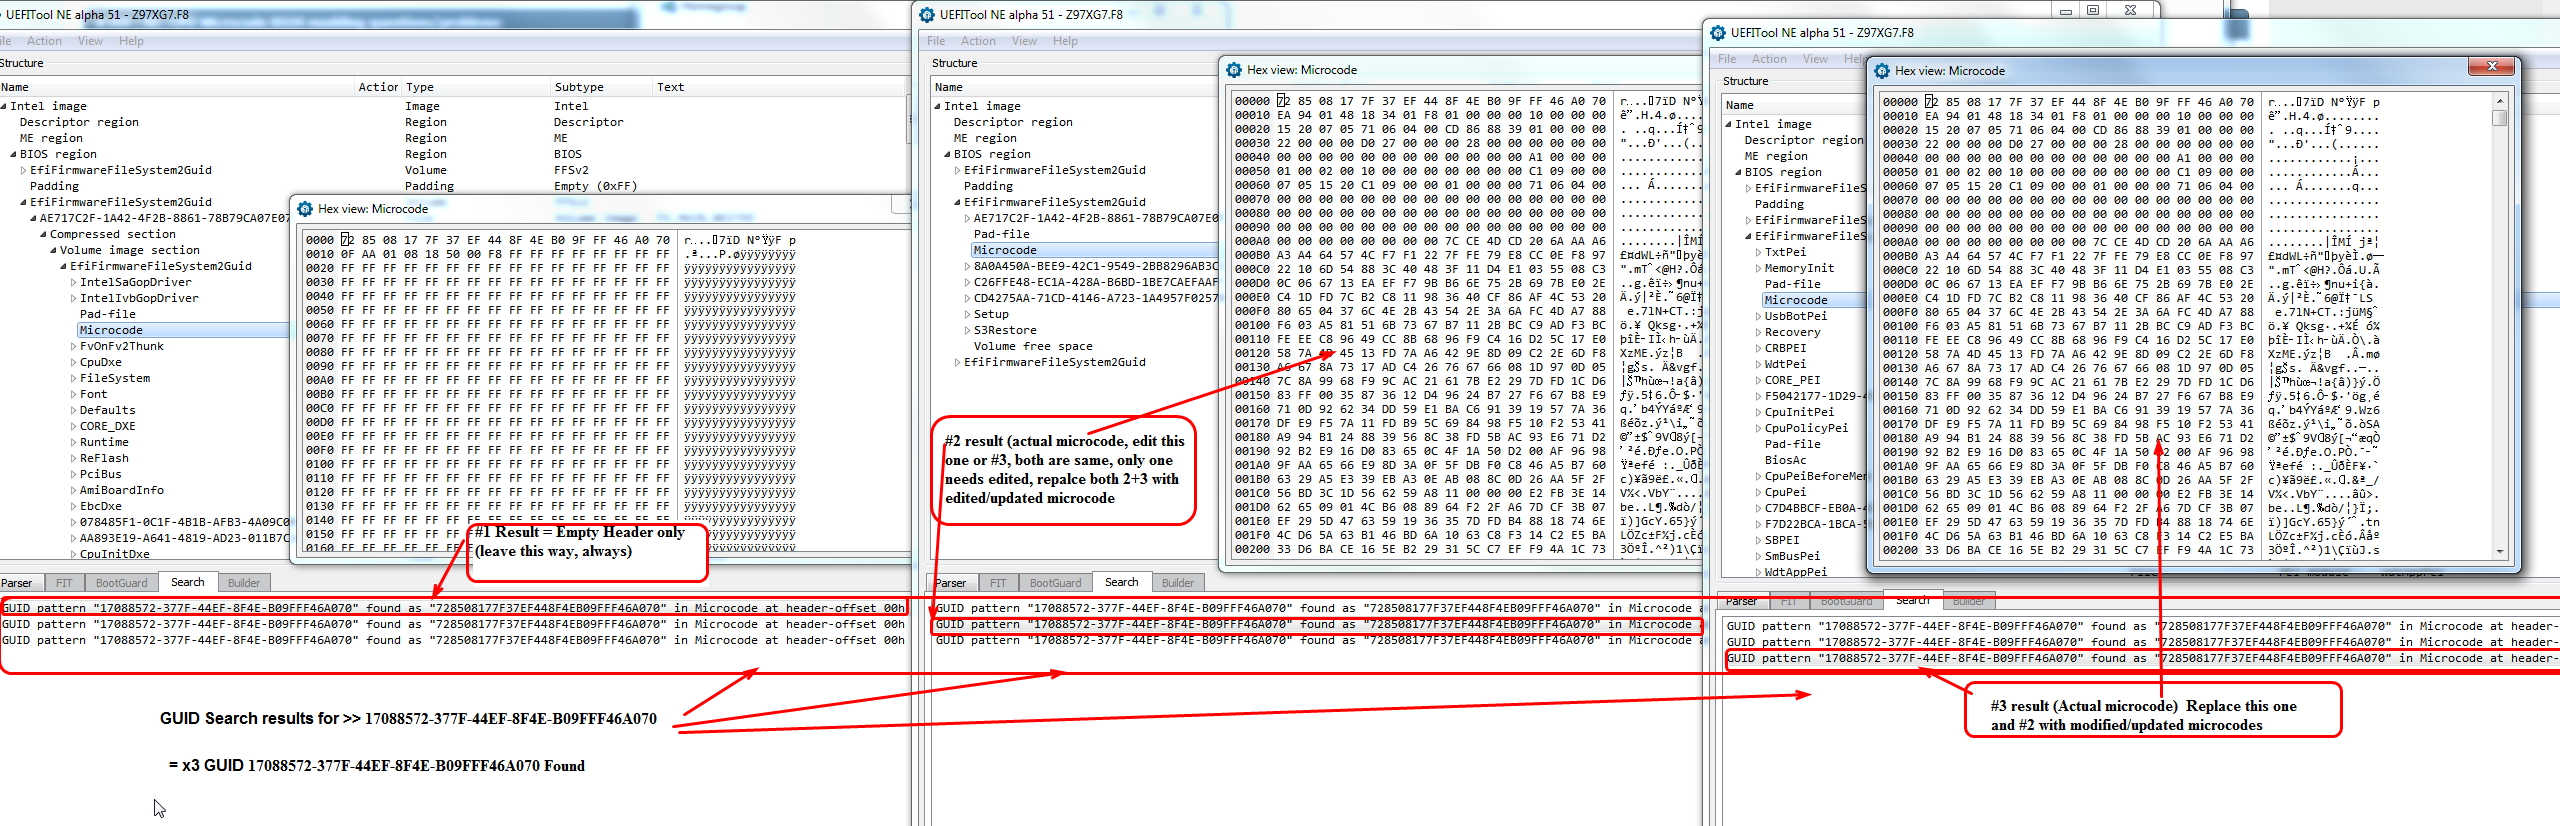
Same will apply to UEFITool NE 53-55 too, but inside each you’ll see the individual microcodes like shown in your image above. Don’t expand it, extract as-is, or via body, then edit
Use UEFITool regular version (25 or 26) to replace both #2+3 GUID with updated microcode module. Extract entire GUID, or body, using any UEFITool, then replace same way you extracted using UEFITool regular version (not NE Alpha version)
Don’t do this edit via hex, since headers and checksums will need corrected (UEFITool will do for you on save/rebuild)
@Lost_N_BIOS
I ran into a snag in the last bit of replacing the microcodes. Here is what I did:
1. I extracted the microcode files as a .raw file (extract body).
2. In the hex editor, I copied and pasted the new microcodes into the .raw file in their appropriate places (this increased each section of the microcode data and the whole .raw file). When I ran MCE.exe on the edited .raw file, it showed all the microcodes were updated correctly.
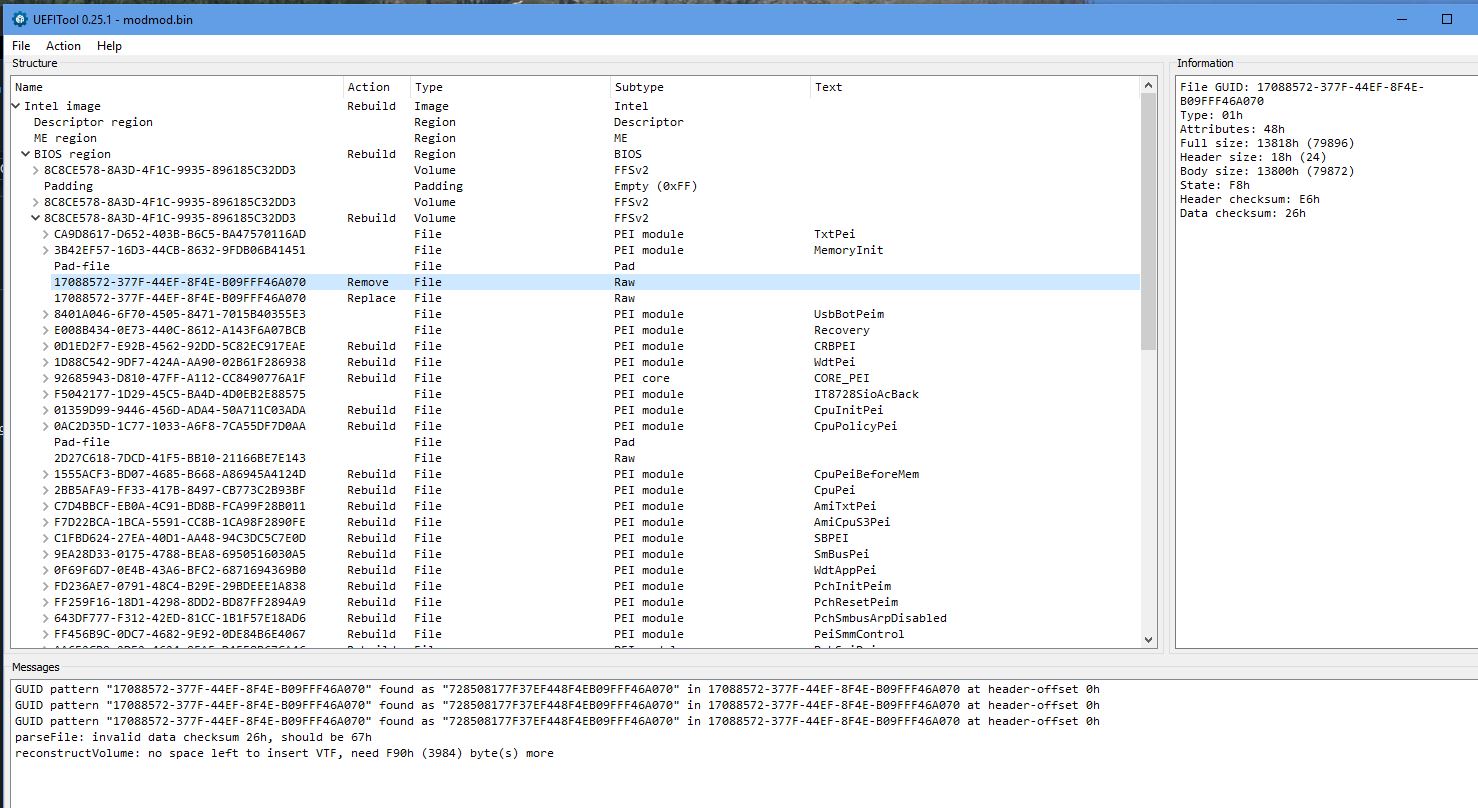
3. I replaced GUID 2 with “replace body” using the edited .raw file and saved the file, opening it after the save automatically.
4. Tried to replace GUID 3 with “replace body” with the same edited .raw file, but I got the following errors, “parseFile: invalid data checksum 26h, should be 67h” and “reconstructVolume: no space left to insert VTF, need F90h (3984) byte(s) more” (see the picture, please)
What did I miss?
Rick
@Lost_N_BIOS
I tried a couple more things. I tried to use MMTool and replace the microcodes with an updated microcode.ffs file (created from the UBU tool). Got the same out of space error. I also tried to alter the size of the padding file in the 3rd microcode area by deleting some FF bytes using a hex editor and then replacing it into the BIOS before trying to update the 3rd microcode. This time I got an invlaid UEFI file error.
I am kinda lost now.
@digitalMedic - to your reply on #374, you don’t usually replace 3xGUID’s as I mentioned in post #373 + showed in the image there, look at each in original BIOS via hex w/ UEFITool NE and you’ll see the first one is only a header, rest FF.
Also, I am not looking at the BIOS right now, but on the original microcode body, but also make sure there is not a footer, since you are changing size, if there is a footer you will need to add that again once you are done with the changes.
And, watch for padding files above/below the microcode GUID’s and at the end of volume you are editing, in original BIOS and then in edits, the padding files must remain the same as original. If UEFITool removes one, use older version (speaking 26 vs 25 here, sometimes padding is removed with 26)
Checksum will be corrected once proper/valid rebuild happens.
If you need me to update your ucodes for you, please confirm what BIOS you want edited (Or link it if already edited for other stuff) and then tell me what ucodes you want ie only certain ones updated, something added that’s not there originally, or all updated etc.,
When I do, I will tell you exactly how I did it. If it’s the Gaming 7 BIOS I checked previously (I was using F8), everything I mentioned in post #373 would be exactly how I would update it, but as I said if you can’t get it let me know and link BIOS if pre-edited for other stuff and I’ll do it for you.
@Lost_N_BIOS
Thanks for the reply. I followed the instructions you gave me before, and got to the point of editing the file and that is where I think I am getting hung up. I am only editing GUID 2 as you said. The original body extracted microcode file was 13800h, but the new microcode file is 14800h. I am not sure where to remove the extra bits from as there is no block of FFs in the microcodes. Should I remove some of the parts of the code with just 00s? I don’t think there is a footer as UEFITool 25 shows the body size as 13800h and the header 18h, which equals the total full size of 13818h.
I think when I get the new microcode size down to 13800h, then I will be able to replace GUID 2 and GUID 3 with the new microcodes.
Here is the BIOS I am trying to mod - http://www.mediafire.com/file/dl08r98vo0irb2x/Z97XGAMING7.9b.zip
Here is the file with most of the other mods I have already done using UBUTool - http://s000.tinyupload.com/?file_id=12313892823344540657
@digitalMedic - You edit two microcode GUID files (out of three total). You only need to make one modified body file, and replace on the two GUID’s that originally contain actual microcodes.
No need to remove anything, just increase the file size and place each new microcode at a multiple of 800h (0, 800, 1000, 1800, 2000, 2800 etc), or since it appears this BIOS alignment does not matter you can place them directly after each other without any FF/00 padding
And no, you can’t remove the 00’s in the original body, those are part of the actual microcodes, there is no spacing or padding between ucodes in this BIOS
For footer comment, I meant look at the file via hex or UEFITool NE Hex view, some microcode bodies contain a footer and others do not.
The footer is something like …MPDT… or something like that, it’s a complete line at the end, if you do not see then nothing to worry about for this BIOS - I checked, no footer on this BIOS microcodes
Never mind much of what I said above about how to edit, that’s proper for many BIOS but does not apply to your BIOS due to space issues, I now see your issue! You have to either leave one of the older GUID’s alone (leave in old) or remove one ucode so there is room if you want to update both.
In MMTool this is the GUID near bottom (One at very top can be replaced with larger one), same for UEFITool, the bottom most one must be left either original, or cut out a microcode so all the updated ones can fit, middle one can be exchanged for larger.
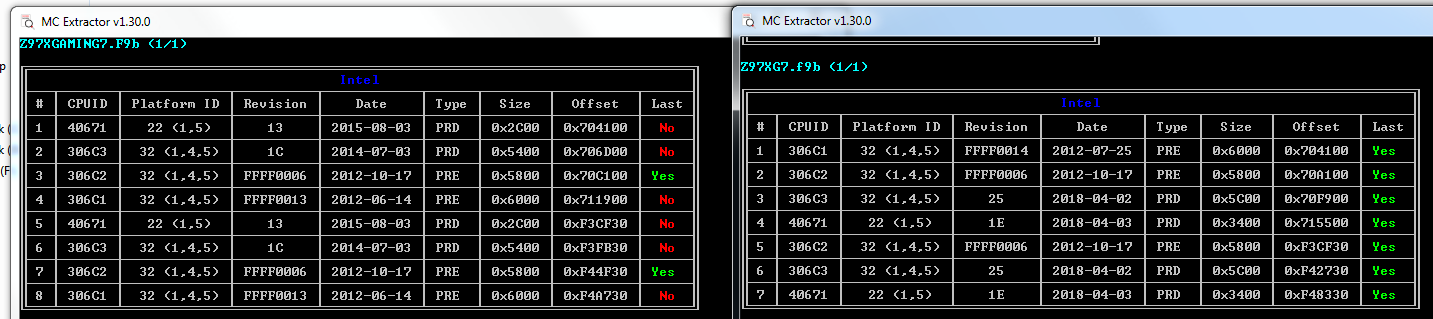
So, what I would do, is replace the one you can with the larger more complete microcode file (with all updated), and then the secondary one that is size limited (in PEI Volume), cut one out that you don’t use and then update the remaining three (remove 306C1 unless you use ES)
Here is BIOS done how I explained that, if you extract each microcode body and drop on MC Extractor, you’ll see what I meant if it’s not clear above I also included both updated ucode body files I used, so you can look at those in MC Extractor/Hex etc.
So, this BIOS has 306C1 removed from one GUID only (The one in PEI volume, that can’t be size increased), but this leaves 306C1 in the other which still would leave proper 306C1 compatibility
Z97X-Gaming-7-F9b-uCode-Mod
Please note, I used the stock BIOS, because there was added padding file in the UBU modified BIOS above middle microcode GUID, which I didn’t trust as bootable like that, since it’s not in stock that way. I may be OK, if you’ve already tested and used this BIOS?
So anyway, if you use this BIOS you’ll need to re-apply any UBU mods, or just use this as an example examine each microcode body to see what I explained above / how I’d do this mod.
Hi @Lost_N_BIOS , big praise for the incredible work you’re doing.
I became aware of the forum by google and like @linklp (pages 15-18) I’m also looking for a MCE/MOD Bios for the Gigabyte H97-D3H with a Xeon E3 CPU.
Unfortunately, the BIOS file you modified successfully are offline again.
Is there any chance that the file is still slumbering somewhere on your hard drive and could be re-uploaded?
Thank you @h97d3h  Since these continually get removed from the two upload places I used before, and tinyupload isn’t working for me to upload to past few days, I will attach here now instead so it will stay this time!
Here’s all three of those files, be careful and re-read everything mentioned in previous testing comments, some may not work with certain CPU’s, so you might need to swap in regular CPU to reflash stock BIOS if one fails with the Xeon
Rename the H97-D3H-F5-Modx2.zip file to .7z to extract it (I renamed to zip due to 7zip files not allowed to upload on forum software)
H97-D3H-F5-Modx2.zip (4.93 MB)
H97-D3H-F5-Mod-306C3-uc19.rar (4.93 MB)