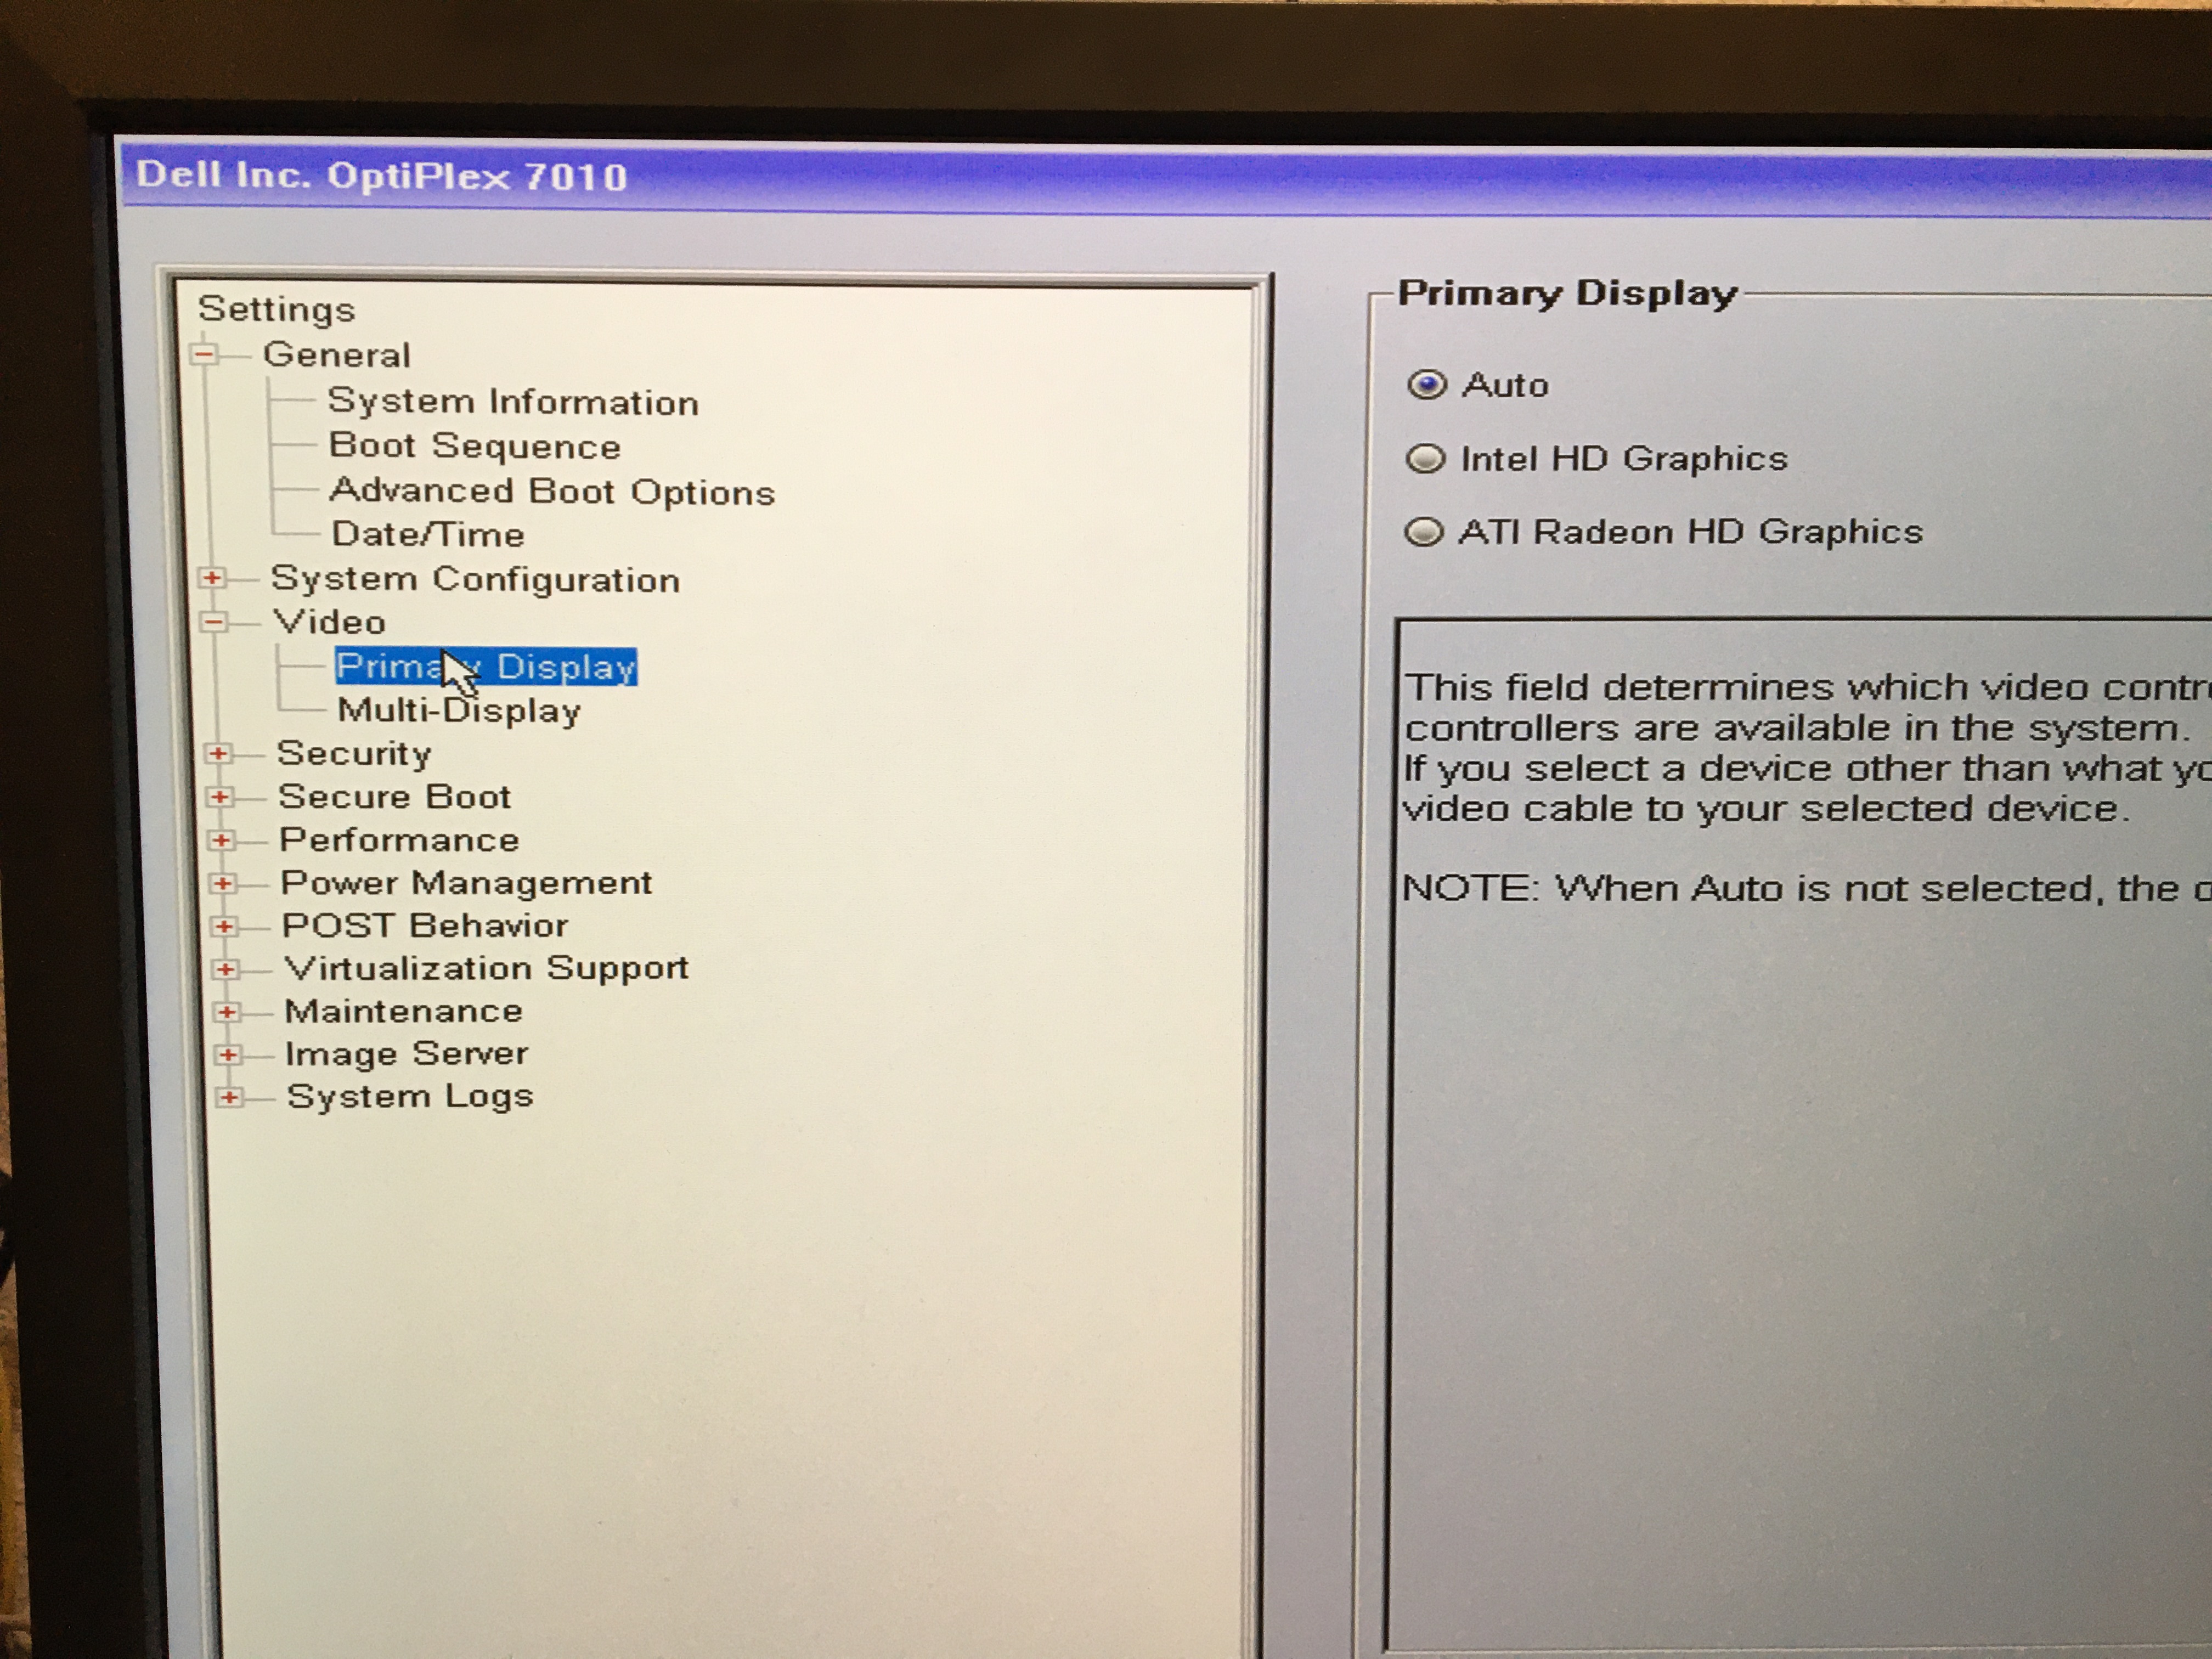
The bios of Dell Optiplex 7010 SFF always disables my i7-3770T’s HD4000 when there is no monitor connected to the onboard Displayports. My bios’ Primary Display tab only has three options: 1. Auto 2. Intel HD 4000 3. AMD Radeon WX4100
When selecting “3. AMD Radeon WX4100”, HD 4000 will be disabled automatically even though the bios description says integrated graphics will be enabled when Auto is not selected.
When selecting “2. Intel HD 4000”, my monitor doesn’t display anything during POST. I can’t rollback my bios settings without a CMOS reset.
When selecting “1. Auto”, I have to connect my monitor to the onboard Displayport and wait for the operation system to boot after a black-screen POST. And then I can reconnect the monitor to WX4100’s Displayport.
Not like some other motherboard’s bios, this bios doesn’t have “always enabled” options for integrated graphics device.
Could anyone let me know how to locate the assembly codes that enables/disables HD4000 graphics device inside the bios file? I would need this information as a starting point to hack the bios.
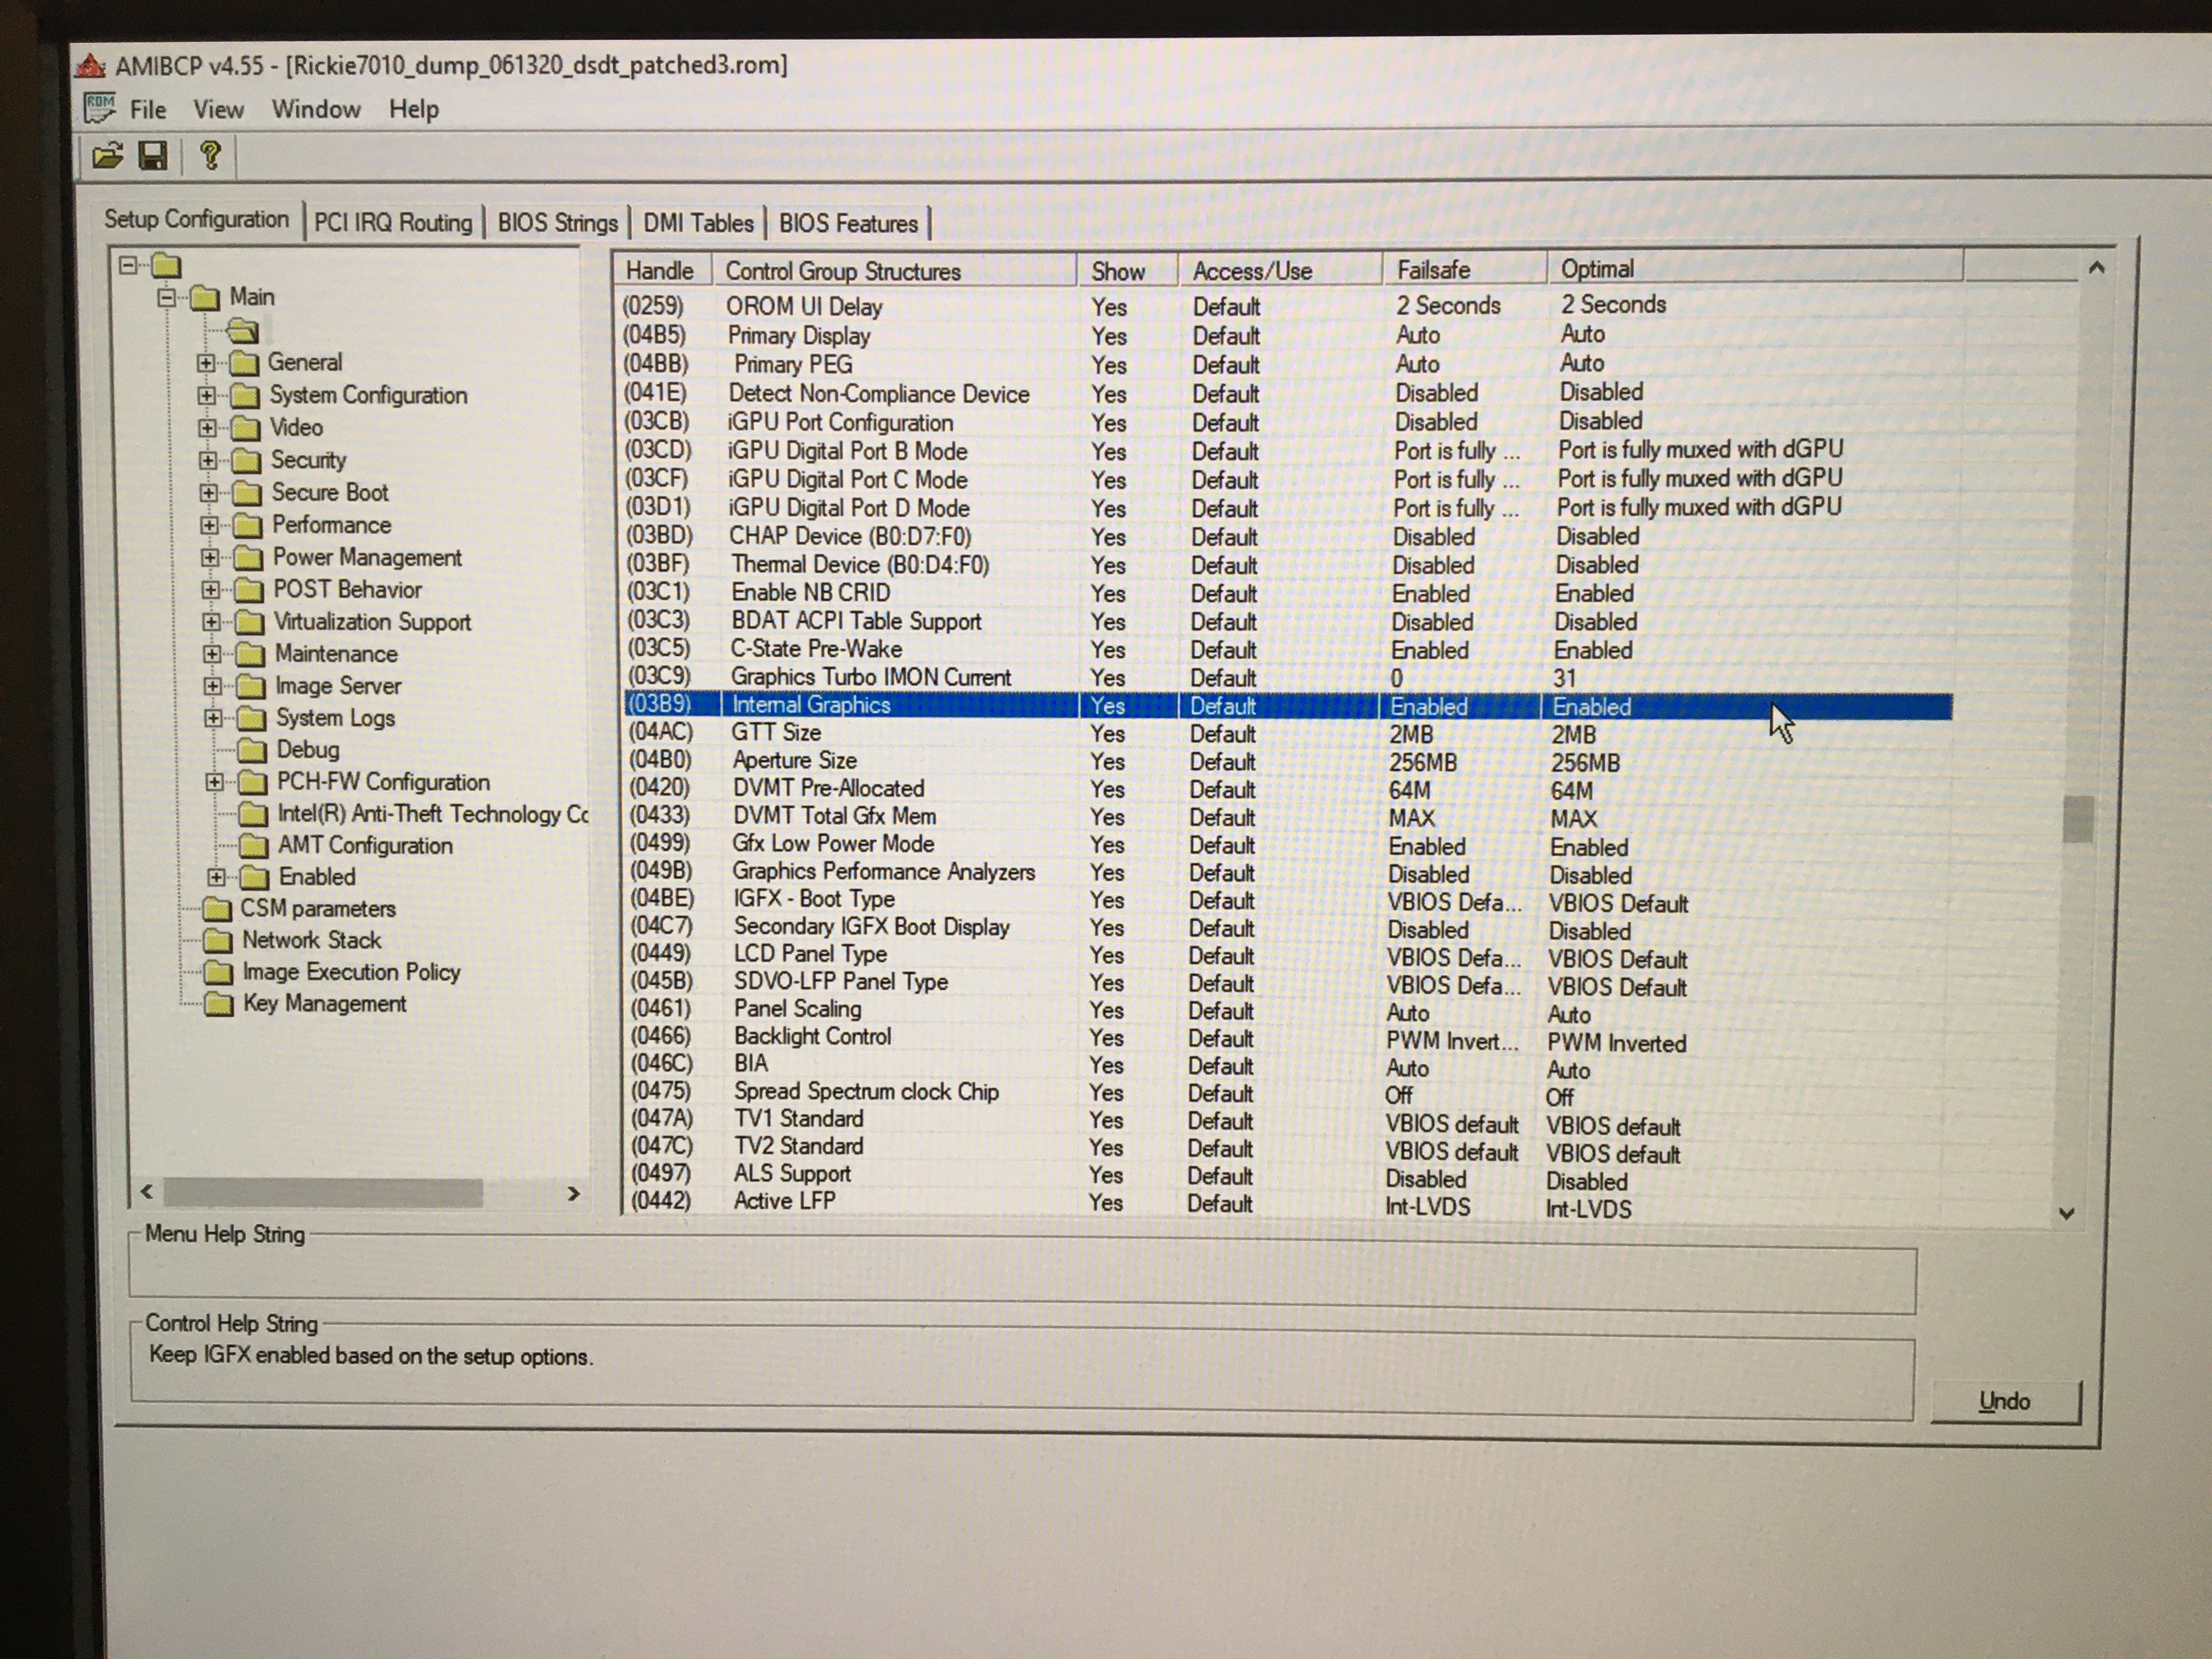
What BIOS section are the settings located in that you mentioned? You need to set “Internal Graphics” to Enabled instead of Auto, but this is hidden debug option. I can set for you, but first I want to see what you are looking at and talking about above, I don’t see that in the stuff you’d see but I guess I’m overlooking it so you’ll have to tell me what section you see that in.
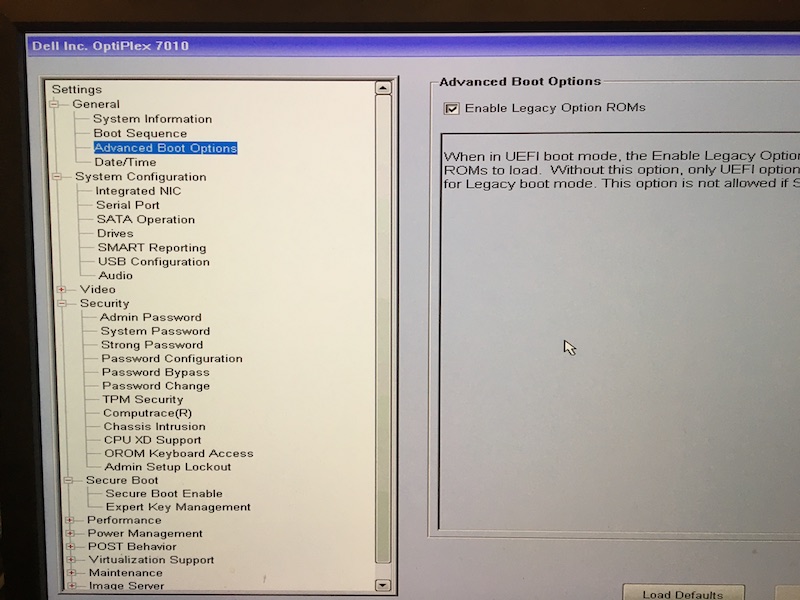
The section I was talking about is Settings->Video->Primary Display. I have attached the snapshot for your reference. I also changed the option “Internal Graphics” to “Enable” with AMIBCP but it doesn’t make any differences.
How is your monitor connected? Option #2 mentioned above should display without issue For option #1, sounds like you may need updated GOP in that cards vBIOS. Please dump it’s vBIOS with GPU-z and send to me, I will edit vBIOS for you to test.
What is the final/actual goal, current issues aside? Since you do have PCIE Card, ideal thing would be disabled onboard GFX, not enabled.
For better resolution and refresh rate, I have to connect my monitor to the PCIE card. I also want to enable VDA Decoder after booting up to my Hackintosh system therefore I need to figure out a way to keep integrated graphics device alive or VDA Decoder will be disabled by MAC OS.
If I choose option #1, my monitor somehow has black screen during POST. Therefore option #1 doesn’t make sense to me even though it worked great after booting into Hackintosh system. My final goal would be choosing option #3 (for displaying something during POST) while keeping onboard GFX alive for enabling VDA Decoder. This also prevents my Hackintosh from kernel panic when I connect a second monitor to the disabled onboard GFX.
Please see the attached file for my PCIE card’s vBios. Thank you for your reply.
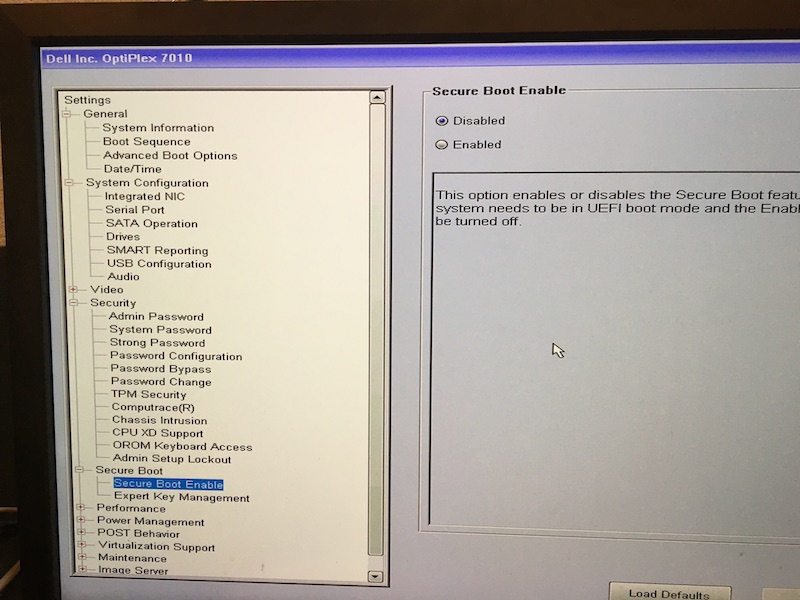
@iMSannob - Yes, I mentioned why #1 is possibly that way, because you need to update GOP in vBIOS. Or, it may always do that no matter what, if you run Secure boot and or CSM disabled, and if GOP update does not help. Or, if you are booting Legacy and Secure Boot disabled / w CSM enabled, it may be that this Dell doesn’t like this vBIOS having GOP, if this is the case we can remove GOP. Please confirm how you’ve setup BIOS in regards to what I mentioned, before I edit this vBIOS, since you may need different vBIOS edits based on how you are booting and this issue.
I am booting Legacy and Secure Boot disabled /w CSM enabled now.
By the way, I’ve also tried booting with CSM disabled and then seen POST screen before booting into Mac OS. Unfortunately Mac OS then had black screen after disabling CSM. So it seems that I have no choice but removing GOP.
@iMSannob - Sometimes black screen is only through post/BIOS though, did you try to wait and let MAC Load? CSM disabled would require/boot from GOP, and in this scenario you’d need to enable secure boot, so would use that and that may need updated is what I meant initially. Here is vBIOS edited both ways. - http://s000.tinyupload.com/index.php?fil…255214342126639
Use ATIFlash from DOS (Files for this attached at end of guide below) or AMDVBFlash from windows. Here is guide to DOS to flash, they’re against windows flash, up to you, I use it but I am always ready and able to recover with other/second card - https://www.techpowerup.com/forums/threa…g-guide.212849/
GOP removed vBIOS can only be used when booting with secure boot disabled and CSM enabled (ie legacy mode) + You need to be sure “Enable Legacy Option ROMs” is enabled At CSM parameters page Video Oprom needs to be set to legacy to boot CSM enabled/secure boot disabled (for the GOP removed vBIOS). When you run Secure boot enabled, and test UEFI/EFI GOP (mod or normal vBIOS), then you need to set this to UEFI before you disable CSM
Hmm, this may not be possible, can you see the “Debug” menu below System Logs? If not, we need to make visible to you first, so you can change Fast boot to enabled (only so you can change setting below it, then change back to disable) Below this, VGA support needs to be set to Auto so legacy can be used, but I’m not sure if the current EFI setting there maybe is only used IF fast boot is enabled (disabled by default). Anyway, I think we should make this visible so you can change and test if needed etc.
Enabling secure boot fails to boot Mac OS. So we can’t enable secure boot. I’ve done experiments with two monitors (A and B) connected to internal (A) and external GPU (B) separately. Here I summarize my experiment:
Bios Version, Legacy Option ROM, POST A, POST B, MAC OS A, MAC OS B Original vBios, Enabled. Displaying Displaying. Black. Black Original vBios, Disabled. Black. Black Displaying. Displaying GOP - removed, Enabled. Black. Black Displaying Displaying GOP - Removed. Disabled. Black. Black Black Displaying updGOP, Enabled Black. Black. Displaying Displaying updGOP, Disabled Black Black Black Displaying
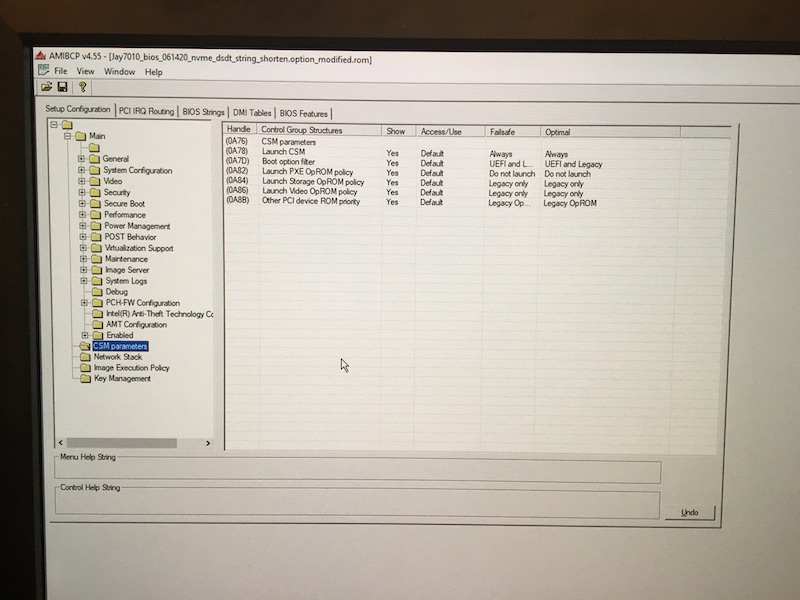
Since “CSM parameters” doesn’t show up in BIOS menu, I am assuming the BIOS set it to "Always"
By the way, could you please teach me how to enable “Debug” and “CSM Parameters” in BIOS menu? I tried to enable them with AMIBCP but it didn’t work.
@iMSannob - So, I can’t gather any useful outcome from the test, but it looks like a lot of the results end with displaying in MAC with GOP removed and or updated GOP - correct? So better, or no?
About menu mods. Do you already know how to flash mod BIOS on this system, or do you have flash programmer etc? We can flash via FPT I believe if you don’t have programmer, please do below and send me your BIOSreg.bin from step #1 Debug menu needs unsuppressed in setup first, and then “May” also need Access Level edit on top of that, but always test without first. This is done by extracting setup modele, generate IFR with universal IFR extractor, then hex edit the item per the info you gather in the IFR
Suppress If {0A 82} QuestionId: 0x3E3 equals value 0x0 {12 06 E3 03 00 00} << Change this 00 >> to >> FF this to null the suppression Ref: Debug, VarStoreInfo (VarOffset/VarName): 0xFFFF, VarStore: 0x0, QuestionId: 0xD, FormId: 0x800C {0F 0F 7B 00 7C 00 0D 00 00 00 FF FF 00 0C 80}
Changes to this in IFR post-edit Suppress If {0A 82} QuestionId: 0x3E3 equals value 0xFF {12 06 E3 03 FF 00} << Suppression now null due to only suppress if 0x3E3 = 00, but we now changed to FF so it would only suppress is 0x3E3 was FF which it’s not Ref: Debug, VarStoreInfo (VarOffset/VarName): 0xFFFF, VarStore: 0x0, QuestionId: 0xD, FormId: 0x800C {0F 0F 7B 00 7C 00 0D 00 00 00 FF FF 00 0C 80}
CSM probably cannot be made visible in this BIOS, but you can change default settings you see there via AMIBCP or hex etc. Yes, CSM is enabled always by default as you see in AMIBCP, but you can change
If you have already modified the BIOS in ANY way, you will need to re-flash it back to factory defaults using factory method (NOT FPT)!!!
If you do not have Intel ME drivers installed, install them now from your system driver download page, then start over here after reboot. Check your BIOS’ main page and see if ME FW version is shown. If not then > DOWNLOAD HWINFO64 HERE <
Once HWINFO is open, look at the large window on the left side, expand motherboard, and find the ME area. Inside that section is the ME Firmware version. Take note of the version. (ie. write it down or get a screenshot)
Once you have that, go to the thread linked below, and in the section “C.2” find and download the matching ME System Tools Package for your system. (ie if ME FW version = 10.x get V10 package, if 9.0-9.1 get V9.1 package, if 9.5 or above get V9.5 package etc) > DOWNLOAD " ME System Tools " packages HERE <
Once downloaded, inside you will find Flash Programming Tool folder, and then inside that a Windows or Win/Win32 folder (NOT x64). Highlight that Win/Win32 folder, then hold shift and press right click. Choose “open command window here” (Not power shell! >> * See Registry file below *).
If you get an error, reply to this post with a screenshot of it, OR write down the EXACT command entered and the EXACT error given.
((If “open command window here” does not appear, look for the “Simple Registry Edit” below…))
Step #1 Now you should be at the command prompt. You are going to BACKUP the factory un-modified firmware, so type the following command: Command: " FPTw.exe -bios -d biosreg.bin "
>> Attach the saved "biosreg.bin ", placed into a compressed ZIP/RAR file, to your next post!!! <<
Step #2 Right after you do that, try to write back the BIOS Region dump and see if you get any error(s). Command: " FPTw.exe -bios -f biosreg.bin " ^^ This step is important! Don’t forget! ^^
If you get an error, reply to this post with a screenshot of it, OR write down the EXACT command entered and the EXACT error given.
Here is a SIMPLE REGISTRY EDIT that adds “Open command window here as Administrator” to the right click menu, instead of Power Shell Double-click downloaded file to install. Reboot after install may be required > CLICK HERE TO DOWNLOAD CMD PROMPT REGISTRY ENTRY <
If the windows method above does NOT work for you… Then you may have to copy all contents from the Flash Programming Tool \ DOS folder to the root of a Bootable USB disk and do the dump from DOS ( DOS command: " FPT.exe -bios -d biosreg.bin " )
Both version of updated vBIOS didn’t do better than the original vBios since both of them has one black screen in Mac OS while the original vBios has two screen displaying.
By the way, by enabling service mode of my computer, I can program whatever modified Bios to this machine’s EPROM. For enable debug menu, I used UEFIPatch 2.8 and applied the patch:
But debug menu still doesn’t show up. Maybe this Dell BIOS doesn’t use settings inside 899407D7-99FE-43D8-9A21-79EC328CAC21 (SetupPrep). I am wondering if we can modify "menu->submenu" structure by replacing some useless submenu with any submenu I want it to show up.
But I can’t find information about how to do it…:<
@iMSannob - You may need to redo those vBIOS test with CSM settings changed when you disable/enable legacy. And do you wait on black screen, in some cases due to OS or settings/vBIOS etc, this may be normal and your only option if you want to use certain things, and you just have to wait until windows loads then it’s visible again.
Yes, that edit may apply twice in setup (once for VT for Direct I/O setting), so your edit with UEFIPatch may not have applied to correct location, especially if it only applied the edit once. Yes, setup may not be used for settings, but we’re talking menu. And as I mentioned, you may need to do this AND then Access Level change (Test user and then Super) If you want me to make you a set of properly edited BIOS to enable it let me know
Yes, I know how to swap menus/submenus etc, but this takes many hours and is not ideal here, especially not right now and or for a single setting or two etc.
Please send me FPT dump of your BIOS region, and I will send you set of three BIOS to test for enabling debug menu >>
If you have already modified the BIOS in ANY way, you will need to re-flash it back to factory defaults using factory method (NOT FPT)!!!
If you do not have Intel ME drivers installed, install them now from your system driver download page, then start over here after reboot. Check your BIOS’ main page and see if ME FW version is shown. If not then > DOWNLOAD HWINFO64 HERE <
Once HWINFO is open, look at the large window on the left side, expand motherboard, and find the ME area. Inside that section is the ME Firmware version. Take note of the version. (ie. write it down or get a screenshot)
Once you have that, go to the thread linked below, and in the section “C.2” find and download the matching ME System Tools Package for your system. (ie if ME FW version = 10.x get V10 package, if 9.0-9.1 get V9.1 package, if 9.5 or above get V9.5 package etc) > DOWNLOAD " ME System Tools " packages HERE <
Once downloaded, inside you will find Flash Programming Tool folder, and then inside that a Windows or Win/Win32 folder (NOT x64). Highlight that Win/Win32 folder, then hold shift and press right click. Choose “open command window here” (Not power shell! >> * See Registry file below *).
If you get an error, reply to this post with a screenshot of it, OR write down the EXACT command entered and the EXACT error given.
((If “open command window here” does not appear, look for the “Simple Registry Edit” below…))
Step #1 Now you should be at the command prompt. You are going to BACKUP the factory un-modified firmware, so type the following command: Command: " FPTw.exe -bios -d biosreg.bin "
>> Attach the saved "biosreg.bin ", placed into a compressed ZIP/RAR file, to your next post!!! <<
Step #2 Right after you do that, try to write back the BIOS Region dump and see if you get any error(s). Command: " FPTw.exe -bios -f biosreg.bin " ^^ This step is important! Don’t forget! ^^
If you get an error, reply to this post with a screenshot of it, OR write down the EXACT command entered and the EXACT error given.
Here is a SIMPLE REGISTRY EDIT that adds “Open command window here as Administrator” to the right click menu, instead of Power Shell Double-click downloaded file to install. Reboot after install may be required > CLICK HERE TO DOWNLOAD CMD PROMPT REGISTRY ENTRY <
If the windows method above does NOT work for you… Then you may have to copy all contents from the Flash Programming Tool \ DOS folder to the root of a Bootable USB disk and do the dump from DOS ( DOS command: " FPT.exe -bios -d biosreg.bin " )
I’ve redone the experiment. Here is the conclusion:
Legacy Option ROM = Enabled: Both PCIE and Internal graphics have black screen during POST. However, both displays work great after booting into Mac OS.
Legacy Option ROM = Disable: Only internal graphics can display during POST while PCIE display is black. Once booting into Mac OS, the internal graphics stops working and only PCIE card is displaying.
Remove-GOP, updated GOP, and original vBIOS all have the same results above.
It would be great if you can give me a sample and teach me how to enable Debug menu. Please see the attached file for the bios file dumped out with ‘FPT -bios -d’.
@iMSannob - So, on the graphics testing, is any of that workable for you to use?
Yes, once we confirm debug visible so I know method required, I will show you all the edits applied to make it appear.
Here, please test in following order, stop once you see debug appear (if it happens ) 1. Unsup33 2. Unsup33AMITSDS 3. Unsup33AMITSDU 4. CutMove 5. CutMoveAMITSDS 6. CutMoveAMITSDU
No problem, Thank you for your help. I am think about using a dummy VGA plug to keep internal GPU alive during boot time. Not sure if I can still see POST screen with a dummy VGA but it’s worth a try. Placed an order on Amazon. Will try it out in a few days.
 )
)