@snake007uk Your efforts interested me a lot bro. I have a 2022 Optiplex 7000SFF and it has the same ICs as yours except 32MB one. Mine is 25R256EFIR 16 pin SOP . If you succeed I have intention to go the same route with you.
Maybe you’re not aware of how valuable your efforts are. Nobody wants to deal with newer Dell Optiplexes’ BIOS modifications. Everybody think that Dell machines especially newer ones are devilmade.
I very thank you for your efforts and courage about this.
Thank you for the encouragement. I will try and post up a summary once I am done. Right now, I think i need another clip/probe for the WSON8 chip as i dont think the probe I have is connecting to the pins properly.
If I had a desoldering station I might have tried to remove it and do it that way.
Ill keep posting my progress.
1 Like
So i found a useful video.
The one Bios dump file I got, I can use MFIT tool which is part of the CSE 16 to decompose the bios file
Youtube video here: (https://www.youtube.com/watch?v=dZPfE6fbgMA)
I will need to wait for the other probe to arrive so I have both bios before proceeding.
Here is what I have currently
I have ran the following commands:
FPTW64.exe -D 7010-FPT-BIOS-1.bin -BIOS

FPTW64.exe -D 7010-FPT-ME-1.bin -ME

FPTW64.exe -D 7010-FPT-FD-DESC-1.bin -DESC
So I have extracted the Bios, ME and FD.
I also ran the command
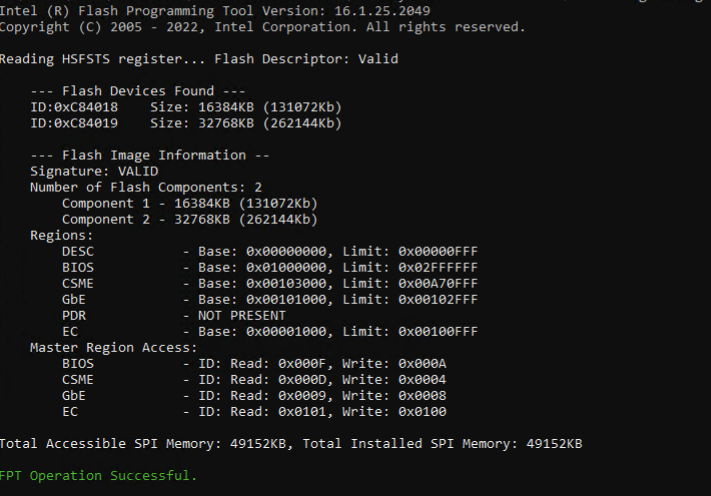
FPTW64.exe -i
The output was as follows:
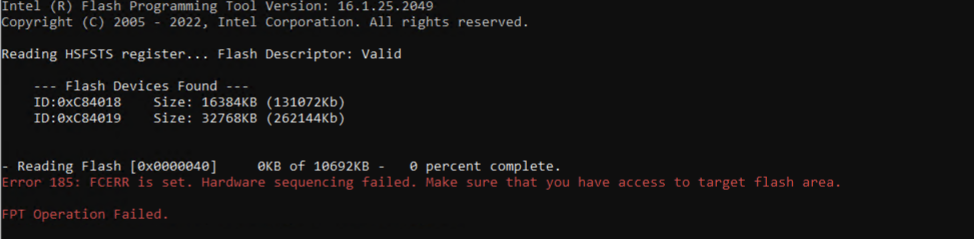
Intel (R) Flash Programming Tool Version: 16.1.25.2049
Copyright (C) 2005 - 2022, Intel Corporation. All rights reserved.

Reading HSFSTS register... Flash Descriptor: Valid

    --- Flash Devices Found ---
    ID:0xC84018    Size: 16384KB (131072Kb)
    ID:0xC84019    Size: 32768KB (262144Kb)

    --- Flash Image Information --
    Signature: VALID
    Number of Flash Components: 2
        Component 1 - 16384KB (131072Kb)
        Component 2 - 32768KB (262144Kb)
    Regions:
        DESC           - Base: 0x00000000, Limit: 0x00000FFF
        BIOS           - Base: 0x01000000, Limit: 0x02FFFFFF
        CSME           - Base: 0x00103000, Limit: 0x00A70FFF
        GbE            - Base: 0x00101000, Limit: 0x00102FFF
        PDR            - NOT PRESENT
        EC             - Base: 0x00001000, Limit: 0x00100FFF
    Master Region Access:
        BIOS           - ID: Read: 0x000F, Write: 0x000A
        CSME           - ID: Read: 0x000D, Write: 0x0004
        GbE            - ID: Read: 0x0009, Write: 0x0008
        EC             - ID: Read: 0x0101, Write: 0x0100

Total Accessible SPI Memory: 49152KB, Total Installed SPI Memory: 49152KB
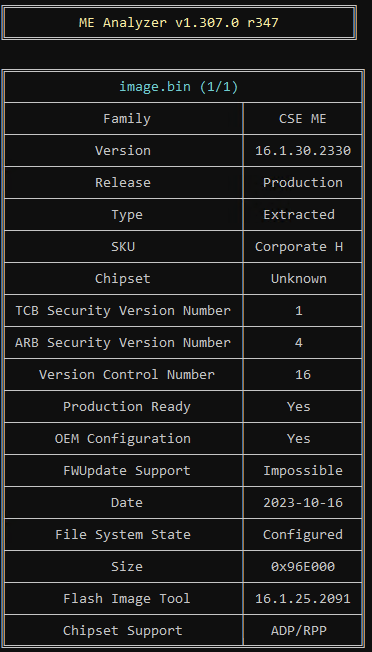
I then ran the ME-Analyzer against the ME extract I got from the command
FPTW64.exe -D 7010-FPT-ME-1.bin -ME
That then gave me this output
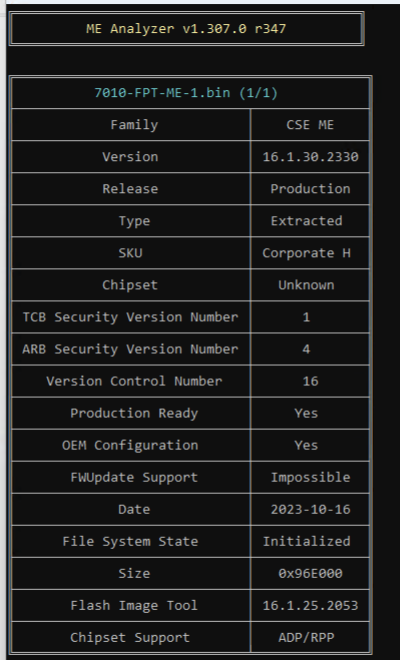
However it also gave an error at the end
![]()
@lfb6 is the above error expected?
Here is the link to download the bios extracted files: extracted-bios-files.zip - Google Drive
ok I think I realised the problem, the first few commands where only extracting certain sections of the firmware NOT the whole thing.
Hence why I have to use the external CH341A programmer to extract the firmware.
I ran the command
FPTW64.exe -D 7010-FPT-1.bin
The output was as follows:
I have extract one of the chips firmware, however I need both I believe. Once the WSON8 probe arrives later today, I will extract that firmware also.
However the question now is, do I have to combine these two firmware files?
If you can dump FD, ME and BIOS (regions) with fpt there’s only GBE and EC left- which one isn’t allowed to dump?
Otherwise the output of fpt -i will give you the addresses and thereby the order of the regions, it doesn’t list the regions in which the regions have to be placed!
And
Didn’t you dump the 16 MByte chip already with the programmer or am I mixing sometyhing up here?
(And don’t use the programmer on the 256 MBit chip! That’s the bios region, no changes needed, no need to mess with this chip!)
You are correct, I already dumped this using the programmer.
I was just following the docs and hit this point.
I’ll check which one is being blocked from being extracted.
The delivery just came for the WSON8 probe, but won’t bother with this if you say it’s not needed.
Then since I have the dump from the extraction.
I can continue
Can you post the 16 MB dump?
(use a hex editor to combine the two dumps- first 16 MB dump with programmer (should contain FD, EC, GbE, CSME, possibly there’s an empty padding between 0xA71000 and 0xFFFFFF)
Use UEFIToolNE for viewing / checking structure
Here is the programmer dump.
GD25B128ESIGR-Bios-1.zip (6.3 MB)
@lfb6 - When you say combine the two, do you mean the Programmer dump + the ME dump (using FPT?)

ok, so you can do it via HxD → Tools → File Tools → Concatenate.
Select the programmer dump as first file and then the FPT Bios extract as second file.
Saved the output,
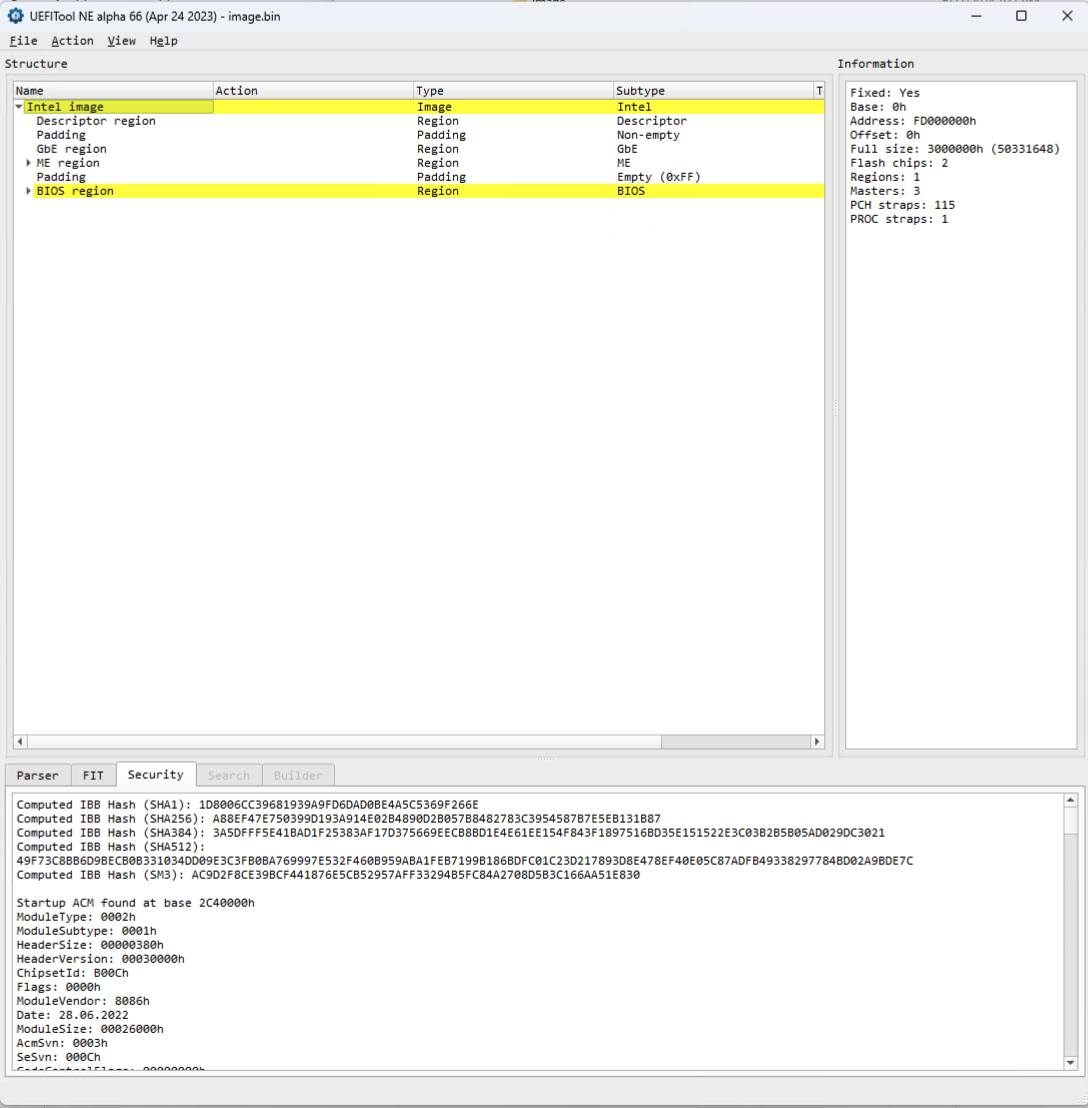
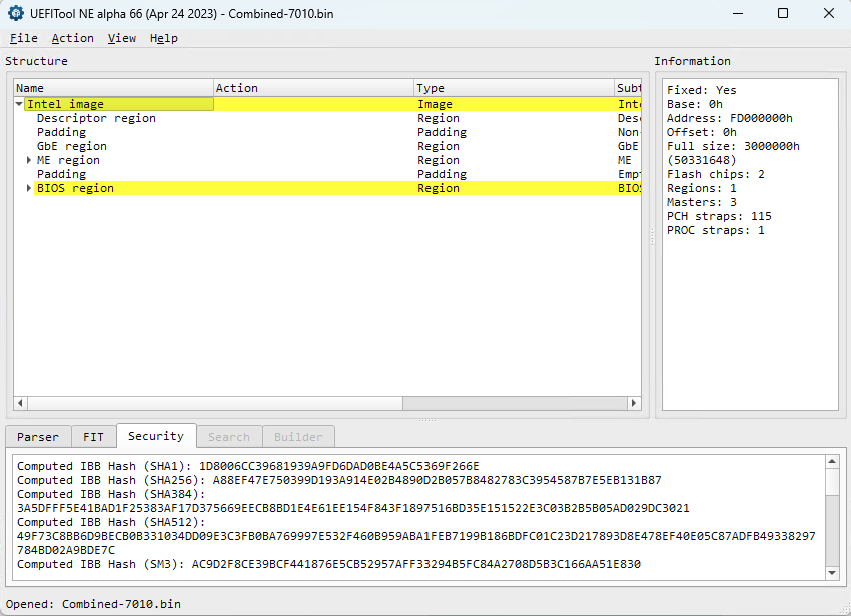
Ran UEFITool and got the following

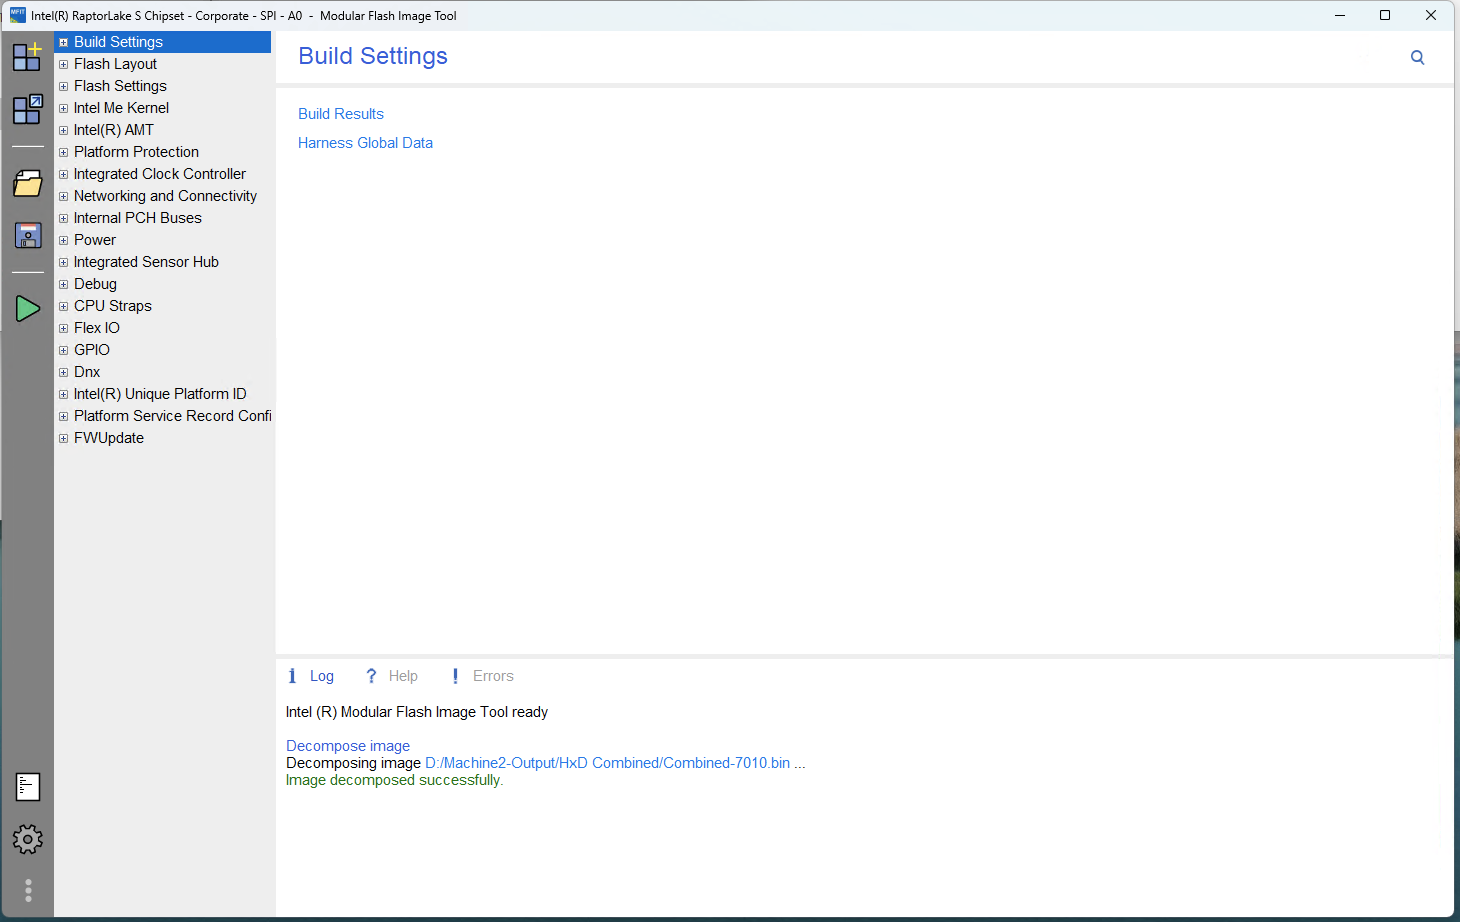
ok, so I opened the combined image in MFIT
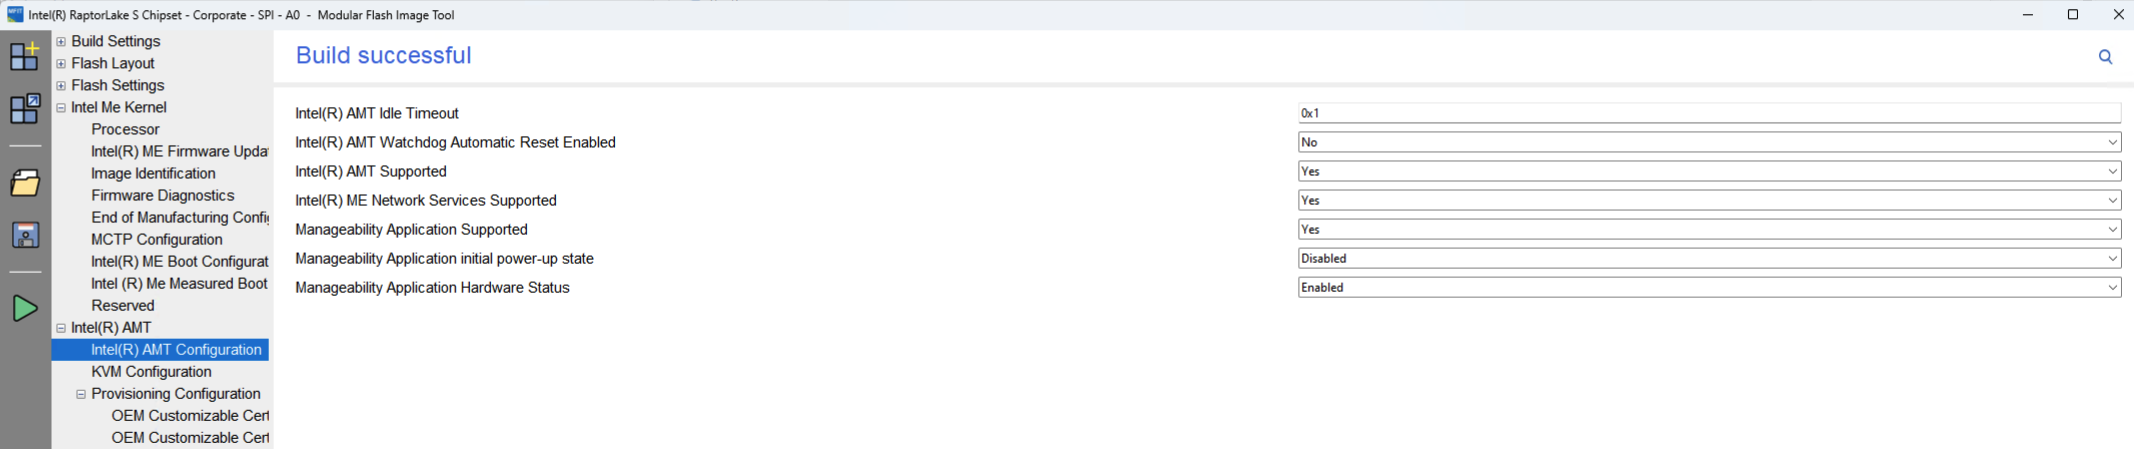
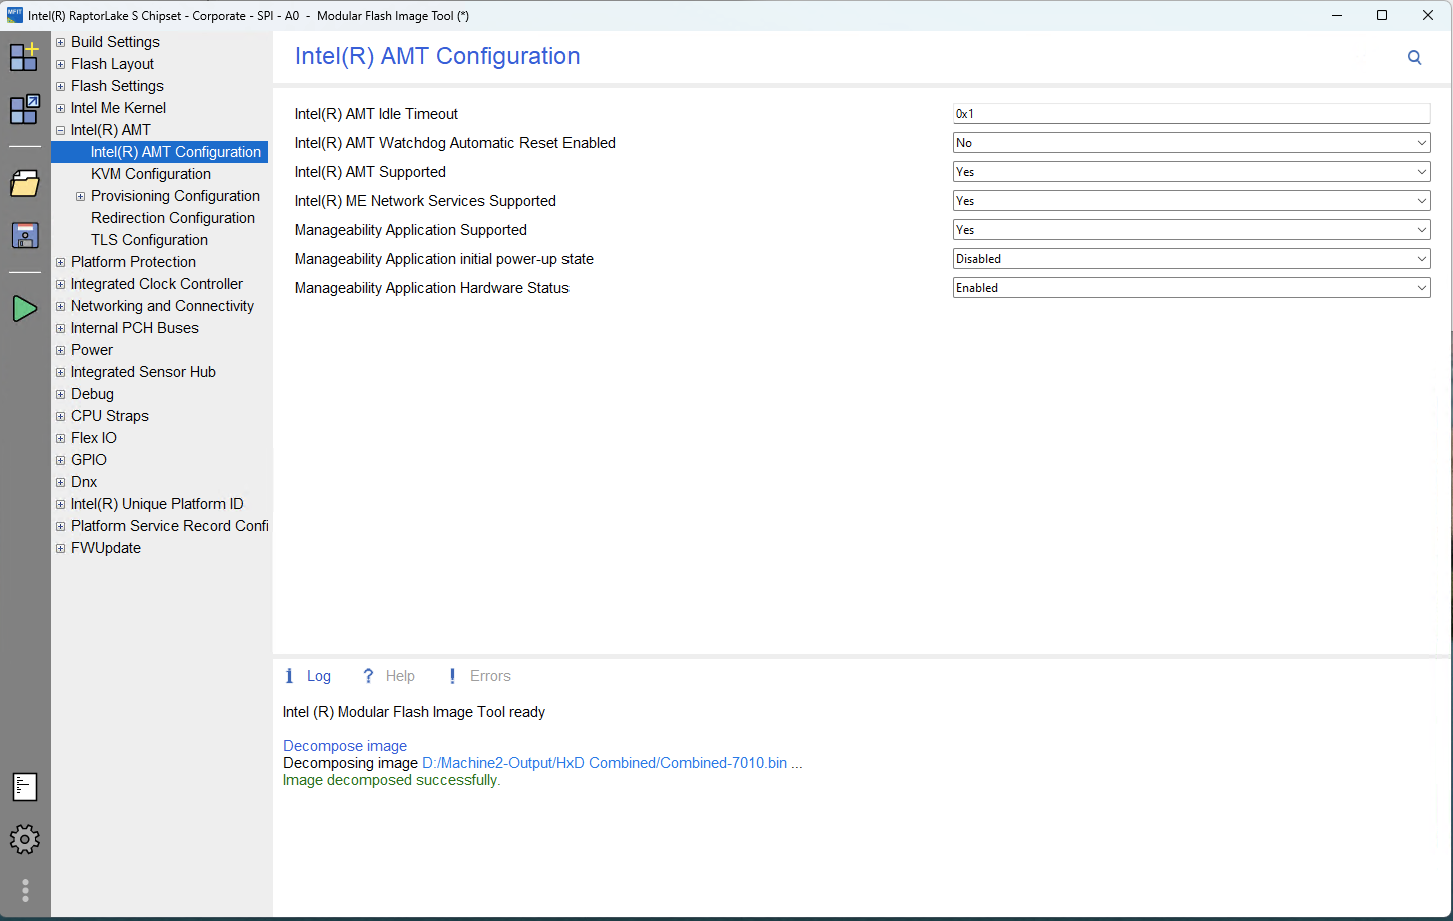
Updated the AMT settings (See screenshot)
Saved the config, then built the image
It output three images,
image.bin
image1.bin
image2.bin
I am assuming image 1 and 2 are the different parts of the bios and the image.bin is the combination.
I then checked the output file in UEFITool and got the following output
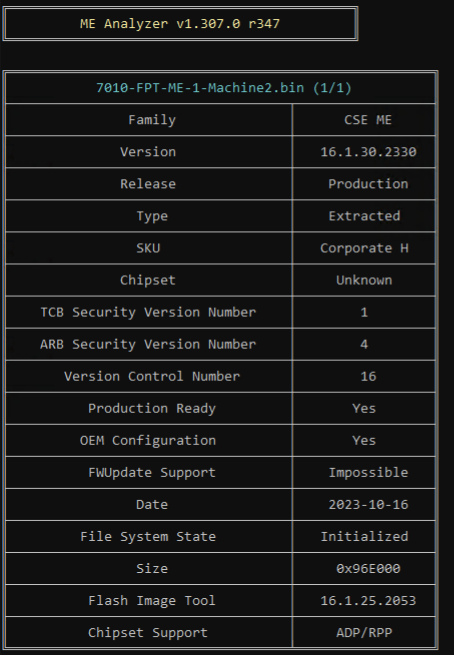
I also ran ME-Analyzer

Which matches the original analysis.
So I am guessing now I can flash this firnware.
@lfb6 - would this be correct?
reading more into this, it seems I dont flash the whole bios back.
I take the split images created by MFIT image 1 and 2. In my case Image1.bin (which is 16mb - same size as the extracted programmer file). Use the programmer to flash this back.
Another update.
I tried updating the MFIT however it wont stick. I am guessing this is because the ME region needs a clean version.
So I tried downloading from
However both 16.1.30.2330 are consumer sku and not corporate and DO NOT work ![]()
I cant seem to find a corporate version.
Please save the config after you made the changes in MFit and attach the created xml- file here,
I have attached the config file.
MFIT-EDITED.xml.zip (30.2 KB)
Ok so now it seems like ME-analyzer showing as configured
So do I use this full (bios and ME) to flash the SPI via the programmer. I am asking this because I thought I used the programmer 16mb (extracted) and then combined with the FPT Bios extraction. So wouldnt this file be too big?
So I would only use image1.bin created by MFIT, NOT image.bin or image2.bin
Just flashed image1.bin and it worked!!! I have Intel AMT enabled.
I have another machine to do and so I will summarise all of the above and pull all the links in one place.
@lfb6 thank you for all your help ![]()
Ok so here is my summary of everything I did
These instructions are SPECIFICALLY for Dell Optiplex 7010 Micro plus 2024 !!!
Take a images of your BIOS to help identify the BIOS chips and ask in the forums.
You will need to purchase a CH341a programmer to read/program this systems bios as they are locked.
The one I purchased was: Amazon.co.uk
All instructions here were carried out on Windows 11 / Either Command prompt running as admin or GUI
Install python from MS Store
Open CMD prompt (Please make sure you right click and RUN AS ADMINISTRATOR)
Then run the command
pip install colorama crccheck pltable
This will install the requirements for ME-Analyzer
- Run HWINFO (32 or 64 - depending on your windows install)
- Click start
- Save the report as HTML
- You will need the information from here
Now go into the FPT (Flash programming tool directory)
CSME System Tools v16.1 r0\Flash Programming Tool\WIN64
And run the command
FPTW64.exe -i
You should get an output like show below - screenshot this for future reference
Then run the commands:
FPTW64.exe -D 7010-FPT-BIOS-1.bin -BIOS
FPTW64.exe -D 7010-FPT-ME-1.bin -ME
NOTE: 7010-FPT-BIOS-1.bin and 7010-FPT-ME-1.bin - is the output filenames, you can name this whatever you like with a .bin at the end.
Assuming you know the path to the FPTW64 extracted file (in this case: 7010-FPT-ME-1.bin) we want to run Me-Analyzer against it.
Run the command
python MEA.py 7010-FPT-ME-1.bin
The above command is assuming the firmware file is in the same directory as ME analyzer.
You should get an output similar to the screenshot below
Now we need to note down:
VERSION: This is the ME Version we need to DOWNLOAD and replace in our bios (so we have a CLEAN ME region, without this your CHANGES will NOT take effect).
Also pay attention to:
File System State: It should say initialised, once we overwrite the bios with our modified one, this will say configured.
SPI BIOS Extract USING PROGRAMMER
Now we need to extract our SPI/Bios using the Programmer, using the ASProgrammer tool
Save the output (ensuring it’s not ALL FFFFF as this means it’s’s blank) - advised to take multiple copies as backups (read each time again).
Use the HxD Tool (Hex Editor) to compare the two dumps ensuring they are identical.
Combine BIOS using HXD
Once you know they are, its time to combine the Extracted BIOS (the one from ASProgrammer) with the FPT BIOS extract (7010-FPT-BIOS-1.bin)
You can combine the two files using the Hex Editor:
you can do it via HxD → Tools → File Tools → Concatenate.
Once you have combined the Bios we need to verify that it is a good Bios using the UEFITOOL (see screenshot below)
You should see something similar to this
Decompose BIOS and create Config
We now use the MFIT tool (Modular Flash Image Tool)
Click on De-compose image and open up the COMBINED image you created from the HxD tool
If everything went well you will see output similar to below:
Now go into Intel AMT on the right hand side
Then select Intel AMT configuration
And change the following settings to YES
Intel AMT supported
Net ME Network Services Supported
Manageability Application Supported
See screenshot below and make sure it is set like that.
Now click the save ICON and this will save the file as untitled in the same directory as the MFIT tool.
Now close the program
You now need the CLEAN ME file. You can get these from:
@lfb6 provided version 16.1.30.2330 (As per the ME-Analyser version I needed).
This file is called: CSE ME 16.1.30.2330 Prod CorpH Unkn ADPRPP.bin
You need to PUT this in the DECOMPOSE Folder under the MFIT APPLICATION folder
So in my case under the MFIT app folder, there is a folder called “Combined-7010” which was the combined BIOS I decomposed using MFIT
Go into this directory and then go into Decompose directory
DELETE the file called: “ME Sub Partition.bin”
Copy the file called “CSE ME 16.1.30.2330 Prod CorpH Unkn ADPRPP.bin” into this directory and RENAME it to “ME Sub Partition.bin”
You now have a CLEAN ME firmware.
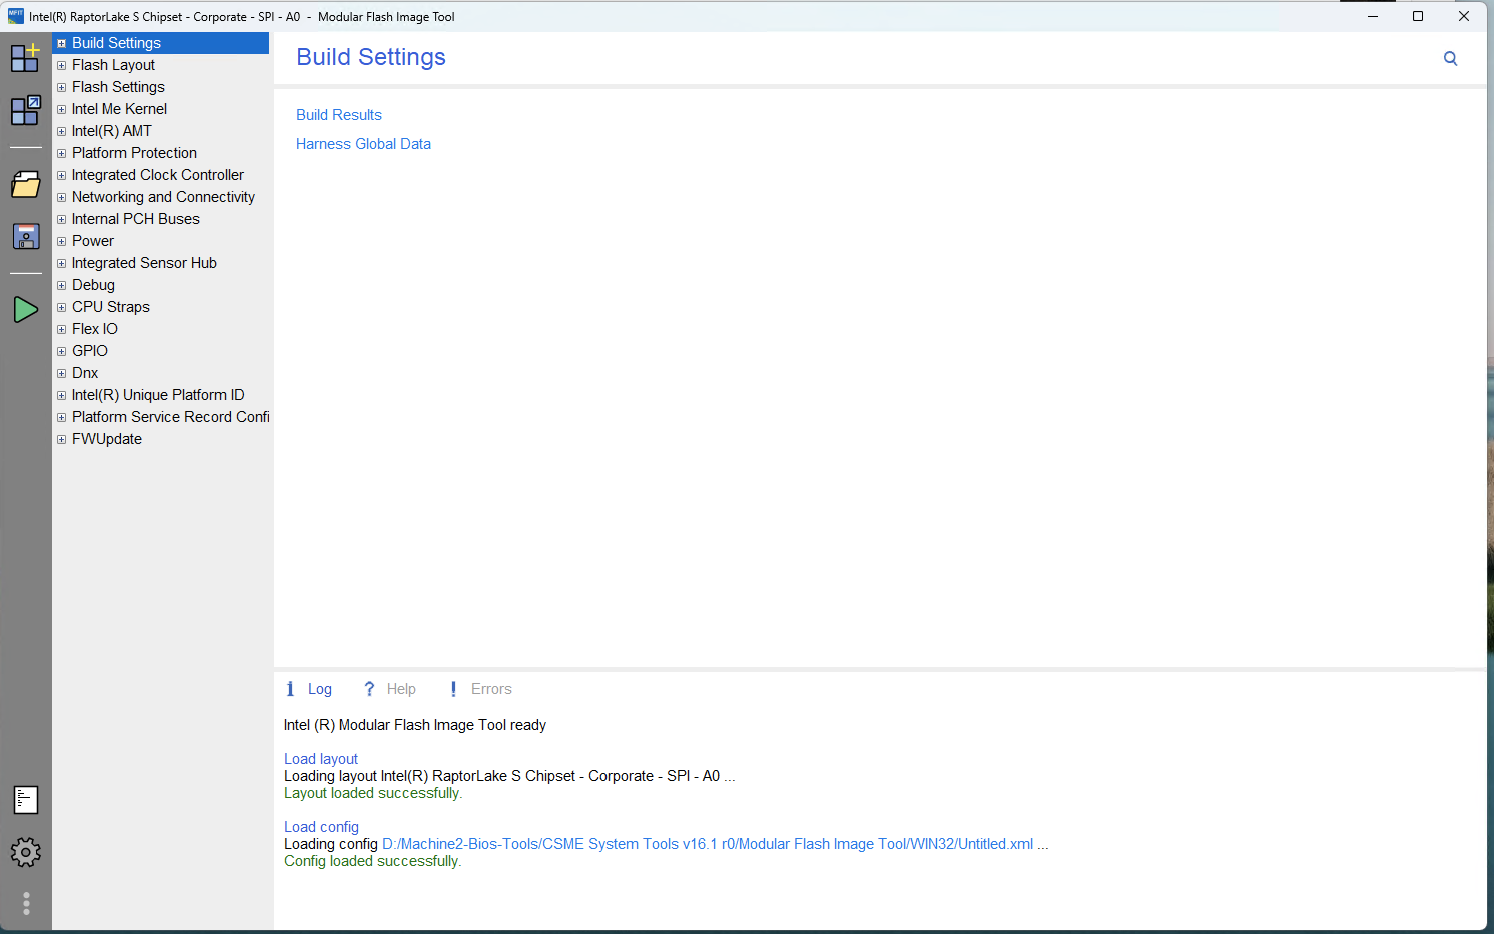
Re-Open the MFIT Application
NOW click on LOAD previous layouts configuration
And open the “untitled.xml” file
If everything went well you should see output like below
Double check the configuration on the LEFT (Intel AMT → AMT configuration)
If this all looks like it should be (as we saved earlier)
You can click on the Green play button to make a new BIOS. If this was successful you will screen like below:
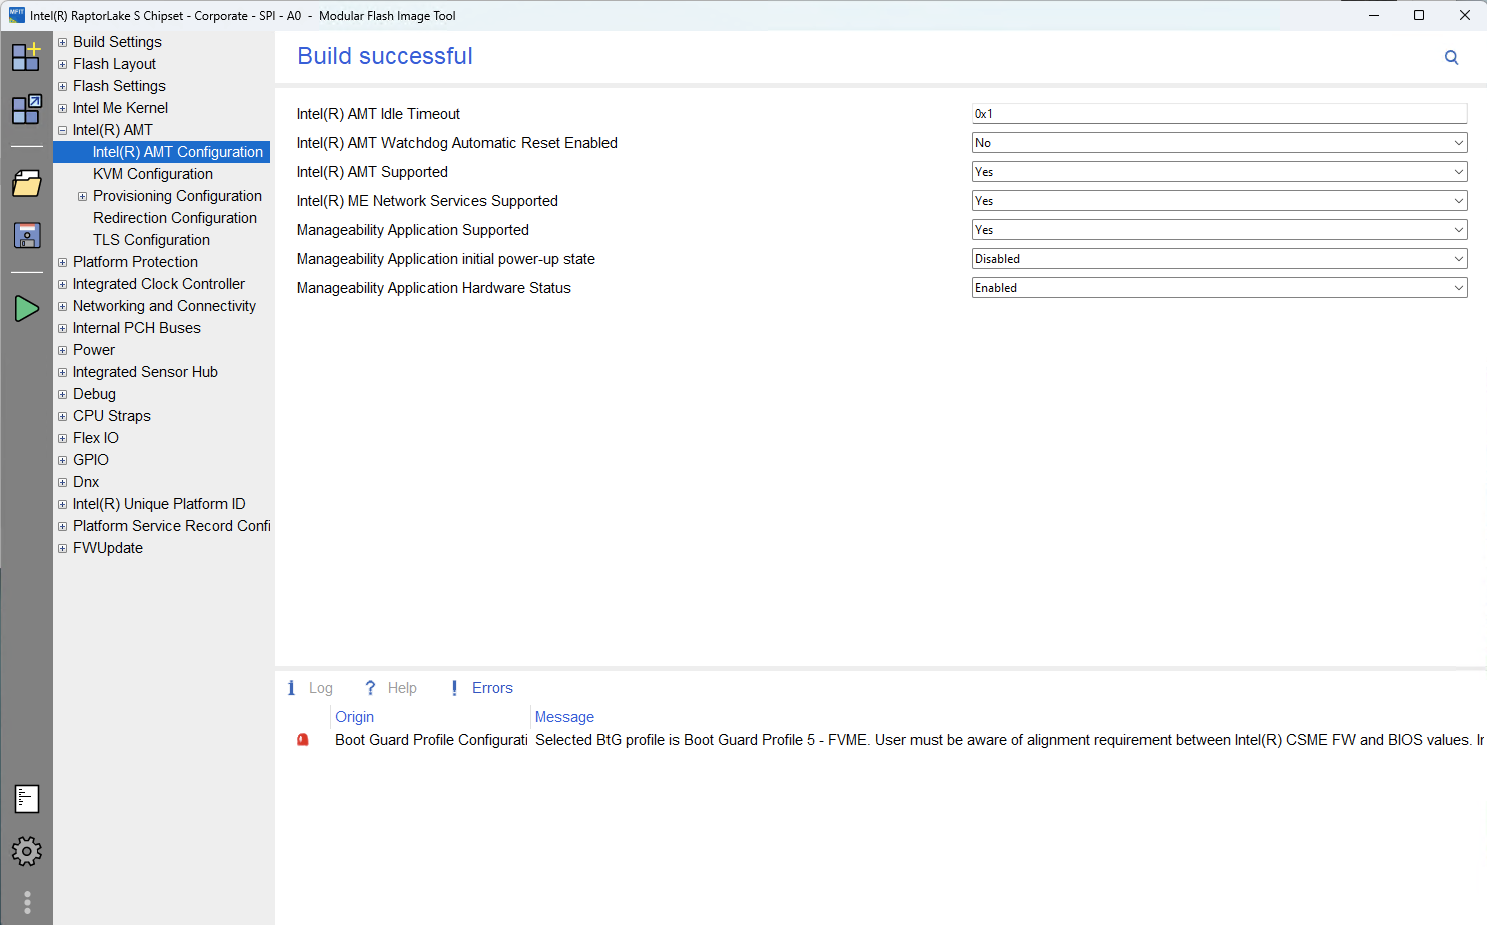
NOTE: Also go into KVM Configuration and enable KVM Redirection Supported (Yes) Otherwise you will NOT get remote desktop.
In the MFIT directory you will have three files
Image.bin (combine bios)
Image1.bin
Image2.bin
This computer has two bios CHIPs and we only care about the one we EXTRACTED the firmware from (SOIC - 8pin)
We only need Image1.bin the 16mb file as we are only going to flash the SOIC 8 pin chip
Open up ASProgrammer as you did before and ensure you can read the chip
If the read went well, and you can see similar output to the ones you extracted before, then you can open your image1.bin and the click on Program IC (Click, the arrow and select -
Unprotect->Erase->Program->verify - from the drop down).
Once this is complete, you should have a written to the chip.
Next you need to go into your BIOS (Set the admin password or Intel AMT will not show up). So press F12, goto BIOS configuration, set the admin password and the under System Management - you can enable Intel AMT.
Once saved/applied you can now press F12 and you will see option to configure the intel AMT.
Thats all - I know this isnt fully step by step and all the screenshots, however it should help anyone trying to figure out the entire process.
All the tools links are available on this page. Or you can find them on the forums.
once again a big THANK YOU to @lfb6
3 Likes
Last question from me would be. Would this setup stay if the bios was updated? currently 1.13.1 there is a newer version 1.14.1.
Or would this reset everything back to AMT being locked?