User tireal spoke about a method to make the Samsung 970 PRO NVMe bootable on Windows XP:
How to add support for booting from NVME in Legacy BIOS mode:
1) Open the topic [Experimental] NVMe Option ROM
2) Download the archive from the first post in it NvmeOpRom.zip
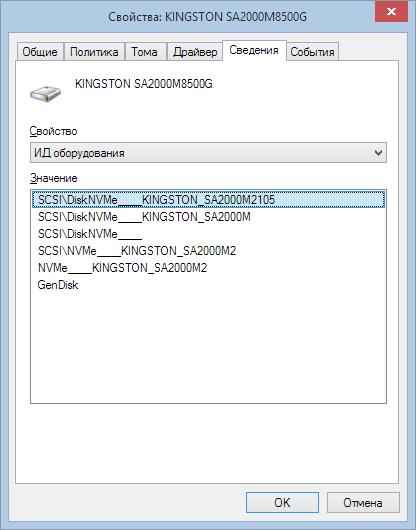
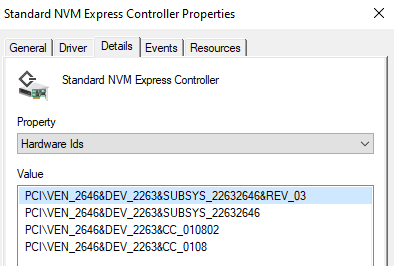
3) We write down the VID / DID of the NVMe media that we plan to use. (Either we search in Google, or, which is more reliable, we insert it into the motherboard through the m.2 to pci-e adapter, VendorID & DeviceId in the Device Manager)
4) Using OpRomCfg.exe, enter the values from clause 3 and the checksum into the firmware.
5) Using the AFUWIN64 program, we save the current bios ROM firmware, make a backup of it.
6) If you have AMI, then take MMTool 3.19 / 3.22 and add the resulting NvmeOpRom.bin via Insert, check the “Link Present” checkbox and enter our VendorID / DeviceID, click Insert, then Save Image As. If AWARD, then it is better to prepare the programmer in advance, because avard is famous for the jambs of its native utilities and often kills the firmware with them, but you can try to find a cbrom that will work with your firmware normally. If Phoenix / Insyde - then everything is really bad.
7) Flash the resulting ROM image.
8) Go to the boot device selection menu and enjoy the line like “NVME 01: 00.00.1”.
9) Install Windows XP with added NVME drivers (item # 2 in Integral Edition).
10) We enjoy life without any Clover and flash drives stuck on a permanent basis.
Tested on Asus Z77 Sabertooth motherboard, AMI BIOS. NVME disk - Samsung 970 pro. Attention! For some time, Asus motherboards have only supported their own CAP format for firmware instead of ROM (MMTool and AFUWIN64 only work with ROM), in my case they differ in that CAP has 2048 additional service bytes at first.
I couldn’t write back the corrected ROM via AFUWIN64, and I made a program that took 2048 from the original BIOS CAP file and wrote them before the corrected ROM. I flashed the CAP firmware through the function of the motherboard FlashBack via USB, when the PC does not need to be turned on for flashing (there is no ROM check for originality). I did all this with a second computer at hand, it is not recommended to do it on the main one - you can make the motherboard inoperative if you do something wrong.
Sources:
https://habr.com/ru/post/481252/ (JerleShannara comments)
[Experimental] NVMe Option ROM
Comparison of performance in Windows XP, Windows 7 and Windows 10:
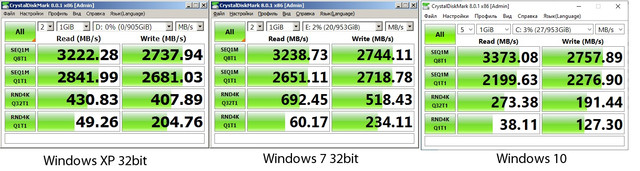
What we see in performance tests.
The performance of NVMe on Windows XP is inferior to the performance of Windows 7, but this is not surprising. It’s amazing that an NVMe drive actually worked on a 20-year-old system !!! But, both systems overtook Windows 10, which was supposed to work faster with NVMe, but in fact Vin10 crap in full. Here are the vaunted optimization algorithms, support for modern hardware and other nanotechnologies. There is nothing in the top ten, there is only marketing bullshit. We know that WinXP is the fastest OS!