understood the error solved problem. thanks @Fernando
Yes, the file named BACKUP.ROM is a copy of the complete BIOS Region, which is within the SPI chip of the mainboard.
Hi. The dumped FDnew.bin is the same like your FDunlocked.bin
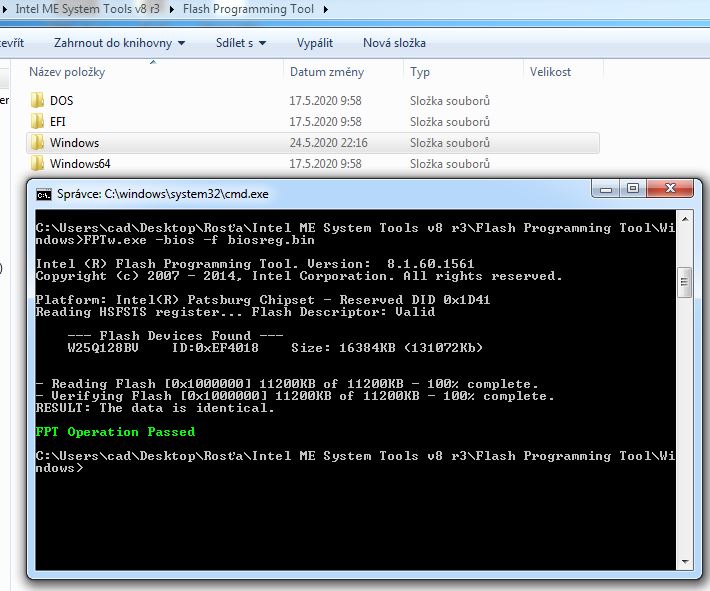
The BIOSREGION was succesfully written back. The problem was that I tried to flash back the origin biosreg.bin made before writting of your FDunlocked.bin I did not know it.
It works now ![]() I am attaching a new BIOSREG.bin file for NVME mod.
I am attaching a new BIOSREG.bin file for NVME mod.
thank you a lot.
BIOS.zip (3.67 MB)
i have used a file backup.rom and when I had read with the know command the program create a file named mod_backup.rom then mod with ubu
@pipes80 :
This is the usual order:
1. The file named BACKUP.ROM will be created by the Flashrom tool after having executed the first (READ) command.
2. Then you can modify this file by using the UBU tool. After having finished the UBU tasks the modded BIOS will be named "mod_BACKUP.ROM" (if chosen option 1).
3. Before you run the second (WRITE) command, it is a good idea to rename the file to MOD.ROM (DOS cannot handle long file names).
@Fernando
I looked through the backup from my Asrock x570m Rro4 and did not find unique information (MAC, SN, UUID, etc).
It turns out that you can flash the stock BIOS, and not backup. Of course, all settings will be set by default.
@Rabanik - Sorry, I forgot I sent you unlocked FD before  So, write in either of those with jumper on, then remove it, and you should then be able to write BIOS region back. Looks like you can now!
Here is NVME mod BIOS, write back >> FPTw.exe -bios -f biosregNVMEMM.bin
http://s000.tinyupload.com/index.php?fil…491902269955638
@SoniX :
Which tool did you use, when you stored a backup of your ASRock mainboard’s BIOS?
By the way - meanwhile I have flashed several times an UBU updated BIOS into the chip of my ASRock X570 mainboard by using Flashrom and all my personal BIOS settings were still active.
Supermicro uses usual afuefix64.efi to flash 32MB SPI ROM:
afuefix64.efi %1 /K /RLC:F
afuefix64.efi %1 /P /B /N /R /RLC:F
afuefix64.efi %1 /x /atr /SSB:{NONBOOT16M} /RLC:e
@Fernando @Sonix @Lost_N_BIOS
Okay I finally figured out how to use the flashrom procedure correctly.
The proper nomenclature to achieve is to enter the following at the C:\ prompt of the bootable DOS USB drive:
C:\flashrom -p internal -w MOD.ROM -o writelog.txt
Below is my renamed writelog.txt with the successful results.
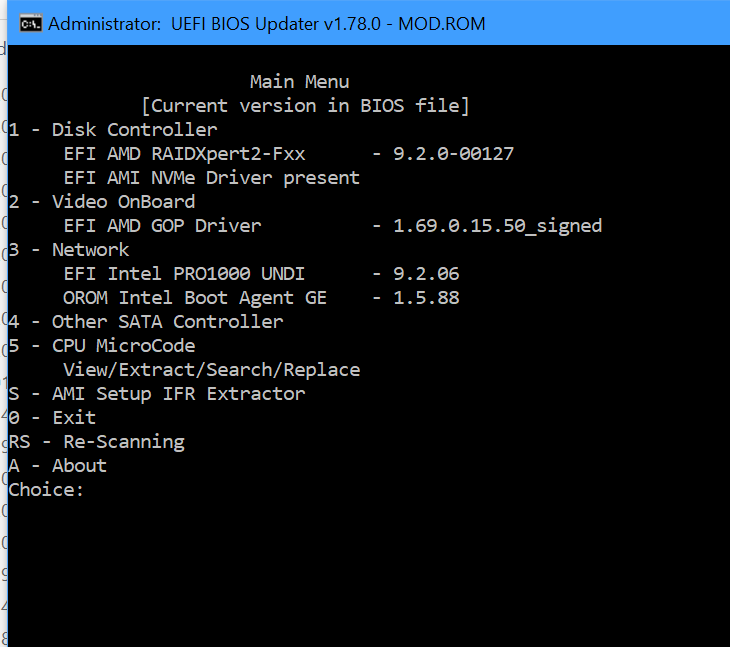
EFI_ROM mods:
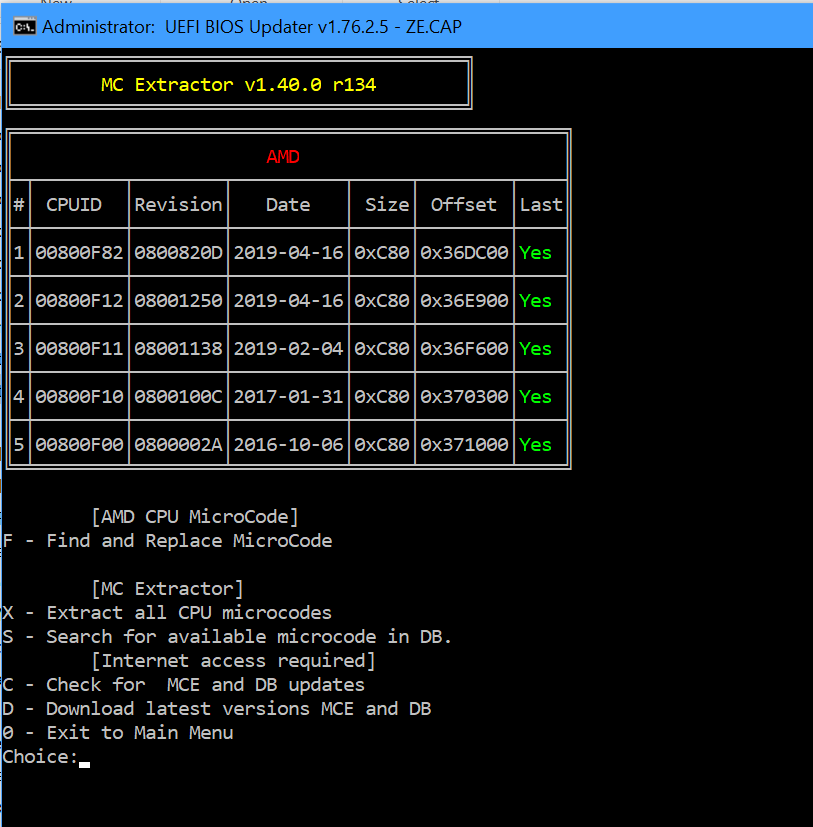
Microcode mods:
I had a few scares for a moment when I did the full update with UBU_1_78_0 as the EFI ROM Onboard Video driver killed my backward compatibility to my old ASUS VG278H monitor from 2012 which still has a dual-DVI connector. Of course I had only had a goofy patch cord to go from DisplayPort on the EVGA 2080Ti to the dual-DVI on the monitor. I kept the monitor around as it would still run at 120Hz refresh rate. After trying to boot up I got the proverbial BLANK SCREEN which caused some irritation and concern, as I couldn’t reenter the BIOS/UEFI without visuals as I’m not clairvoyant yet…! Then I started to think about my setup. I checked up the the connections specs and realized I had an HDMI port on the Asus VG278H monitor, and one HDMI port on the EVGA 2080Ti. I scrambled around on and found my neglected HDMI cable flying around behind the back of the desk collecting no small amount of dust. I shut down computer and monitor, hooked up the HDMI cable and suddenly had visuals on boot up. This allowed me to flash the BACKUP.ROM to its previous state. Further I noticed, that the RAIDExpert2 EFI on the 9.3.0.xxxx is a nonstarter on the Asus Zenith Extreme so I wound up looking through my UBU folders for an older version of RAIDExpert2 EFI and found the version 9.2.0-00127. I reflashed and with the older RAIDExpert2 module and VOILA my NVMe RAID0 boot array was recognized.
EDIT by Fernando: Unneeded blank lines removed (to save space)
Asus Zenith Extreme v2001 BIOS_UEFI flashrom update log 25 05 2020.pdf (143 KB)
@hancor :
Thanks for posting the complete flashrom flash command (incl. suffix) for users, who want to get a log file about what the tool has checked and done.
Does this mean, that the command "flashrom -p internal -w MOD.ROM" is not correct?
@aGeoM @Fernando @Lost_N_BIOS @SoniX
Originally: your script on page one was denoted to read as C:\flashrom -p internal -r BACKUP.ROM
Which was correct.
Then the second command was to WRITE the new modded bios
Originally this was set out as: C:\flashrom -p internal r MOD.ROM a couple of days back…
Of course this was a typo as this only reads the contents of the BIOS over one’s modded bios !
I see you’ve since corrected this as follows: C:\flashrom -p internal w MOD.ROM
I looked up the documentation from the original source and near the end of the doc found the BIOS write command as:
C:\flashrom -p internal -w MOD.ROM -o writelog.txt
In any case, it is sorted out now!
Also I had a query as I am running the RAIDExpert2 module with an NVME RAID0 array using two Samsung 970 PRO 1TB drives. At one point @aGeoM suggested there was a RAIDExpert module denoted 9.2.0.138 somewhere. I combed through my File folders of my collection of older AMD RAID modules but haven’t found it.
Anybody have an idea where I can find this module?
Cheers!
and to create a backup bios you have to make it read an original bios downloaded from the manufacturer site, right?
@pipes80 :
No, the BACKUP.ROM is not created by reading and copying any downloaded BIOS file. The BACKUP.ROM is a copy of the BIOS REGION, which is currently in-use by the mainboard.
It is within the BIOS chip.
and where can take the first bios image?
I don’t understand what you mean, but I recommend to do the following, when a new original BIOS version is available for your mainboard.
1. Flash the new original BIOS by using the tool, which is recommended by the MB manufacturer.
2. Let the Flashrom tool create a BACKUP.ROM by copying the freshly updated BIOS Region and store it somewhere outside the PC.
3. Use the freshly created BACKUP ROM file as source for the UBU updates. After having finished the UBU tasks, rename the BIOS to MOD.ROM.
4. Flash the UBU modded MOD.ROM file by using the related Flashrom command.
5. If everything works fine with the UBU modded BIOS, take a new copy of the freshly modded BIOS Region and store it as BACKUP.ROM. In this case you can delete the one you in point 2.
If you should not be satisfied with the function of the UBU modded BIOS, you can recover the original BIOS Region at any time by flashing the previously stored BACKUP.ROM file. In this case the command should be "flashrom -p internal -w BACKUP.ROM".
Any instructions for dell? Specifically a dell precision t5610. I extracted and modified the bios using dell pfs extractor. It gave me a bunch of files (.bin). They are listed below:
1 – 1 System BIOS vA.19.bin
16,384 1 – 2 Gigabit Ethernet v0.D.4.bin
1 – 3 Legacy RAID OROM v3.7.0.1049.bin
1 – 4 Intel Management Engine Update v8.1.72.3002.bin
1 – 5 ACPI OS support v4.0.0.0.bin
1 – 6 Embedded Controller vA.5.bin
1 – 7 Model Information v1.0.0.0.txt
I edited 1 System BIOS vA.19.bin, with mmtool. I then verified the changes, but my question is how do i flash it?
Do I need to repack the archive? Do i need to flash the 6 .bin files? Or just the 1 system bios .bin. I could not find any posts on this forum about flashing a dell bios. If a post exists please point me in the right direction.
Thank you very much!
@blu702 :
Welcome to the Win-RAID Forum!
AFAIK you have to use the “Flash Programming Tool” (FPT), which is part of the matching Intel (CS)Me System Tools. Please look into >this< or use the Search box of the Forum by inserting “Dell BIOS”.
Good luck!
Dieter (alias Fernando)
@Lost_N_BIOS
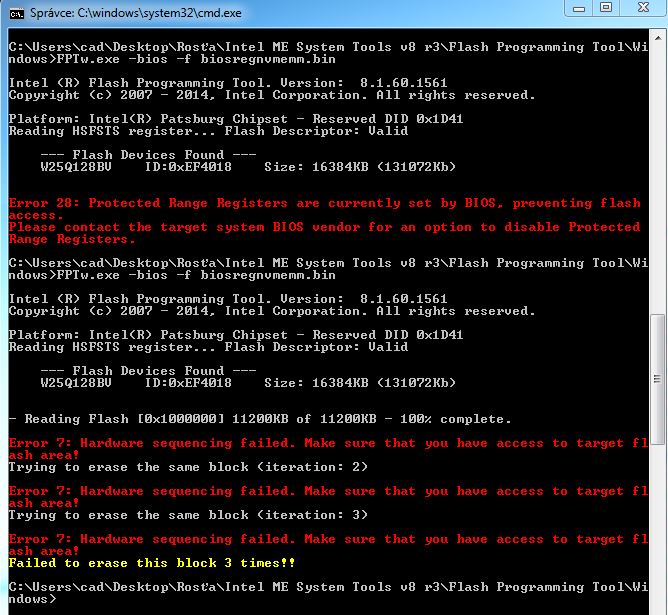
I tried to flash your modded BIOS but I got the error 28 when during flashing. It does not matter if jumper is in read only or write position. When I flashed it after sleeping mode I got the same error 7.
It seems that I can only flash the dumped REGIONBIOS back. I found out that enabling for writting of BIOS works like this. I have jumper on standard position (read only) and when the system works/runs I put the jumper to write position and get the PC to sleeping mode. After this I can write back the (dumped) BIOS. But it is weird that I can not write back your modded BIOS. Any idea? Thank you.
@Rabanik - Yes, that is unexpected! You may have to get flash programmer then, or you need to put on jumper, and then reboot 2-3 times first, then attempt the mod BIOS flash back (Some systems w/ jumper you need to do this before it’s enabled)
Your BIOS does not have sleep bug, so you can’t quit testing that. Unless, you’ve never tested this method without jumper in position? If you have not, test it now with jumper not in position, in case having that set is causing some conflict. If still error 7, then BIOS does not have the S3 sleep bug, so no need to further attempt this method.