@savior2
no matter, but if you have your original dump, before any modification, you can use that one.
Yup, in fact I got 3 copies of that because of paranoia haha. Thank you dsanke for answering my silly questions, will report back after doing the whole process!
Update to anyone who might be deterred in the future!
I did restore an official BIOS and the problem was still there, did the steps as described by dsanke to mod the BIOS again and the ethernet problem was still there.
I did some research and it is completely unrelated to the BIOS mod, it was a Windows privilege issue that got fixed with a regedit modification.
Now I’m enjoying 80GB of RAM, OCed to 3200MHz CL 16! Cheers for the help @dsanke
Time to run some Local LLM models!
THANK YOU so much. I was stuck in a boot loop for days trying to get unstuck. That worked on a Z370 Aorus Gaming 7 with firmware 15b. Someone should tell the Gigabyte users on the me_cleaner issues page that it’s easier to just use Coffeetime0.99. If you can’t find Coffetime you can manually remove MeRecoveryDxe using an old version of UEFITool like 0.21.5, then set the HAP bit using me_cleaner as many have stated in this thread.
can you point me at how to get the ram limit removed on mine? same board.
no need to pin mod or anything if using coffeetime tool?
I used an SPI flasher from aliexpress. No pin mod. me_cleaner -s.
Z370 AORUS Gaming 7
Did the following to get 96gb working (that’s all I had)
Dumped everything with FPTW64
(fptw64.exe -d all.bin)
^ I’d recommend making a safe-copy of that also.
Put it into me_cleaner using -s flag, this is for setting HAP Bit since I couldn’t figure it out otherwise, the exact strings people here had, I couldn’t find. (some have had issues with lan otherwise)
py me_cleaner.py -s all.bin
in HxD search for EB 0A C7 86 15 5F 00 00 00 80 00 00 hex value, and change the 80 00 to 00 01, it’ll read EB 0A C7 86 15 5F 00 00 00 00 01 00. (if you can’t find this exactly, try with the values in the first post but that didn’t work for me in HxD, I believe some say you might be fine without changing this also)
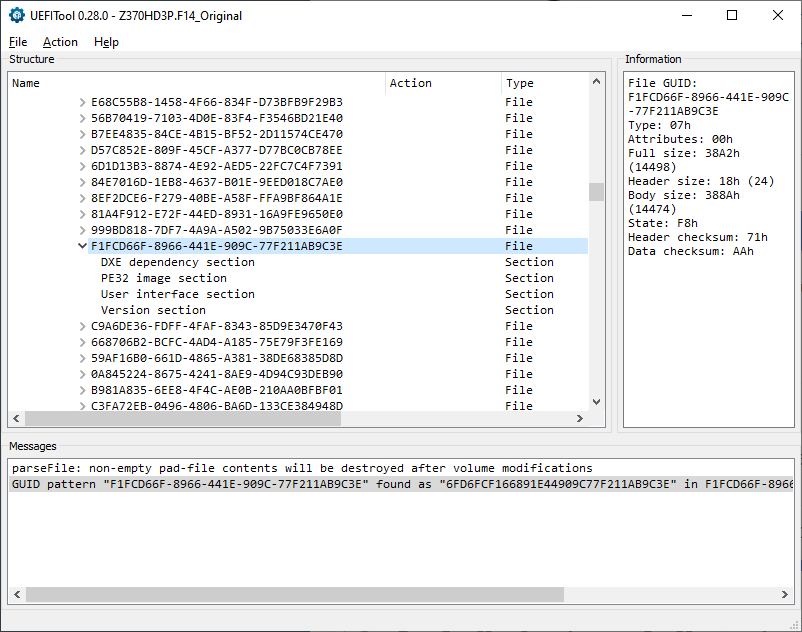
Remove MeRecoveryDxe GUID: F1FCD66F-8966-441E-909C-77F211AB9C3E (thnx dsanke)
using UEFITool 21.5. Right click when found and hit remove, then save from the toolbar.
Flash with FPTW64
(fpt64w.exe -f all.bin)
I didn’t bother extracting the SiInitPreMem since you can just edit directly from what I’ve seen. I had no issues. Finding the C7 86… Value is a PITA at times, It should be C7 86 xx xx xx 00 00 00 xx xx xx 00, where xx are just wildcards.
Any chance anybody has a copy of the bios posted by Kemerd for Gigabyte Z370P D3 (rev 1.0)? The Google drive link is dead and not sure if I trust myself to follow follow the instructions haha.
Never mind - I see others said it didn’t work anyway and I’ve bricked my mobo following the above instructions. They probably had a slightly different version of the tool or something, but once I finally got a flashable version of the f15 bios, I now just get fans on full and no action otherwise.
For future reference - when following the python script use the following to get a working bios:
py me_cleaner.py -s bios.xxx
Hello,
I own a GigaByte Z370 HD3P which I use with 4x16 GB RAM. I want to upgrade to 4x42 GB RAM. It seems that in the BIOS the Hex-Pattern 0001 is already set. But with 4x32 GB the board will not but. You wrote that the HAP-Bit has to be set.
I’m completely new in BIOS-Modding. Could you point me to a manual how to set this bit?
The current BIOS for the board could be downloaded from
Thanks
Stefan
Hello,
I will answer my own question ![]()
In the meantime I found the me_cleaner and use the option -s to set the HAP-Byte to 1.
I flashed the BIOS but it doesn’t work - the BIOS is loaded and the BIOS shows the screen which it initialize the mainboard-components but then it reset again and again. After flashing the original BIOS again it worked.
What could be wrong here?
Stefan
@swestner as i said before, you need remove merecoverydxe, you can do that via mmtool or uefitool (not new engine).
Hello dsanke,
thanks for your answer.
I opened the BIOS in the UEFITool and found the section “F1FCD66F-8966-441E-909C-77F211AB9C3E”.
Should I complete remove the “F1FCD66F-8966-441E-909C-77F211AB9C3E” with all its childern or only one or all children and leave the section empty?
BTW, what is the reason that the UEFITool NE doesn’t allow to delete sections anymore?
Greetings
Stefan
@swestner just do the complete removing.
Hello,
thanks again for your answer.
I flashed the changed BIOS and the booted in Windows 10 without problems. I will test 128 GB later.
But after flashing the BIOS I checked the BIOS-settings and Intel PTT is disabled now. I enabled it again and saved the setting but after accessing the BIOS again it was disabled again.
In the windows device manager a previous available TPM 2.0 is no longer there.
Any idea why?
Stefan
If before it was normal for me to say that the world is small, now I can say that the web is small too!
I never thought I’d find the genius of (@Dsanke) here. ![]()
@swestner
intel ptt (ftpm) need intel me to work, and we have set intel me disabled, to make 128G ram work.
How did you miss my message a few days ago? I was stuck in the Gigabyte bootloop and I wrote EXACTLY how to get out of it.
