@Fernando - thanks, now I understand! I assumed "SataDriver" had the AHCI functionality of modern UEFI Board (like old AHCI oRom), but I never checked into it too much.
I agree, and was about to mention to HumbleModder that AHCI BIOS option, for AMD controller or ASMedia would be separate controller options in the BIOS, and use different controller and colored ports as he mentioned.
The cables were not touched just flashed the new BIOS and crossed my fingers it would boot. I noticed the slight difference when loading the OS.
Thanks now I understand how it works.
@Lost_N_BIOS
I think there is a way after adding microcodes and firmwares to a BIOS, you can hex edit it so, for example, you can still flash a Gigabyte BIOS with the built-in BIOS flashing tool instead of efiflash.
Can you share how I’d do that? I think I’m in the right thread.
Edit: Flash it with QFlash I mean from within the BIOS.
I have an ASUS M5A99FX Pro R2.0 board and want to add PCIE NVME support to it.
I have flashed (I think) the Bios as edited by another user in the BIOS Offers section that supports NVME.
In Win 10, I can successfully see the 512 GB Patriot Scorch M.2 Internal SSD (PCIe 3.0 x 2 NVME 1.2), and have cloned the OS to it (Macrium Reflect).
(Adapter is NFHK Model N-M201, V1.0)
My issue is, the drive does not appear in the BIOS.
Do I need to insert an ID Code for the SSD into the BIOS image so that it will be recognized? Any idea what that code would be?
Thanks in advance,
CleverTwit
EDIT by Fernando: Unneeded blank lines removed (to save space)
@CleverTwit :
Welcome to the Win-RAID Forum!
If the EFI NVMe module has been correctly inserted into the BIOS, you will be able to install Win10 onto the NVMe SSD and to boot off it. For details please look into the start post of >this< thread.
The fact, that you cannot see the name or manufacturer of the NVMe SSD within the BIOS, doesn’t mean, that it is not detected. Once Win10 has been properly installed in UEFI mode onto the NVMe SSD, you will see within the BIOS the entry “Windows Boot Manager” (which is within your NVMe SSD).
Good luck!
Dieter (alias Fernando)
Hello!
I’m still new to the BIOs modding scene and am trying to mod the Dell Inspiron 7567 UEFI in order to get access to the [Advanced] settings menu.
I extracted my BIOs from my laptop, shorted Realtek pins 1 and 5, modded descriptor block, and reflashed it to achieve write access.
However, what I couldn’t figure out, was how to unlock those menus in the first place.
I tried to use AMIBCU to change Advanced menu’s [Default] options to [USER] options, but after flashing the modded BIOS, my laptop black-screened and recovered only after restoring from USB using the recovery options.
However, this recovery only allows the factory exes to be flashed (renamed to rcv), and that makes me redo everything, including the disassembly and shorting of the pins.
I think this has to do with the flags 0xF56 (BIOS Guard), 0x894 (BIOS Lock), and 0x11CF (Flash Signature Override).
So, my question is, how do I go about resolving this issue?
Any help would be appreciated, and thanks in advance!
** P.S. Also, one particular thing I discovered was that AMCBCP (using v5.02 ofc), shows the advanced settings separate from the main options, and as my UEFI BIOs does not, by default, has no ‘advanced’ tab, (Google “Inspiron 7567 BIOs”), I don’t know how I would access it even if I enabled it… 
See attached image for reference.
Hello Bios Mod-Pros
The last Days i spend a lot of Time in this Forum - but i dont know if this is the right Way.
Ive got an Notebook with an very "closed" AMI UEFI Bios. The only Problem is, that the i5 CPU gets the CPU Fan at 55 degrees almost at full Power.
There is no Setting in the Bios for that, all is hidden.
So ive Downloaded the newest Bios - but nothing Changed.
Then i found this Place "win-Raid" and the Cloudy Sky went away…
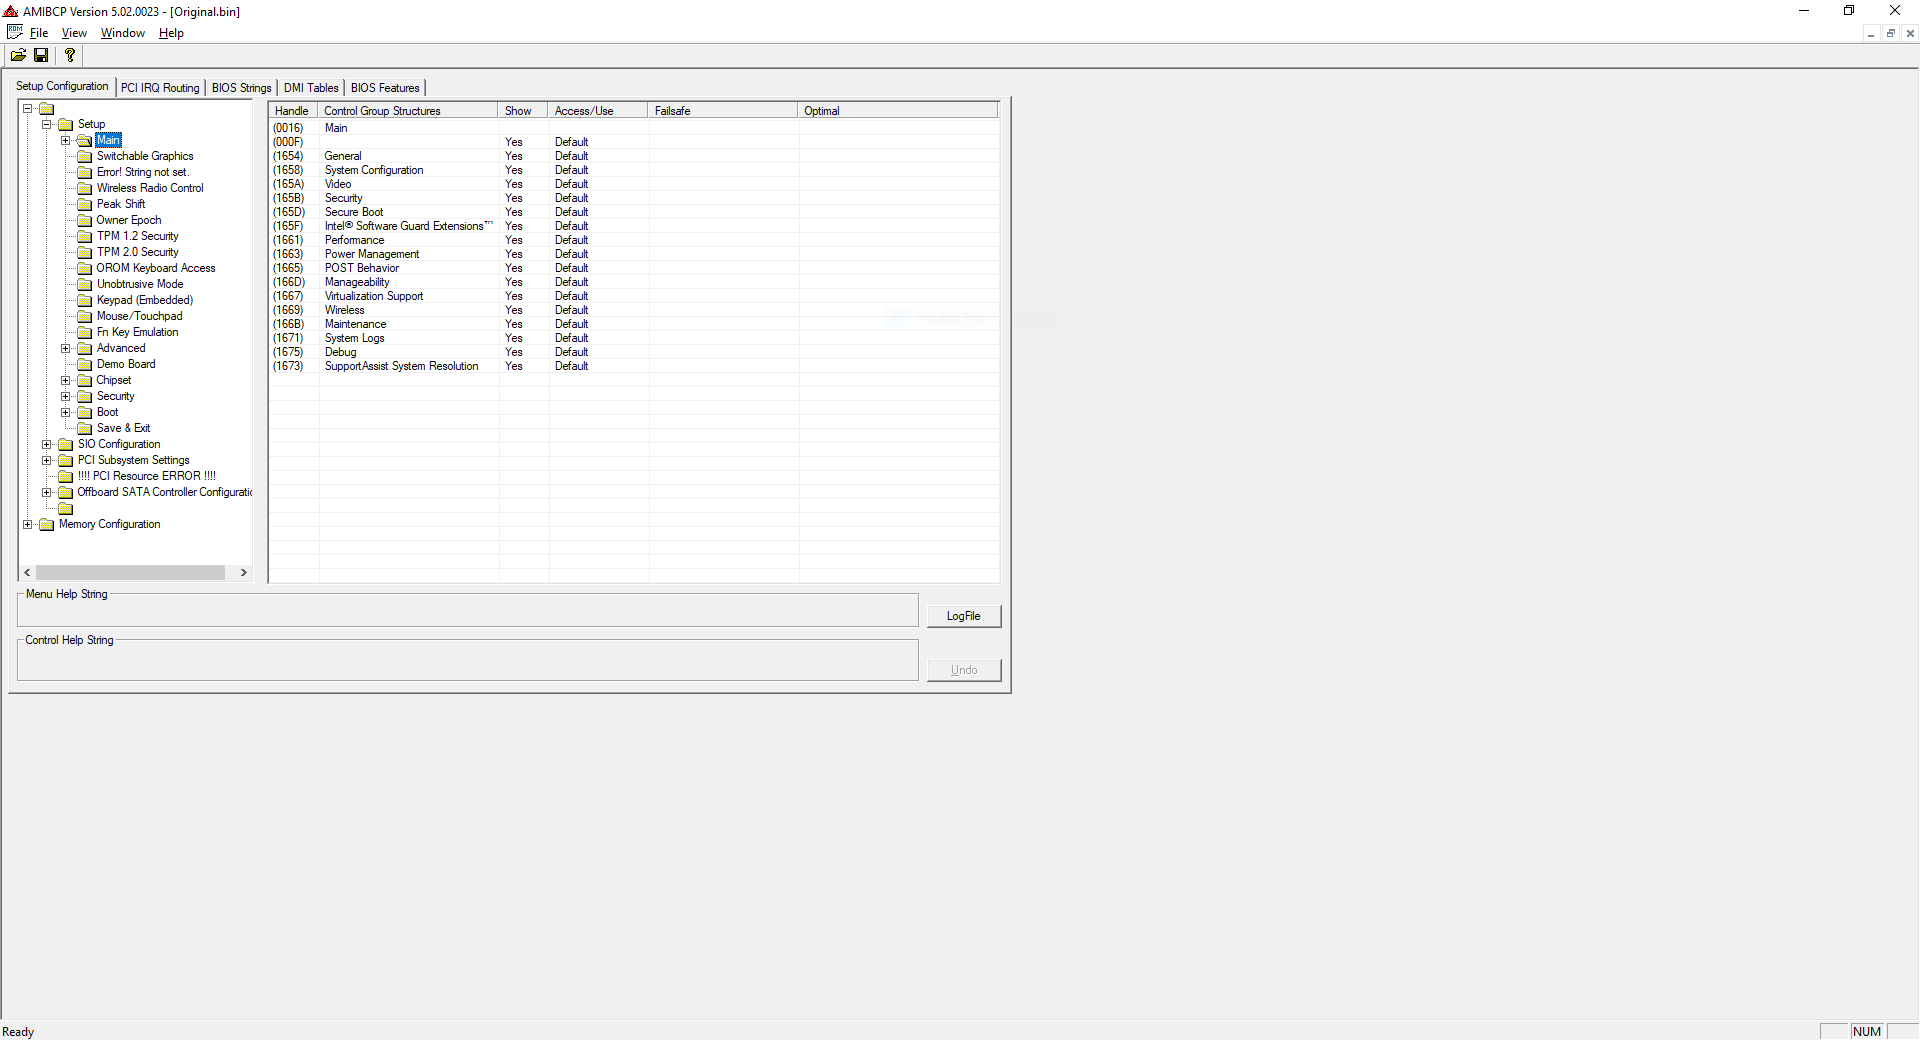
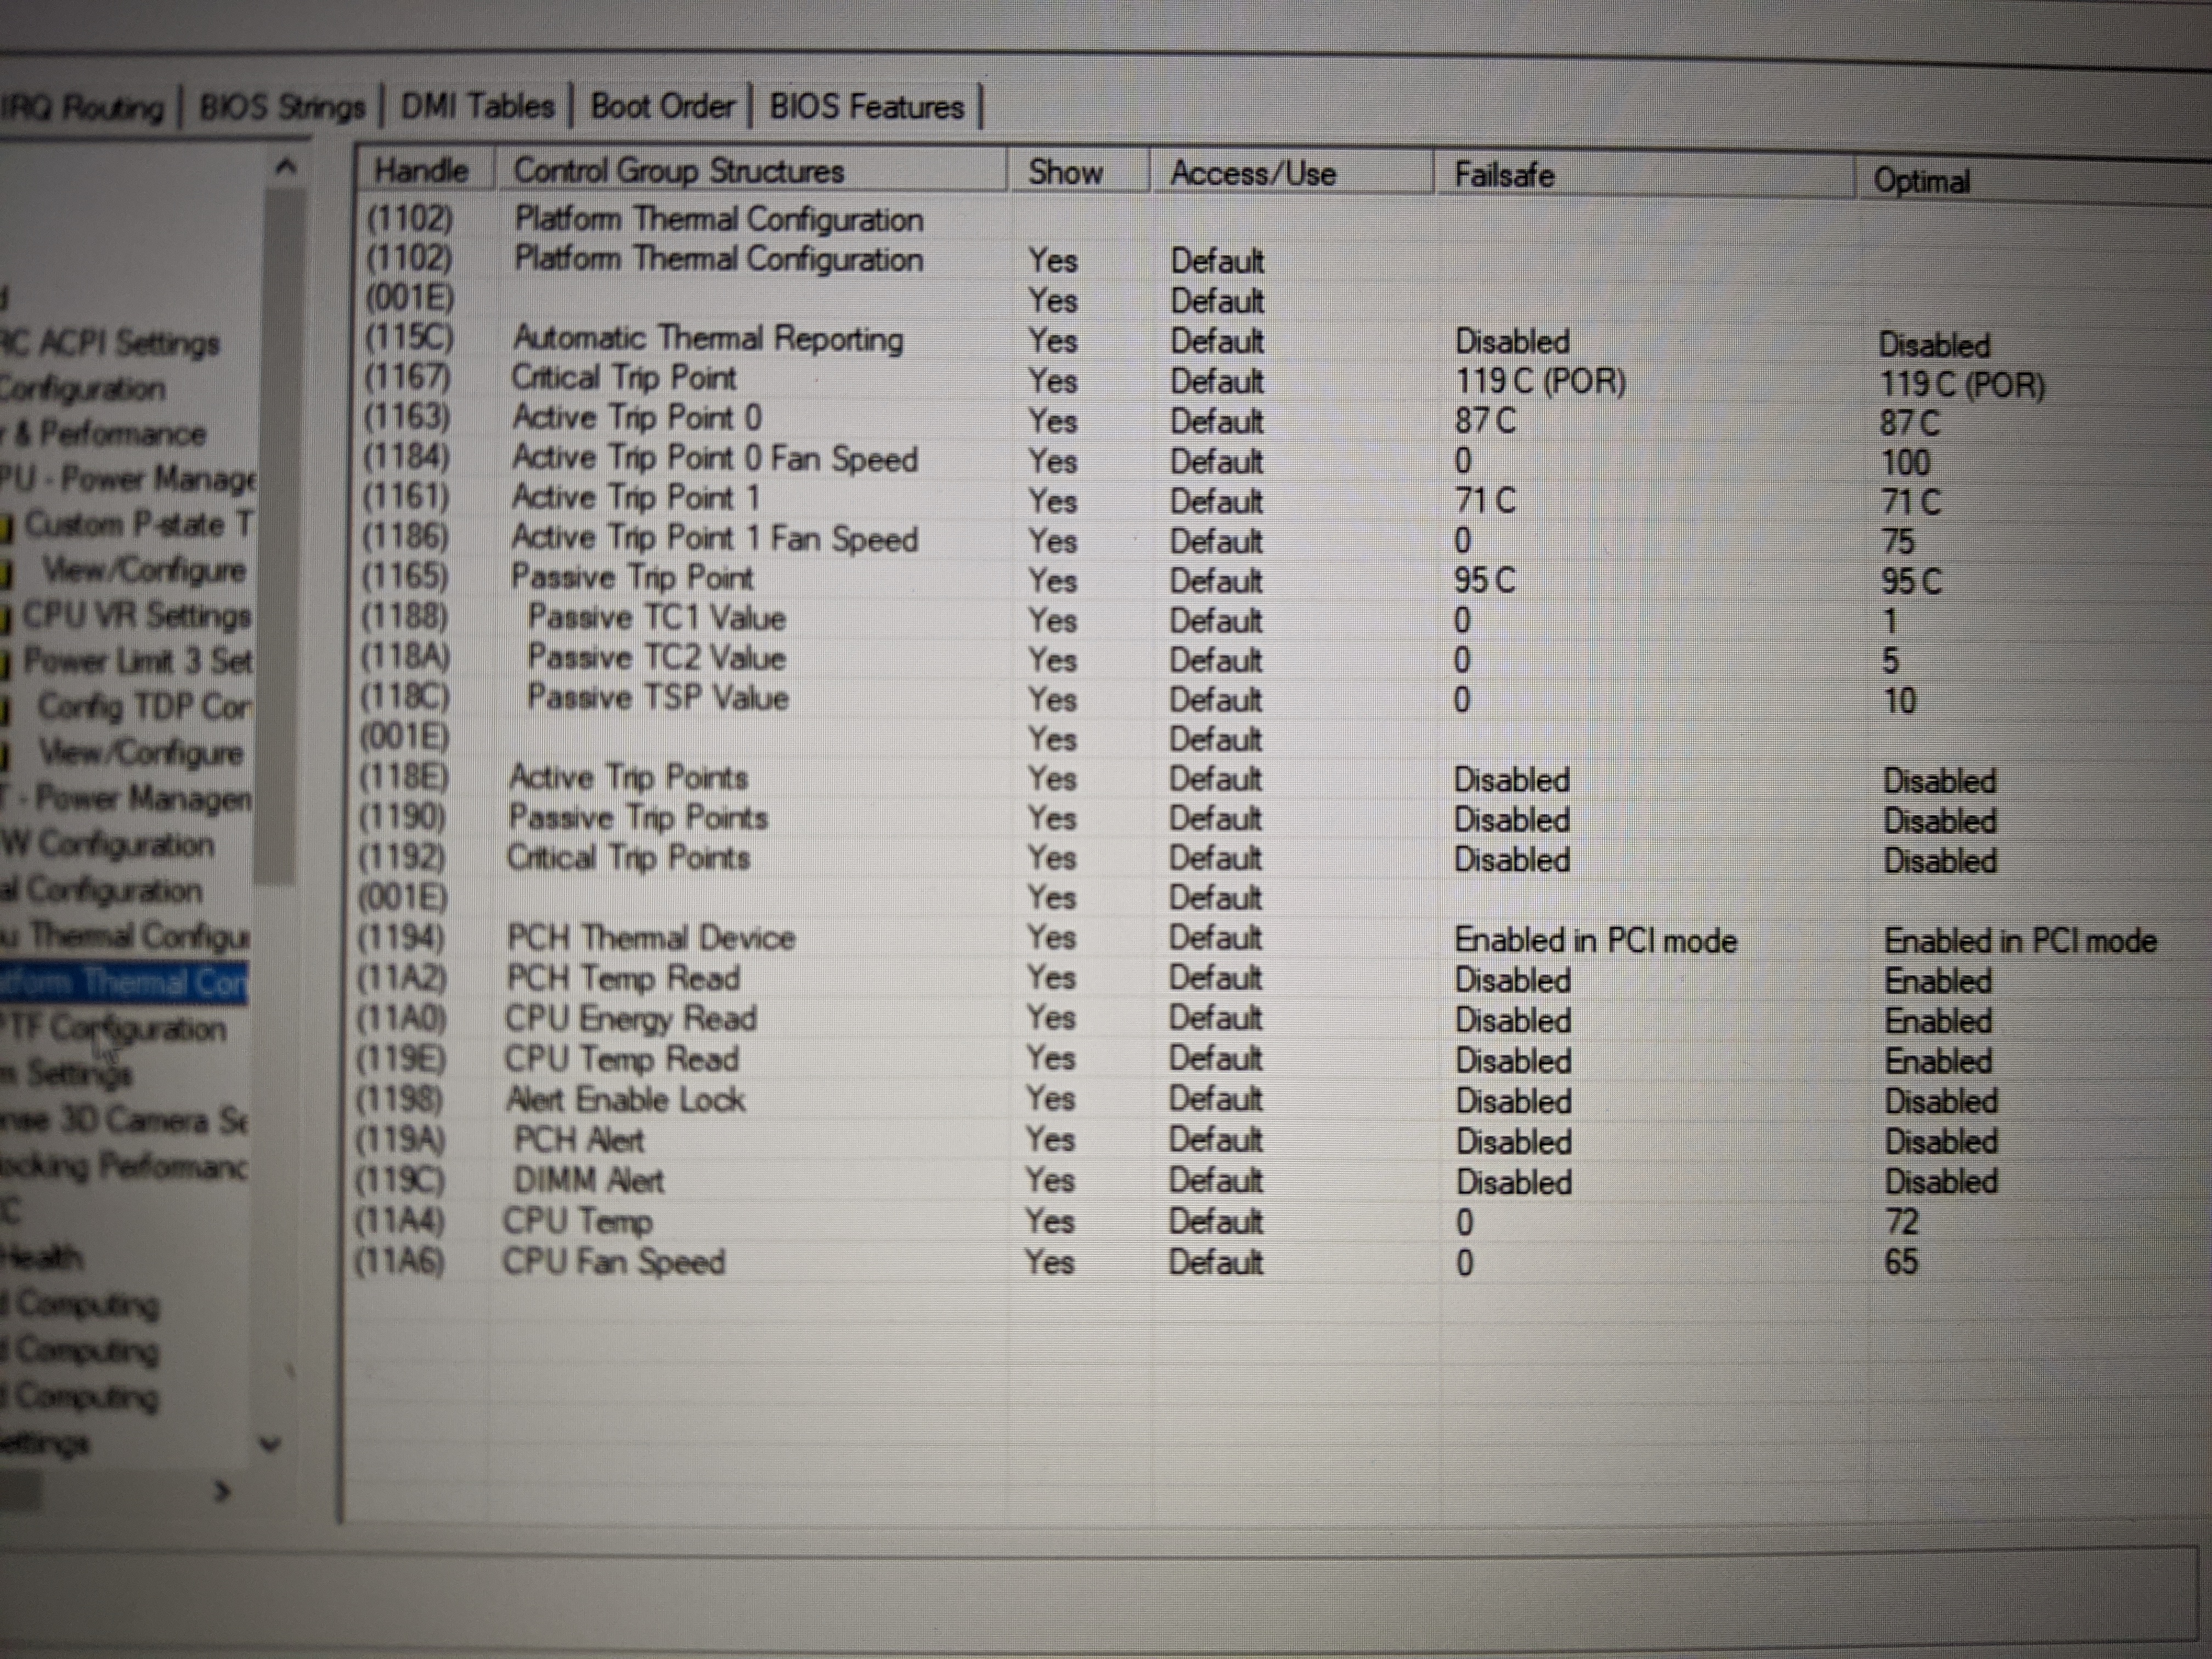
After several Theads - i find the Tool AMIBCP 5.02.0023 - i opened my "downloaded Bios File" (*.bin) and find the right Section
And i changed the TRIP Point 0 form 55c to 71c and the trip Point 1 from 71c to 87c, and Safed the File.
Now what to do? Can i easily run the Updater again?
Or what is the best Way to Edit this two little settings?
Thx for Help!
@Lost_N_BIOS
Good morning - have you an great Tip for me?
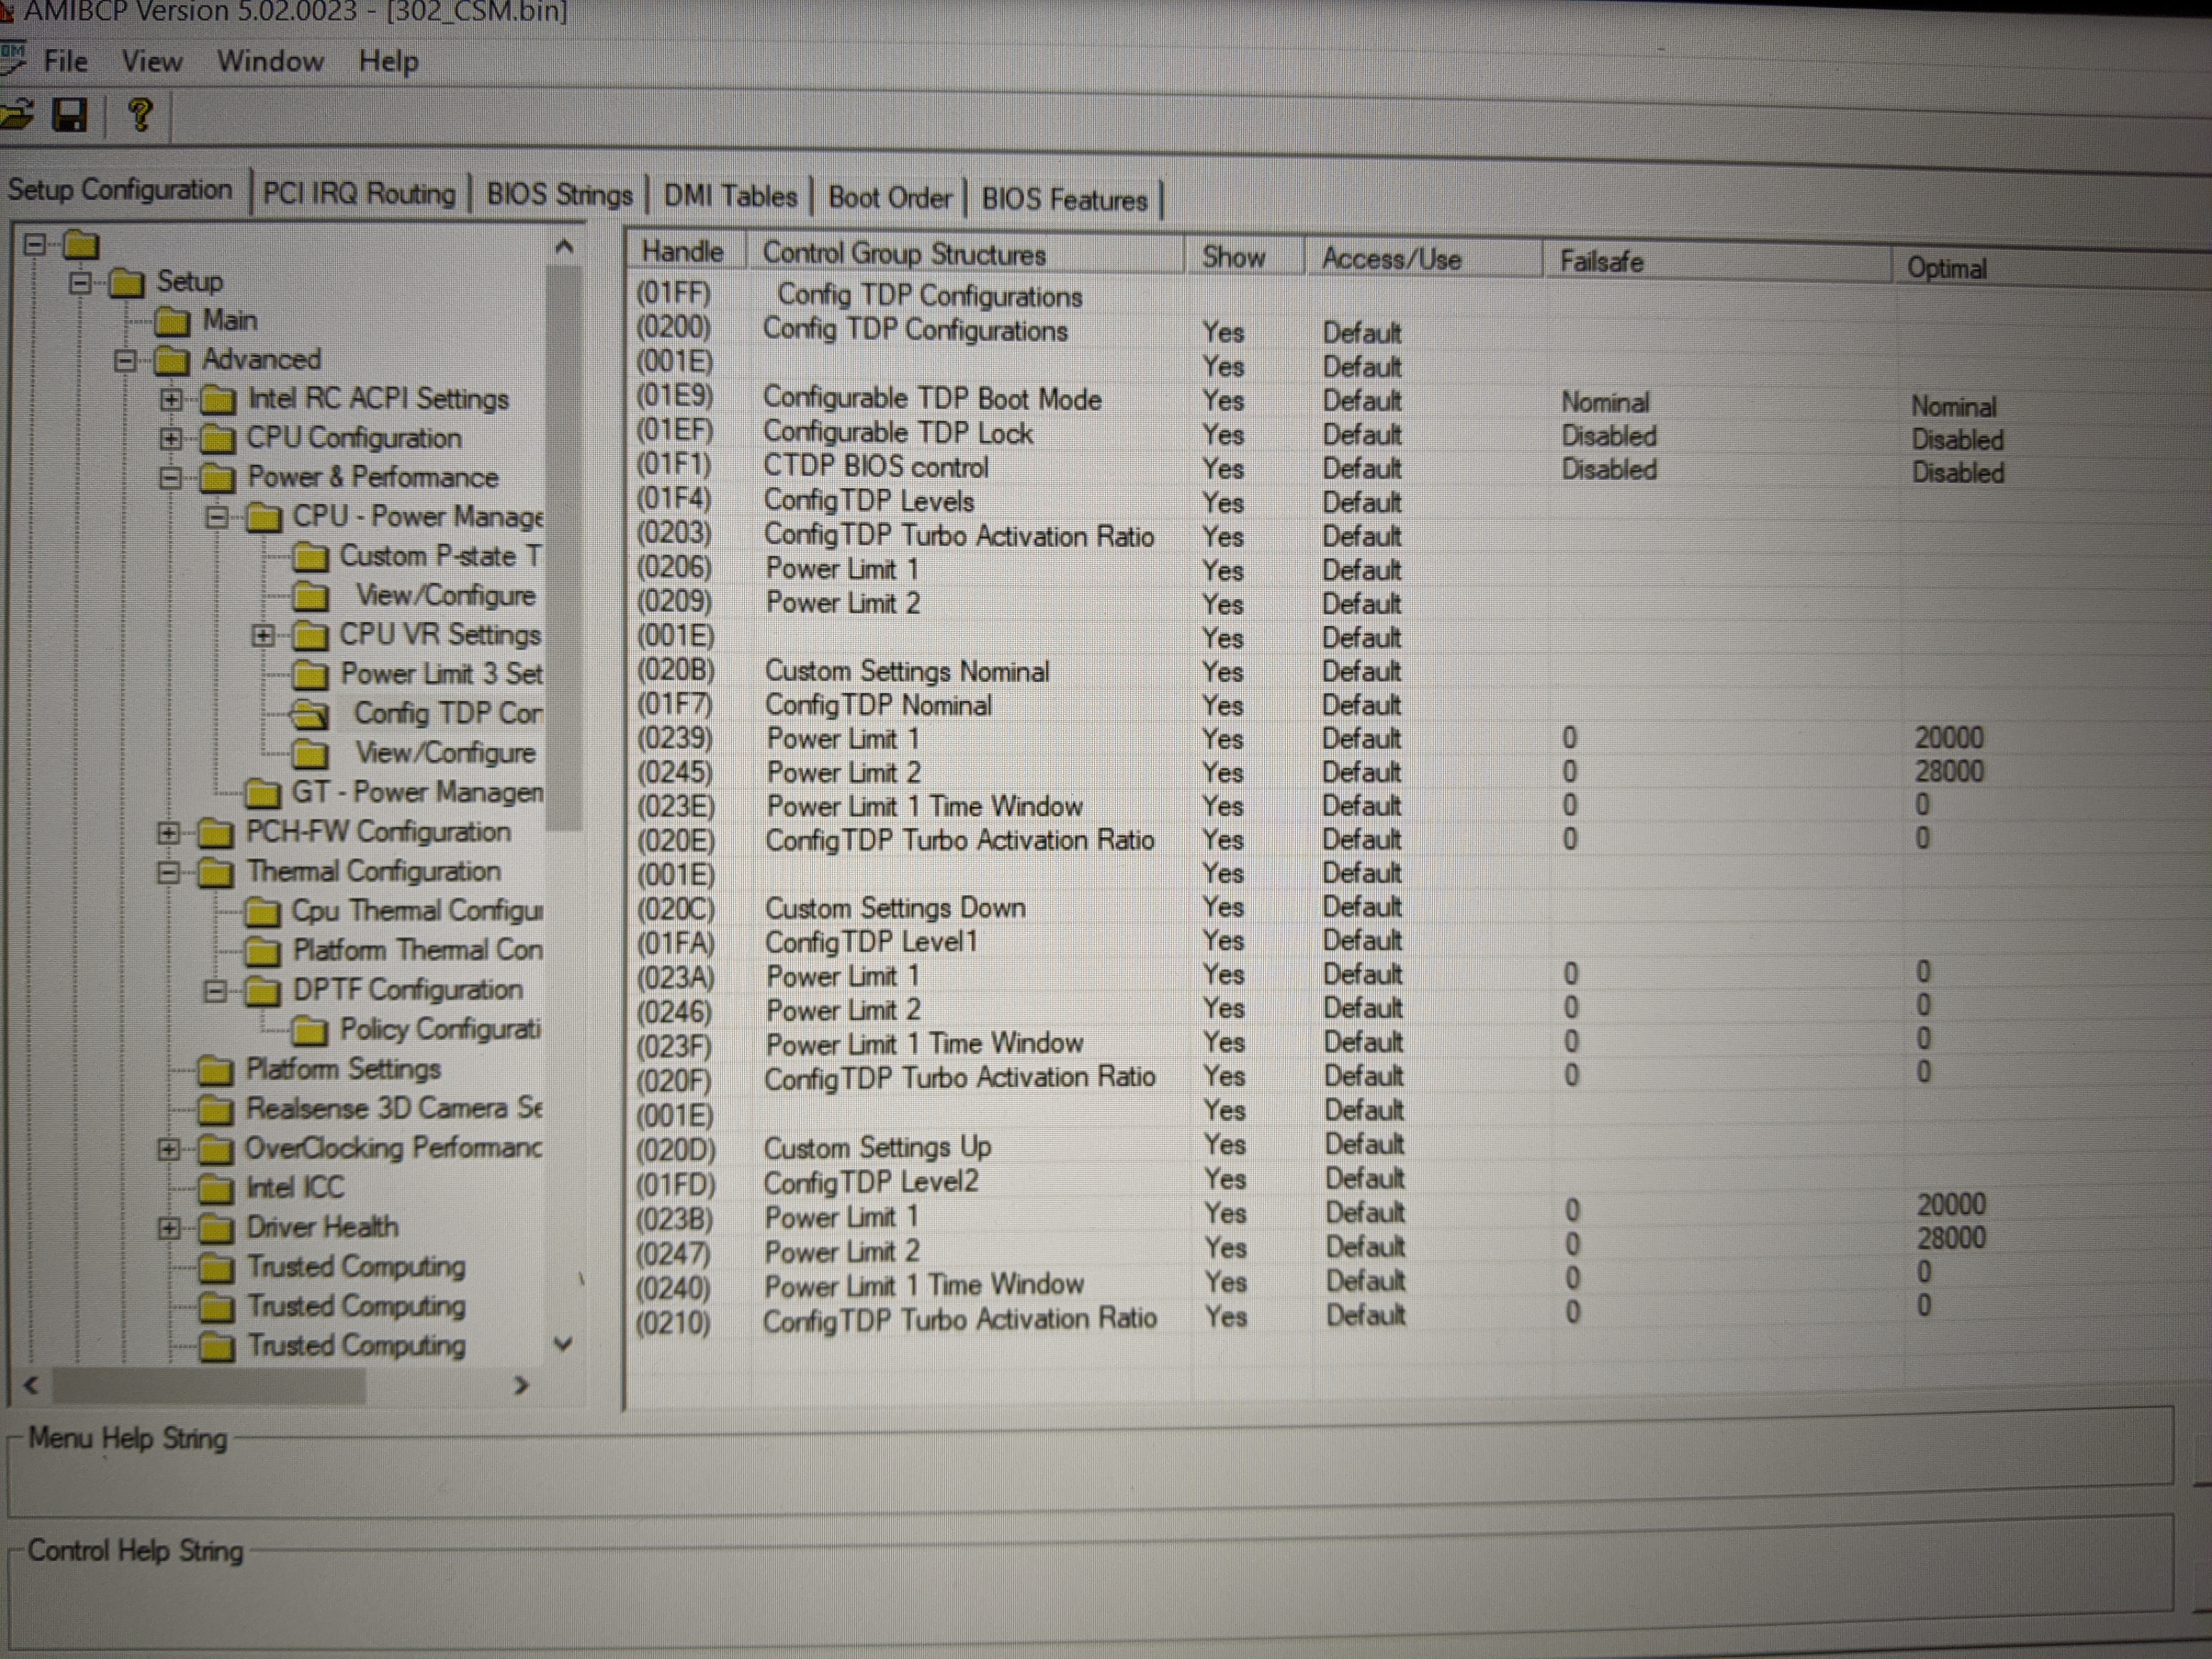
Update i fount the TDP limits - now only "how to Flash the updated BIN file…
hi, could someone help me with adding pci express 3.0 compatibility to the ECS A960M-MV motherboard has the latest bios of 2013, the motherboard has pci express 2.0, but does not recognize pci express video cards 3.0, i think is possible achieve compatibility at the bios level, i have another asus motherboard with pci express 2.0 and it has an update with the bios of the year 2016 and accepts pci express 3.0 video cards, also i do not know if you could help me to insert the microcode of the gtx 1060gb nvidia, which is the video card that i want to connect to it but the bios does not recognize it
i cant put the link of the bios because im a new user, but the last bios is in the website of brand , just type in google "ECS A960M-MV bios"and is an AMI bios
sorry i don’t have any knowledge of modding bios, anyone can help me, or guide me, please. thanks
THANK YOU! I HAVE BEEN TRYING TO FLASH MY MSI BIOS FOR DAYS AND YOUR ANNEX GUIDE WORKED!
hello there is no way the wd sn750 will recognize me, i have an ASUS M5A99X EVO R2.0 board.
I extracted the capsule with UEFI Tolls v0.28 I inserted the NvmExpressDxe_4.ffs module with MMTool 4.50.0.23.
and I flash the signature in 2 steps with / GAN in afiwinx64.exe, I did the whole process successfully but at the moment of restarting and activating the UEFI in the CSM parameters. It does not show them to me in the boot menu and throws me a warning "the current BIOS setting do not fully support the boot device"
I tried all the possible combinations and repeated the whole process countless times! What am I wrong?
thanks
Hi. Following alot of guides here and I modded the bios of my dell t5810 with amibcp. I have flashed the chip with the modded bios and the pc works as normal except not a single item I selected USER for shows up. Not one. I made sure to enable the menu in root and sub and some of them I assumed would pop up just fine and others I was hopeful. I pulled another dump and verified it in amibcp and it def. Shows all the items I changed…any help?
@Fernando , it seems the guide is designed for Aptio IV bios user. However, as more and more board is using Aptio V UEFI bios, perhaps it is better to include a guide for people who is trying to insert a ROM module for Aptio V bios.
For anyone who is interesting to insert the AsMedia 106x AHCI ROM module into Aptio V UEFI BIOS for onboard AsMedia 106x chips, following steps are necessary in order to obtain all the necessary data for all the fields in AMI MMTools 5.x, as the guide on the first page is designed for Aptio IV UEFI BIOS only.
First, open up device manager (devmgmt.msc) under Windows running at the target system (the one that is going to be flashed by the new BIOS), and navigate to ‘Storage Controller’ and find ‘Asmedia 106x SATA Controller’. Double click on it to open up the property dialog.
Then navigate to the ‘Details’ tab of the property dialog, and note the following items by choosing them at the drop box list of ‘Property’.
Hardware IDs: Note the 4 digits at DEV_XXXX, as the AsMedia 106x ROM module can be used for both 0612 and 0611 device manufactured by AsMedia (VEN_1B21)
Location Paths: Note the whole string which started as PCIROOT(X)#PCI(XXXX)#PCI(XXXX) (the second PCI part may not appear as it depends on how the manufacturer connect the chip on the motherboard)
If you have found that the Hardware IDs noted is different from the file that you have downloaded from the repository, you may consider to edit the ROM module via hex editor to update the device ID. To update the device ID in the ROM module, open up hex editor such as ‘HxD’ and load the file. Search the hex string as per the vendor ID, which can be found from the above Hardware IDs (4 digits at VEN_XXXX). For example, the AsMedia vendor ID is 1B21, and you should search the hex string as ‘211B’ in the option ROM file (instead of ‘1B21’ due to its endianess). And the 2 bytes after the first found hex string ‘211B’ from the top of the file should contain the device ID of the option ROM, which should either be ‘1206’ or ‘1106’ (i.e. DEV_0612 or DEV_0611) for AsMedia ROM, and you should modify them such that they matches the actual device ID.
After that, open up MMTools 5.x and load the bios that you want to insert the AsMedia Option ROM Module, and prepare / extract the AsMedia Option ROM Module after downloading it from the repository. Navigate to the ‘Option ROM’ tab of MMTools 5.x, and click on the ‘Browse’ button to load the extracted AsMedia Option ROM.
Choose ‘Insert an Option ROM’ at the radio / button box list, click ‘Apply’, and a box with 3 fields will come up for you to enter.
For the Option ROM File GUID, normally you can choose the existing one by pressing down arrow button, as most Option ROM modules often use the same File GUID within a single BIOS.
For the Option ROM Section GUID, I have generated a Section GUID by pressing the ‘Generates Section GUID’ button, as I cannot find the Section GUID of AsMedia 106x Option ROM module on the internet at all. A randomly generated section GUID should be fine, but perhaps someone with more experience in MMTools can provide some information / explanation about it.
For the Device Path, you have to choose the correct one which matches the ‘Location Paths’ that you have noted down in the device manager. For example, if the ‘Location Paths’ shown was PCIROOT(0)#PCI(1A00)#PCI(0000), then you should select ‘HB0-0:0-0:0-1A:0-0:0’ as the device path, by matching up the last few digits. Another example is that if the ‘Location Paths’ shown was PCIROOT(0)#PCI(1F03) without the second PCI string, you should select ‘HB0-0:0-0:0-1F:3’ as the device path. The prefix / start of the DevicePath string may vary but the number at the middle / at the end must match the ‘Location Paths’ shown in Device Manager.
For anyone interested to know whether the AsMedia AHCI Option ROM Module will work in Aptio V BIOS or not, I will let you know after I have flashed my BIOS, since I have just updated my BIOS with latest ME engine, microcode, RAID driver, etc., but did not flash it yet.
@Fernando , Hi I’m interested in Modding two motherboards.
Is it that simple to just simply extract modules that simply and incorporate it to my flash?
G1 Sniper M5 already has ↓
Change Log -
1. Added NVME Mod
2. Menu Edit >> @ M.I.T. >> Miscellaneous Settings
3DM01 Boost >> Replaced w/ >> High Precision Timer
I’m interested in a Disable SMI toggle in UEFI & Resizable BAR + Above 4G Decoding support.
Reference to another post that has the 2 aforementioned features already incorporated but does not have ways to disable SMI or enable Resizable BAR & Above 4G Decoding
Gigabyte G1.Sniper M5 (Z87) F10 -HPET NVME Mod
EVGA Z370 Micro with more UEFI features such as:
Disable intel speedstep toggle
Major features such as LLC control & other OverClocking features
I hope this already has HPET setting in there as well so there is a toggle for that too.
@lime :
The procedure is simple, but not without any risks.
Before you flash a modded BIOS, where 1 or more natively present modules have been replaced by other ones, which were extracted from the BIOS of another mainboard, you should make sure, that
1. the GUID header of the module stays untouched and
2. the inserted module is compatible with the recipient mainboard.
If you are unsure, you should better ask a BIOS modding expert for help and post your specific request into >this< Sub-Forum.
By the way - if you want to address your request to a specific Forum member, you should better insert an "@" in front of his/her nickname. Otherwise that person will not be notified about your post.
@Fernando , Gotcha. I apologize Fernando. Appreciate the help.
Does anyone have experience modding HP Omen bioses? The Omen 2021 versions seem to have had their options mostly locked out, but their overall structure seems to still look like AMI ones…
@hahagu :
Hello mate, can you help me with unlocking the read/write access by modifying the flash descriptor? I wanted to unlock Overclocking lock in the latest bios 1.15.0 and I have already successfully modified the PE32 file for it. As you mentioned in your post about shorting the pins of the HDA chip (Realtek for 7567), I wanted to know 2 things if you could kindly help me;
1) Is the HDA chip marked "HDA1" on 7567 motherboard and is located under the palm rest assembly (keyboard) on the right side near the headphone jack (little realtek chip)? Or there is another chip marked HDA only?
2) After shorting the pins and booting into OS (removing the short as th OS loads), what do I actually need to modify in flash descriptor as you mentioned above and how? do I need to boot into the modified GRUB and use FPT there or after booting into the OS and use from the command prompt?
I would appreciate the help since I am stuck with bios 1.11.0 just for the sake of undervolting. I only need to know the exact steps to modify the FD, no detailed guide required. I shall be really thankful.