[Guide] Unlock Insyde H2O BIOS with Checksum Control

Definetly interested, in combination of insyde-tools/H20UVE, this could remove the restriction and could make a simpler modification tool more available.

Absolutely! I will follow.

I have trouble reproducing STEP 2 PART 4 : BIOS verification identifier, your BIOS shows that it has $SH2 identifier, my BIOS dump shows up no results for the padding.
Question : In what package/location did you find the padding/verification string? I could try finding them with H20UVE/IDA.

Maybe a list of "known" strings could be made, for quicker/faster identification.

I didn’t find the code"$SH2"in the.bin file either, maybe there’s something else that is the checksum string?

would you upload your BIOS file? So that I can check the correct identifier for you

yes, this is the bios files I got by using ftpw.exe tool, the bios region,description region,and ME region,add up 16MB. Anyway, thanks for your help! @gao2001

HP-ENVY x360 BIOS.rar (5.67 MB)

The identifiers of the verification codes are various, and the identifiers of different brands and different periods are different. Some BIOSes do not even use identifiers, and instead use absolute addresses or offsets to locate check codes. Finding the location of this verification code is actually very simple. You can judge which one is the area for verification by comparing the BIOS of the same model and different versions. Under normal circumstances, the check code will be in the padding area, and will not exist in any DXE or PEI module. When you have determined which part is the verification code, you can use UEFITool to find the absolute address or offset, and then search in the BIOS which module the address exists in.


Thanks 4 tha effort!


https://ufile.io/o5oyudy7

Its an HP Omen 17-w101na, may you find it and tell where/how you found the identifier.
Thanks 4 tha effort!


Hewlett-Packard’s BIOS verification procedure is extremely complex. The algorithm and verification method are changed almost every year. So to modify HP’s BIOS will be a little harder. I have found the area where the verification code is located, but the verification procedure is still to be cracked. In 2019, HP uses an absolute address to locate the verification code, which means there is no identifier to refer to. I am trying to solve this problem, it may take a few more days.

thanks for your great effort
can you help me modify my notebook:hp 15q-aj006TX
I want to remove the whitelist, I modify the bios with the tutorial on internet, when i flash the modified bios back with programmer, the notebook can not boot
it can be a RSA or checksum error cause this problem, can you help me
I have follow with your tutorial, but i can not find the code
I have upload the original bios, can you help me modify it, thanks

https://lanzous.com/ib8w8mb

@gao2001 Could you give the original and the modified bios that you did your example on? I will try to check it on my own bios rom. Thanks!

@Vechs here’s my bios, take a look.

MOMO.G.WI71C.MABMRBA02.ROM.zip (2.08 MB)

I wanted to use your method to modify the HP4520 BIOS, but UEFITOOL finds only $ SIG. How to be in this case?

UEFItool_HP4520.png

can you tell about simple way of doing whitelist in hp and Lenovo laptop? for wifi

HP4520s_sp75888_automod.zip.

UefiTool and Insyde Variable Editor.

hi I have two versions of bios, but I don’t know what tool to use to view the check code will be in the padding area. I use Google Translate to reply.

Its very simple. By comparing different versions of the bios, you will be able to locate the checksum. In my case where the address is absolute and no magic bytes precede it, it (the checksum) is followed by $BNF.
To give you an idea of it,

temp_screenshot.png


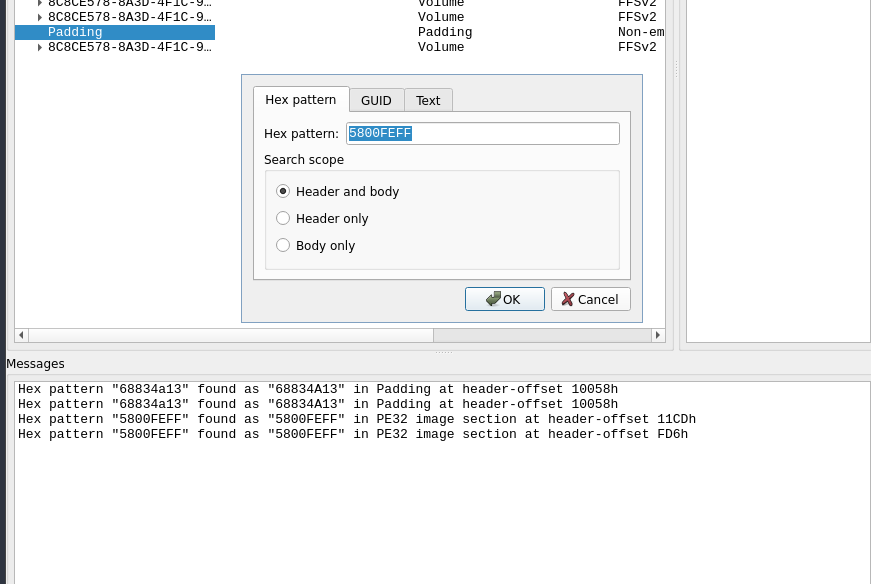
Then you will need to locate the absolute address of the string in UEFITool. To accomplish which you only need to search for part of the checksum (4 leading bytes should suffice here)

temp_screenshot_2.png


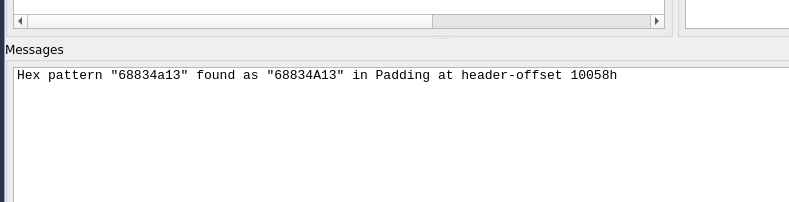
The search result should come up with a header offset

temp_screenshot_3.png


You may proceed with this data, but you might run into an ordeal of finding the correct instruction in IDA, so it’s best to calculate the absolute address (You might need UEFITool NE for this)
Assuming that you are on a little-endian arch, you’ll have to search for it in a reverse order
Now search for the modules with the absolute address you got:

temp_screenshot_4.png


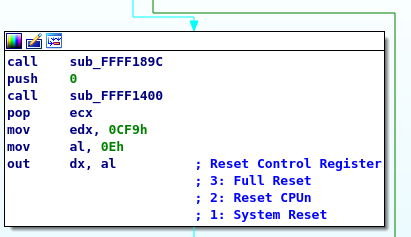
After which, something should appear in the search result panel. At this point, follow the guide uploaded by the author and please be noted that the assembly code might differ a bit, but that’s fine as long as you can identify the same pattern as in the pictures provided by the author. To pinpoint the part of the code to be modified, you may search for the address in hex in ida free and the jz instruction will be in the vicinity. I hope anyone stumbling upon find this message helpful.

Tips:
If you see this block of codes, it means you are near to finding the target:

temp_screenshot_5.png

1 Like

Anymore updates on this?

1 Like

yes , pls help for ideapad gaming 3 15ach6 too, bios unlock