I totally understand your decision.
Nevertheless I am still hoping, that we will be able to find a way for users with a Gigabyte Award BIOS mainboard to update the PCI ROM modules without getting the wellknown error message.
Thanks for your contributions and for having done the tests. They were very helpful.
Regards
Fernando
I try to flash it by DOS and it didnt work too, i got a message "invalid BIOS image", thanks for your help.
EDIT
BIOS Modding Results
Vendor and exact Name of the mainboard/pc/notebook = Gigabyte 880gm-ud2h, PC
System Type (MB=mainboard, PC=personal computer, NB=notebook, BB=barbone) = MB
Chipset and Southbridge of the system = SB700
Vendor, Sort and Version of the inserted PCI ROM or EFI module = AMD AHCI ROM v3.1.2.0
Success: Yes or No = NO
optional: Remarks (in case of success: noticeable advantage, in case of a failure: possible reason)
I dont know where to put this info…
Maybe we can test it later another method but right now i have to study for a test, thanks.
Thanks for having tried it this way.
Side note:
Some months ago a had a conversation with a Gigabyte employee and I asked him for the details of the internal Gigabyte Award BIOS integrity check. He obviously was not allowed to answer my question directly, but he wrote, that it is not enough to update the related BIOS modules correctly by using the CBROM tool. According to his words an additional work with an Hex Editor will be needed to circumvent the "Invalid BIOS image" message while flashing a modified Award BIOS.
After having read this "Gigabyte secret", I tried to find out, which sort of hex codes modification may be needed. Although my investigations haven’t yet been completely successful, I know now, that the Checksum-8 of all original Gigabyte Award BIOSes is "00" and obviously has to be "00".
Unfortunately this is obviously not enough. There must be another sensitive point, which we haven’t yet discovered.
EDIT:
I will put your report into the related BIOS modding success/failure table.
Thanks for it!
Hi Fernando, here is my BIOS form my PC the F8 and I put the F8 form gygabyte site i don’t know if this could help you. I check it with the Hex program and i found there are differences between them because i already configured my BIOS and the empty BIOS without settings.
https://mega.co.nz/#!MQEAQSAY!BSKC7TUe91…ujp4x6Is1h0XNNU
I don’t know if this could help to find that checksum.
EDIT
Fernando if you compare the fail check form my BIOS and the Gigabyte website are same CHECK fail form Award BIOS EDITOR 1.0.
I edit my PC bios and compare it and they are not the same.
https://mega.co.nz/#!xFUAHRxA!ZqIDzUDRpk…AgXcT8NX6WfNoe0
I check the checksum-8 form my PC BIOS and its not "00", compare it with the original BIOS form gigabyte site F8.
@ Ser2k2:
Thanks for the links. I will do a look into the BIOS later this evening.
@ Ser2k2:
You are right: Both BIOSes are a little bit different and the checksum-8 of your BIOS is “15”, whereas the original BIOS has the typical checksum-8 value “00”.
Neverteless I haven’t yet any idea how to solve the problem.
Questions:
1. How did you extract your currently running BIOS?
2. Have you tried to flash your extracted BIOS with the checksum-8 value “15”?
The mobo allow me to make a backup form the BIOS, I enter a Q-flash and there is a option to save your BIOS to USB. I didn’t try to flash the BIOS with the backup yet…i was thinking to make a shot. I Tried a mod BIOS from my backup-BIOS but no luck, I check the checksum-8 from my backup-BIOSMOD and its different form my backup-BIOS.
@ Ser2k2:
It seems to me, that the tool cbrom had worked fine with your BIOS:
1. Although the sensitive MEMINIT module has been below the PCI ROM modules, the MEMINITENTRYPOINT was after the update of the AMD AHCI ROM on the exactly same position as within the orignal BIOS.
2. The checksum-8 of the modded BIOS was “00” (as the original BIOS file).
I really don’t know, why you get the error message nevertheless.
This is the my bakup-BIOSMOD:
https://mega.co.nz/#!MUUFgS6Y!FGbCXk-nn6…D5PWw2C4jhUwnr4
The checksum-8 is different and it didn’t work. If you compare the checksum-8 from my backup-Bios to bakcup-BiosMod are differents.
Yes, the in-use BIOS with the individual (non-default) settings obviously is different from the original BIOS and consequently has another checksum-8.
Although all these findings are very interesting, I don’t think, that they will help us to circumvent Gigabyte’s internal BIOS check. That is why I am searching for 2 original Gigabyte BIOSes for the same mainboard, which differ just by the AMD AHCI ROM module version. If we could get such BIOSes, we would be able to see the differences outside the AHCI module itself and to compare the "updated" original BIOS with a BIOS, which we have updated ourselves by using CBROM.
Update:
Meanwhile I may have found such test BIOS versions >here<. The offered BIOS versions F14b and F13 for the GA-990XA-UD3 obviously only differ regarding the AMS AHCI ROM version.
If you have time, please do a deeper look into both BIOS files, update the AMD AHCI ROM module of the F13 BIOS by using cbrom and compare the result with Gigabytes’ F14b BIOS. I will do the same, when I have the needed time to do it.
Another thought:
It seems, that it may be possible to circumvent Gigabyte’s internal BIOS check, if the BIOS is flashed by the @BIOS method.
Please read >this< German language post from the user gst, who successfully had flashed a modded Gigabyte Award BIOS.
Hi,Fernando,I’m from China.I think maybe I can help u guys.I had update my mobo’s(which is a Gigabyte GA-880GM-UD2H rev.1.0) AHCI rom & RAID rom successfully!
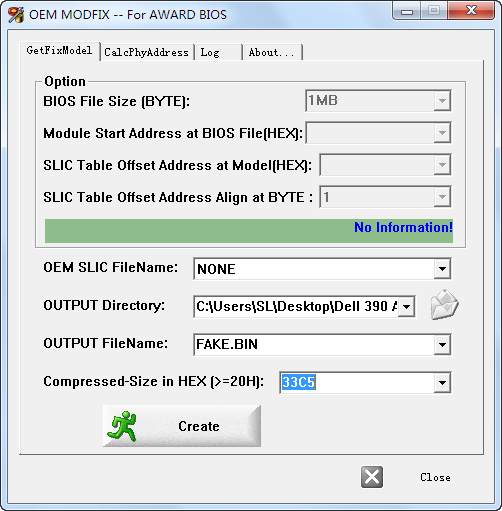
TOOLS U NEED:winhex,cbrom1.55(latest versions will try to fix minit automatically,which will cause trouble,so we use 1.55),cbrom198,modfix.exe
As u know,mod Gigabyte’s Award bios will change the location of “meminit.bin” or “ppminit.rom” module in bios.So i read this method from bbs.bios.net.cn and the pdf.We could creat a “fake” module,whose size is exactly same as the original AHCI or LOM module,then we can insert it into the same place in bios like before.Bang,we are done.
now follow me:
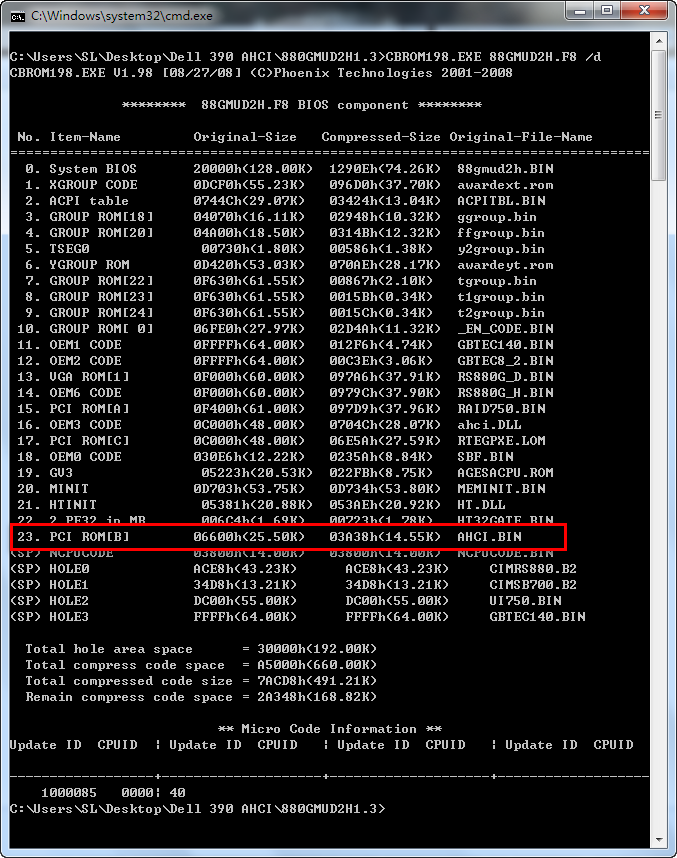
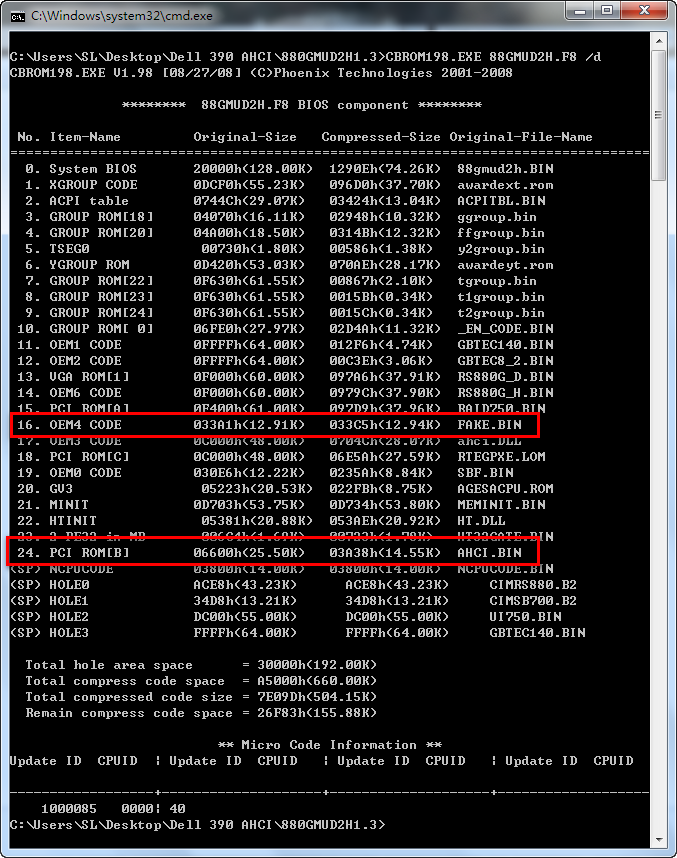
1.use cbrom198 to see the detail of official bios.“cbrom198 88GUD2.F8 /d” write down the “compressed-size” of the module u want to update.In my case,the AHCI.bin’s value of “compressed-size” is “03382h”.it’s a hex number.Then we use modfix.exe to creat a “fake” module which size is 3382.i named the “fake” module “SL.bin”.
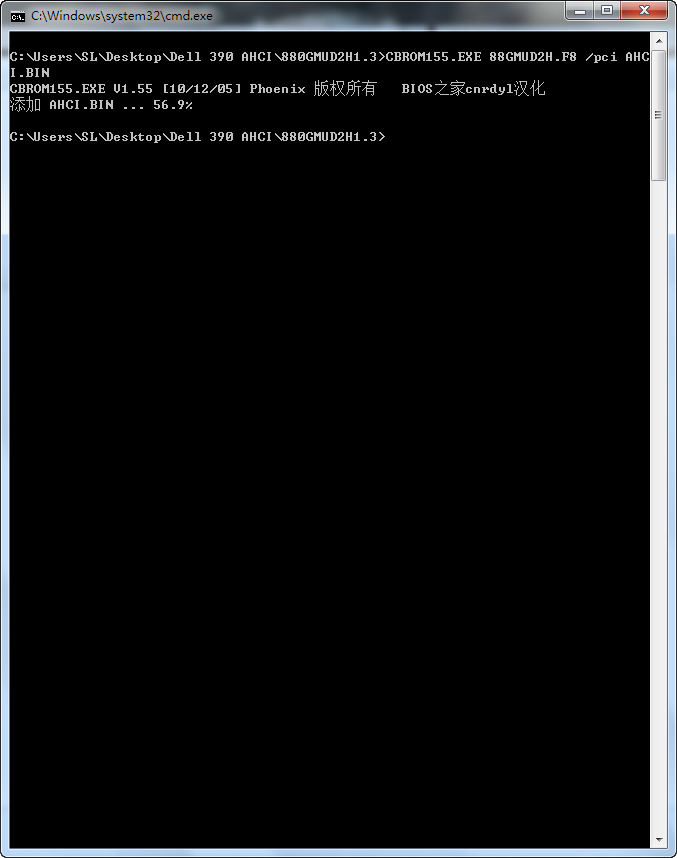
2.use cbrom155 insert ahci.bin or any rom else u want to into official bios file.use command like “cbrom155 88GUD2.F8 /pci AHCI.bin”.then use "cbrom198 88GUD2.F8 /d"to see if insert correctly.now u will find that the rom u inserted before has been moved to the end of the bios,precisely,behind the “meminit.bin”.
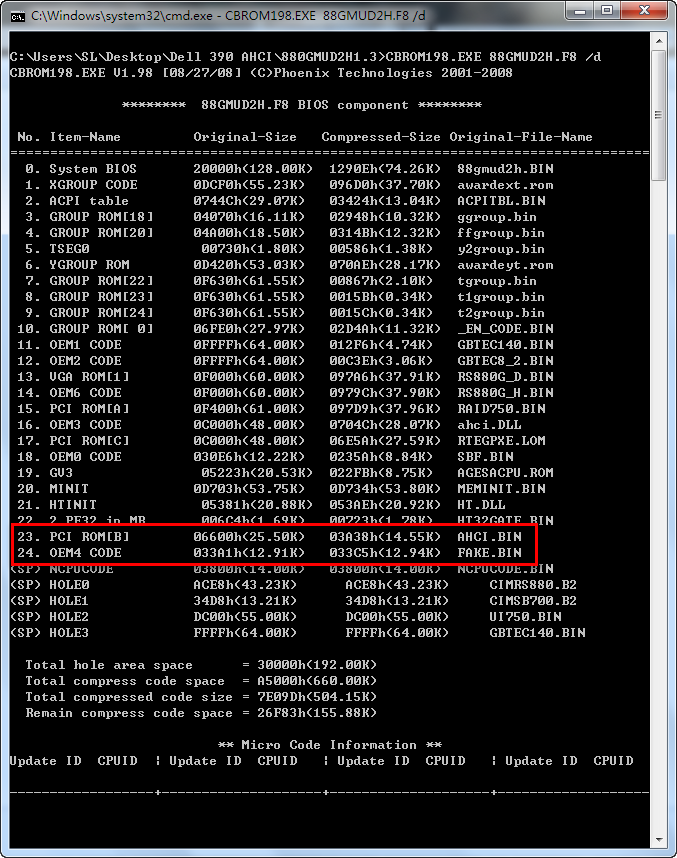
3.use cbrom155 insert SL.bin.CAUTION HERE!USE COMMAND LIKE “cbrom155 88GUD2.F8 /oem4 SL.bin”(u can easily find that there are many oem code holes in bios,like oem3,oem4…oem6).
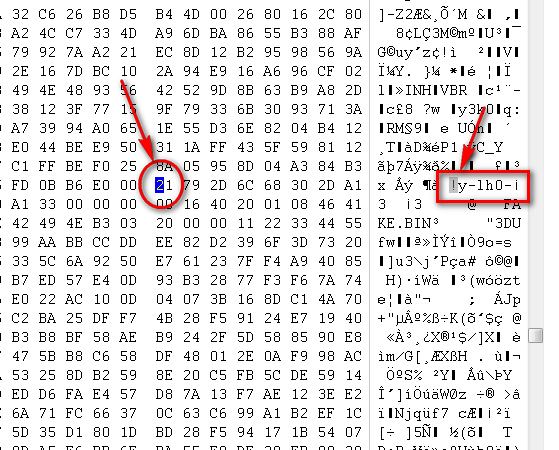
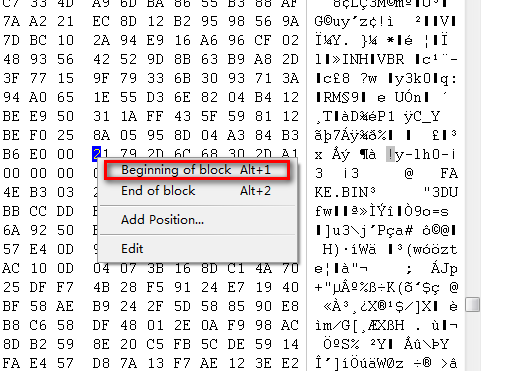
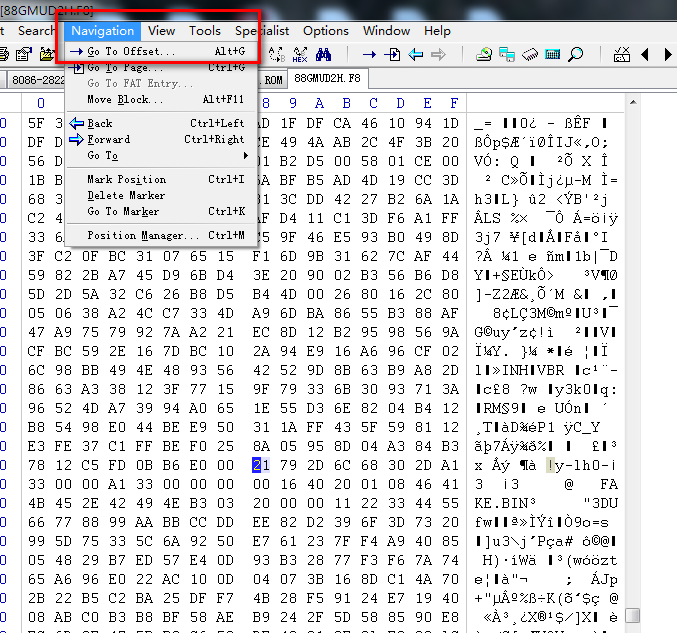
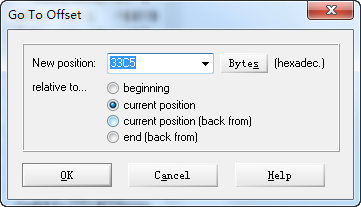
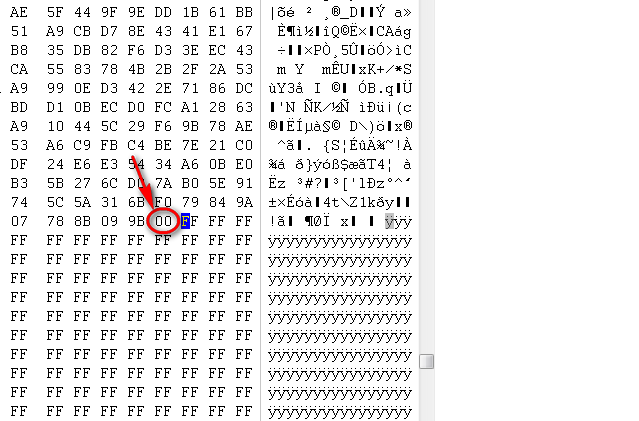
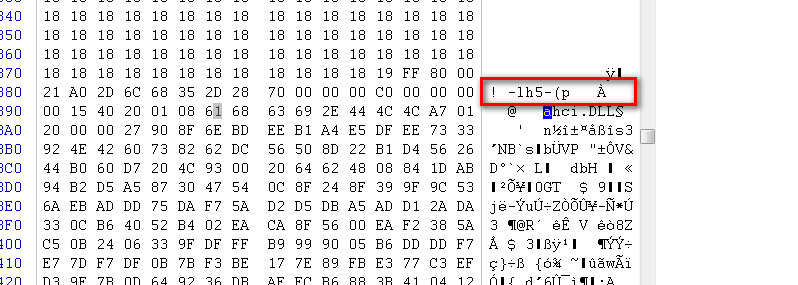
4.in order to make sure the “meminit.bin” module doesn’t move at all,we must move the “fake” module from the end of bios to the place where the original “AHCI.bin” was.And we know that every module in an award bios begains with "??-lh-?-…file name…"so we use winhex open the modified bios.Search for the name of “fake” module,here we use “SL.bin”.Before the file name,u can find a string like “??-lh0-”,right click on the first “?”,choose “begainning of block”,then use “go to offset”(new position:3382 (bytes),relative to current position),mark the byte before the byte u “go to”(jump to) as “end of block”,then cut the whole block.
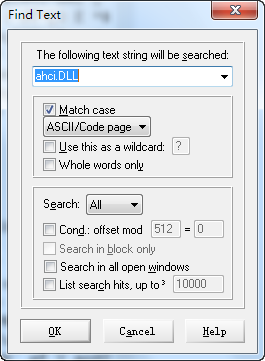
5.search for “AHCI.dll”,paste the block before the “AHCI.dll” module(==the byte before “??-lh0-?-…file name…”).Save file.
6.use cbrom198 to verify the bios modification.if everything did right,u should see the “fake” module (has the same size of the module be replaced)in the same place that the original module was.
7.now use Qflash.shouldn’t see the “invalid” error message any more.
8.enjoy~~
my english is really poor,if u guys have further questions,u could pm me,or send email to [email protected].
i could upload some pics if u need.
880GMUD2H1.3TOOLS&PICS.zip (1.53 MB)
88GMUD2HF8modified.zip (576 KB)
@ aaaaaa889:
Welcome at Win-RAID Forum and thank you for your very interesting post, which hopefully will bring us the breakthrough regarding the modification of Gigabyte Award BIOSes.
A special thank goes to you for your detailed instruction how to do it.
I have just tested the use of CBROM_155 under Win8.1 x64. Result: It works!
Regards
Fernando
@ aaaaaa889:
I have a question if i use the hole oem6 in the BIOS 88gmud2h.F8 to put the fake file, i notice that it will reemplace the file RS880g_h.bin, this is good o bad…
EDIT
Sorry but i am lost in the point 4 about position, go to, "u", etc…
@ Ser2k2:
The user aaaaaa889 had written, that he may be better contactable via PM or via eMail. So I suggest to do it additionally.
thank u,Fernando.Without your great thread of “AHCI/RAID ROM modules for BIOS modding - already extracted” and “BIOS-Modding: How to update PCI ROM modules of an AMI/Phoenix/Award BIOS” posts,i wouldn’t be able to mod AHCI in the first place.Anyway,i myself didn’t invent this method,i learned it from a forum,called “Home of BIOS”,@bbs.bios.net.cn.i will translate their useful articles and tools to help u guys.After all,we are all learning.
@ aaaaaa889
Thanks for your work aaaaaa889, i made some test but i have some problems selecting where it starts the files and where it ends. And i have troubles where to paste the selection, because the modifications doesn’t appears when you use cbrom to see the changes on the BIOS, there are some files missing, instead of 23 files i only see 14 files and i don’t understand where i paste the rest of the files on the BIOS.
see pics blow:


@ Ser2k2:
When you have modified the BIOS according to aaaaaa889’s instructions, please compare it with the modded BIOS he had attached to >this< post, before you are going to flash it into the mainboard BIOS chip.
@aaaaaa889 :
If Ser2k2 should succeed with the flash of the modified Gigabyte Award BIOS, I want to ask you to start a new thread with the topic “Guide: Modification of Gigabyte Award BIOSes” (or similar). It would be fine, if you would insert the related pictures into the guide.
Once you have done it, I will delete your last post. The “Picture Gallery” you have created, is fine, but has a bad influence on the “Portal” site of this Forum.
Furthermore I recommend to remove the link to the “Tools&Pics” package, because the included ModFix Tool gave me an MS Defender Antivirus alarm. We have to find another solution. Let us discuss it via PM.
Thanks again for your amazing support!
It works @Fernado, thanks @aaaaaa889 and you to @Fernando. I update de ahci module with the version 2012…
@aaaaaa889 , can you tell me how did you update the RAID modules because you need the RAID module + MISC module?, because de misc module is in <SP> HOLE2 and what other oem can i use?.
EDIT
BIOS Modding Results
Vendor and exact Name of the mainboard/pc/notebook = Gigabyte 880gm-ud2h, PC
System Type (MB=mainboard, PC=personal computer, NB=notebook, BB=barbone) = MB
Chipset and Southbridge of the system = SB700
Vendor, Sort and Version of the inserted PCI ROM or EFI module = AMD AHCI ROM v3.1.2.0
Success: Yes or No = YES
optional: No problems
That is very, very good news, not only for you, but for other users with an old Gigabyte mainboard and Award BIOS structure as well. ![]()
![]()
From now on BIOS modding will be an interesting option for much more people.
Thank you very much for your patience and for doing all these tests! They were very helpful.
Regards
Fenando