As I have already written, I would rather like to offer a new thread with the topic title "Guide: Modification of Gigabyte Award BIOSes" or similar, which can easily be found by the users, who want to modify such BIOS. If you should not want to write the start post of the new thread yourself (which I would prefer), I will do it for you (without forgetting to point to your instructions, which you had published >here< and which brought as the breakthrough). Meanwhile I have tried to follow your instruction, but ran into some questions/informations:
The CBROM155.EXE you had attached is a chinese version. I think, it will be better to offer the english language version of this tool. As you can see >here<, I have already added the english version of CBROM_155.EXE into the start post of the thread "BIOS Modding: Introduction and Preparations".
Meanwhile I have tried to update the AMD AHCI ROM module of the BIOS 88GMUD2h.F8 according to your guide, but ran into a problem. This is point 4 of your instructions:
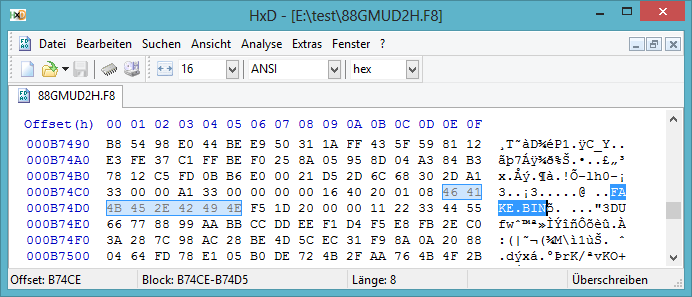
Everything worked fine for me until this point, but I cannot find the 2 question marks in front of the text code "-lh0-" at the beginning of the "FAKE.BIN" module. This is what I see:
Instead of "??-lh0-" I see !Ö-lh0-". Have I done something wrong or what is the reason why I got different text codes than you? It should not matter, that I had named the module "FAKE.BIN" instead of "SL.BIN", or am I wrong regarding this point?
If you download the file that contains the image form @aaaaaa889 , its doesn’t mather how the symbols look like [??-lh0-] o [!Ö-lh0-], both are the same. My where slightly different, but you can compare it with the hex address becuase it have to be the same from the image.
EDIT @aaaaaa889 , when you have time can you explain how did you modified both the raid modules?, please.
1.yes,i know I’m using a Chinese version of cbrom155,but all English version I found requires Administrator permissions(UAC warning),so I choose the Chinese version to demonstrate,sorry. 2.the “?” stands for a single letter(or char),it could be any ASCII char.so the “?” is what we called “asterisk wildcard”(translate by google).Actually,i found that in “fake” module I created,it always begains with a hex “21” and “!Ö”,which u can easily found. 3.i’m busy doing my job recently,so if u want to do anything with my post and pics,that’s all right,just do it.i have no problem with that.i’m just happy enough that I could do something useful for other people.i learned everything I know from the internet,so I think share is great,right? 4.i was trying to mod my Dell OptiPlex 390’s bios,update the AHCI and RAID rom,but I don’t know how to do that.if u guys know something about that,please tell me.thanks a lot~~
The english CBROM_155.EXE I have linked now doesn’t require any additional administrative rights. After having started CMD as Administrator and having navigated to the test folder this CBROM version 155 runs as flawlessly as the CBROM32_198.EXE, even on Win8.1 x64, which probably is the OS with the strongest UAC features.
Thanks for your explanation. Now everything is clear for me. In my country usually the "XX" is used as a "placeholder" for any characters (digits/letters).
I totally agree with you. Thank you for your statement. Whithin the next hours or days I will write the related guide and hope, that you will check it and contact me, if something should be wrong or misunderstandable.
Do you have a link to that BIOS?
Another thought: If I understand everything correctly, the modded BIOS will be accepted by any Gigabyte Award BIOS chip, if it meets the following conditions:
The size of the modded BIOS file has to be exactly the same as the original BIOS.
The checksum-8 of the complete BIOS file has to be "00".
The sensitive BIOS modules MEMINIT.BIN, HT.BIN and HT32GATE.BIN must have the exactly same compressed size and must be at the exactly same place as within the original BIOS (same offset begin and same offset end).
If this should be correct, there must be another way to modify a Gigabyte Award BIOS without getting the "Invalid BIOS Image" message. The "FAKE.BIN" method you have published obviously worked fine for Ser2k2, who just updated the 26 KB sized AMD AHCI ROM module, but I am afraid, that it will not work with the update of more than 1 module or a much bigger sized module like the Intel RAID ROM. The insertion of a "FAKE.BIN" needs additional space within the BIOS file and the space of a 1MB Award BIOS is very limited. What is your opinion about this problem?
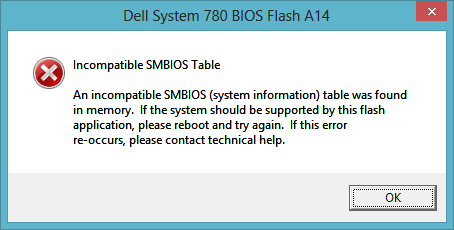
None of the official BIOS tools (CBROM, AMI MMTool, AMI Aptio UEFI MMTool) is able to open Dell’s .HDR BIOS files, but I found >here< something, which may help you.
Meanwhile I have another idea about how it may be possible to avoid the "Invalid BIOS Image" message without the need of using any extra tool like CBROM155 or ModFix and without inserting any additional "Fake" file. The only required tools would be CBROM32_198 and a Hex Editor like HxD.
This would be the procedure:
Open the original Gigabyte BIOS with CBROM32_198 by doing the /D command, make a screenshot of the BIOS details and store it somewhere.
Open the BIOS with HxD and search for the beginning of the MEMINIT and the end of the HT32GATE files.
Copy the complete code of the 3 sensitive files (or the complete BIOS part beginning with the first hex codes of the MEMINIT module?) and store it somewhere.
Run CBROM again and extract all listed modules beginning with the topmost module you want to update.
Release and re-insert all modules (inclusive the more actual PCI ROM ones you want to get inserted) according to the original order.
Open the modded BIOS with HxD and replace the part with the 3 sensitive modules (or the complete BIOS part until the end?) by the previously stored original codes (without changing the BIOS size).
Make sure, that the checksum-8 of the modded BIOS is "00".
Reopen the BIOS with CBROM by doing the /D command and compare the listed details with the screenshot you had taken at the beginning.
Did you try to modify your Gigabyte BIOS according to the method I have described within my last post? That would be great! Please give us some more informations about what you have done and what you got. By the way: The correction of the checksum-8 will not be a big problem, if everything else should work as I thought.
Yes, the checksum difference is no surprise for me, because the cut-out and the re-insertion of the sensitive modules have not been done by CBROM. This is why the tool didn’t correct the checksum itself. Much more interesting for me are your answers to the following questions: 1. Which part of the BIOS did you cut off and reinsert (just the 3 sensitive modules or the complete rest of the BIOS)? 2. Has the BIOS size been untouched by this sort of BIOS modification? 3. Did CBROM open the BIOS after the cut-out and reinsertion of the sensitive modles without any problem? 4. Which were the differences regarding the BIOS structure and the compressed sizes of the modules before and after the complete operation?
@Fernando 1. Which part of the BIOS did you cut off and reinsert (just the 3 sensitive modules or the complete rest of the BIOS)? I only tried cut the sensitive ones,one by one, not all at the same time. I reinserted all the files in the proper order.
2. Has the BIOS size been untouched by this sort of BIOS modification? The BIOS size are the same but the offset are different, i lost about 3 lines form the end of the offset of the BIOSMOD and Q-FLASh didn’t recognize the file. The offset of the BIOSMOD it has to be same as the original BIOS. If not Q-FLASH don’t recognize the file.
3. Did CBROM open the BIOS after the cut-out and reinsertion of the sensitive modles without any problem? Yes CBROM read the file without a problem.
4. Which were the differences regarding the BIOS structure and the compressed sizes of the modules before and after the complete operation? The only difference was the offset. I found some troubles when cutting the last sensitive file, the 3rd, i think the size is not same same as original but i need to compare the file size with the original after the insertion and before the cut of the sensitive files, with the original untouched BIOS. Because i lost some lines at the end of the BIOSMOD and the offset where different form the original BIOS.
Thank you for having done the test and for having uploaded the modded BIOS. Meanwhile I have checked this modded BIOS and compared it with the original one. The offset length differs and the sensitive modules are not at the same place. I suspect, that you have done a mistake while copying, cutting or inserting the BIOS part with the sensitive modules. The offset, where this BIOS fragment has to start, is A3C40 and it should end at the offset B6E50 of the BIOS 88GMUD2H.F8. Here is the original BIOS part, which should be inserted into the modded BIOS: >Original BIOS part< Maybe you have the time to redo this part of the test. If not, I will do it myself.
EDIT: After having published this post I have realized, that you just have posted yourself. Thank you for your detailed answers.
the Q-Flahs recognize the file. I found that the last sensitive (3erd) file from the original BIOS, its a little bigger than the MODBIOS, thats the reason the offset are different.
Thanks for the file, which looks much better than the previous version (correct offset length, correct MEMINITPOINT location). Nevertheless there are 2 things, which seem to be not ready for flashing: 1. The first part of the MEMINIT.BIN file differs from the original BIOS. 2. The HT.DLL and the HT32GATE.BIN are at different locations compared with the original BIOS.
That is already a good sign.
As I already have written, this is easy to be corrected to "00".
EDIT: If you should have the BIOS version after having done point 5 of my guide, but before you have cut out and inserted the sensitive modules, please upload this file.
Edit I tried to paste it int the offset A3C40 to B6E50 but cbrom can’t read the file. I mean can’t read the sensitive files and there are some files missing. I found when i did that, i overwrite 3 files.
I cannot find the first parts of the sensitive modules within this file - no MEMINIT.BIN, no HT.DLL and no HT32GATE.BIN text codes. Since it is nearly midnight, I will stop investigating these things and continue tomorrow. Thanks a lot!