Hi,
I just wanted to share how I edited my bios to get a Xeon E3 1230 v5 working in my Gigabyte Z170-HD3P, keep in mind that BCLK OC IS NOT WORKING (doesn’t work at all, even 101 doesn’t register, probably because the ME is disabled).
The proof of work in my case : Intel Xeon E3 1230 @ 3601.76 MHz - CPU-Z VALIDATOR
It SHOULD works for Xeon Skylake and Kabylake (v5 and v6) on 100-200 series chipset as well as CoffeeLake Xeon on 300-400 series chipset. I’M NOT SURE how to get sky/kabylake Xeon working on 300-400 series chipset, as well as CoffeeLake Xeon on 100-200 series chipset (please create another thread to seek help).
I did two thing in order to properly access bios AND BOOT to an OS (otherwise it would bootloop) :
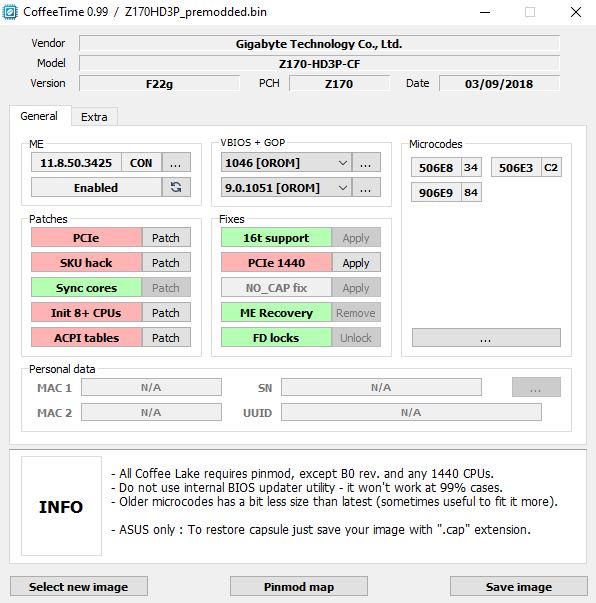
Remove the “ME Recovery” with CoffeeTime (press the remove button so that it become green)
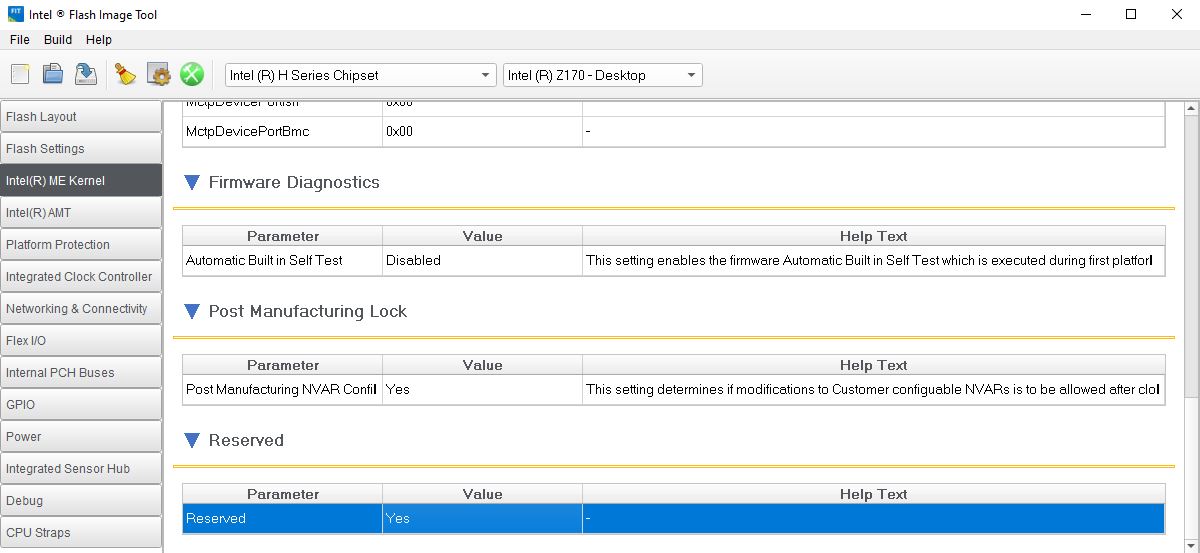
Set the “Reserved” bit in Intel FIT to yes
(it was over 6 month ago so I don’t recall exactly why I did those things, but in the end it’s running like expected)
How to remove the “ME Recovery” :
I used CoffeeTime because it’s easy and just work with one click, download “CoffeeTime_0.99.rar” here : CoffeeTime — Яндекс Диск
or here : 117.82 MB folder on MEGA
Extract it then open CoffeeTime.exe. Now select your bios and click “Continue”. At this point you should be able to click on the remove button at the right of “ME Recovery”, then when "ME Recovery is highlighted in green, you can save your bios by cliking on “Save image” (save it in .bin format), not the ME version your bios is currently at.
This is what you should be looking at before saving the image :
How to set the “Reserved” bit in Intel Flash Image Tool :
Download the CSME System Tools corresponding your ME version shown in CoffeeTime right here : File folder on MEGA
Extract it and go to the “Flash Image Tool” folder then open fit.exe. When Intel Flash Image Tool is launched, open the bios file you previously edited. When your bios is properly loaded, go to the “Intel(R) ME Kernel” tab on the left then scroll to the bottom up to the “Reserved” section. In this section double click on the “Value” of the “Reserved” parameter and set it to YES (instead of NO). The next step is to build the image, to do so click on “Build Image” found in the top left “Build” menu, if it ask to continue, just say yes.
This is what you should be looking at before rebuild :
When the bios is finally rebuilt, it should be in the same folder as the fit.exe file and it will be called “outimage.bin”, just rename this image to whatever you want (still keeping the .bin extension).
And voilà, you have the correct bios to make your Xeon works in regular motherboard, I’m not covering how to flash it but you should NOT be able to flash it like a regular bios, you need to follow one of these tutorial (I personnally used an external/CH341A programmer).
Hello, thanks for such good information. I ask you, is the same procedure for asus h110m-p? And where do you insert the microcodes for a xeon e3 1240 v5?