Hey guys, it’s me again.
I got a MSI z170 krait gaming running with F8 BIOS, MSI official website show me they support 7th gen CPUs from FB bios, but I don’t have any 6th gen CPU to update the latest version BIOS to support 7th gen CPUs
I know if I programming the latest version BIOS via programmer I will lost my UUID\SN\MAC and all “DMI informations”,
So how can I transplant these “DMI informations” to a New Clean BIOS? I had backuped the origianal BIOS use programmer.
Thanks in advance!
@June_Da_Pek - Dump current BIOS with programmer and send to me, I will check, it may only have MAC ID in there that needs transferred over, or possibly nothing stored in BIOS.
But, I will check and see what is there (send me serial in PM and MAC ID too, so I can see if there). Then, I can do for you, or show you location/method how to do it, up to you.
@Lost_N_BIOS https://ufile.io/cu4znvht all in this zip file, could you make a tutorial using my file as a template ?
@June_Da_Pek - Thanks, I will let you know what I find, how to fix etc 

This board, correct? https://www.msi.com/Motherboard/support/Z170-KRAIT-GAMING
You were missing a C in your MAC ID in txt file
* edit @June_Da_Pek - * Edit - Here is how to fix System Info into your stock BIOS, then program in
Use UEFITool 25.0
1. On dumped BIOS >> Extract BODY of FD44820B-F1AB-41C0-AE4E-0C55556EB9BD (SMBIOSFlashData) Expand to RAW, extract BODY
2. Replace this into stock latest BIOS, same way you extracted.
3. Extract GbE As-Is in Backup >> Replace As-Is into latest stock BIOS
3a. Save BIOS image, this may be all you need to do
-----------------------
4. Inside “BIOS Region” Second padding (Above last three volumes), extract As-Is in dump.
5. As above, in latest stock BIOS, extract As-Is
6. Open dumped padding in hex editor 4C-5B copy 16 bytes, paste into stock padding at same exact location
7. In Dumped padding at 1C53C-1C63B copy 100 bytes, paste to same location in stock padding
8. Replace edited stock padding back into your target BIOS, then program in
* #4-8, may be skipped possibly, this data may auto-populate after running system
If you need me to do for you let me know
Yes ,it is
Ops I loss a C in MAC adress, 4CCC6A is true
@June_Da_Pek - Yes, I noticed that right away about the MAC ID 
See edit above for how-to
@June_Da_Pek - See my edit above again, 1-3 may be all you need to do
I will try it myself. If I fail, please allow me to ask you again
What does 4-8 do ?
@June_Da_Pek - OK, good luck! If you need me to do, it’s OK, I will do and don’t mind to do it at all
4-8, I am not sure if this is just backup copies of sys info data, or what, it looks like copies that may get updated, changed, as you use system, update BIOS etc
I say this because there is some NVRAM data copied there too (In some users BIOS it’s copied MANY MANY times, others only a few, so I think it’s randomly copied into there. So it may not be necessary for you to put in, but you certainly can go ahead and do it how I mentioned.
@Lost_N_BIOS
Hello my friend, I try to replace these 2 files I extracted,but when I save the change ,the UEFITool show me :
rebase: can’t determine if TE image base is adjusted or not, rebased TE image may stop working
Here is my step:
1\ open the backuped rom file,
2\ right click the “GbE region”,
3\ extract as is and save this file,
4\ find the GUID FD44820B-F1AB-41C0-AE4E-0C55556EB9BD and unflod
5\ right click the Raw section,
6\ extract body and save this file,
7\ open the New Clera rom file download from MSI official website
8\ right click the “GbE region” and Replace as is with the rgn file from 3<br />9\ find the GUID FD44820B-F1AB-41C0-AE4E-0C55556EB9BD and unfold,then right click the Raw section,
10\ choose Replace body with the bin file from 6<br />11\ ctrl+s save the change
I try to programming this modified BIOS , when I boot it ,the postcard show me 0D, look like a CPU mistake.
@June_Da_Pek - Hmm, no TE files should be touched or rebased here. But, your steps outlined look correct. What UEFITool version are you using?
Ohh!! Sorry, I see the issue, I didn’t notice before, FD44820B-F1AB-41C0-AE4E-0C55556EB9BD is inside PEI volume!
So only do GbE swap in with UEFITool, this other edit we have to do on straight hex file. Once GbE swap done, save.
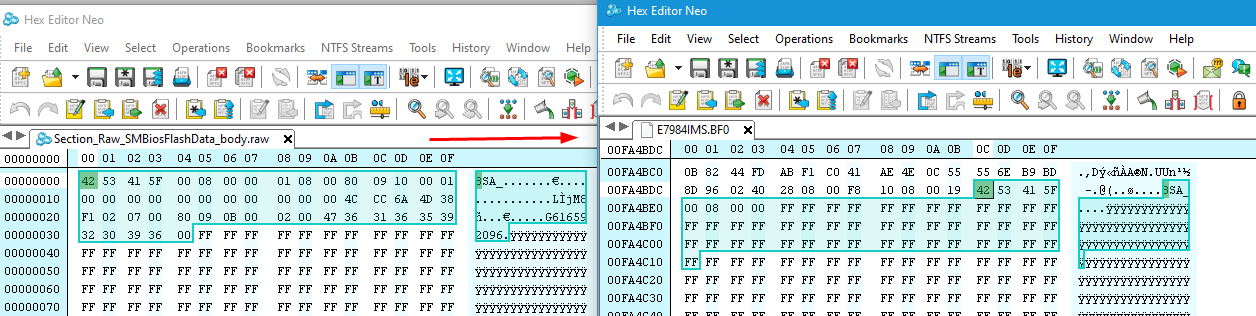
Then open target BIOS file as whole in hex editor, also open copy of your extracted FD44 module body with the info inside it (that you originally wanted to insert into BIOS)
On Target BIOS, go to offset >> FA4BDCh, select 35 bytes
On extracted FD44 module Body Select >> “BSA >>> to end of serial with . (period)” at end, so >> 42 53 41 5F 00 08 00 00 01 08 00 80 09 10 00 01 00 00 00 00 00 00 00 00 00 00 00 4C CC 6A 4D 38 F1 02 07 00 80 09 0B 00 02 00 47 36 31 36 35 39 32 30 39 36 00 = 35 bytes
Paste that into target over the selected BSA + FF’s area. Make sure you are writing over, not inserting, or overall file size in hex will change and = brick.
If you need me to show you image of this let me know Actually, here is image
Ohhhh, I tried again, and the post card show me 0D anain…
Did you start over with new base file? If not, that would be why. If you did, and still same, do you want me to do it?
Then if mine = same, you’ll have to manually confirm your write with programmer is OK >> After write, close app, open again, read, verify, save and then compare that file in hex vs what you wrote
I’m sure that I did it use a new clear base rom file, AsProgrammer support earse write and verify in auto, so hope you can make one for me…
If convenient, I hope you can record a video or a few screenshots
June Da Pek - Don’t use auto there is no blank check that way. Do erase, then blank check both manually, then do write/verify
Sorry, I forgot to have you fix checksum at same time there too. See second line in my image above FA4BDC >> 8D 96 >> Should be 8D 0C once you paste in rest as shown above.
Here is fixed file - http://s000.tinyupload.com/index.php?fil…758826113460255
Do all steps manually one by one, unprotect, erase, then blank check, then open file and write, verify.
What is BIOS chip ID? Maybe ASProgrammer not best software to use?
Oh yes, yesterday(for me) I tried paste the BSA_ in WInHEX first, and when I replace the GbE with UEFITool 0.25.0 ,the UEFITool remind me checksum error…but I think its no matter at that time…
BIOS chip id is MX25L12873F, because of CH341a programmer, 16MB rom is too large for it, and the original CH341a software has a slow programming speed… I mean… the AsProgrammer usually faster than original CH341a software…
@Lost_N_BIOS OK!!! It worked! But the not all items be shown, some items always show null…
Thank you !
Slow write does not matter, wait it out 

For MX25L12873F all these work >> CH341A v1.31(1.4) (CH341AFree) (This is the name of the folder), ASProgrammer 1.4 or 1.41, or CH341A v1.1.1.32
16MB Rom size does not matter for any of this??? If you mention that due to CH341AFree version, pick correct type first (25) then pick correct size (16MB)
Write speed should not be a concern here, only proper write once done is all that matters
OK, fine, It worked! AsProgrammer was good, I write with AsProgrammer 2.1 and verify with 1.4.
Does it have any other data in other empty items?
No, that BIOS had both areas put in it So all success then, and system boots properly? If yes, great!
Yes, this system boots properly ! You are so GREAT!
I mean there has some items shown “Default Strings”, Does we have anyway to fill these items ?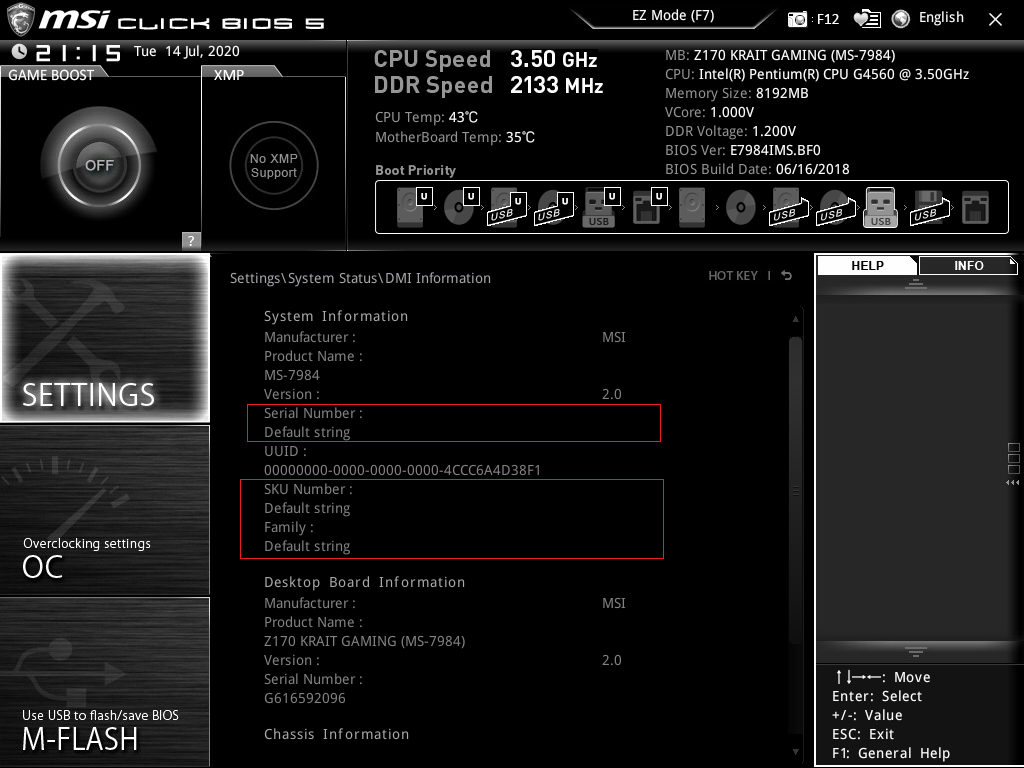
Great to hear it, you’re welcome!! That is all normal for MSI
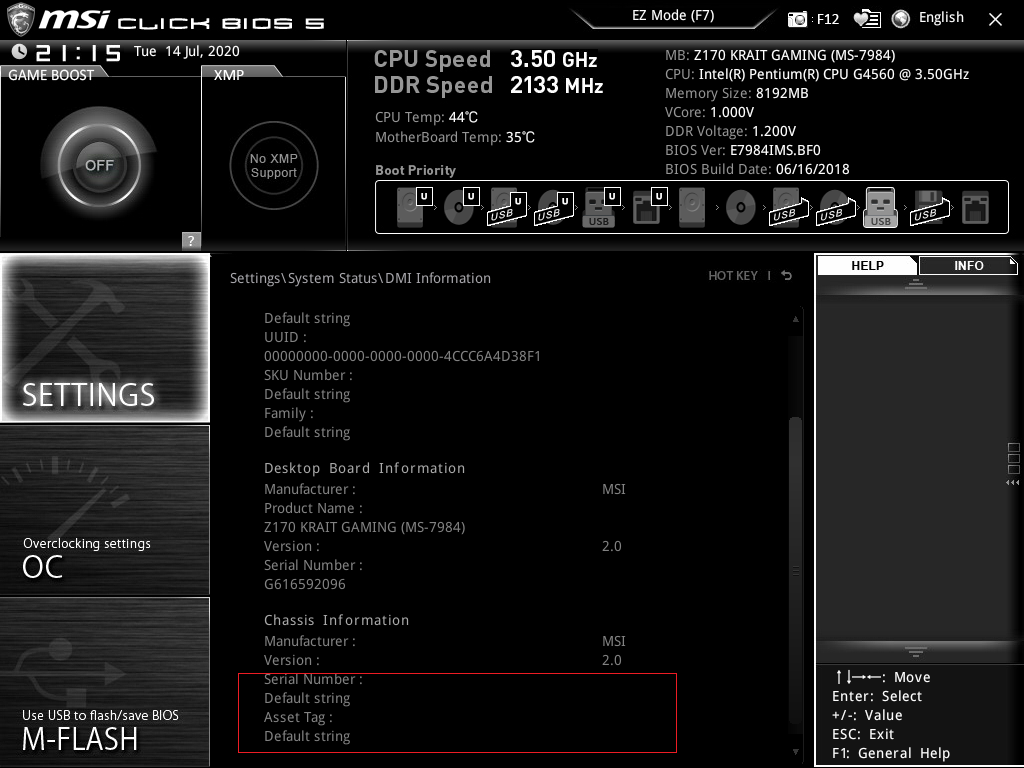
We can enter info there if you want, but it’s not there by default generally. Last image, that is for case type models, so nothing would ever be there for you anyway
But, if you want, we can put serial in first image serial location - Do you want me to make that edit to GbESMBFlash.bin and send to you? See, serial is already there though, first image, towards bottom