Not even a motherboard model identification…nice indeed.
This not the proper way to check it and not according the guide.
And this capture screen is also not correct way, share the original and mod files here or in a sharing service of your preference.
Would someone please give me a hand with this Acer B75H2-AM (M4620GH) BIOS? I tried several NVMe modules, but MMTool complains about all of them exceeding the size.
I don’t mind if the filesize increases to be honest, even if that means soldering in a larger capacity BIOS chip.
BIOS Download:
m4620gh.zip (2.0 MB)
Thanks
You can safe remove all network-related drivers from DpcDxe to Udp6Dxe if you don’t use UEFI network boot, in order to get some space on the bios volume.
Thanks, that worked.
@Fernando
Thank you very much for all your effort.
I followed your guide, using UEFITool: I loaded the (ASUS) BIOS, extracted the body removing the capsule, inserted the EFI NVMe module and saved the modded BIOS file (.rom).
I have a question about when you say:
"**Only for ASUS BIOSes, whose capsule had been removed by extracting the “Body”, but shall be flashed by using the ASUS USB Flashback feature:
*Don’t forget to re-insert the original capsule and to save the modded BIOS as .CAP file!"
How is that last operation done? I cannot find any instruction about how to re-insert the original capsule.
Thank you for your attention and help.
@macs4all
Welcome to the Win-RAID Forum!
>Here< you can find a guide about how to re-insert the capsule of an ASUS BIOS before going to flash the modded BIOS by using the ASUS “BIOS Flashback” feature.
Good luck!
Dieter (alias Fernando)
@Fernando
Thank you very much for your indication! The guide you pointed at was very helpful.
Hopefully, I succeded in obtaining a modded BIOS wich includes NvmExpressDxe_5.
As a new user, I am not allowed to upload attachments. How can I submit the modded BIOS for checking by forum experts?
Thanks again
@macs4all
If you cannot directly attach the *.zip or *.rar compressed BIOS files (original + modded), you should upload them to any file hoster and give us the link.
@macs4all
The insertion of the NVMe module seems to be well done. According to what I see the modded *.CAB BIOS is ready for being flashed via USB Flashback (after having customized the name according to the ASUS USB Flashback rules).
By the way - why did you add the original BIOS file twice?
@Fernando
Thank you for your prompt feedback.
I didn’t notice I had added the original BIOS twice, until you highlighted that. Sorry, it was unintentional.
Hello and thanks for that huge topic and the whole support for all the people here. Really great.
I read and tried a lot but I can’t get it done to get my get my ASUS M5A99X EVO R2.0 modded.
In this forum is also a thread where someone got a request for that MB. Unfortunately the link inside this thread https://winraid.level1techs.com/t/request-nvme-for-asus-m5a99x-evo-r2-0/36216/2 to download the modded BIOS is not accessible.
Let me first explain what I have done so far, following steps at the beginning of this thread:
1.
Donwloaded MMTool (Ver 4.50.0.23) and UEFITool (Ver 0.28.0) and the NvmExpressDxe_5.ffs.
2.
Downloaded the latest BIOS Version 2501 for my MB from ASUS.
3.
Created two folders.
4.
Opened my BIOS with UEFITool and extracted the partition/part where the CSMCORE is located.
5.
Opened this part with MMTool and inserted the NvmExpressDxe_5.ffs.
6.
Saved the image.
7.
In UEFITool I replaced the partition/part with the one from my step 5.
8.
Saved it as a .CAP file.
9.
Renamed the file with Brenamerl from ASUS.
10.
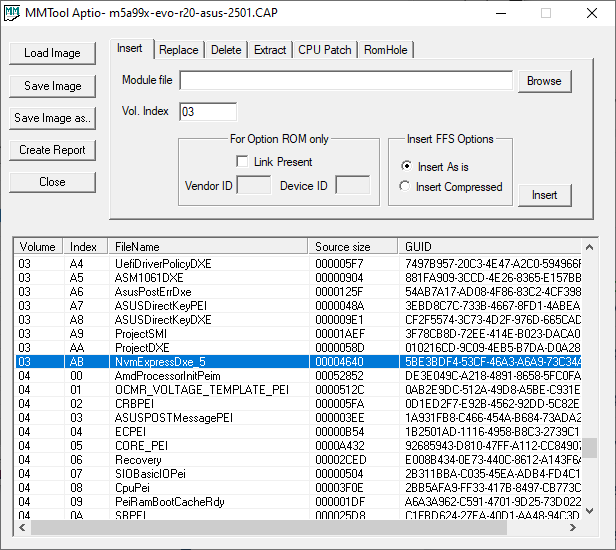
Opende this new file to look if the NvmExpressDxe_5.ffs is in place. And it is, take a look at the pictures.
11.
Put this file onto a Transcend Jetflash 8GB USB-Stick which is formatted in FAT32.
12.
Rebooted my system into BIOS and startet the EZ Flashback.
13.
After successfully installation the system was rebooted.
14.
Unfortunately my Samsung 970 EVO will not show up.
I tried different “Save As” and “Extract As” and so on. Even different PCI to NVME adapter cards.
My Samsung will not show up during BIOS boot.
But I’m wondering, after inserting the file and saving, the file size is the same as before. How could that be? UEFITool shows here more details than MMTool.
Currently I’m using the Clover Boot with an USB-Stick. It is going but it’s not what I wanted and what I might can have. So, my ssd and my adapter card is working and are not broken.
Does anyone got an idea what I might doing wrong or have forgotten?
Please feel free to aks me questions when I have forgotten to tell some important details or steps.
Thanks in advice and kind regards
Michael Jost
This is a MOD is not an official bios modification, 90% of modified old boards dont show NVMe in bios, only upon Windows x64 UEFI setup, in destination drive.
In the guide theres a mention how to test in bios, temporarily setting to CSM/Legacy and a PATA device can be visible, look again the guide.
Hi MeatWar,
thanks for your fast reponse. OK, it is my fault, I was not precisely enough. I already changed this settings (one of all these things I tried) and still the ssd is not visible.
The problem is more that after installing windows 10 pro n, on that ssd via pcie, windows will not boot from this device. Sorry I didn’t told that in my earlier post.
How were you able to get Win10 installed onto the NVMe SSD, if it is still not bootable? Since the OS installation requires at least 1-2 reboots, it is impossible to get Win10/11 (inclusive the EFI Boot partition = Windows Boot Manager) properly installed onto a not bootable NVMe SSD.
Have you ever tried to follow Step 4 - Installation of the OS onto the NVMe SSD of my Guide?
Hi Fernando,
yes I followed all of your steps, not only step 4. So, a big thank you for these explanations.
The different is that I got a USB-Stick with the windows setup on it. Created by the Media Creation Tool from microsoft. I do wanted a clean installation.
I disconnected all “normal” SATA drives. Only the ssd over pcie and the USB-Stick were connected.
Then I started to boot from the stick to lunch the windows installer. I removed all partitions from the ssd over pcie and windows partitioned the ssd by itself and copied the nesessary files onto the ssd. To this point it should be like in your Step 4. But when it comes to restart the pc, the pc hungs up and nothing happened. Just a blinking white cursor.
Then I connected the Clover USB-Stick to boot the ssd over pcie via the Clover boot manager. Then windows continued to install.
But without the Clover boot nothing will hapen.
@Michamann
Please check, whether a device named “PATA” is listed within the"BOOT" section of the BIOS after having enabled CSM.
I suspect, that either your modded BIOS has not been successfully flashed or the BIOS has not been correctly modded.
Additionally you should attach or link to the original and the modded BIOS.
Hi Fernando,
thanks for the reply.
Unfortunately a device named “PATA” is not listed wether I have enabled CSM or set to AUTO or whatever I tried.
The EZ Flash from the BIOS shows up that the BIOS were flashed successfully, it takes some minutes to flash. Maybe it wasn’t flashed successfully and the message is wrong. Some other of my modded BIOS (as mentioned above I tried different ways) got wether the message “security verification failed” or "file needs the .CAP ending. By the way, they all have the .CAP ending…
Here are the links to the BIOS:
Original BIOS
Modded BIOS
MOD file seems OK.
Final verification if flashed is making a backup with AFUWIN in windows environment or EFI/DOS cmd, open the dump/backup again with MMtool/UEFItool and verify the module, if not present the mod was not flashed.
Can also try previous DXe_4, i’ve seen a few boards (very low percentage) working with the old revision and not the DXE_5.
Hi MeatWar,
thanks for that tip. I opened it with AFUWIN and I’m shocked that the DXE_5 is not present in this file. Wether it was not in my flashing file or it was not flashed correctly.
So I tried it again with UEFITool and MMTool to get the DXE_5 into the file. But unfortunaltely it will not work. It seems that the UEFITool will not really rebuild the file. It shows up to rebuild but I am not asked if it have to when I save the file. I build four files in almost the same matter:
I open the original file with UEFITool, extract only the body in which I have to place the DXE_5 file. Open that extracted body with MMTool and insert the DXE_5 file and save the body. Then I replace the original body with the modified in UEFITool. UEFITool shows up to replace and rebuild the whole file. At the end I save the file or extract the whole file.
In one file I insertet the DXE_5 file directly in UEFITool and saved it.
After having done all this, two files doesn’t inhabitate the DXE_5 file but can be flashed. The other two got the DXE_5 file inside but can’t be flashed due to varification fail.
Do I got a not so well working UEFITool?
Or am I doing something else wrong?
Should I use the AFUWIN to flash my BIOS from windows? I think it will be much saver to do it within the BIOS, didn’t I?