@Fernando
Switching to the “normal” NvmExpressDxe_4.ffs solved problem 2&3, now windows report only 44.5MB of RAM reserved for hardware which is much better and HWMonitor shows that Vcore stays in 1.248V rather than shoot up to 1.361V.
For problem 1, in BIOS device menu it still shows ‘PATA:’ but in boot menu it shows ‘UEFI:Windows Boot Manager(Asgard NVMe blablabla)’.
For Problem 0, Integrated Realtek ALC892 Audio Controller still missing (double checked the BIOS, pretty sure that Onboard Audio Controller set to Enabled and Realtek Audio Driver downloaded from MSI product support page successfully installed) but I purchased a USB Audio Adapter so it doesn’t matter anymore.
Thanks again for your advice.
Hi guys!
Currently I’m using BIOS modification with NvmExpressDxe_3. Does it make sense upgrade to NvmExpressDxe_4?
Thanks!
It makes sense, if you have any problem with the older NVMe module or want to replace your currently used NVMe SSD by a newer one.
Sorry Fernando for taking so long to reply back, i don’t want Intel Raid0 for these 2 SSD’s/just SSD’s. I was hoping i can get a adapter that allows to place 2 extra pcie boards in a 90 degree which at the moment i don’t need 2 ssd’s right now. Long story; short… i want one ssd to work at this time in 4x with my video card in 8x, since i have an extra 4x lane from cpu i was hoping if i can use that extra one for when i don’t have anymore space for storage in current drives. It’ll be a adapter which comes out the last PCIE slot for a mATX board which splices to two others. Hope that makes sense :S
Also the current "NvmExpressDxe_4" module, does it allow for Samsung 970 Pros?
UPDATE: the moment i plugged in the USB Audio Adapter, the Integrated Realtek ALC892 Audio Controller shows up in Windows Device Manager. Must be the act of mighty god.
Your G1 Sniper M5 Z87 supports SLI, which means the 16 PCIe 3.0 lanes from the CPU can be split to x8/x8 and you want to take advantage of that by using the full x8 for two x4 PCIe/NVME SSDs. So far, so understandable. ![]() The issue is that the chipset does not support further "bifurcation" of the PCIe lanes in that x8 slot. So with passive M.2 adapter cards, all the card sees is one x8 slot and the mainboard only sees one x8 card. Server chipsets and the X299 chipset support PCIe lane bifurcation as far as I know. For a consumer grade chipset like your Z87, you would need an acitve adapter card which has a PLX PCIe switch chip onboard. Those exist, see here and here, but they do cost about $450 and up, because of the PLX chip price gouging that is going on. At that price it does not make a lot of sense and the money is better spent on a larger capcity SSD to begin with. Maybe you would be fine with a PCIe NVME SSD and a M.2 SATA SSD on the same adapter. Those exist and work. The PCIe SSD gets power and data through the PCIe slot and the SATA M.2 SSD gets power through the PCIe slot, but has a cable connected to a normal SATA port. That way it is compact and you only have one cable connected. You won’t get the super speed of PCIe on both drives though and no RAID. Otherwise, use the small PCIe SSD for as long as it suites you and once you need something bigger, sell it off and buy something bigger. That’s about the only two viable options I see for your situation at the moment.
The issue is that the chipset does not support further "bifurcation" of the PCIe lanes in that x8 slot. So with passive M.2 adapter cards, all the card sees is one x8 slot and the mainboard only sees one x8 card. Server chipsets and the X299 chipset support PCIe lane bifurcation as far as I know. For a consumer grade chipset like your Z87, you would need an acitve adapter card which has a PLX PCIe switch chip onboard. Those exist, see here and here, but they do cost about $450 and up, because of the PLX chip price gouging that is going on. At that price it does not make a lot of sense and the money is better spent on a larger capcity SSD to begin with. Maybe you would be fine with a PCIe NVME SSD and a M.2 SATA SSD on the same adapter. Those exist and work. The PCIe SSD gets power and data through the PCIe slot and the SATA M.2 SSD gets power through the PCIe slot, but has a cable connected to a normal SATA port. That way it is compact and you only have one cable connected. You won’t get the super speed of PCIe on both drives though and no RAID. Otherwise, use the small PCIe SSD for as long as it suites you and once you need something bigger, sell it off and buy something bigger. That’s about the only two viable options I see for your situation at the moment.
Now to my own post, which was the reason I registered yesterday:
Hey!
I just registered to write a big thank you for this thread! ![]() My system specs are in the signature. TL;DR: It all worked great!
My system specs are in the signature. TL;DR: It all worked great!
Long rambling version:
I had a 500GB 840 Samsung SSD since 2013, the first TLC NAND SSD (with the bug). It was sorta fixed via firmware eventually, but the SSD still felt slow after using it a while. I didn’t just want to upgrade to another 2.5" SSD and I didn’t want to upgrade to another 500GB SSD. When the Samsung 950 Pro was released, I was tempted to get the 256GB version (~170€) just for my Windows partition and a game or two, because it had the Option ROM which meant it would work and it would have provided a nice upgrade in terms of speed, though not capacity. Never followed through, the small capacity was a turn off and the 512GB version was a bit too expensive for my taste. I kept an eye on the whole thing though. I saw several threads that discussed inserting NVME modules into older chipset BIOSes to get PCIe NVME drives bootable. And while I’ve done BIOS mods on my graphics cards and laptops to reduce voltage or increase frequency, I was still wary of messing it up and bricking my motherboard. So when I saw a good deal on a 960 Evo 1TB SSD (300€ @ Amazon.de), I started looking into it again. I noticed the Clover chainloading version and thought that sounded good and non-invasive. But once I actually clicked on all the "plus/spoiler" signs in the first post, I realized the BIOS editing did not seem too difficult and the brick potential was low. So before I even ordered the SSD and adapter, I edited my BIOS file and flashed it. Since I have a CSM version, MSI does not offer BIOS files on their website, they only update through software. But in the BIOS, one can save the BIOS file, which I did and I edited that. Then I saved the flashed file to confirm that the NVME module was present, which it was. All worked.
It was good timing as well, since I had to do some PC maintenance in any case. My CPU heatsink fans stopped reporting RPM numbers, which possibly meant they were dead (Dark Rock Pro 2 has two fans, one 120mm and one 135mm). And my case fans had a loose blade assembly (from being too old is my guess, 9 years), which meant they scraped against the case. So I replaced all the case fans, checked the CPU heatsink fans (which worked) and then inserted the Icy Box IB-PCI209 with my Evo 960 installed in the PCIe slot (it has another slot for a SATA M.2, which is powered via PCIe slot but connected with a SATA cable). I also disconnected both SATA drives and had my new Win 10 USB stick with version 1803 ready to go. Loaded up the BIOS and selected the "[UEFI] Patriot USB Stick" option. It loaded and I could choose the ~930GB SSD to install my Win 10. I let it do its thing, then shut it down and installed the 750GB 2.5" data HDD. The bootable thing is the "[UEFI] Windows Boot Manager", but in the overview it mentions it as "[UEFI] Windows Boot Manager (Samsung Evo 960 1TB)". I disabled the legacy boot stuff and enabled fast boot for the first time and I now load into Win 10 after 12 seconds. Before, I had it at [Legacy+UEFI] and normal boot, which was about 25-30 seconds or so.
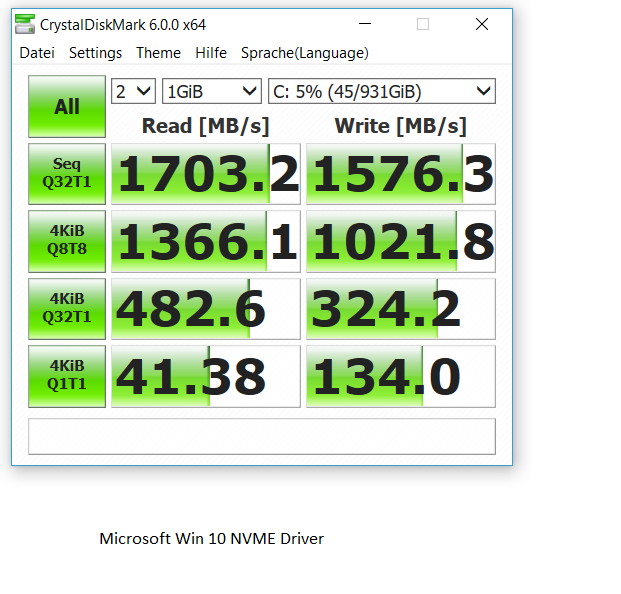
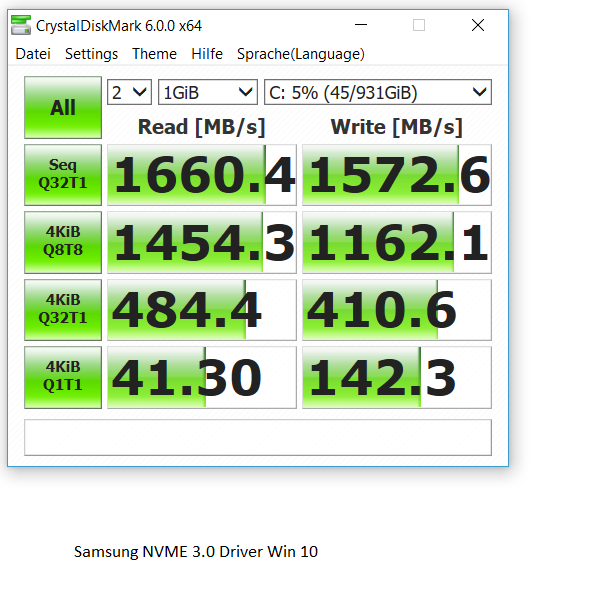
I did one CDM benchmark with the default Win10 driver and one with the 3.0 Samsung NVME driver. Sequential speeds are pretty similar, randon speeds are a bit in Samsungs favor. So I think I’ll stick with it for now.
If I wasn’t such a fan of small cases and tidy installations, I probably would have gotten a Micron 1100 2TB 2.5" drive as my catch all. My current system is 500+750GB (Sys/Data), so 2TB would be plenty. And they are cheap-ish, at 330-350€ on ebay.de. But I do like the M.2 form factor, so I went with the PCIe NVME version for my system drive. I will likely get a 1TB M.2 SSD for my data drive, not sure if it’ll be SATA or NVME/PCIe. SATA I could use right now with the adapter card. PCIe, I could use when I change to a Ryzen system (waiting for a nice mATX A450 board) with the M.2 slot onboard and the adapter card occupying the PCIe 2.0 x4 slot (native onboard 3.0 x4 would be my Evo 960 for system stuff and adapter card 2.0 x4 would be a Kingston A1000 which is 3.0 x2 fo 250€ right now, SATA M.2 is 210€ for 1TB on sale). We’ll see. ![]()
Anyway, super grateful for the thread and the great first post guide. For anyone wondering, my BIOS settings weren’t changed by this mod, my CPU still runs at 3.6GHz/1.0V, no weird things happened to my graphics card (32" 4k monitor @ DP1.2 and 22" 1080p @ DVI). My LAN connection might have a hiccup (Realtek chip), but that used to happen from time to time with no real reason before as well, unfortunately.
Cheers,
Lukas ![]()
Edit: It seems that the LAN issue is a cable issue. Switched it to another one and that seems to be working fine now. Opening/moving the case around must have exacerbated and existing cable issue.
@DeathAngel :
Hello Lukas,
welcome to the Win-RAID Forum and thank you very much for your detailed and interesting report!
It is fine, that you succeeded by simply following my guide and now can enjoy the performance of your NVMe SSD.
Regards
Dieter (alias Fernando)
Thanks to the developers for the correct method, for the meticulous description. The system works perfectly!
nguru
@nguru :
Welcome to the Win-RAID Forum and thanks for your feedback!
It is fine, that you are satisfied with the method, the guide and your result.
Regards
Dieter (alias Fernando)
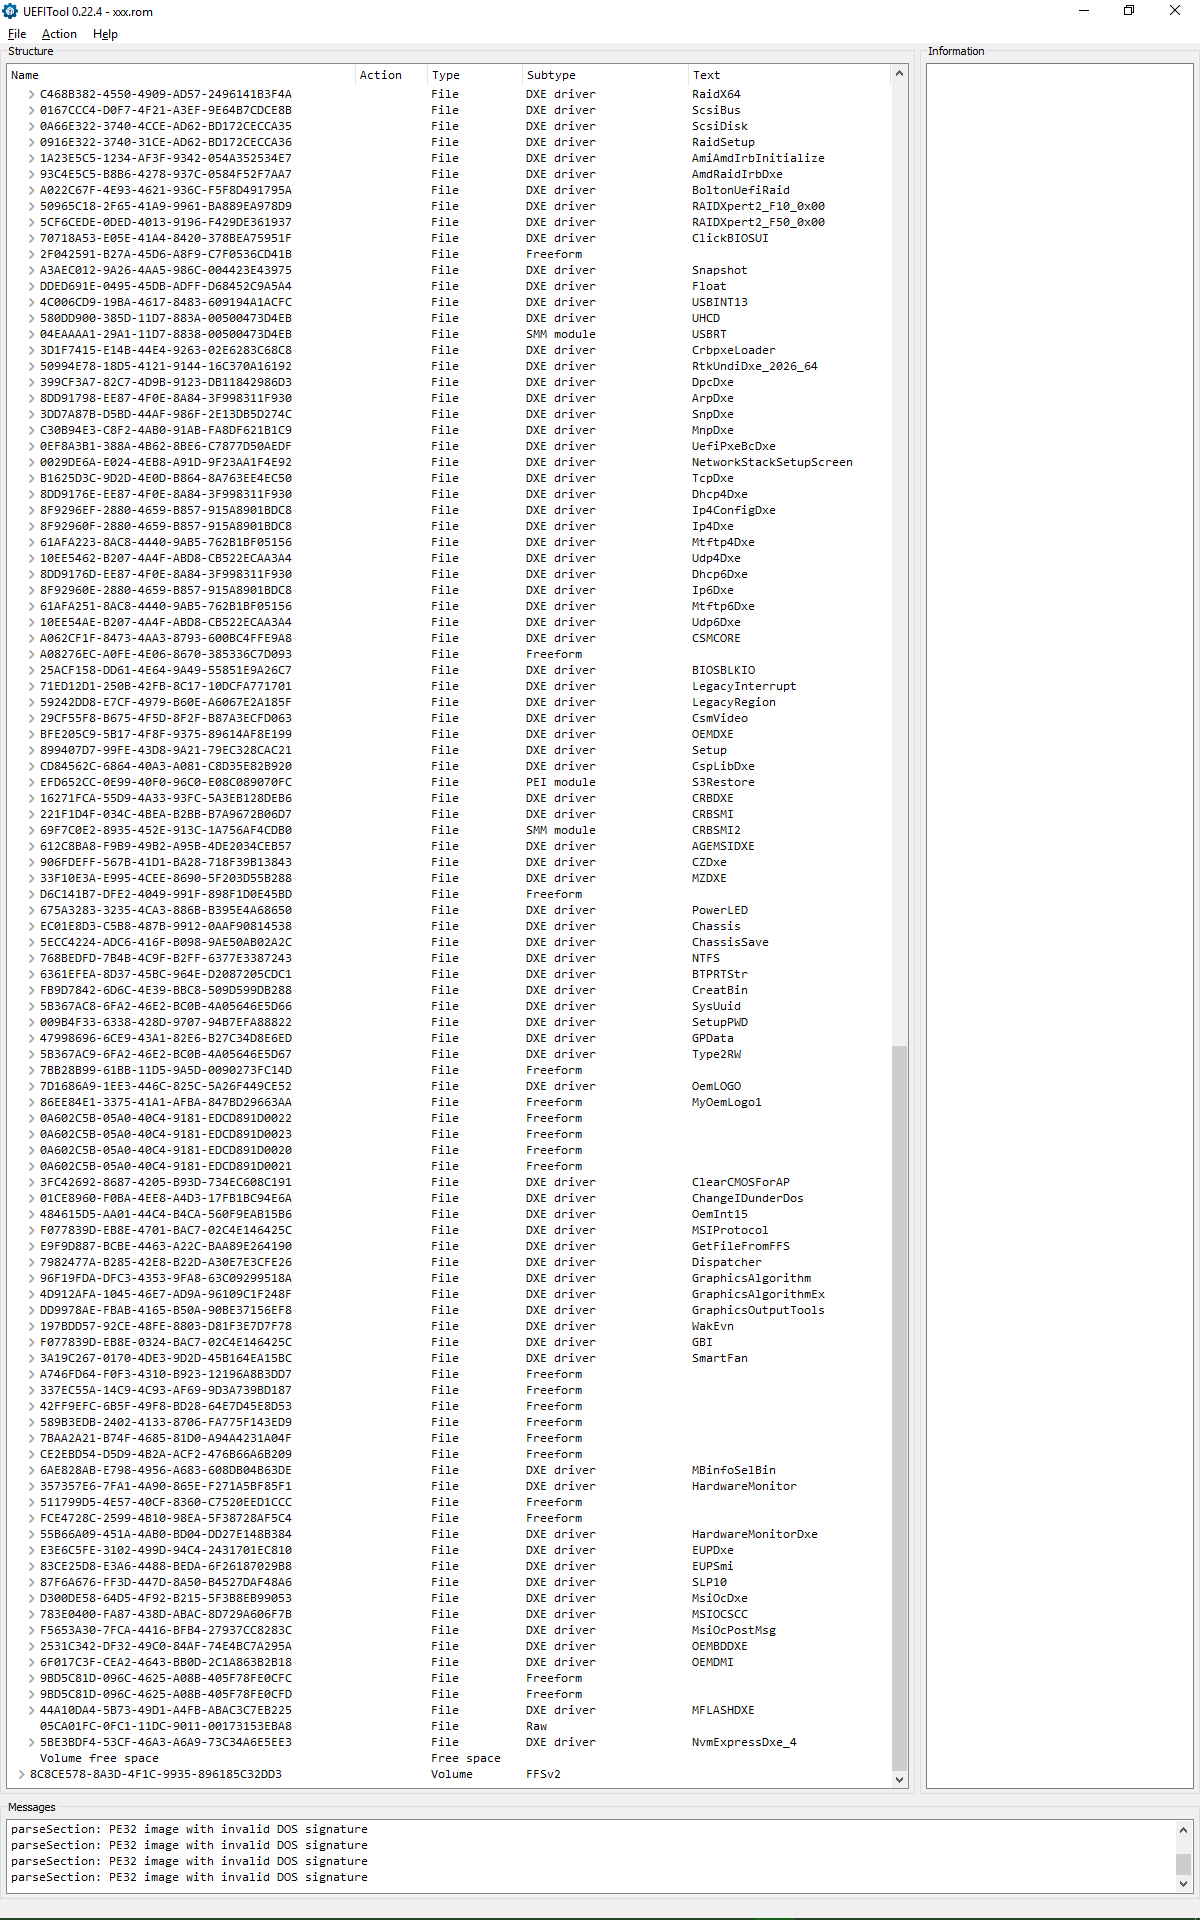
The file to be modified is "E7793AMS.I40" from a Microstar A88X-G41 PC Mate (V2).
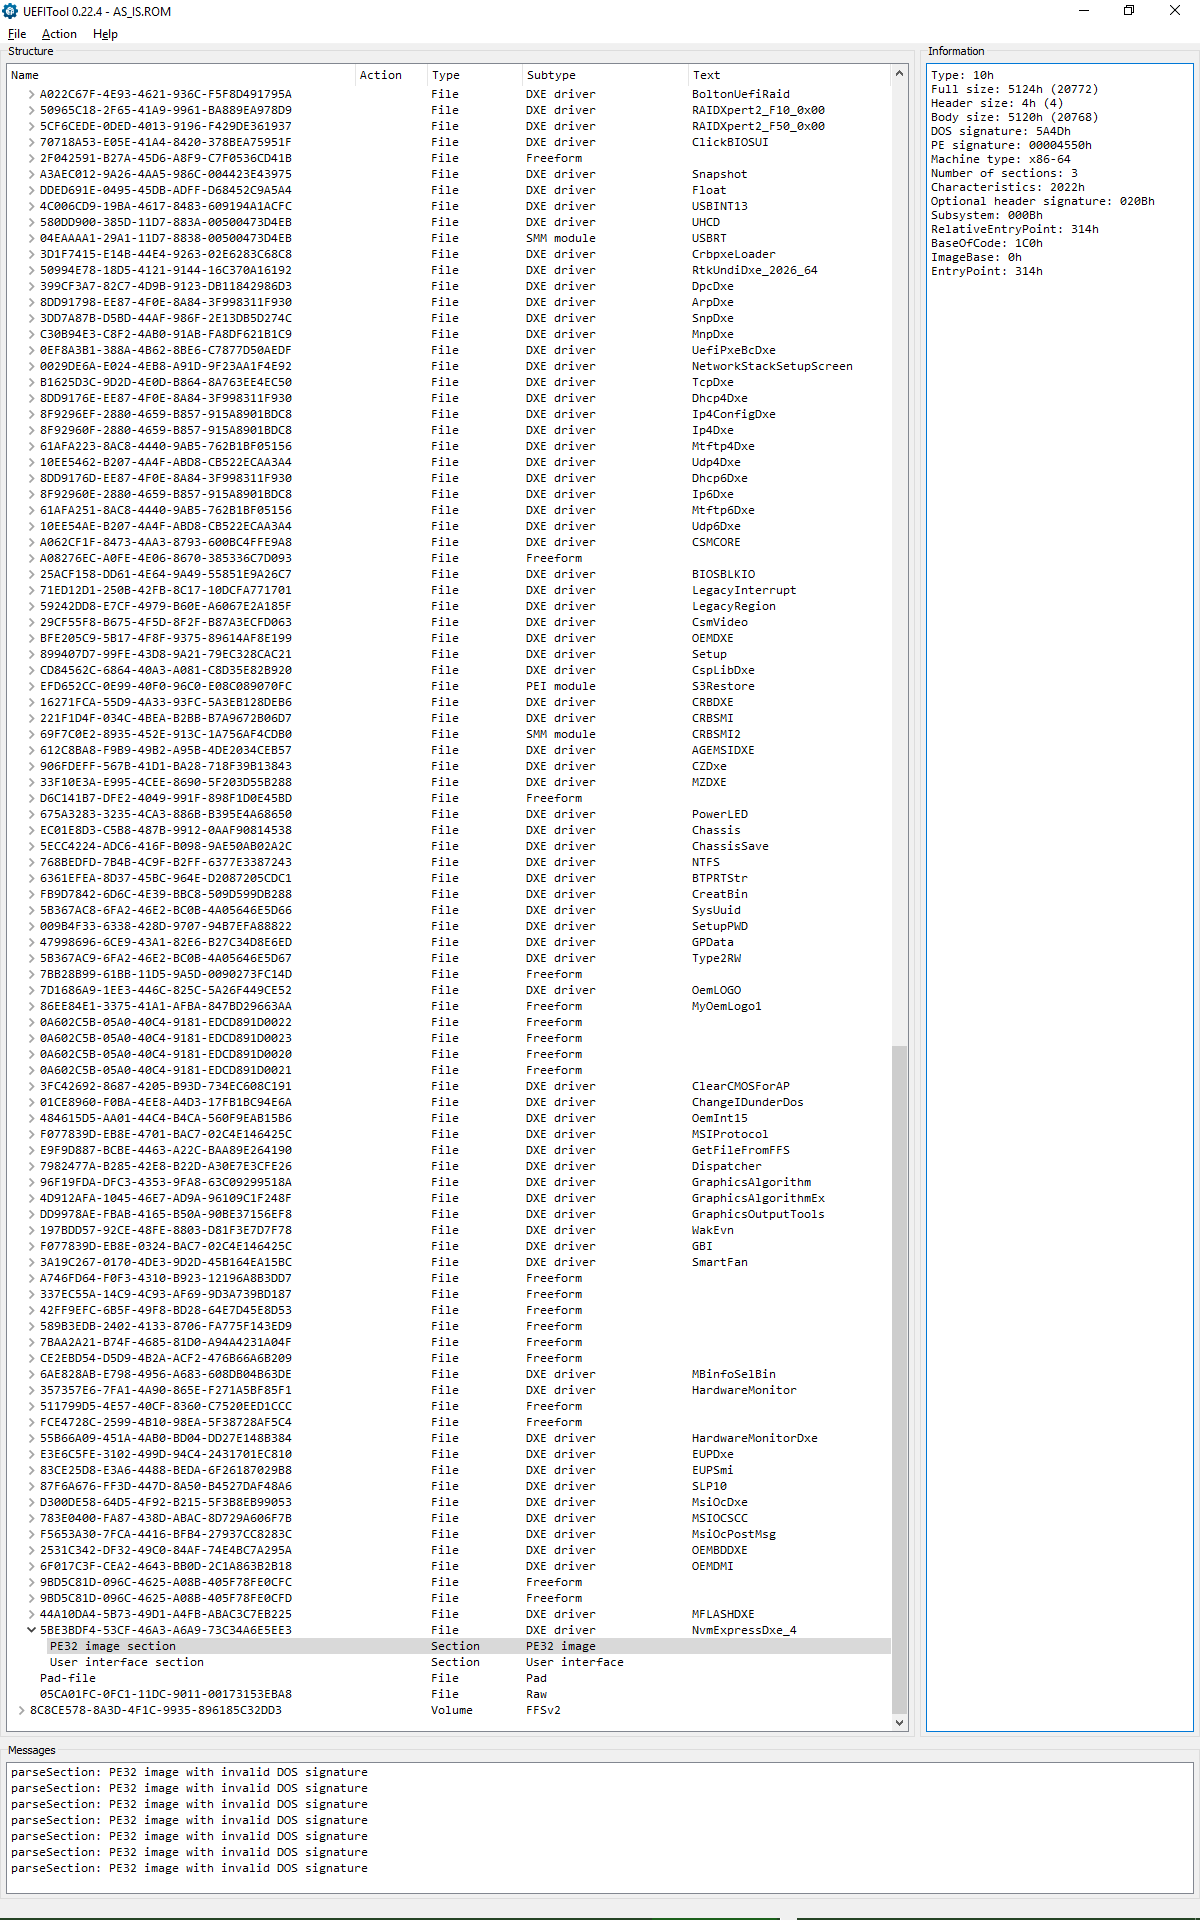
After opening the file with UEFITool (v0.22.4), the following messages appear:
parseSection: PE32 image with invalid DOS signature
parseSection: PE32 image with invalid DOS signature
parseSection: PE32 image with invalid DOS signature
parseSection: PE32 image with invalid DOS signature
parseSection: PE32 image with invalid DOS signature
parseSection: PE32 image with invalid DOS signature
parseSection: PE32 image with invalid DOS signature
.
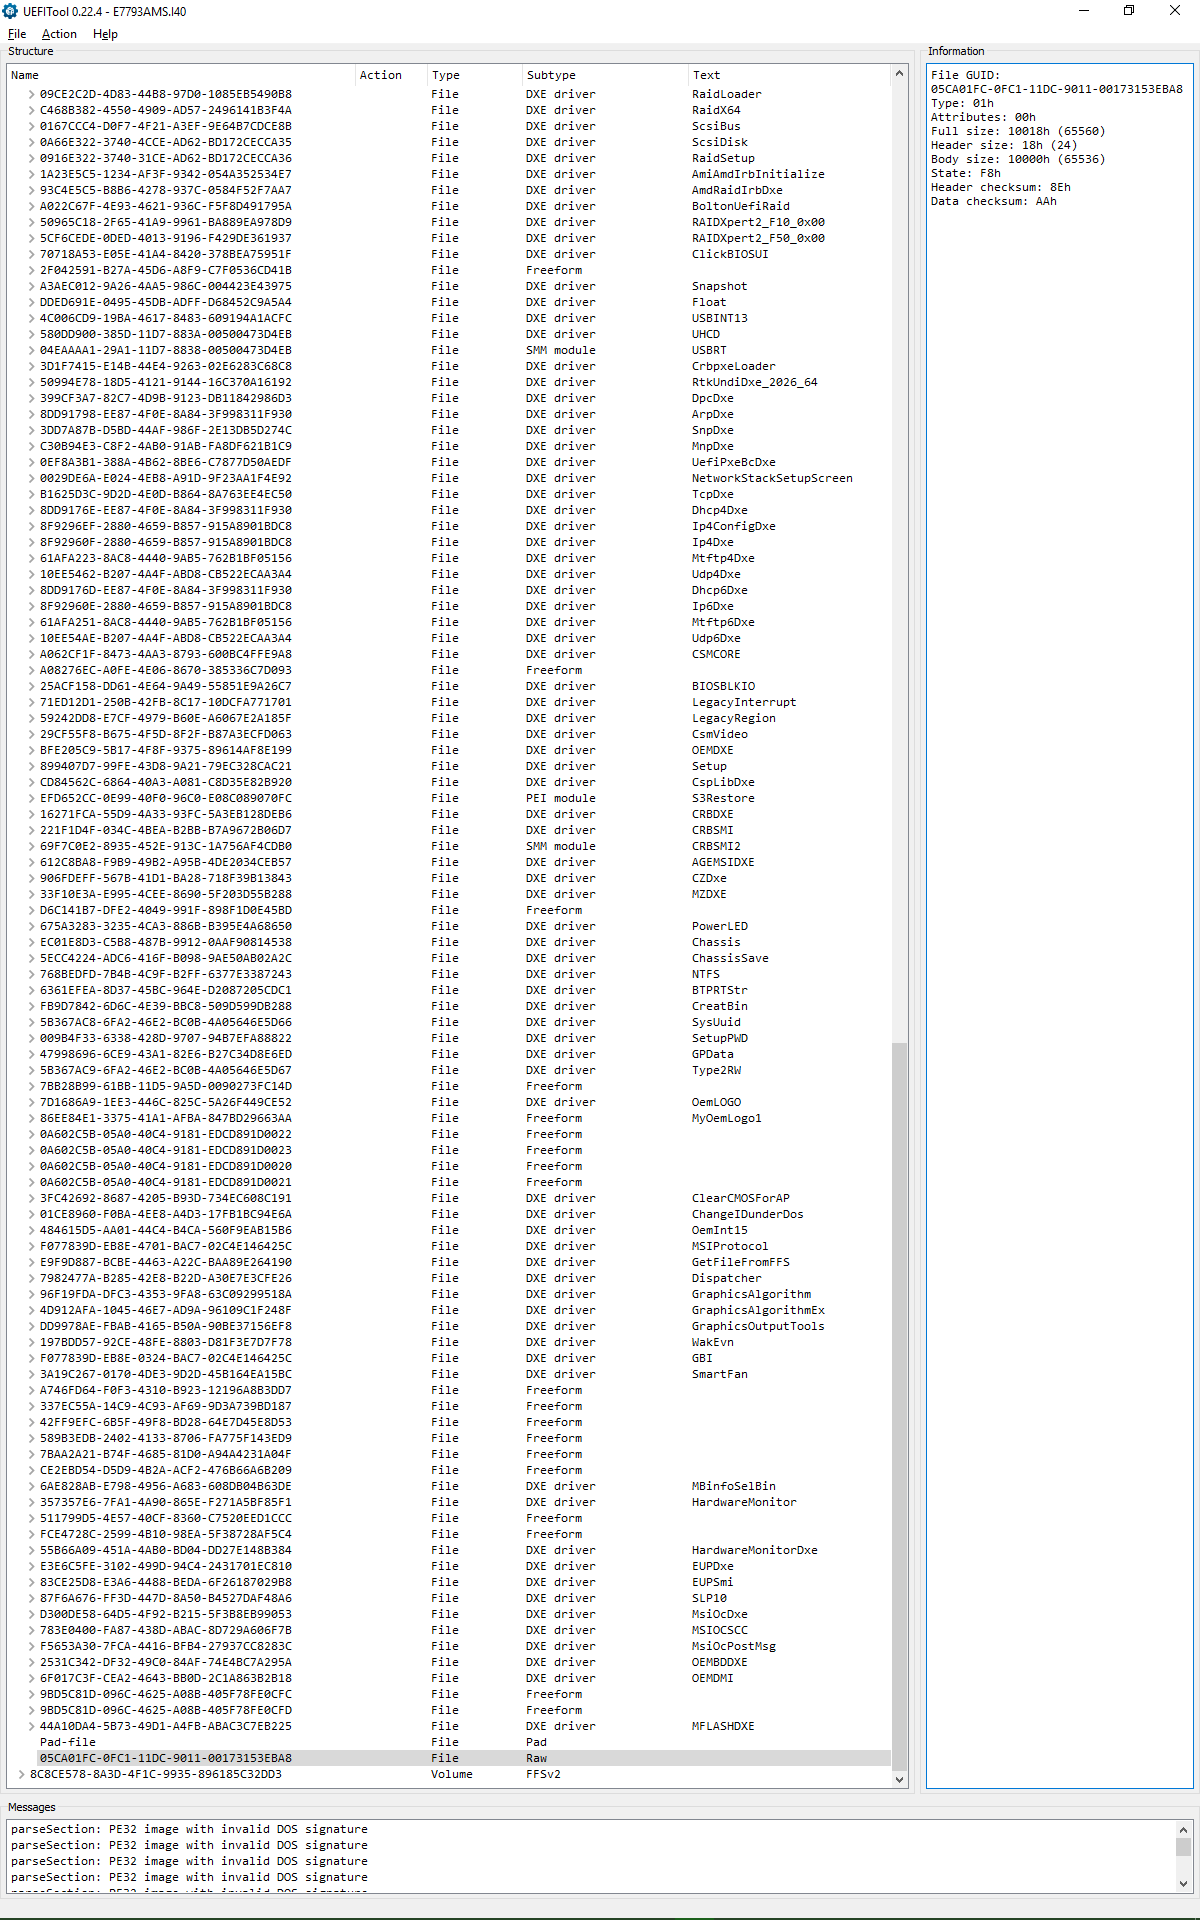
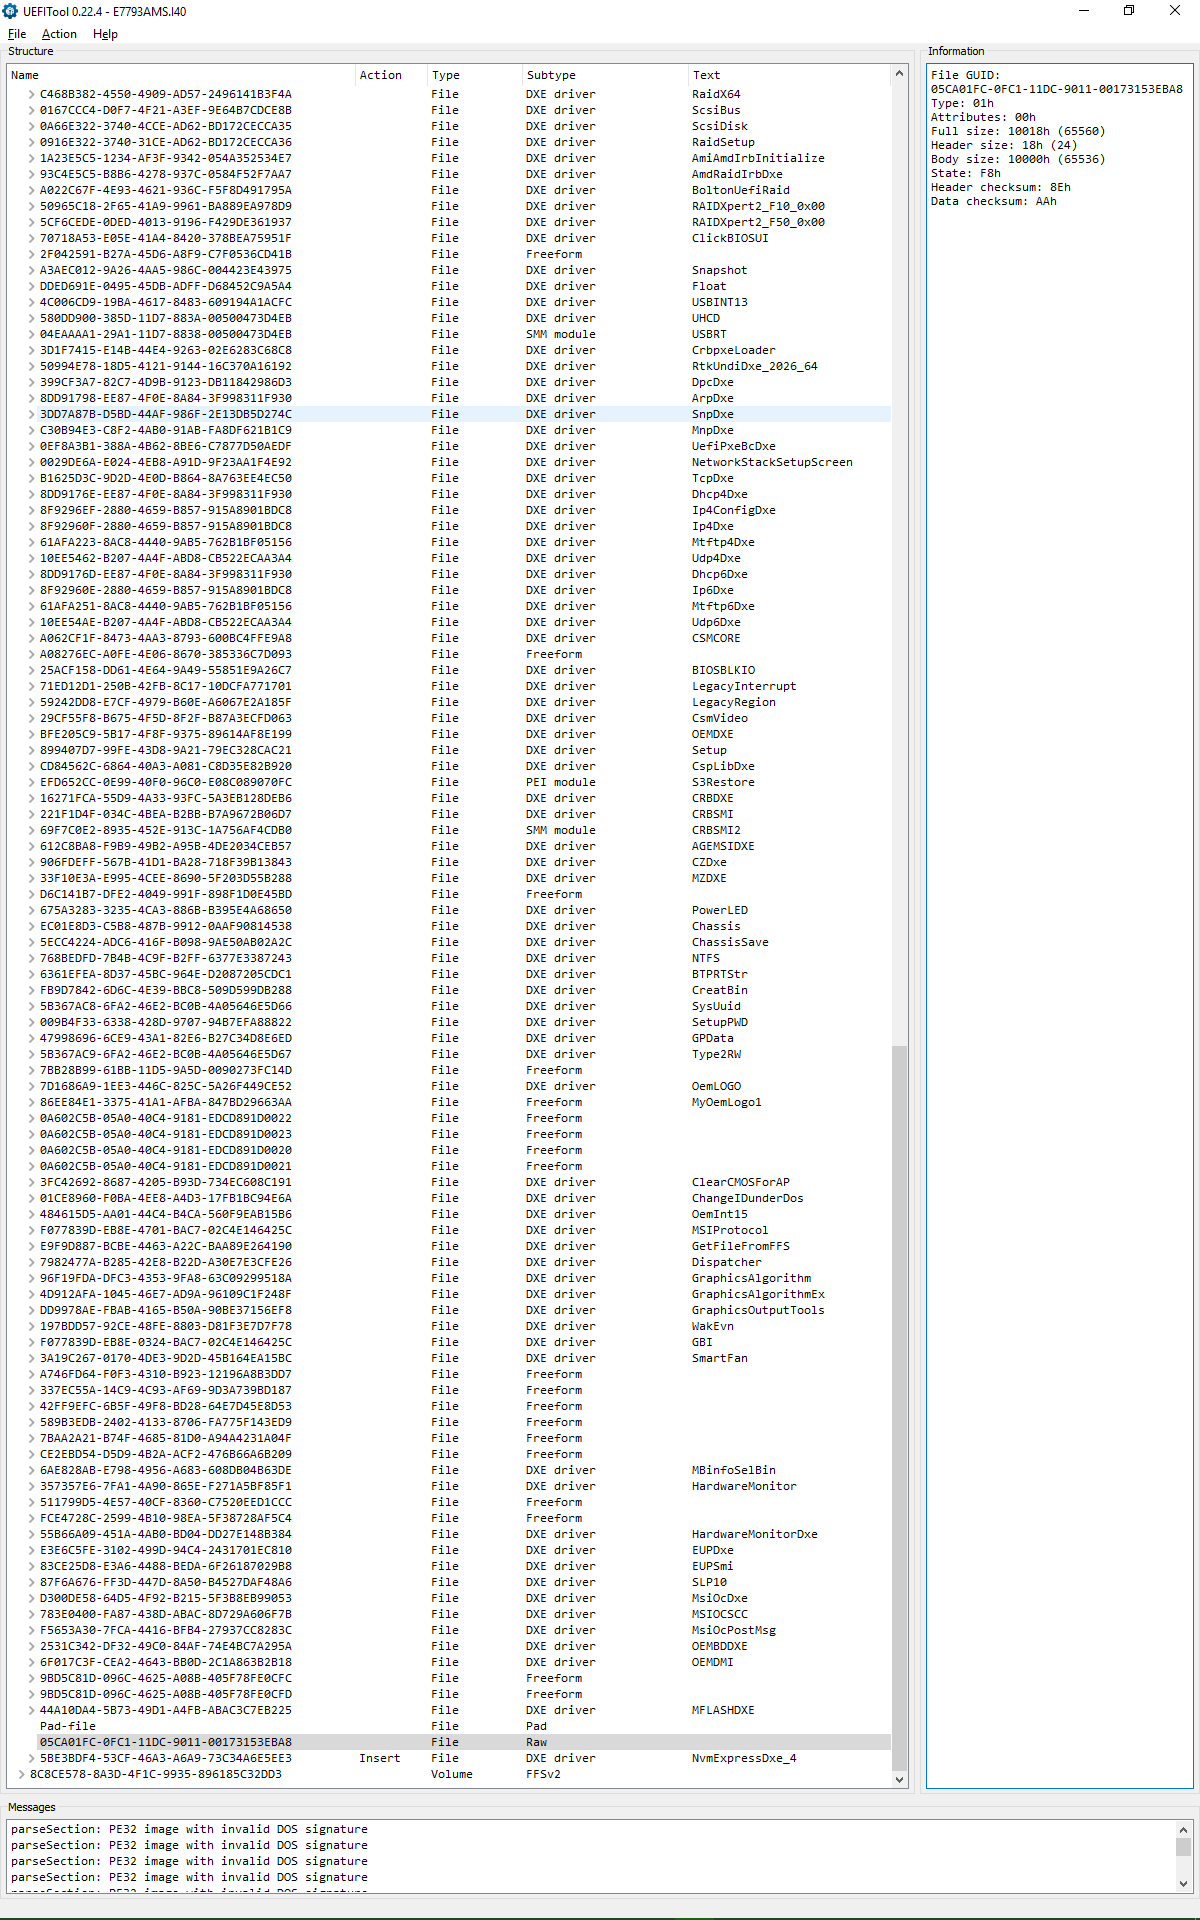
The last item with a GUID in the section is of the Raw subtype (01h), the previous item is a Pad-file of the subtype "Pad" (F0h) and the one preceding it is of the subtype "DXE driver" and it is named "MFLASHDXE".
Should I insert it after the "Raw" item?
If I do so, the result looks like on the last of the attachments. The last 4 items in the section are as follows:
MFLASHDXE
Raw
NvmExpressDxe_4
Volume free space
.
Is the module inserted correctly?
Can I attempt to flash the resulting image?
@Antikapitalista :
Welcome to the Win-RAID Forum!
Please attach the original and the modded BIOS files (compressed as *.ZIP or *.RAR archives) and I will do a look into them.
Regards
Dieter (alias Fernando)
Thank you very much for your cordial welcome, Fernando.
Here is the download source of original BIOS file: http://download.msi.com/bos_exe/mb/7793vI4.zip
I believe that there should be some ways of recovering the mainboard after a bad flash, but I would like to take as many precautions as possible because I the flash chip is soldered to the mainboard and even though I have a parallel port Willem flasher (successfully utilized a few times), probably with even a suitable clip somewhere, I am so notoriously clumsy that I would rather do my utmost to avoid such recovery attempts.
On running E7793I40.exe, E7793AMS.I40 is unpacked into the user temporary folder.
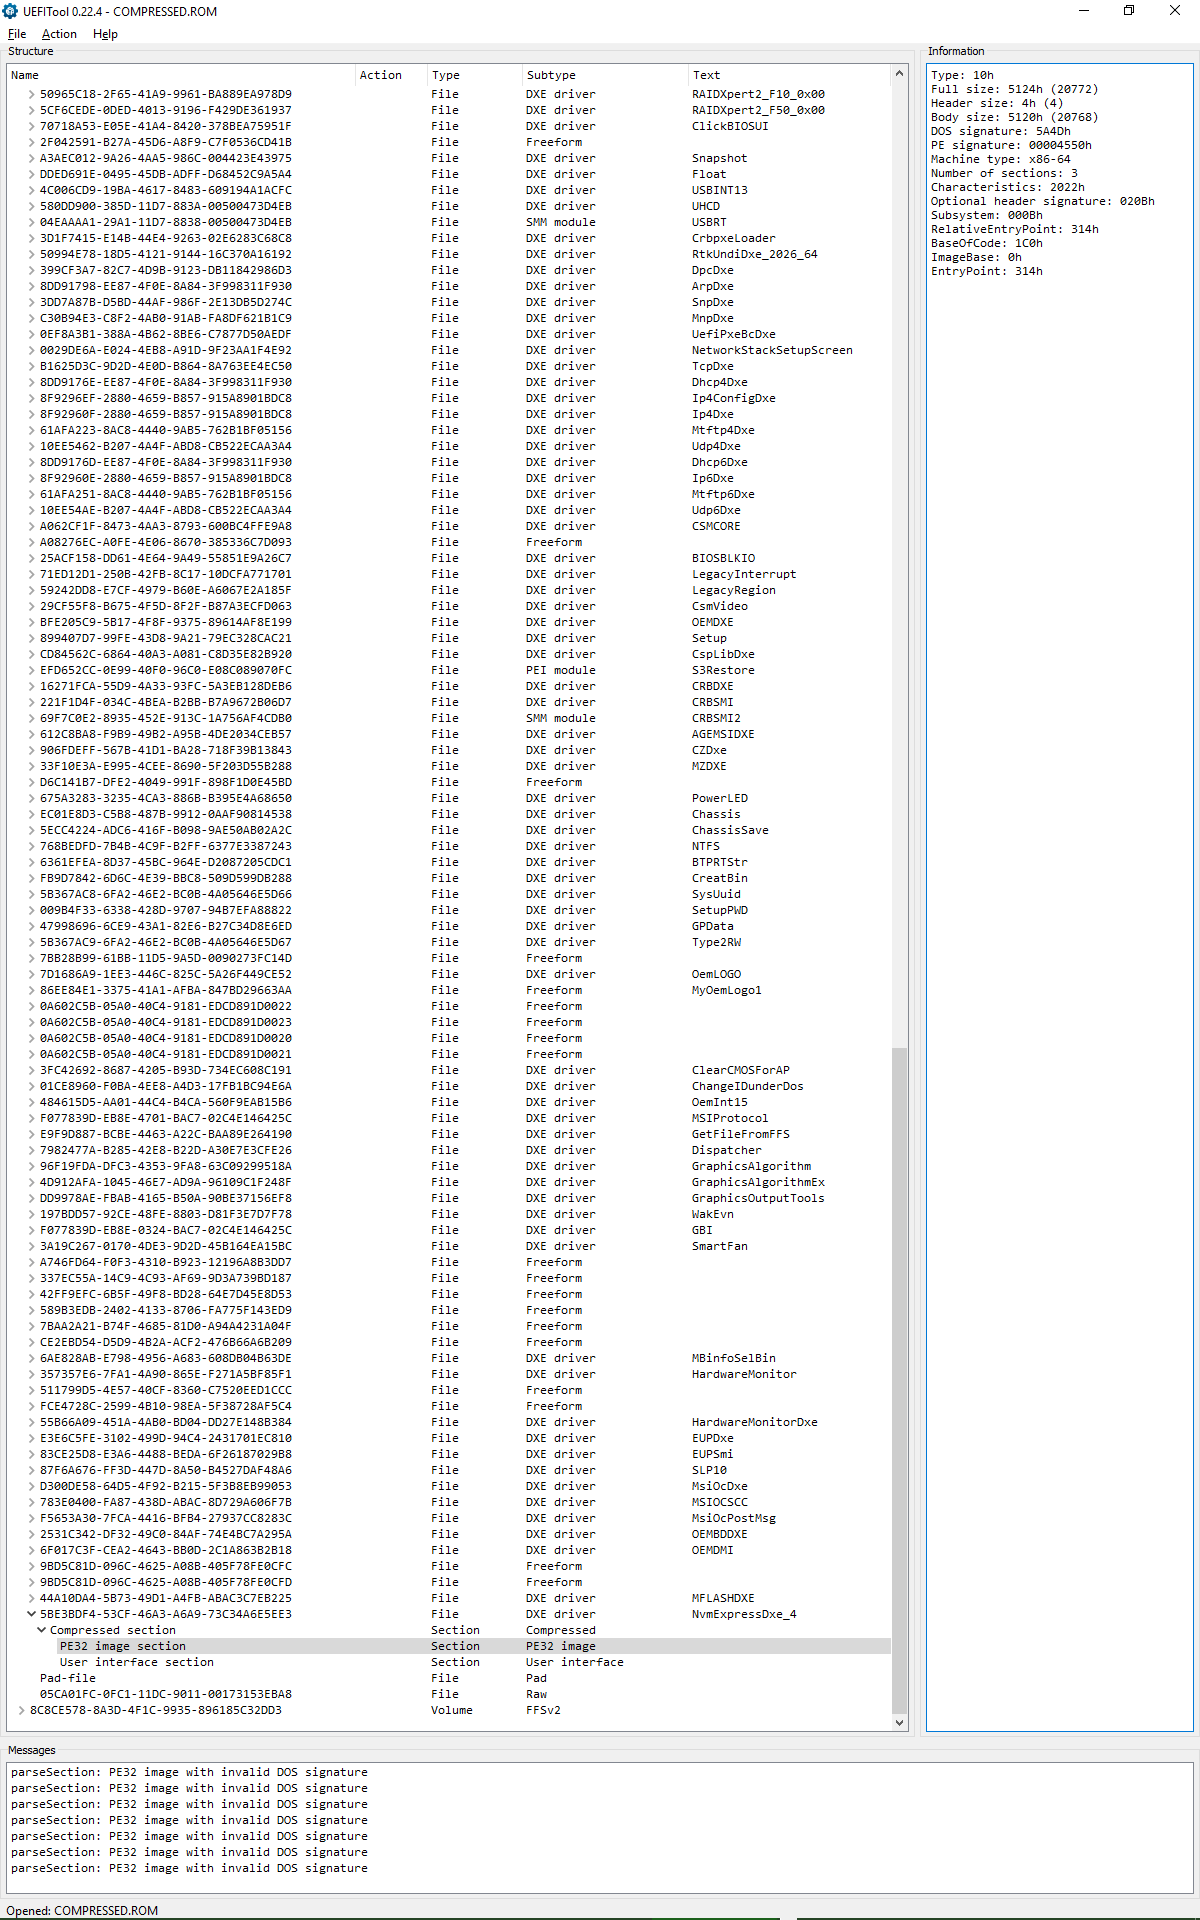
MODIFIED.ROM has been modified with UEFITool.
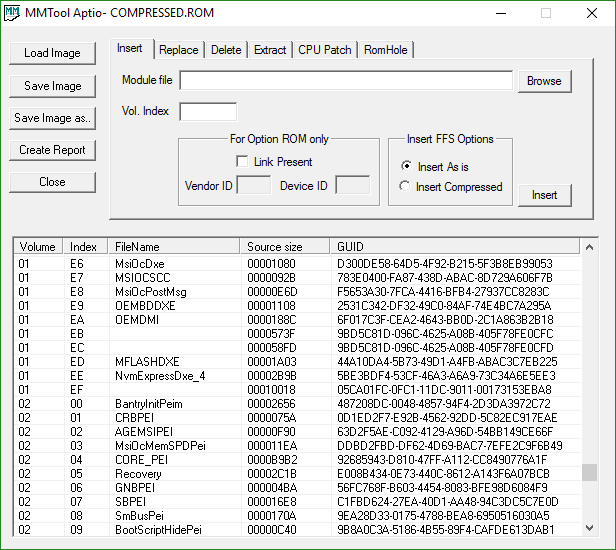
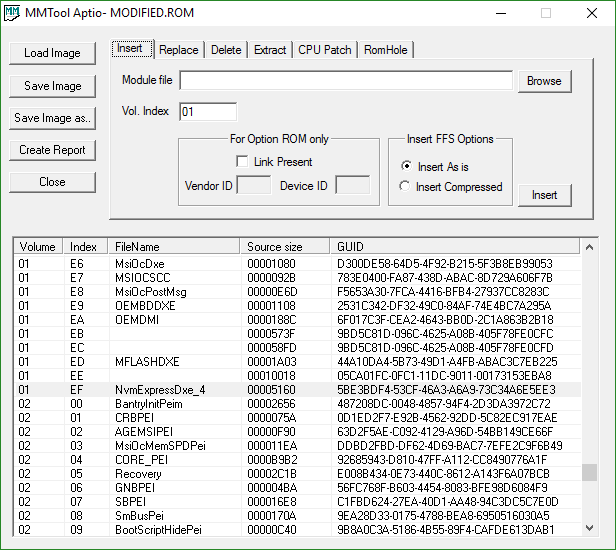
COMPRESSED.ROM has been modified with “MMTool 502.0024 Mod” (MMTool 5.02_patched) by inserting the module as compressed (as are the other modules in the image).
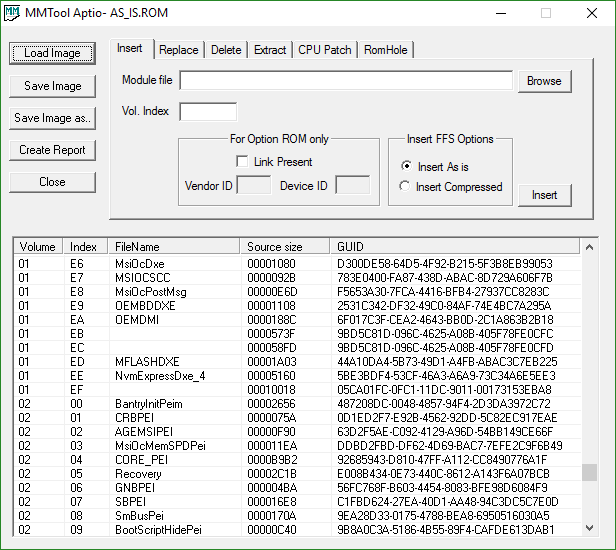
AS_IS.ROM has also been modified with “MMTool 502.0024 Mod” (MMTool 5.02_patched), but this time by inserting the module as uncompressed.
It is interesting that MMTool Aptio produces images whose layout is much more similar to the original image file.
Which resulting file one should I use? Should I use the one which is produced by UEFITool, as it is recommended at the beginning of this discussion thread, or should I use one of the files produced by the patched MMTool Aptio?
Which one should I use?
I have also attached screenshots of the results of the process of modification using MMTool 502.0024 Mod; first as MMTool Aptio sees them, then as UEFITool sees them… and finally a screenshot of how MMTool Aptio sees the image produced by UEFITool.
I compressed the attachments with WinRAR (5.50), which, in my experience, produces ZIP files which are widely compatible.
E7793AMS.zip (5.76 MB)
MODIFIED.zip (5.77 MB)
COMPRESSED.zip (5.77 MB)
AS_IS.zip (5.77 MB)
@Antikapitalista :
Thanks for the uploaded BIOS files.
I have done a look into all of them and found, that you have done the modification correctly with all 3 modded variants. That means, that all 3 will work (provided, that you are able to flash a modded BIOS at all).
If I were you, I would flash the BIOS, which you have named “MODIFIED.ROM” (simple reason: without any compression the module may be loaded faster while booting). Don’t forget to rename the file before you are going to flash it.
Good luck!
Thank you for your advice, Fernando (even though I did not follow it in the end).
Eventually, I decided to flash the AS_IS.ROM image, the one modified with the "MMTool 502.0024 Mod" (the MMTool Aptio patched to support Aptio 4 UEFI images) to include the driver uncompressed.
The computer started without a glitch and listed a PATA drive (my Optane SSD) in the Bios Boot Specification (BBS) section of the UEFI.
So everything looks as expected.
Hi all!
I got ASUS P8Z77-V LK MB (BIOS v.1402) and willing to get NVMe boot option for Kingston SKC1000H. I’ve tried steps described here, but to no avail I get “Security verification failed” notification while uploading modded BIOS. So I already tried:
- modding source BIOS in UEFITool_0.25.0 and MMTool_4.50.0.23 by adding new NVMe modules
- uploaded using ASUS EZ Flash 2 Utility with fresh FAT32 USB stick - got “Security verification failed”
- uploaded using ASUS BIOS Updater in DOS - also failed
- interrupted source BIOS update to crush it, then uploaded modded one through CrashFree BIOS Utility - still no effect, several restarts and it returns to initial state (v.1402)
Please let me know how to trick that damn “Security verification failed”. Thank you in advance!
@Svem :
Welcome to the Win-RAID Forum!
This thread is about how to get full NVMe for all systems with an AMI UEFI BIOS, but if you want to know how to get a modded BIOS properly flashed, you should read the start post of >this< resp. >this< thread and follow the advices given there.
Regards
Dieter (alias Fernando)
Thank you, Fernando!
ASUS EZ Update really solves “Security verification failed” issue, but still do not see my NVMe in BIOS bootables. Please hint what I’m doing wrong.
I’ve tried uploading two modded BIOS versions: the one with NvmExpressDxe_Small (separetly tried NvmExpressDxe_4 either with no success) module added in UEFITool_0.24.0, the other with Nvme, NvmeSmm, NVMEINT13 modules (extracted from original Z97 BIOS) added in MMTool v4.50.0.23. NVMe do not appear bootable after restart, I still see it as flash drive only (in Windows10), also can install Windows10 on it.
p.s. ASUS USB Flashback ends with “Security verification failed” too, so ASUS EZ Update procedure is our only friend.
You wll never see the name of your NVMe SSD shown as bootable device, because it is only bootable in UEFI mode.
Please check, whether a Disk Drive named PATA_SS is shown within the BIOS. If not, the modded BIOS has not been flashed properly.
What does this mean? What happened?
Since your mainboard doesn’t offer the “ASUS USB Flashback” feature, you should use “AMI Flasher Utility” (AFU) according >this< guide.
Victory!!!
Thank you, Fernando, you’re the great!)
I saw PATA_SS yesterday, tried to boot it twice with no success, and continued other ways. Now it is all clear and works fine as bootable.
My MB doesn’t support “ASUS USB Flashback”, but yesterday I crushed BIOS and it showed me black screen saying to plug in USB with P8Z77VLK.CAP BIOS. It accepted only original.
So, for the others luckily have ASUS P8Z77-V LK and now want NVMe support I suggest:
- Follow every step on the 1st page, using UEFITool to get modded BIOS with NvmExpressDxe_4 module
- Use “ASUS EZ Update” (contained in ASUS AI Suite) procedure to upload modded BIOS without “Security verification failed” restriction
- When you see “PATA SS” in Boot Manager in BIOS, prepare FAT USB with Windows 10 x64 and follow steps on the 1st page
- And the last one, most important, NEVER deal with ASUS hardware!! (lesson learned )
)
Good Luck!
Thank you, Fernando, Ethaniel and EDK2 Team for this great work.
My pretty old mb Gigabyte GA-Z77-D3H now is working with NVMe drive on Win10 native, you’ve saved me from spending a lot of money on new motherboard, may be cpu/ram/etc.
So with my greatest thanks I’ve send a donation.