hello
will this bios mod work with Asus Rampage III gene (x58) and samsung 970 evo ?
@nofearek9 :
Welcome to the Win-RAID Forum!
No, the BIOS modification is not possible, because your Intel X58 chipset mainboard has a LEGACY mode BIOS without any “DXE Drivers”.
Only systems with an AMI UEFI BIOS are supported by the guide, which is layed down within the start post of this thread.
Nevertheless there are alternative methods available to use the Samsung 970 EVO SSD as system drive of your old system, but the boot sector would be outside the NVMe SSD.
>Here< and >here< are the related guides, which describe different methods.
Regards
Dieter (alias Fernando)
thanks for the reply fernado.
Hi , I’ve modded bios using your nvmexpress add on ,still can’t get the ssd working . I have Windows 7 and H81M-E33 motherboard,the ssd is m.2 integral 2280 240gb ,trying to get it work using adapter for pcie .The SSD is not seen in bios ,neither in Windows . I’ve tried to use the Clover ,couldn’t copy files for booting.And DUET ,I think the usb stick with DUET was working but I didn’t booted my pc into windows or windows installation.I have installed microsoft fix for SSD from their website the fix 477475.And runned EFI installation of windows 7 with hotfix ,couldn’t find the ssd there too. Can You help me making this work ?
@nicko13 :
Welcome to the Win-RAID Forum!
Without knowing what you have done and what exactly happened, I cannot help you. I don’t even know, whether you have modified the BIOS correctly.
Please attach the modded BIOS as *.ZIP or *.RAR archive. Then I will do a look into it.
Regards
Dieter (alias Fernando)
I have tried with these two files ,and different versions of bios newest is 6.80 ,I’ve used 6.70 and 6.60 too. bios files MSI H81M-E33
Tried to put nvmexpress dxe after Float value ,and in the bottom of bios.I was doing also extraction of nvme files from other MSI motherboard Z97 Gaming bios and inserted them into bios file,didn’t work as well.
Also I had problems with bios update many times. The bios was freezing the pc when updating.And when I update it goes to 96% and then restart.
Fernando Tell me please , this module is suitable for moding the BIOS "NvmExpressDxe_4" module or need NvmExpressDxE_2 GUID ?
asus b8z77v pro thanks .
@nicko13 :
The 1. step is the integration of the NvmExpressDxe_4.ffs into the latest/best BIOS by following my guide (= start post). There is neither a need for other NVMe modules nor for other BIOS versions.
Once the integration has been done correctly, step 2 is flashing the modded BIOS. By the way: The related procedure is not the topic of this thread. >Here< is the related guide with links to other more specific ones.
@SERJEY777 :
To be honest, I do not understand your question. What do you mean with “this” module and why should you need an extremely outdated BIOS module, which doesn’t support modern NVMe SSDs?
I’ve attached bios files after integration , one of this is with integrated NvmExpressDxe_4.ffs into latest bios from motherboard manufacturer’s site just like in the guide.Flashing goes to 96% then the computer restarts,but I’ve readed it’s normal with MSI mobo.I’m using adapter for PCI-e and into it is m.2 ssd. I’m thinking maybe the adapter it’s broken.I will try to do that again but I’ve tried like more then ten times,maybe I’m doing something wrong.
Edit:
I’ve done everything again like in the guide in first post.
Flashed the modded bios through MSI M-Flash.
Windows 7 doesn’t see the m.2 SSD and it doesn’t show up in the bios.
I’m attaching the modified bios into this post.
E7817IMS.680.zip (5.93 MB)
@nicko13 :
Thanks for the link to your modded BIOS. It seems, that you haven’t inserted the NVMe module into the correct location (directly beyond the undermost listed DXE Driver).
You may try to flash the BIOS, which I just now have modded myself. >Here< is the download link. Unzip it by using WinRAR v5.xx and rename the BIOS file according to the MSI rules (similar to the original BIOS?), before you start
You will not see the name of the NVMe SSD within the BIOS, but if you see there a Disk Drive named “PATA”, you can be sure, that
a) the insertion of the NVMe module was correct and
b) the flashing of the modded BIOS was successful.
Good luck!
Hi,
Finally I was able to put the modified BIOS into my flash chip… used a CH341 programmer.
My system: Asus mainboard: M5A99X EVO R2.0, AMD FX 8 core CPU, Windows 10 x64, NVMe SSD: Intel 500GB with an PCIe to NVMe adapter.
I am sure that the modified Bios works, I see now an entry “PATA SM” in the Bios. Also I have a installation DVD of Windows Server 2012R2, it sees the NVMe disk, and allows selecting it. I do not want to install Windows 2012R2, and just used it to test, if it would allow installation. So far so good… On the negative side is that Linux tools like Clonezilla Live DVD does not see the NVMe disk, so I can’t use those tools.
Please support me, to get my NVMe disk bootable with Windows 10 x64…
More details about my system: I have to very old SATA SSDs in this machine, a 80GB and a 120GB.
The computer boots now (C Drive) from the 120GB drive, maybe that is also important: the 120GB SSD is partitioned with MBR.
In Bios I must enable CSM, when I disable it, I can’t boot anymore from the 120GB SSD.
What I tried yesterday: I used a Window tool “Macrium Reflect” to clone the complete 120GB SSD:
Before my boot-drive was c:, the NVMe SSD was G:
Cloning seemed to be fine, letter H: was assigned to cloned SSD…
After rebooting and changing boot drive to “PATA …”, it seems that the system still boots from the original old 120GB SATA SSD, when I remove the SATA cable from the 120GB SSD, machine does not boot.
Please help! What steps are recommended? If possible I would like to avoid to install a new fresh windows.
@CoffeeOne :
I generally do not recommend to clone the data from one SSD to the other, if the data transfer protocol (and in your case additionally the partition scheme) has to be changed.
Big advantages:
1. The OS installation is much easier and safer.
2. You will recognize a big performance gain, because you get rid of all the data garbage, which have been stored within the last years.
3. The opportunity is brilliant to get the latest Win10 version 1809 installed without residues of former Win10 versions).
Everything is layed down within the start post of this thread:
1. Let the tool Rufus create an UEFI mode bootable USB Flash Drive containing the desired Win10 Image.
2. Unplug all HDDs/SSDs except the NVMe SSD.
3. Enter the BIOS and make sure, that the options “Secure Boot” and “Fast Boot” are disabled.
4. Boot off the USB Flash Drive in UEFI mode, let the OS Setup delete all existing partitions of the target (NVMe) SSD Drive and do a fresh install of Win10 onto the freshly created target partition of your NVMe SSD.
I’m not seeing anything like PATA in the bios ,flashed bios modded by You.
In Windows I found only something like this and I had it before(after flashing the bios with mod).
![]()
@nicko13 :
If you don’t see a Disk Drive named “PATA” within the BIOS, I suspect, that the modded BIOS has not been overtaken while trying to flash it.
So you should try another method to get the modded BIOS properly flashed.
Since your problem “How to flash a modded AMI UEFI BIOS” has nothing to do with the topic of this thread, I recommend to have a look into the start post of >this< thread and to post your questions into that resp. into another more specific thread, which is linked within the related start post.
Hi,
OK, I agree to do a new installation…
One more beginners question: How to disable Secure Boot? There is only "Windows UEFI" and "other OS" option. Do I have to delete all the keys? Does it have some influence on the Windows activation?
@Fernando What happens if I do not delete the keys, just curious.
@CoffeeOne :
You neither need nor should delete the Keys.
If you don’t have the BIOS option to enable/disable the “Secure Boot” feature completely, there is nothing to do regarding this point.
For those with an Asus Z87 Plus motherboard with a 2103 firmware, this is what the ‘undermost’ DXE driver looked like on my end before (left Pic) and after (right Pic) the insertion of the NVMe module:
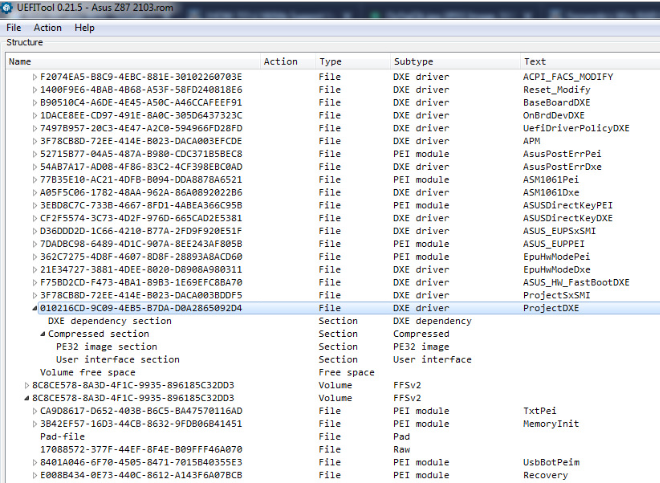
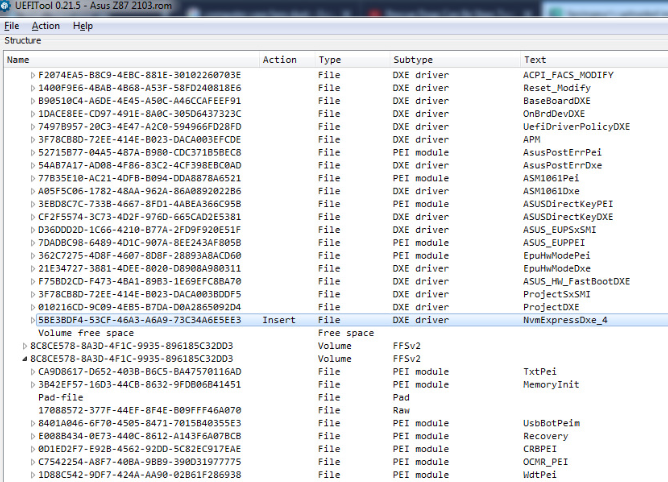
EDIT by Fernando: To save space, I have cropped, resized and directly attached the pictures by using the Forum software. They can be enlarged by clicking onto them.
I Can flash to version 6.60 and it shows 6.60 and then to 6.80 modded and it show 6.80.So it looks like flashed for me.
@CoffeeOne - "There is only "Windows UEFI" and "other OS" option" << If you want secure boot disabled choose other OS
@oculon :
Welcome to the Win-RAID Forum!
If I understand your contribution correctly, you succeeded and now are using the NVMe SSD as system drive. Congratulations!
Since the UEFITool screenshots before and after the insertion of the NVMe EFI module look quite different with each mainboard BIOS, I have customized your post and cropped/resized the inserted pictures.
Hoping, that this is ok for you
Dieter (alias Fernando)