Do you have a guide for this as well? I tried to download the hotfix from MS and it says it’s not available anymore.
Maybe someone kept a copy?
With the hotfix applied I don’t need to load any NVMe drivers then?
@Jor3lBR - x64 version is attached here - [Guide] How to get full NVMe support for all Systems with an AMI UEFI BIOS (251)
Yes!
No matter what I try the UEFI image is not useable through UEFI tool, I have extracted it with WINRAR, 7zip and win zip no method works for making the file useable.
@mehim123 :
Welcome to the Win-RAID Forum!
You obviously didn’t carefully read my guide (= start post of this thread).
Here is the related excerpt:
Good luck!
Dieter (alias Fernando)
Hello,
[Firstly, thank you Dieter/Fernando for this extremely interesting information and running this site.]
Has anyone successfully modified (added NVME boot support) for an Asus Q87 motherboard?
I have been trying to modify the BIOS for an Asus Q87M-E motherboard using the method in this thread. I am confident that I performed the modification successfully, but I have had problems flashing the BIOS. I am using BIOS version 36.02.
For my first attempt I used the Asus AI Suite flash method, using a modified .CAP file which had not had the Capsule Header removed. (The Capsule Header removal instructions only appear partway through the ASRock section. As I had an Asus motherboard I stopped reading at the end of that section.) The result was an unbootable computer, but reflashing the original firmware was easily done using Asus’ recovery method. (Not at all like the ‘good old days’! ![]()
Attempt number 2 was to dump the original BIOS using the AMI AFU Tool for Windows. I ran it several times and compared the files hashes - all matched & it looked OK in UEFI Tool, so I am confident the dump was successful. I tried flashing the modified bios using AFU Tool, but it failed as follows:
Reading flash … done
- ME Data Size checking . ok
- FFS checksums … ok
1e - Error: Secure Flash function is not supported on this file.
Some searching of the forum and elsewhere revealed that this message is probably due to Secure Boot related protections in the BIOS, but in one case was due to neglecting to de-capsule the BIOS before modifying.
So my final attempt was to take the original Asus .CAP file and remove the Capsule Header using UEFI Tool (as per the ASRock flashing instructions), then modify the file containing the extracted body of the firmware. I once again tried flashing the BIOS using AFU Tool under Windows, but the result was the same.
Before trying anything else I thought it wise to consult the forum. Especially as I had noticed that all of the BIOS files - the original .CAP, dumped ROM & modified files - are 16MB in size, not 8MB as everyone else’s seem to be.
Options I have not tried yet are flashing under DOS using the version of AFU Tool with the /GAN option. And flashing using the Intel Flash Programming Tool.
It is not essential to get this motherboard modified. I just though it looked like more fun than using one of the NVME bootloaders and, if successful, should be less work in the long run when moving drives & disc images between computers.
Thanks.
[Apologies if I have not done enough research and missed something obvious. I have problems with my vision & cognition which makes reading rather difficult.]
@davelister :
Welcome to the Win-RAID Forum!
Your specific problem to get the modded BIOS properly flashed has more to do with >this< thread than with the topic of this thread.
Please have a deeper look into >this< thread as well.
Good luck!
Dieter (alias Fernando)
I’m trying to get nvme support on my X9DRD-7NL4F board. I’ve modified the BIOS I think appropriately, but when I try to boot it I get no video. I saw this: [Guide] How to flash a modded AMI UEFI BIOS (17)
Reading that it looks like I might also need to inject a video driver as well. If that’s the case where would I find that driver?
@davelister - adding to what Fernando mentioned, I see you said “The Capsule Header removal instructions only appear partway through the ASRock section”
That does not apply at all to Asus boards Capsule, hence what you mentioned is in the Asrock section. Any file you created removing a capsule in this manner for Asus will brick your board, do not try to use those files.
Asus Capsule can be removed by opening BIOS in UEFITool and right click where you see capsule in the middle, choose extract body. This file will be 2KB smaller than original, and will now be a rom/bin file.
Since your board does not have USB Flashback, I highly suggest using the method I made guide for located below, you can start at step #6 because here is your variables step #1-5 gathers >> 0x8A and 0x8B
[GUIDE] Grub Fix Intel FPT Error 368 - BIOS Lock Asus/Other Mod BIOS Flash
For this, DO NOT use CAP BIOS, must be extracted from capsule first using UEFITool. However, no problem there if you follow the guide, since you will make a backup file to edit anyway.
If you see ANY size errors in FPT stop and do not proceed, post an image of your command entered and the error shown all in same window.
Please pay attention to the red warning at the start of my guide, if you use this method you should create a backup per the guide, then modify that, then use that to flash with.
Your ME version is 9.1 (So you know which ME Tools folder to download to get FPT)
@mottsen - Did you change BIOS settings after flashing the modified BIOS into the board? If not, then it wouldn’t have changed your graphics output from what it was previously, legacy or UEFI graphics rom loading setting would need changed (Or to secure boot mode when not previously EFI vs legacy etc)
Sounds more like you flashed mod BIOS and were not able to enter BIOS to change anything, correct? I could be wrong, but sounds like possibly the mod was not done correctly.
Do you get what I meant, not sure if I explained that well, if mod BIOS worked NVME or not, you hadn’t changed anything relating to the graphics yet, so it should be possible to fail to load graphics same as before, unless you were able to enter BIOS aftter mod and started changing settings to try and boot from the NVME.
If that’s the case, then yes, what you linked might be true for your board.
@mottsen :
Welcome to the Win-RAID Forum!
This problem is obviously caused by a missing appropriate EFI GopDriver within your mainboard BIOS for your in-use graphics adapter.
You can temporarily solve it by entering the BIOS and setting the “CSM” option to “ENABLED”, but you have to make sure, that you will still be able to boot the storage devices in UEFI mode.
Please give us some additional information:
1. What exactly have you done after having modified your mainboard BIOS?
2. Did you already flash the modded BIOS? If yes, do you see a Disk Drive named “PATA” or “PATA SS” within the “BOOT” section of the BIOS?
3. Which BIOS settings did you choose within the “BOOT” section of the BIOS?
>Here<.
Regards
Dieter (alias Fernando)
Thank you.
Hey everyone i just wanted to say that i followed the guide and successfully installed Windows 10 on an Asus P8Z68 DELUXE. I used this adapter https://www.amazon.de/gp/product/B07FN3Y…0?ie=UTF8&psc=1 and Samsung 970 Evo.
I installed the bios module from this post - Small NvmExpressDxe driver. The maximum speed I got was 1500 i believe this is the maximum for PCI-e 2.0. Tnx Fernando ;]
The lack of video is even in the BIOS. I don’t see the splash screen. I suspect there is something wrong with the BIOS that I flashed.
I’ve attached the BIOS as I flashed it. The concern I have is that I might need to place the driver after the raw subtypes instead of after the last dxe driver.
X9DRD78.zip (3.55 MB)
@Bufu :
Welcome to the Win-RAID Forum and thanks for your feedback!
Enjoy the speed of your NVMe SSD!
Regards
Dieter (alias Fernando)
@mottsen :
I have checked your modded BIOS. The insertion of the NVMe module has been done correctly.
So there must be another reason for your issue.
If you have access to any other graphics card, insert it instead of your currently used one.
Yes I did miss that part of it. My mistake was not operating the BIOS mod tool correctly. It is evident I am in way over my head… I understand nothing of what I am doing, However I managed to MOD the BIOS and am now trying to see if I can brick my MOBO with my inexperience and thanks for the step by step tutorial I really appreciate it, I will continue trying until I destroy My MOBO or am successful.
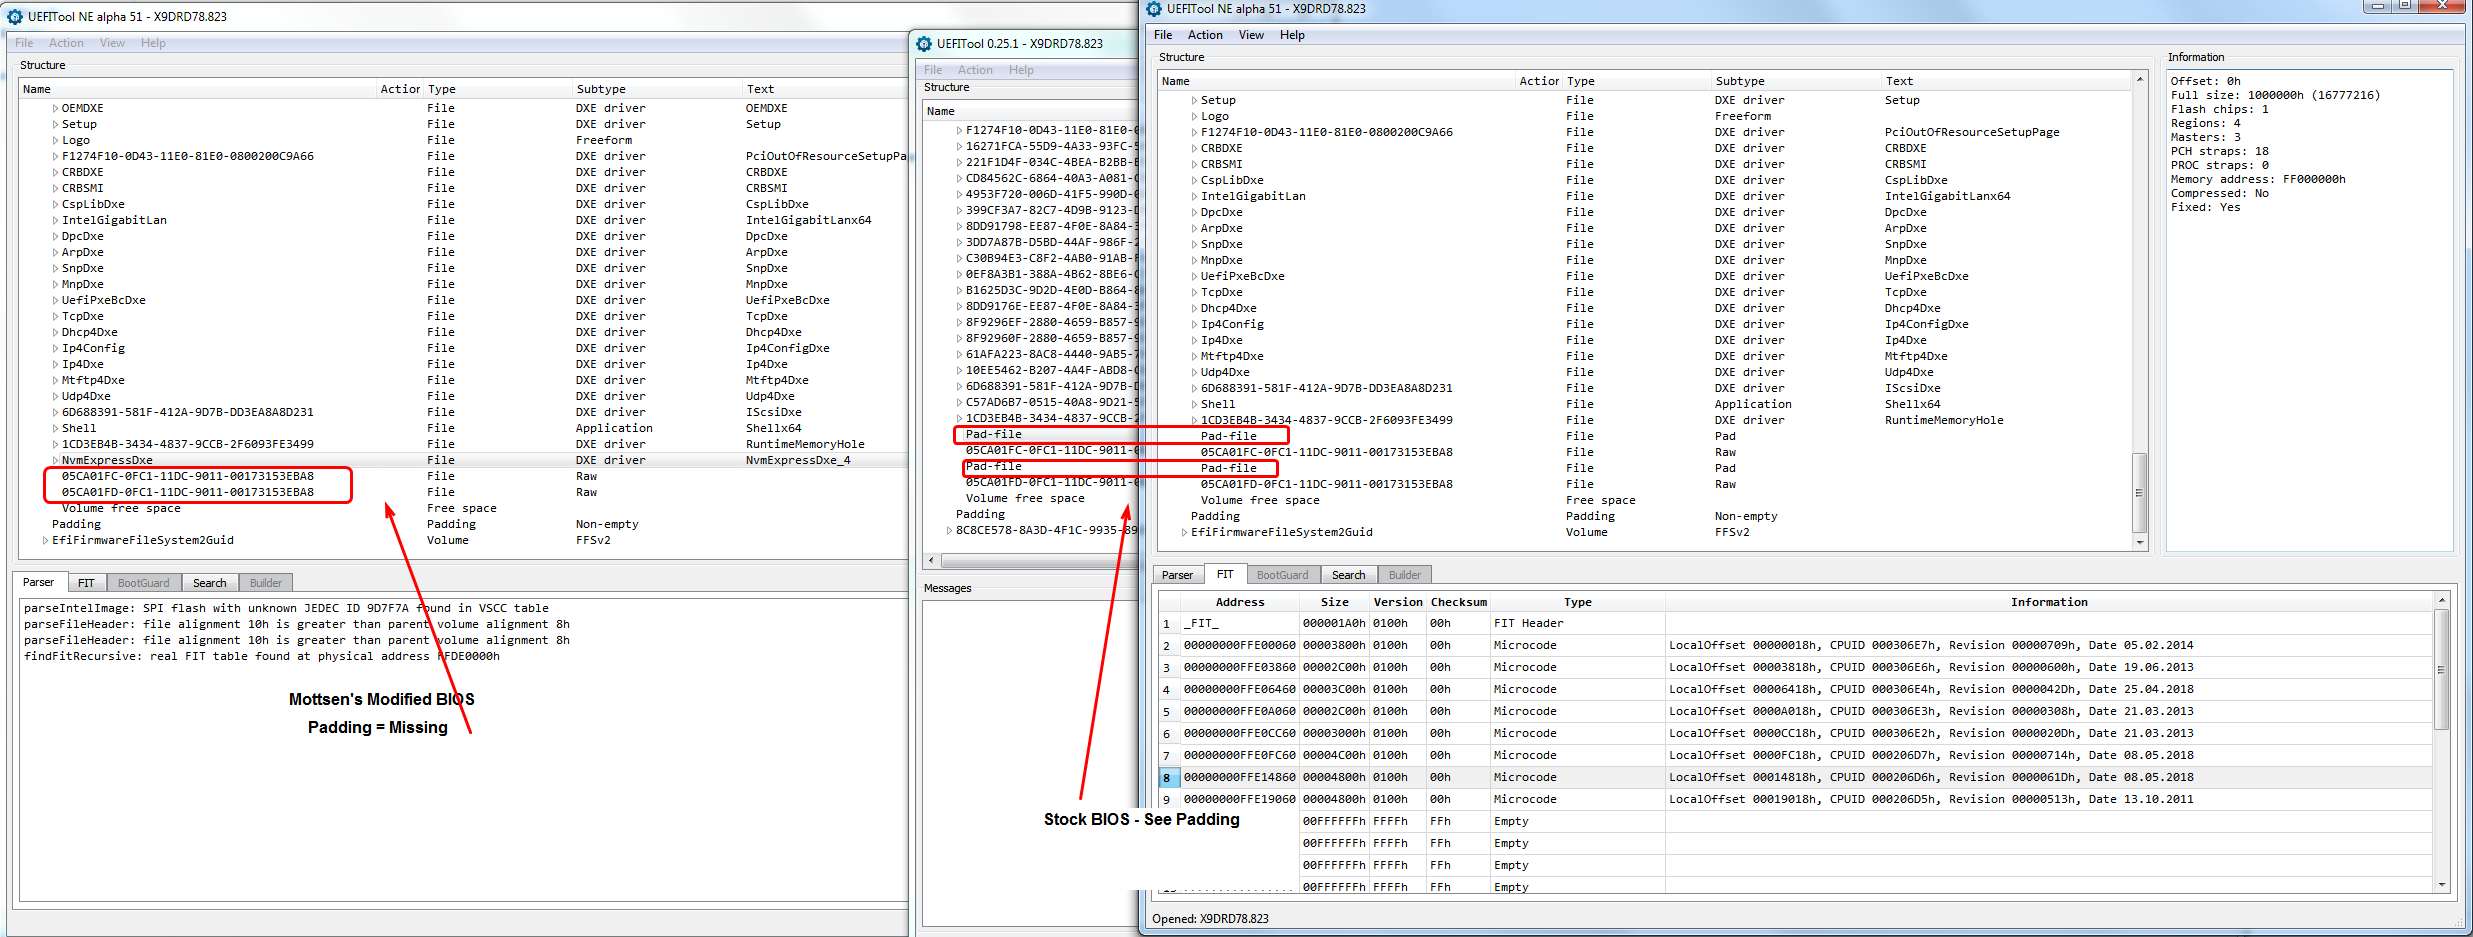
@mottsen & @Fernando - That is broken BIOS mod - this is due to UEFITool, similar to what I mentioned before Fernando about the padding/Non-UEFI data in padding regions etc, only this one no UEFITool version works. Only in this BIOS there is no warning for this in the parsing section.
See comparison with stock BIOS (Right) and modified (Left). And, after several tests, for this BIOS you must use MMTool, which would be your fix anyway Fernando 
 I checked UEFITool all the way back to 17.4, all destroy those padding files (That do contain data)
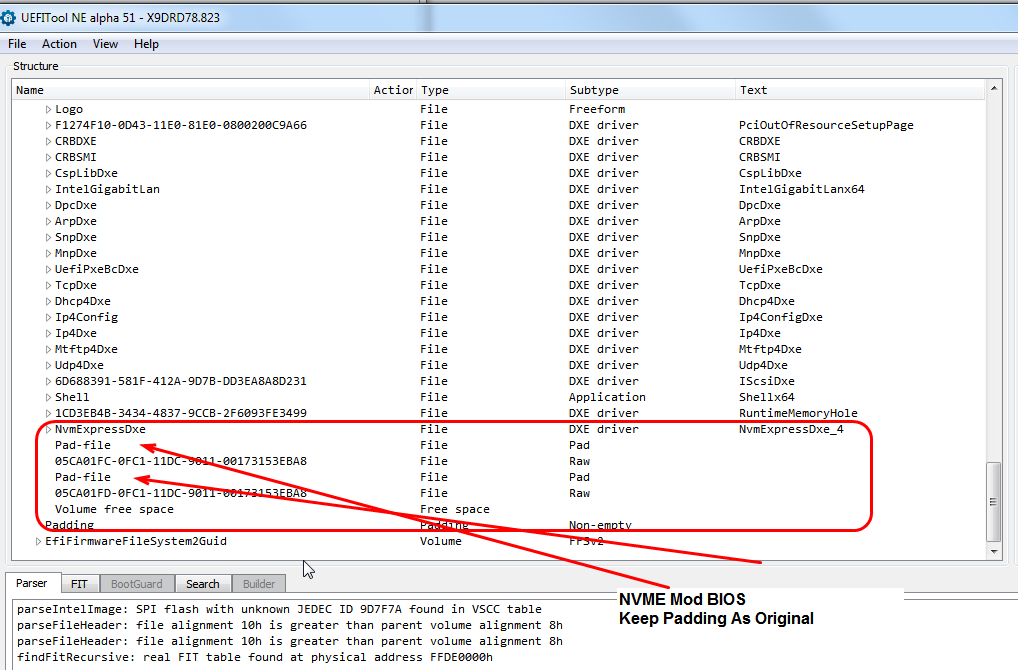
Here is properly modified BIOS mottsen, using MMTool
@mottsen :
I am sorry, that you ran into a problem after having correctly followed my guide.
Fortunately our BIOS expert Lost_N_BIOS found the reason for the BIOS corruption and a way how to solve it.
Good luck while flashing the “repaired” BIOS offered by him.
@Lost_N_BIOS :
Thank you very much for your interesting find regarding this bug of the UEFIool regarding the insertion of any EFI module into the BIOS of certain mainboards.
Due to your report I will add a warning and/or an alternative method to the start post of this thread,
@CodeRush :
Were/are you aware of the UEFITool bug, which has been found by Lost_N_BIOS and explained >here<?
Is there a chance, that this bug will be fixed in the near future?
No problem @Fernando happy to help! I usually only see this on some BIOS, always usually with some padding files it will show >> NE Alpha = non-UEFI data found in pad-file Or Regular version = Non-Empty pad-file will be destroyed after volume modification
This issue does not always occur, sometimes it leaves the padding alone after modifications, other times it destroys it as mentioned/warned. However, normally when that happens you can use 25.0 instead of 25.1 and the padding wont get destroyed usually.
In this case, there was no usual warning shown in the parsing section about any pad-files, so it wasn’t easy to spot without knowing in advanced to check for this regardless of the warning or not.
I believe he should be able to boot to NVME now, at least o BIOS for sure. I doubt the vBIOS/graphics issue would occur unless he has to later change boot modes CSM/UEFI etc to boot from the NVME, if he does then he may need the updated vBIOS insertion as discussed.
For your reference Fernando, these padding files are not always in that location, near NVME insertion, that can be destroyed when modifying BIOS, they can be anywhere, even outside volumes too
So it’s something I always check before/after mod to see if the parsing mention of padding is present before/after and if not then investigate to find it’s location and contents, and if necessary use other version until padding remains as originally was.
Since you detected the bug and know much more about it, it would be the best, if you write the related bug report.
Maybe I should replace temporarily the current chapter “Insertion of the NVMe module” by a new guide using the MMTool v4.50. What is your opinion?