https://us.msi.com/Motherboard/Z87-GD65-GAMING.html
Hi, and did anyone do a BIOS modification for my MSI GD65 z87? link to the manufacturer’s website above.
Can you please make a modification, and upload the BIOS file. I have very little experience, I’m afraid that I will do wrong and get a brick. I want to install nvme sdd in the PCIe port. Thank.
link to download the latest BIOS from the manufacturer’s website.
http://download.msi.com/bos_exe/mb/7845v1C.zip
@ubisyka :
Welcome to the Win-RAID Forum!
I haven’t started this thread and taken my time to write a detailed How-To Guide with the intention to do the BIOS modding myself.
Please follow my instructions given within the start post of this thread and you will realize, that it is much easier than you may have thought.
By the way: Not the BIOS Modification itself is risky, only the flashing of a (wrongly) modded BIOS.
If you are unsure about your BIOS modding result, feel free to attach your product as *.ZIP or *.RAR archive and we will tell you, whether it has been well done or not.
Regards
Dieter (alias Fernando)


Look please, I did everything right? I used to have the E7845IMS.1C0 file extension and after the modification I changed to E7845IMS.rom, is this the norm? And when you open the message it says this, is it normal too? All screenshots under the spoiler.

Sorry for my bad english, thanks!
files attached, E7845IMS.rar new BIOS file, after modification. E7845IMS_OLD.rar is an old file downloaded from the manufacturer’s website without modification.
E7845IMS.rar (5.74 MB)
E7845IMS_OLD.rar (5.73 MB)
@ubisyka :
Thanks for your attached original and modded BIOS.
Here is my comment:
- You have done the insertion of the NVMe module absolutely according to my UEFITool guide, but nevertheless I do not recommend to flash your modded BIOS.
Reason: As your attached picture regarding the “invalid DOS signature” verifies, the original BIOS hasn’t been built correctly by the mainboard manufacturer. That is why the UEFITool deleted the pad-file, which is within the original BIOS very close to the undermost listed DXE Driver. Since any additional alteration of the original BIOS (here: deletion of the pad-file) may induce a failure while trying to flash such modded BIOS, I do not recommend to try it. - Attached is the BIOS, which I have modded just now by using the AMI Aptio MMTool. As you can verify it yourself, the pad-file is still at the bottom of the DXE Driver Volume (as within the original BIOS).
- Since you get the “invalid DOS signature” messages even by opening the original BIOS, there is no reason to worry about them regarding the flashing procedure.
AFAIK this is the easiest and safest method to get a modded BIOS properly flashed into the BIOS Chip of an MSI mainboard:
1. Rename the modded BIOS exactly the same way as the original BIOS (incl. extension).
2. Copy the file to a USB.
3. Enter M-Flash.
4. Select the BIOS file.
5. Flash it and wait until the process has been completed.
6. Redo your previous BIOS settings.
Good luck!
Dieter (alias Fernando)
E7845IMS_modbyfernando.rar (5.74 MB)
In the archive with the original bios, from the manufacturer’s website, there is another AFUDE238.exe file. Maybe he formulated the correct BIOS file during the firmware?
Thanks for your help, I will try to flash my BIOS on your guide, take your BIOS file and change the name.
AFUDE238.rar (59.3 KB)
@ubisyka :
You can use the AFU tool as well.
I don’t really understand what you mean.
Thank you, I used your bios file. Everything is working fine. In choosing a device from which I want to boot a PCIe SSD will appear after I install it in the computer?
Could you please recommend which device to purchase, I am not well versed in hardware. I need a fast NVME SSD to work.
I installed this bios at the moment, everything works fine. But there is no way to check the boot from a PCIe SSD, I have not bought it yet. Thank you so much for your help, you really helped me. Respect to you. When I buy my new NVME SSD for PCIe, I will write you the result.
Sorry for my bad english.
@ubisyka :
It is fine, that everything works flawlessly after the successful flash of the modded BIOS.
You cannot yet see anything new within the BIOS, because you haven’t inserted any NVMe SSD into any of the PCIe slots. Once you have done it, you should see a device named “PATA” or “PATA_SS” within the “BOOT” section of the BIOS.
Regarding the NVMe SSD I recommend to buy a Samsung 970 EVO or Pro (depending on your budget). Additionally you will need an M.2 > PCIe Adapter.
Hi @Fernando !
What a fantastic manual you wrote ! I followed every step (it took me a while to understand everything though) and I can confirm that the Samsung 970 EVO PLUS 1TB is bootable with NVMe on Windows 10 PRO (BIOS v 3402) !!
I used the coderush’s UEFI Tool to insert the NvmExpressDxe_4.ffs NVMe module into my original BIOS version 3402.
I didn’t use the rufus tool to create the bootable EUFI flash drive.
Instead I used the Windows media creation tool with standard settings and it worked flawlessly ! I found it rather userfriendly ! Maybe you can include this in your manual.
I also had to disable my 6 SATA ports in the BIOS settings to be able to boot on the 970 EVO PLUS. Luckily my motherbord also had a Marvell SATA controller with 2 other SATA ports that do work !
My GPU is in my first PCIe 2.0 x16 slot (and runs x16 speed)
My NVMe drive is in my third PCIe x16 slot (which doesn’t share lanes with the first and thus runs @ PCIe 2.0 x4 speed)
Benchmarks in attachment. Funny thing is that my 4K read/write speed is the same as with my previous samsung 860 EVO 500 GB connected through SATA III cable (600 MB/s). I am rather surprised…
My sequential read/write has almost improved with factor 3.
I also have this “PCI ROM priority” setting in my bios. Reading your manual I thought this should be set to ‘EFI compatible ROM’. Doing so my system became unbootable and stock on a black screen (couldn’t even access BIOS anymore!).
After clearing my MB memory and redoing BIOS settings I left this option to ‘LEGACY ROM’ and it seems to work like this.
My system:
CPU: 2nd gen. Intel core i7-2700K @ 3,5 Ghz
MB: Asus P8Z68-V PRO (BIOS version 3402)
CHIPSET: Intel Z68
MEM: 8 GB DDR3 @ 1600MHz
Boot drive: Samsung 970 EVO PLUS 1TB NVMe SSD (using a M.2 to PCIe adapter)
GPU: Sapphire Radeon RX 580
OS: Windows 10 PRO x64
2dex:
Welcome to the Win-RAID Forum and thanks for your report! It is fine, that you succeeded and and got what you desired.
Now to your comments:
- With the Windows Media Creation Tool the user can download the OS directly from Microsoft and store it as ISO file, but for the installation of the OS in UEFI mode (absolutly required in this case) the tool Rufus is the better/safer choice.
- An NVMe SSD boosts the speed while writing and reading normal and big sized files (the bigger, the better!), but there is no real performance gain while processing small sized files (e.g. 4KB). This is absolutely normal even for RAID0 systems.
- As cause for your problem after having set the “PCI ROM priority” to “EFI compatible” I suspect, that the BIOS of your graphics card doesn’t contain a matching EFI (GopDriver) module. By adding that EFI module you can shorten the boot time additionally.
Enjoy the performance of your NVMe SSD!
Dieter (alias Fernando)
Hi @Fernando
Thanks for the instructions. I’m trying to get an NVMe PCIe drive to boot on a Supermicro server MB (X10SLM±F). Since it has AMI BIOS I though I can use your guide to mod it. I have the latest BIOS 3.2 dated 05/10/2018 with UEFI support. Here is the link to this BIOS:
https://www.supermicro.com/products/moth…0/x10slm_-f.cfm
After inserting NVMe DXE file using UEFITool, I see an extra “pad file” is created. MMTool did was not able to load my BIOS, so that is not an option for me.
Any advise?
I went ahead an applied the update. It works perfectly! Thank you for the awesome guide!
@Mazar :
Welcome to the Win-RAID Forum!
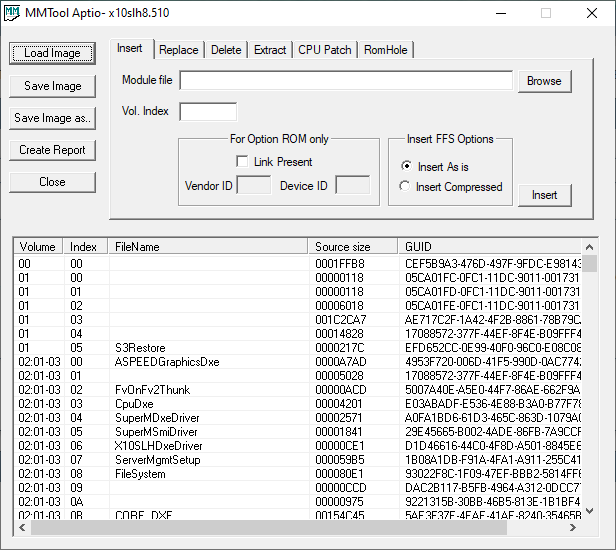
If the UEFITool should create or remove an extra pad-file while integrating the NVMe module, you should use the AMI MMTool.
You were not able to open the BIOS by using the AMI MMTool, because you forgot to change the “File type” to “All files”.
Here is the proof, that it works:
Good luck!
Dieter (alias Fernando)
You were just lucky, that your system is still working after the flashing of the modded BIOS.
In your case it would have been better to use the MMTool for the modding procedure.
May be I will ask you the question of lol? but I cannot find how to solve. My mb GA-z170 gaming k3,bios F2C. If I use UEFITool and open bios, I see below this: parseFile: non-empty pad-file contents will be destroyed after volume modifications. If I use MMTool Aptio, there is not the CSMCORE module in the list. Impasse. Sorry for my english
@kostik1966beta :
Welcome to the Win-RAID Forum!
Here is my comment:
1. All currently offered BIOSes for Z170 chipset mainboards natively do fully support NVMe. So there is neither a need nor makes it sense to add any NVMe module to the BIOS.
2. According to >this< Gigabyte site a BIOS F2C doesn’t exist for your mainboard.
3. Since all BIOSes of Z170 chipset mainboards are AMI AptioV ones, the module named CSMCORE is not a discrete BIOS module, but only part of another (bigger sized) one.
4. The message “parseFile: non-empty pad-file contents will be destroyed after volume modifications” given by the UEFITool is normal and nothing to worry about.
Regards
Dieter (alias Fernando)
The need to modify the BIOS under nvme due to the fact that my
the motherboard does not see the nvme drive, even as a normal non-boot diskdrive. All the advices comes down to the fact that I have to update the BIOS. May be, that in the first BIOS versions nvme support was closed, I don’t know exactly. But for overclocking the CPU skylake(non-k) over bus-there is no new BIOS, because of the ban intel
F2C BIOS is the only BIOS for overclocking skylake processors over bus on my motherboard. It is clear why Gigabyte removed it from the site.
Is there a way to modify my BIOS according to your instruction for nvme support?
p.s. I’m so sorry, could you see if my BIOS has nvme support if I send it to you
If your ever looking for a BIOS for Gigabyte that’s been pulled from the main site, use Gigabyte’s BIOS repo (in MOST case’s, there are some that have gone POOF from here as well!):
http://download.gigabyte.cn/FileList/BIOS/?C=M;O=D
mb_bios_ga-z170-gaming-k3_f2c.zip 24-Dec-2015 14:43 4.5M
http://download.gigabyte.cn/FileList/BIO…ming-k3_f2c.zip
Thanks for the link, but I’m not looking for this BIOS, I have it installed and running on my motherboard. Another BIOS for overclocking over bus on my motherboard simply does not exist
I have a problem that it does not support nvme disks though should support
@kostik1966beta :
With the help of Net7’s link I was able to download the BIOS F2C and to do a look into it. It definitively contains the NVMe modules, which usually are within the BIOS of modern Intel chipset systems.
So I am very surprised about your report, that the NVMe SSD is not detected by your BIOS.
Before you are going to try any BIOS modding, I recommend to make sure, that
a) the NVMe SSD has been properly inserted and
b) that the connection port is really usable (and not disabled within the BIOS or shared with another in-use storage dusk drive).
It is possible to additionally insert the NvmExpressDxe_4.ffs module, but I have no idea what will happen with a system, which has already natively full NVMe support.