Thanks, now i seem to understand the problem, i’ll soon try to reinstall Win10 properly and i’ll update you on the progress.
And if you should succeed, please change your nickname to “Lucky NVMe Guy”. ![]()
 sorry, but i’m still in no luck…
So i reinstalled Windows, following every step of the instruction… but the Windows Boot Manager doesn’t show up.
I feel that it’s because of the PATA option available only in UEFI+Legacy mode. If it was present in UEFI mode, everything would work just fine.
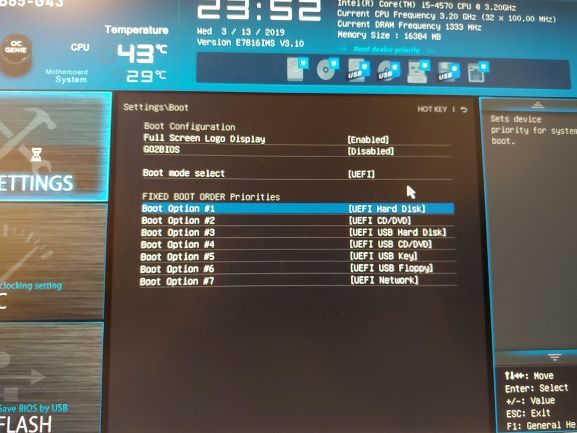
But in UEFI mode i only have this:
And when trying to boot in UEFI with nothing recognisable, i get this:
.
That’s that.
I guess i could still get it to boot with USB device, but this option is much less reliable.
If I have Win 10 on SATA SSD with GPT partition, I can clone it to NVMe SSD, right?
@Unlucky_NVMe_guy :
You cannot see the entry “Windows Boot Manager” unless the Win10 installation onto the NVMe SSD has been completed.
My advice: Unplug all SSds/HDDs except the NVMe SSD, set the Boot options to “UEFI” and boot off the USB Flash drive in UEFI mode, which contains the Win10 image.
Yes, but you cannot boot into the OS, because the SATA SSD uses another storage driver than the NVMe SSD.
I unplugged all of them, started to install Windows, then the installer decided that it’s time to reboot PC as the final step of installation and… of course it boots into flash drive again where installer just wants to install Windows from scratch. And if i try to change the boot option, i don’t see the “Windows Boot Manager” there. Is there anything i can do about it?
Repeat the Windows installation and unplug the USB Flash drive while doing the reboot after having completed the first installation step (= copying the OS files onto the NVMe SSD).
Do you think that’s the reason why Windows Boot Manager didn’t appear?
I am sceptical about that, because if it didn’t appear after installation in the Boot Menu before, why would it appear now? Windows is just gonna boot into that strange black screen with some code and not into flash drive, but everything else would be the same, i think.
Btw it doesn’t seem possible to change the profile name…
@Unlucky_NVMe_guy :
Have you done what I proposed within my last post?
I will do it for you, if you want, but the first step is to get the NVMe SSD bootable.
Hello Fernando, you have done some amazing work here.
I flashed my Asrock z87 Pro4 about 9 months ago. I cannot remember what modules I flashed, but I assume they were from the z97 pro4. I can boot to the windows install, and the install can see the nvme drive, but It says "cannot delete selected partition" or something to that effect.
Any thoughts?
@RabidPlatypus :
Welcome to the Win-RAID Forum!
Without detailed information about what you have done and at which situation you got the mentioned message, I cannot help you.
Why didn’'t you just follow my guide?
Regards
Dieter (alias Fernando)
I did follow your guide, but it has been so long. I think I will start over from scratch and report back with any issues.
Ok so I started from scratch using your guide and the UEFITool. Loaded up a brand new download of Asrock Z87Pro42.30 bios. Extracted the body and inserted “NvmExpressDxe_4” module. Flashed Bios, and same issue. Windows setup can see the drive, but when you try to delete partitions, it gives error "couldn’t delete the selected partitions. Error: 0x80070057
Modded bios file i flashed. https://app.box.com/s/9r6g2bsctapwfx878vinf86f4b8g6h7i
@RabidPlatypus :
The BIOS, which has been modded by you, looks fine and should guarantee full NVMe support for your system.
Questions:
1. Did you disable the “Secure Boot” option within the BIOS, before you started the OS installation?
2. How did you prepare the bootable USB Flash drive resp. which tool did you use?
Big thanks to Fernando for the bios guides & the modding community.
I’m booting from a 970 pro on a Asus p8z77-v lx motherboard. I bought a spare bios chip so I could have a play with the knowledge of no permanent damage if things went wrong. I ended up buying a ch341a to flash the bios chip as I found every method failed. Worked first time!
@jimec :
Welcome to the Win-RAID Forum and thanks for your feedback!
It is fine, that you succeeded at first try.
Enjoy the speed boost of your "old"system!
Dieter (alias Fernando)
@RabidPlatypus
Can you secure erase the NVMe drive before beginning the OS install? Parted Magic’s NVMe secure erase works good (version 10-12-18 or later).
Alternatively, you can use “diskpart” during the Windows install to clean the drive and set it as GPT. The NVMe SSD should be the only storage drive connected. Start the Windows installation. When you get to the screen that shows your available drives (and your NVMe SSD is shown) press shift+F10, type “diskpart” (no quotes) and press “enter”, type “list disk” and press “enter”, type “select disk *” (enter your disk # from the list; e.g. “select disk 1”) and press “enter”, type “clean” and press “enter”, type “convert gpt” and press “enter”, type “exit” and press “enter”, close the command prompt window, and refresh the window that shows your available drives. The step to convert to GPT may not be necessary if the SSD already had a GPT partition table (not MBR), but it won’t hurt (better safe than sorry).
Yesterday i modded another version of mobo bios, flashed it, installed Windows with removing the flash drive in the process.
It changed nothing since my last reply:
I don’t see PATA option after modifying bios in UEFI mode, and later, after installing Windows, i don’t see Windows Boot Manager in the boot list.
As i understood, the main interest is now this black screen, which i can see when trying to boot into the installed on the NVMe Windows
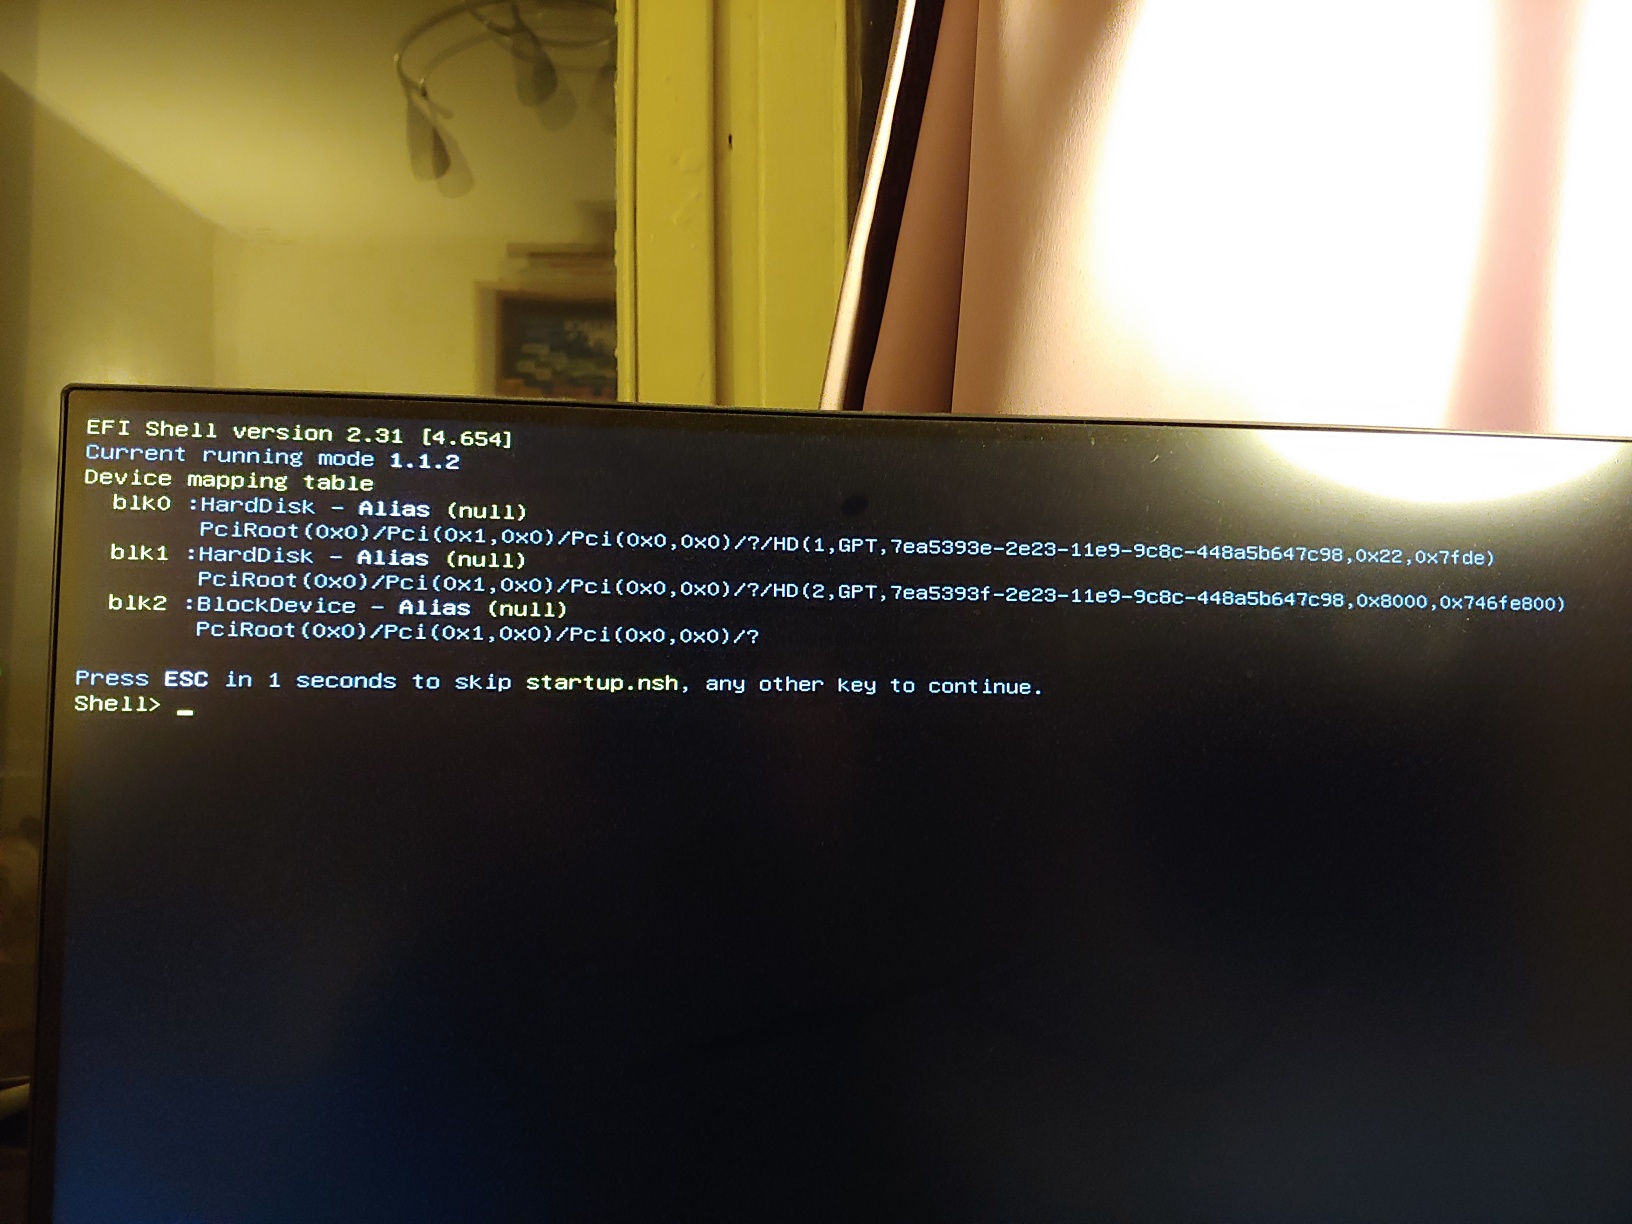
I googled it, and it seems that it shows visible partitions on the new SSD, which aren’t able to boot due to some errors. I did’t see any replies on how to solve this problem though.
I’d appreciate any help on this, but thanks anyways!
@Unlucky_NVMe_guy :
The black screen while trying to boot off the NVMe SSD may be caused by a missing EFI GopDriver for your in-use graphics adapter.
So you will have to set the Compatibility Support Module" (CSM) within the BIOS to ENABLED.
Much more interesting is the question, where the Win10 Setup has created the 100MB sized EFI System partition for the Windows Boot Manager.
Please repeat the Win10 installation from scratch by following these steps:
- Enter the BIOS and choose the required BIOS settings (“CSM”: ENABLED, “Secure Boot”: DISABLED, “FAST BOOT”: DISABLED),
- Remove/unplug all HDDs/SSDs except the NVMe SSD.
- Boot off the USB Flash Drive containing the desired Win10 image in UEFI mode.
- When you come to the point, where you have to decide the target for the OS installation, the Win10 Setup will show you all partitions of the target disk drive (here: NVMe SSD).
Please take a photo or remember and write down somewhere the details of the list (incl. the amount and the size of the shown partitions). - After having done that, delete all shown partitions of the NVMe SSD by hitting the “Delete” button and navigating to the related shown partition - one after the other.
- Now hit the “New” button and create a partition for the OS. You can use the full available space of the SSD.
- After having done that, the Win10 Setup will create the other required partitions itself and highlight already the partition, which has been designed for the OS installation.
Please take a photo or write down the amount and the size of the freshly created partitions. - Let the Setup install the OS onto the highlighted partition.
- If the computer should not continue the OS installation after the first reboot, remove the USB Flash Drive and restart the PC.
Good luck!
Hmm, i don’t have CSM setting in my bios… Is there any way to access this setting not within the UEFI interface?
Everything else i did exactly like you described.