If u read careful the guide u will notice that this mod is applied to AMI CORE IV/V for booting, generally… MS OS but in a PURE UEFI environment… never CSM/Leagcy, so ur limited in ur options on a non-standard motherboard desktop user.
Theres no miracles here as the mod itself is presented… it is expected that users with HW outside the regular desktop system, like u, cannot or have some issues in different hw platforms, besides the correct implementation of the mod.
EDIT: Not my tutorial, its Fernando credit, ur problem is not the dxe modules, most likely the use of CSM for ur RAID card.
Alright, besides that I tried a few different tips, extracting the modules “Nvme”, “NvmeSmm” and “NvmeInt13” of a newer board (same product line).
Inserting them into the BIOS and flashing it like I did before still does not pop up the NVME drives as bootable option.
I see I’m not the “common” desktop user like your tutorial aims for but still if somebody has any tip or idea how to get it working on this board I do really appreciate that.
@00FakE : Welcome to the Win-RAID Forum!
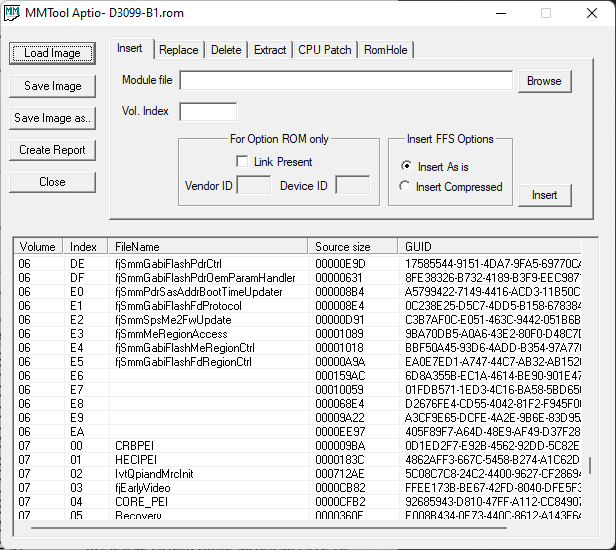
I have checked your "modded" BIOS file named D3099-B1.rom, but couldn’t find there any inserted NVMe EFI module.
Do you have more than 1 NVMe SSD connected to your mainboard? If yes, what sort of RAID did you create?
Please re-read the related part of my Guide carefully. No user with a mainboard without native NVMe support can see the NVMe drive as bootable device within the BIOS.
Regards
Dieter (alias Fernando)
Opening the D3099-B1.rom with MMTool does list the module for me (vol 6 at the end): i.imgur.com/TpuZIMU.png
I’ve got 2 NVME drives plugged in via. PCIE adapters in 2 different PCIE 3.0 (x16) slots.
They aren’t set up as software RAID via. the BIOS (since they don’t exist in the BIOS) but as ZFS RAID (RAID 1 - no compression) while installing Proxmox.
Tbh I’m not sure about that one.
The board has an Intel Series 6 chipset (supporting Intel Xeon E5-24xxv2-Series - if that helps).
Probably has no native NVME support I assume…
(edit)
Fujitsu support forum:
Different chipset - same issue
forum.ts.fujitsu.com/forum/viewtopic.php?f=86&t=48970&p=155427#p155427
It looks like it is possible modifing the BIOS but probably not with the module you provided.
I’m sorry, the ZIP archive didn’t get overwritten for some reason.
BUT the actual USB drives has the RIGHT files on it, including the ROM with the module.
I’ve uploaded the modded one once again:
drive.google.com/file/d/15Bc_8WnULXfZMukD3M9AK78a00YkMk-4/view?usp=sharing
Another ROM archive I uploaded is from another mainboard (same product line) but already supporting NVME boot.
Tried to use export it’s modules into my BIOS based on tips I found in the 'net.
drive.google.com/file/d/1TbFXFXC-3z9uqN-gY9QfC2OzddbV_6yU/view?usp=sharing
This didn’t work as well.
–
Well at this point I tried anything I found in the 'net without success.
I will probably need to figure out how to use a small internal SATA SSD as bootable device, actually booting the installed OS on the PCIE NVMEs.
Not sure if I can still hit the performance advantages of the NVME drives after doing so.
@00FakE :
Have you ever tried to follow the chapter 4 ("Installation of the OS onto the NVMe SSD") of my guide?
Do you see a device named "PATA" or "PATA_SS" within the BIOS?
I’m trying to get this working with Debian (11) right now not Windows.
It does support NVME.
Anyways I can not use Windows and since Proxmox is based on Debian which isn’t bootable, it seems like I can’t get it working.
Thanks for helping but it seems like there’s no non-Windows solution I’m aware of.
No.
@00FakE
Just a reminder for you: As the name of the Forum and the domain indicates, this is a Forum for Windows users (and not for users of Linux/Debian, MacOS, Android etc.).
@00FakE
Easiest way to do this with Proxmox from an NVMe is to boot off a usb and basically chain load PVE from your NVMe drive. If you are using zfs, just need the usual 1st and 2nd partition on the usb and the UUID of the usb stick included in boot-uuids list. If you aren’t sure how to build the usb parttiions, install PVE in UEFI mode to a USB drive using VirtualBox or whatever VM package you want (instructions are on the web) and then delete partition 3. Works perfect and if anything ever happens that messes up the boot config, it is very easy to edit from another pc. I did get PVE to boot using the modded bios from my NVMe drives, but opted for this instead as there are advantages to this method.
Good luck!
Thanks for the detailed instructions. Awesome resource.
Was able to Get a Corsair PM400 booting on my ASUS Rampage IV Extreme using:
AMI’s Aptio UEFI MMTool
NvmExpressDxe_4.ffs
Stock ASUS RIVE 4901 BIOS
The Modded BIOS gave a “Security Validation” error message when attempting to open it in EZ-Flash but worked flawlessly using Bios Flashback.
Modded and tested working BIOS ->
www. mediafire.com/file/k4gihs4b3856r8k/R4E.CAP/file
Hi everybody! I wanted to share my (successful) experience at modding BIOS & flashing it in order to get NVMe booting support for my ASUS N751JX laptop.
NOTE TO GURUS, EXPERT USERS, etc.: if you find any mistakes, inaccuracies, etc. in this post, please feel free to correct / inform about them!
PRELIMINARY NOTES:
-This account assumes previous careful reading of post #1 in this thread. If you want to upgrade your laptop to get fast booting, please consider another pain-free alternative, for example installing a SSD SATA3 unit and booting from it. If you are still willing to try the NVMe way, I hope this (rather lengthy) text is valuable to you.
-I have included several accidental details to offer a realistic and specific account of what I actually did. I think this can be helpful for those not so experienced users. I insist on reading post #1 carefully to get a comprehensive view of the procedure and to contrast its contents with my particular account. That being said, though, and as always, remember that you are the only responsible for what you do (or don’t do) to your machine!
-I use Manjaro GNU/Linux but for the present purpose I performed all the procedure using “Hiren’s BootCD PE” which features a fully operative WINDOWS 10 system. To get a bootable usb with the Hiren’s BootCD / WIN 10 system I used the “Rufus” application, which burns the Hiren’s .iso file onto the usb drive and makes it bootable.
-The usb stick burning operation was done using another PC with a VirtualBox Machine containing a WINDOWS 10 —of course, any W10 is ok to do this.
-Once burnt, the usb stick can be used on the ASUS laptop. Booting W10 from it requires entering the BIOS (power on and immediately press F2 key to enter the BIOS setup utility). Under the “Save & Exit” main menu, choose the appropriate “Boot Override” menu option.
-Hint: BIOS version checking described in 1) below can be performed before booting Hiren’s W10.
STEPS:
1) Enter the BIOS (press F2 immediately after power on). Check if your BIOS is up to date. You need the 211 version. Now take the option 1a) or 1b) that applies to your case:
1a) The BIOS isn’t up to date (not 211 version):
Tis is the info about my BIOS before doing anyhting:
-Aptio Setup Utility, Version 2.15.1236 (2012)
-American Megatrends: Version 210
GOP Version 5.5.1031
EC Version F025090001
30/10/2015
10:53:14
Ok, so now go to the ASUS official site and get it. The name of the file (as of 13/november/2021) is “N751JXAS.211”. This file can actually be considered a “pack” comprising a .rom file (that you’ll need to extract using the UEFITool utility) plus an Aptio “capsule” which we’ll need to bypass in order to successfully achieve our goal. It seems that the downloaded BIOS file is a somewhat disguised .CAP file featuring .211 extension instead of the (“more standard”?) .CAP one. Anyway, we need the inside/encapsulated part of the BIOS file, which we’ll be referring to as the .rom file.
First of all, you need to flash the BIOS file to your machine using the official/standard procedure, performed using the “Easy Flash Utility” option in the BIOS Aptio Utility (power on + f2) under its “Advanced” menu.
Save the file to an USB FAT32 formatted pendrive (FAT16 was useful for me too). Perform the flash operation and when you are done check that the BIOS version number has changed from “210” to “211”.
Now you are at the same point as 1b) assumes: your machine BIOS is 211 version. Therefore, you can skip to 1b) or keep following the next instructions (this latter way is what I actually did). Both of them achieve the same goal: getting the pure, not encapsulated .rom file that is the piece of software we need to perform the NVMe modding onto. The 1b) instructions get the .rom file from the installed BIOS in your motherboard, while these instructions extract the .rom file from the encapsulated official file.
[NOTE: for the sake of safety, and considering that 211 version is needed in your machine, perhaps it’s a good idea to perform both 1a) and 1b) extraction methods and then compare the resulting files. I didn’t do this, I flashed the downloaded .211 file to the laptop and then used this same file to directly extract the its encapsulated .rom file. I didn’t extract the .rom file from the flashed BIOS. This is the 1b) way.]
To extract the .rom file use the UEFITool.exe utility. Launch it, click “File/Open image file…” and select the “N751JXAS.211” file (choose the “all files” option from the menu box located next to the “Filename” box in order to make it appear, for by default there is a “BIOS Image files” option that doesn’t show files with “unusual” extensions).
Then click on to the “AMI Aptio capsule” line to highlight it. Now right-click on the highlighted area and select “Extract body…”. Choose a name, for instance, “N751JX.rom” and save it.
1b) The BIOS is up to date (it is 211 version): you need to get the .rom part of the BIOS. To do this use the “AMI AFU For Aptio 4/afuwin/64/AfuWin64/AFUWINGUIx64.EXE” utility. Run it and you are ready to get the BIOS .rom file: you only need to click “SAVE”, which will only save the BIOS .rom file (without the capsule part, cf. paragraph 1a above) under the “afuwin.rom” name. Rename it, for example, using “N751JX.rom”.
This is the info about my BIOS after flashing the official 211 version:
-Aptio Setup Utility, Version 2.15.1236 (2012)
-American Megatrends: Version 211
VBIOS Version 1030.I15N751JX.003
EC Version F025090001
2) Now we have the .rom file that is to be modded. The only successful modding combination for me was:
-NVMe driver: “NvmExpressDxe_Small.ffs” file, the small one (~6kb).
-Modding tool: “UEFITool.exe” (The “MMTool” spoils the .rom file; this is contradictory to the tutorial in post #1, but this is what happened to me.)
The tool that worked for me to perform the insertion of the driver into the BIOS .rom file is UEFITool. MMTool wiped out at least a “Pad File” near the point of insertion of the NVMe driver; this alteration of the .rom file renders an invalid/dangerous/unreliable BIOS file, as stated in previous posts from this thread.
Short report on FAILED combinations:
a) UEFITool + NvmExpressDxe_4.ffs driver (the big one) → removal of the Pad File mentioned above, functionally the same result as c) below.
b) MMTool + NvmExpressDxe_4.ffs driver (the big one) → “file exceeds the volume size” warning message, cannot proceed to insertion.
c) MMTool + NvmExpressDxe_Small.ffs driver (the small one) → insertion performed, but invalid/dangerous/unreliable modification due to the removal of the “Pad File” near the point of insertion of the driver.
Ok, so now the insertion of the driver is done this way:
2a) Run UEFITool.exe and open the “N751JX.rom” file using the “File/Open image file…” menu option.
2b) Go to “File/Search…/Text” and search for “LANDriver”. The result message, displayed at the bottom window of the utility, is this:
Unicode text “LANDriver” found in User interface section at offset 0h
2c) Double-click on to the message and the upper window will show a list. Now look for the three “DXE driver” “Subtype” entries in a row. The search hits the “User interface [etc.]” subentry of the DXE driver entry (the “26841BDE” one), corresponding to the “LANDriver” search. It is the last one before the “Volume free space” entry. This is the point where the NVMe driver will be inserted.
Also look for the “Pad File” entry located below the “26841BDE” line. You can found it at a second level of indentation, just after a 3rd level “User interface section” and just before a 2nd level “17088572 [etc.]” one. It is a point of reference to check that the modding is correct. It must not disappear after modding the file.
2d) Right-Click on the “26841BDE [etc.]” line corresponding to the DXE LANDriver and then choose the “Insert after…” option. Pick the “NvmExpressDxe_Small.ffs” driver and insert it. Now there is a “5BE3BDF4” entry right after the LANDriver one. It is the inserted driver. Check the “Text” column to verify the driver’s name.
2e) Save the modified file: “File/Save image file…” and give it a name, for example “N751JXmd.rom”. Wait a few seconds until a window pops up asking you to “Open reconstructed file?”. Answer “Yes”.
2f) Perform the same search as in 2b) - 2c) and check that the inserted driver is there and that the Pad File below is there too. Close the UEFITool utility. At this point, we have the modded .rom file ready to be flashed on to your machine.
3) Flashing will be done bypassing the security policy imposed on BIOS flashing by the “Easy Flash Utility” from the Aptio Setup Utility (remember, the “power on + f2” one). For example, one remarkable restriction is that you cannot reflash the BIOS, i.e., if the utility detects that you want to flash the BIOS with the same file it currently has, it won’t let you do this. So we need to use an “Operating System” method, so to say.
3a) Open “AFUWINGUIx64.exe” from “AMU AFU for Aptio 4”, that is, the same tool we used to extract the BIOS .rom file in 1b).
3b) Close any open program (File Browser, Web Browser, etc.)
3c) Click on the “Open” button and load the “N751JXmd.rom” modded .rom file.
3d) Click on the “Progress” tab and (HERE COMES THE FIRST MOMENT OF TRUTH!!!) click on the “Flash” button. Wait until the flashing process is (hopefully) completed without any problems.
3e) Close the “AFUWINGUIx64.exe” utility and reboot your machine.
HERE COMES THE SECOND MOMENT OF TRUTH: My mind: "Will it reboot? If so, will I find the NVMe option among the other booting options? If there is no option, at least I didn’t brick my laptop…, etc."
3f) If rebooting is ok, reboot again (if needed) and enter the BIOS Aptio Setup Utility (f2). Go to the “Boot” menu (or to the “Save&Exit” one, if you want to override booting options) and search for a [UEFI OS] option.
PLEASE NOTE: I probably got this boot entry because I had previously installed a full operating system into my Samsung SSD 980 NVMe unit. I did so by writing an image.file of the operating system I use to the NVMe unit. This writing operation was performed from a LiveCD Linux distro (using “dd” command). This means I cannot say what I would have got in the “Boot” menu hadn’t I installed the OS before. Please refer to other posts (specially #1) in this thread to know more about this.
ENJOY!!!
[Additional reference: search for “ROG-G751-JY-BIOS-211-NVMe-Upgrade-Guide-Step-by-Step” post at Republic of Gamers ASUS forum]
Edit by Fernando: Since we don’t have the space here for detailed guides, which are only valid for 1 specific device, I have put the text of the procedure into a “spoiler”.
win-raid_ASUSN751JX_NVMe.zip (6.9 MB)
@Tritos : Welcome to the Win-RAID Forum and thanks for your contribution, which may help other users with the same ASUS laptop model.
Enjoy the Forum!
Dieter (alias Fernando)
Hello Fernando and thank-you for this incredible thread.
I have an ASUS M51BC and trying to add nvme support.
Unfortunately, following the steps does not allow the bios to recognize my nvme drive connected via PCI x4 adapter
Perhaps it has something to do with where the CSMCORE is located on the bios?
Attached is my modded .cap (flashed via a .rom via the amigui tool)
M5A97-EVO2-ASUS-M51BC-0502-MOD1.zip (3.03 MB)
@MichaelAngelo : Welcome to the Win-RAID Forum!
According to what I have seen you have inserted the NVMe module into the correct "DXE Volume" of the BIOS.
What I cannot evaluate is the following:
a) Has any Pad-file been touched by your BIOS modding? I would need the original BIOS for a comparison.
b) Was the flashing procedure successful? Question: Does the "BOOT" section of the BIOS show a new device named "PATA" or "PATA_SS" while having CSM enabled?
Regards
Dieter (alias Fernando)
Hi Dieter,
Thank-you for the prompt reply.
I’ve attached the original bios - as far as I can tell there is no pad file discrepancy.
Flashing was successful as far as I can tell, bios now shows the updated version (however I flashed the non-mod updated version first, then the modded version).
With CSM enabled there is no new pata or pata_ss device unfortunately - my goal would be to see either of those things!
Perhaps it is my pci adapter card that is not recognized by the bios? I can see the drive (unformatted) in Windows
M5A97-EVO2-ASUS-M51BC-0502 (2).zip (3.02 MB)
@MichaelAngelo - thanks for the quick response.
While making a comparison of the content of both BIOSes I agree with you. The modded BIOS seems to be fine.
Due to the fact, that no “PATA” device is visible within the BIOS, I suspect, that the modded BIOS hasn’t been properly flashed by the method you have used.
Please read the start post of >this< thread and follow the related advices. If you have a question or a problem regarding the flashing procedure, you should post it into the linked thread (it is not the topic of this one). Once you succeeded, please give here a short feedback about how you managed it.
Good luck!
I just wanted to say thanks. Works flawlessly on my MSI H77MA-G43.
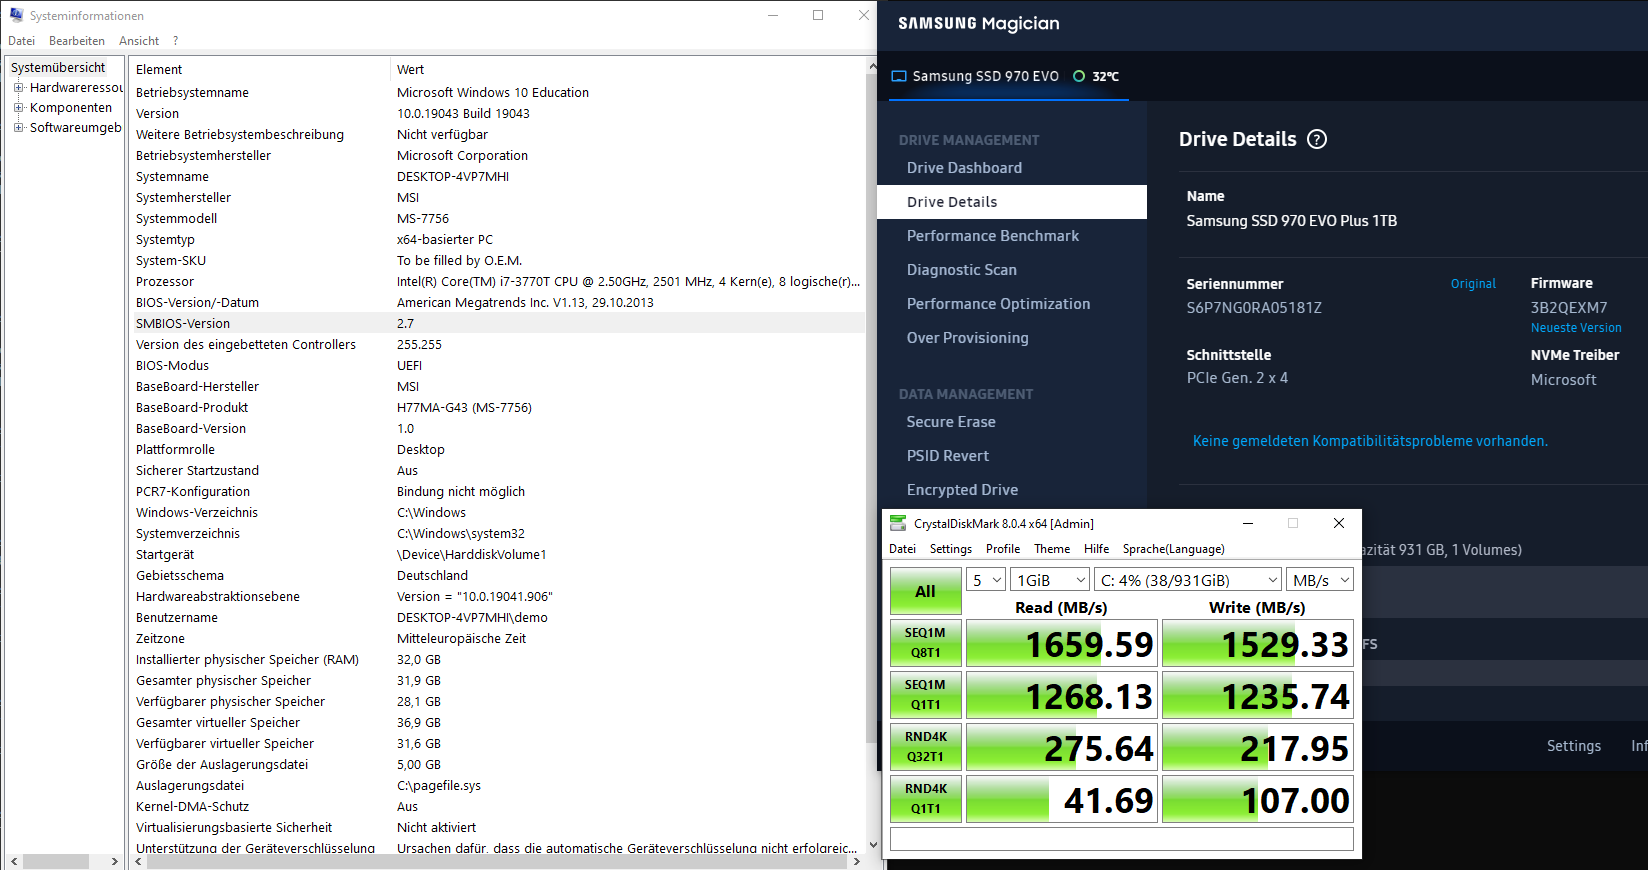
@Kalimero : Welcome to the Win-RAID Forum and thanks for your feedback!
Enjoy the performance of a bootable NVMe SSD with a natively not supported mainboard!
Dieter (alias Fernando)
Hi all,
I wanted to see if someone can check my mod to make sure it’s correct before I install on my mobo?
Thanks ahead of time,
Jay
P9X79LE.zip (4.59 MB)