After reading the OS install process again, I realized that I needed to boot the USB with the OS installer in UEFI mode too. Once I adjusted a few of the boot BIOS settings and booted the Windows installer in UEFI mode it installed the OS without issue. It now boots off the SSD as expected.
Thanks again for the pointers. I should have read the OS install instructions more carefully.
Hi,
Thank you so much. SSD drive able to boot with this bios patch.
Sleep mode is not working after I installed chipset driver. It was working on fresh install before chipset driver.
System is switching half-close mode (fans are spinning and nvme led is blinking but monitors and front panel leds are not in activity) and it waiting for between 5 and 10 minutes then restarting when I click sleep button.
I tried different option but I did not identify source of problem.
My motherboard is: Asus P8H67-V
* Updating drivers to latest available versions.
* Installing nvme driver provided by manufacturer (samsung 970 evo plus)
* nvme firmware is already latest version
* Installing latest available version of intel management engine interface driver. (I think there is no firmware upgrade option because the chipset is "Intel H67 (Cougar Point) [B3]" and firmware version is "8.0.4.1441")
* Installing latest available version of intel rapid storage technology interface driver.
* disabling raid controller on bios
* disabling sata controller on bios
* unplugging all sata cables of mechanical drives.
@tugrul
No interference from SATA/RAID as the system use NVMe controller/driver, you can enable at least the SATA.
Latest Intel ME FW image update its the 8.0.20.1513 1.5MB or even the 8.1.70.15.90 1.5MB.
Intel (Converged Security) Management Engine: Drivers, Firmware and Tools
Intel (CS)ME, (CS)TXE, (CS)SPS, GSC, PMC, PCHC, PHY & OROM Firmware Repositories
Hello again,
even I found on this forum alredy modded bios F13w for my GA-X79-UD5 and succesfully booted into win 11. I modified an alredy modded F14b with injected cpu microcode and also added nvme support with Your tutorial and everything works fine. Thank You!
@MeatWar
Thank you so much. I’m able to upgrade firmware version to 8.1.70.15.90 1.5MB successfully.
But sleep problem is not solved.
I see 2 different version numbers in 3 lines of Intel ME information section in HWInfo64 tool.
Intel ME Version: 8.1, Build 1590, Hot Fix 70
Intel ME Recovery Image Version: 8.1, Build 1590, Hot Fix 70
Intel ME FITC Version: 8.0, Build 1410, Hot Fix 2
@tugrul
Thats normal, nothing to worry about, as this is only an update not a full ME FW image deployment.
Your issues with windows seems to be related to drivers, as you already stated before, there is no recent Intel Chipset drivers package for modern OS like 10/11 for SandyBrigde/YvyBridge.
This old systems uses the Windows Update MS drivers, some will be optional in WU, just use them and update only VGA, Audio, Intel v13 driver for SATA and NVMe driver by Samsung/MS Generic NVMe.
Fernando provides a modified Intel Chipset driver package, but this is optional.
I have ASUS p8z77ws motherboard. Is it possible to have a mod bios to be able to use samsung 980 pro as bootable disk ? I tried to make myself a mod bios following the guide in the forum, but I’m not sure to have done the right job.
Hello, everyone
First of all, thanks Fernando for this topic. It’s been very instructive and helpful.
I was actually doing my research on how to add support for nvme booting on an old motherboard, Asrock QC5000-ITX-PH.
I believe I did correctly all that’s required to mod my BIOS, but it’s not working when flashing.
It said something like “security file check failed”, which maked me wonder why.
So I thought about flashing with windows, so I downloaded “AMIBIOS and Aptio AMI Firmware Update Utility”, and tried to flash with its “AMI AFU For Aptio 4”.
Then it said that the mod BIOS file was too big, and it was right, the original BIOS file was 4096 Ko and the mod BIOS file was 4100 Ko, no wonder why.
I remember that the first time I modded the BIOS, I used “NvmExpressDxe_4.ffs” as is, uncompressed.
So I tried again, but compressed this time, and still no luck.
I continued trying with “NvmExpressDxe_Small.ffs”, both uncompressed and compressed, and still not working.
And again, everytime 4100 Ko.
Reading on the topic, I learnt that I could squeeze some unnecessary network DXE drivers, quoting CodeRush "You can safe remove all network-related drivers from DpcDxe to Udp6Dxe if you don’t use UEFI network boot."
I even removed the NTFS driver.
Nothing changed, still 4100 Ko.
I’m now lacking solution, I don’t know what else I can do.
Did I do something wrong ?
Any help is greatly appreciated, thanks very much !
Attached are my original and modded (no network driver, no ntfs, compressed nvme small) BIOS files
QC5ITPH1.00.zip (2.97 MB)
qc5itph1.00 (Modded).zip (2.83 MB)
@zeffix
Share here your mod file and it can be verified of the correct operation.
@zeffix
EDIT: Your mod file doesn’t contain any NVMe module on it, you can use the MMtool method on the guide and flash with Asus BFB function ONLY.
@Tuan
“…It said something like “security file check failed”, which maked me wonder why.” Why so surprised… this is a bios mod that your flashing, not an original Asrock file…ring a bell???
The flash security failures has nothing to do with the DXE modules, both have the same functionality, if the standard doesn’t fit you can use the small variant.
The issue is the flash mod itself
[Guide] How to flash a modded AMI UEFI BIOS
As this is an AMD platform, you cannot use Intel FPT tool, does this motherboard have M-Flash function in bios?
Another tryout, extract the bios region from bios file (Thats its CAPSULE) with UEFItool_NE, edit the extracted region and then append back with the standard UEFItool.
Your previous issue with file size is due to the CAPSULE of the bios file.
Regarding your mod file, the NVMe small dxe seems correctly inserted in the right volume
Hello everyone,
I have an Asus ROG G771JM laptop since 2016. As it really slow now, i planned to do a full reset (HDD formating & fresh W10 reinstallation) and “upgrade” it with a 500GB SSD (samsung SSD 980).
I was able to install W10-21H2 on the SSD (w/ USB and MediaCreationTool) after convert the SSD in GPT (as i got error message related to existing GBT partition on the SSD).
Finally, W10 was reinstalled on sata HDD because the NVME SSD was not shown by the bios (and like many other, the SSD is visible under W10).
(i also tried to install W10 on the SSD with sata HDD removed from the laptop => still not shown by the bios).
1st i update the Bios to the lastest available version G771JMAS.203 with the Asus procedure.
Then, thanks to your Guide, i modded the Bios (NvmExpressDxe_Small.ffs) and flashed it w/ windows afuwinx.exe G771JMAS_203_NVME.rom
I was still no able to boot on NVME SSD (i tried to change Bios Option like CSM disable, Secure Boot Disable and no fast boot option is available) even after reinstalling W10
After, i also tried an other tutorial: G771JM Custom BIOS with NVMe Support found on ROG.ASUS
i downolad current Bios w/ AFUDOS: ORIG2.ROM (NvmExpressDxe_Small is present & no PAD file)
and i flashed w/ AFUDOS MOD.ROM (shared in the tutorial and containing NvmExpressDxe_4 which was inserted w/ UEFITool v0.26.0)
New W10 fresh installation => still not shown by the bios
Then i check the modded bios shared and NvmExpressDxe_4 is present BUT PAD file is present also  (Bios was flashed with success & i was still able to boot W10 on the sata HDD).
Back to your guide, Bios was reflashed w/ windows afuwinx.exe G771JMAS_203_NVME.rom (=> NvmExpressDxe_Small is present & no PAD file)
Then i flashed the original bios G771JMAS_203.rom by extracting body of G771JMAS.203 (original last BIOS version available & version of the Bios before starting Bios flashing).
=> Back at the begining of the story.
on the Forum, i saw @loqki & @Dziubek got the same trouble with this laptop.
apparently, loqki was finally able to boot on SSD 970evo => hope is still present 
no feedback from Dziubek…
G771JMAS_203_NVME.rom, G771JMAS_203.rom and G771JMAS.203 are in attachement. Could someone have a look at theses Bios ? is modded G771JMAS_203_NVME.rom is correct?
Remarks:
For module insertion i tried both MMTool 4.50.0.23 and UEFITool.exe
unlike loqki, i was not able to insert the NvmExpressDxe_4.ffs module => i used NvmExpressDxe_Small.ffs
thanks for this “How to”, even if it’s not yet working for me, i learn a lot 
Thanks for your help!
Bios.zip (6.93 MB)
@cacaomyrtilles
The bios mod file (G771JMAS_203_NVME.rom) provided in your ZIP archive, seems to be correctly done with the insertion of the small DXE variant in the correct bios volume, no pad files added or removed.
Just follow point #4 of Fernando’s guide, for correct OS installation.
You changed the first bytes of the bios region (normally not usefull), otherwise no NVME module/ identical files.

I am trying to create a modded Bios for my Asus p8z77ws to have nvme support and use a Samsung 980 Pro as bootable disk
I created a Bios-mod.rom extracting the "Body" of the original Bios-stock.cap and adding the NvmExpressDxe_4.ffs. Now i have difficult to create a Bios-mod.cap file to flash, according to Lost_N_BIOS guide, using Hex editor Neo.
I enclose Bios-mod.rom and Bios-stock.cap
P8Z77-WS-ASUS-3505.rar (4.13 MB)
P8Z77-WS-ASUS-3505-MOD.rar (4.14 MB)
Open the stock rom, mark the code from 0x0 to 0x800, copy it, open your modded bios, put the cursor right in the very beginning, paste the copied 0x800 (capsule), save with different name
OR
Open the stock rom, go to 0x800, mark all from 0x800 to the end, delete, open your modded firmware, mark all, copy, past at the end of 0x800 left from stock bios, save with different name.
Your file should look like this.
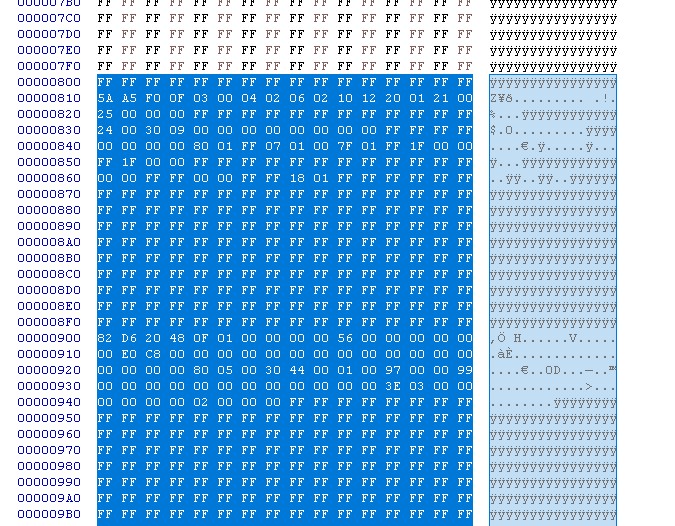
Do a file comparison in hex editor (might use HxD since Neo dosn’t have this feature in free version), first difference to stock should be at ~0x51D190 for the cap- files
I used HxD and follow your instructions: “Open the stock rom, mark the code from 0x0 to 0x800, copy it, open your modded bios, put the cursor right in the very beginning, paste the copied 0x800 (capsule), save with different name”. The file i have create has a generic extension “file” and not rom or cap. What next ?
P8Z77-WS-ASUS-3505-MOD2.rar (4.14 MB)
You copied the capsule bytes twice, overwrting the first 0x800 of the firmware, too.
Why don’t you follow the recommendations given? The first difference between stock cap-file and your modded ‘firmware’ comes at 0x810! This file will for sure brick your mainboard, too.

The description was as detailed as possible, if you don’t follow the steps outlined I can’t help you any further here.
Would you please reupload those two?
@Juggler
You reported back, saying that only the original (updated by me on 06 Nov 2021) file from Lost worked, so i assume the others did cause issues…