Because I would be having problems removing the heatsink when I need to do some mod.
Actually I reused liquid metal multiple times on a AMD laptop removing heatsink and it didn’t cause any issues with temperature.
You will probably have better mounting pressure too since you won’t have to use thick paper because liquid metal is thinner and can insulate with electrical tape or something similar.
Let’s see how it goes for me in a couple of years.
If you live alone and use the laptop alone fine otherwise you are exposing people around you and in your house/apartment to mercury vapors probably without their knowledge.
I’ve heard people complaining about a stuck heatsink after using liquid metal. What was wrong there?
Apparently, you have to repaste liquid metal at least once a year, right? I don’t think it would be the case with mercury. And yes, I’m living alone
I’ve heard people complaining about a stuck heatsink after using liquid metal. What was wrong there?
Use of liquid metal (gallium) on a copper heatsink without nickel plating makes it slowly dry up and stain heatsink. The same effect also happens with mercury too and mercury evaporates too so it might dry up faster.
Apparently, you have to repaste liquid metal at least once a year, right?
Unless you have a heatsink without nickel plating it shouldn’t dry up and stain heatsink. And drying up without nickel plating happens with mercury too.
From my experience liquid metal didn’t dry at all after 2 years when used on a 2013 budget HP laptop.
From my experience liquid metal didn’t dry at all after 2 years when used on a 2013 budget HP laptop.
Good to know this. So you’re using Conductonaut?
I did another test which has turned out to be unsuccessful with T9500 CPU in Prime95 using Arctic MX-4 paste.
I filled the whole CPU heatpipe with mercury, but the temprature went as high as 70 degress within seconds while it peaked at 52 degrees with a normal heatpipe. Even though mercury has worse heat conductivity, it feels alright to use it as a thermal interface in terms of efficiency.
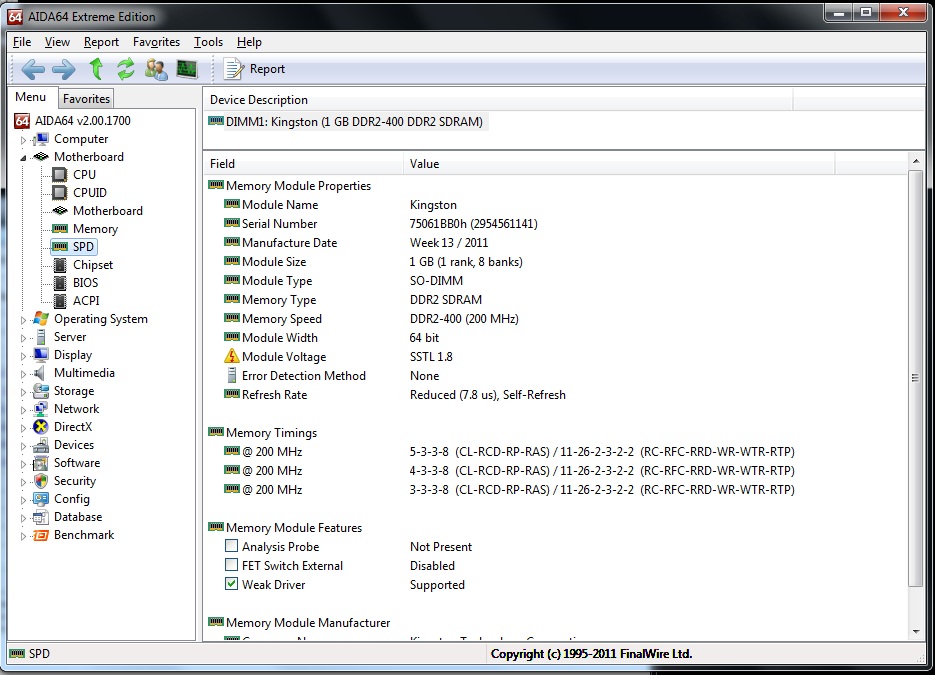
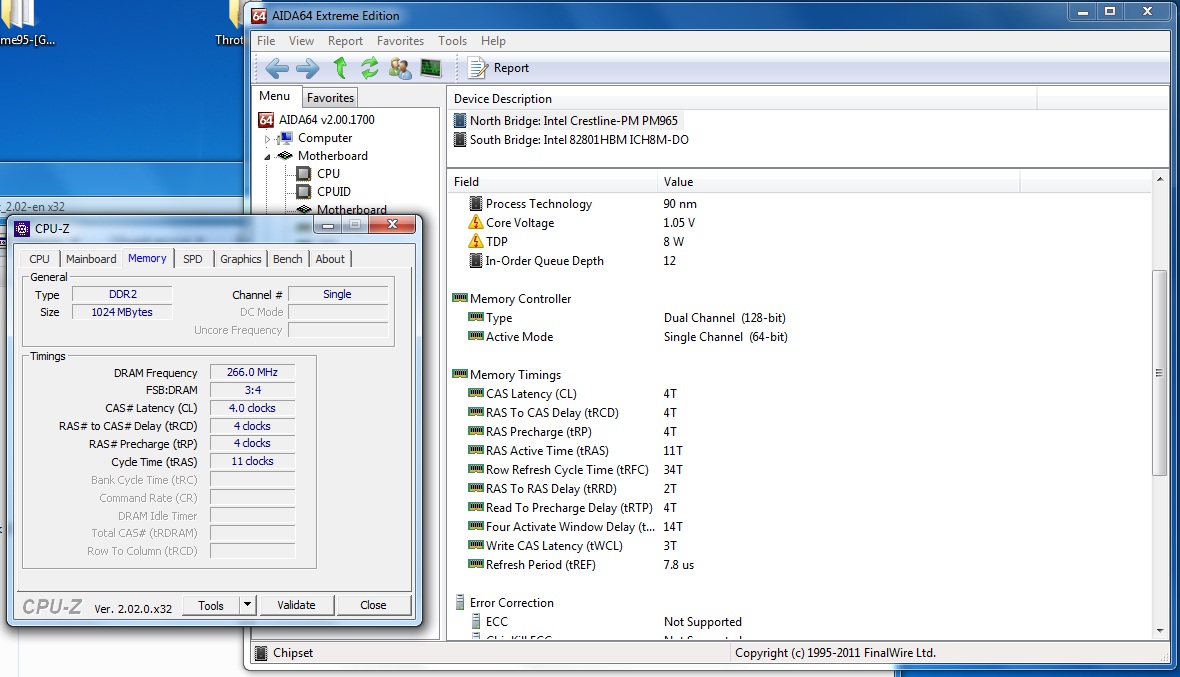
Another thing to mention. I got PC2-4200 1GB RAM and tested it out. As expected, BIOS overclocked it from 400MHz to 533 MHz setting up CL4 timings (4-4-4-11). A bit better than mine (4-4-4-12)? But still no chance for CL3.
Here’s the factory setup of the RAM stick and active timings
Did you mean you tried to fill in the pipe of the HDX with mercury?
Yeah, but I left just a couple of drops of free space inside in case if it was going to expand after heating up.
Hopefully you have a spare good one?
Of course. Actually, I got this one specifically for the experiement.
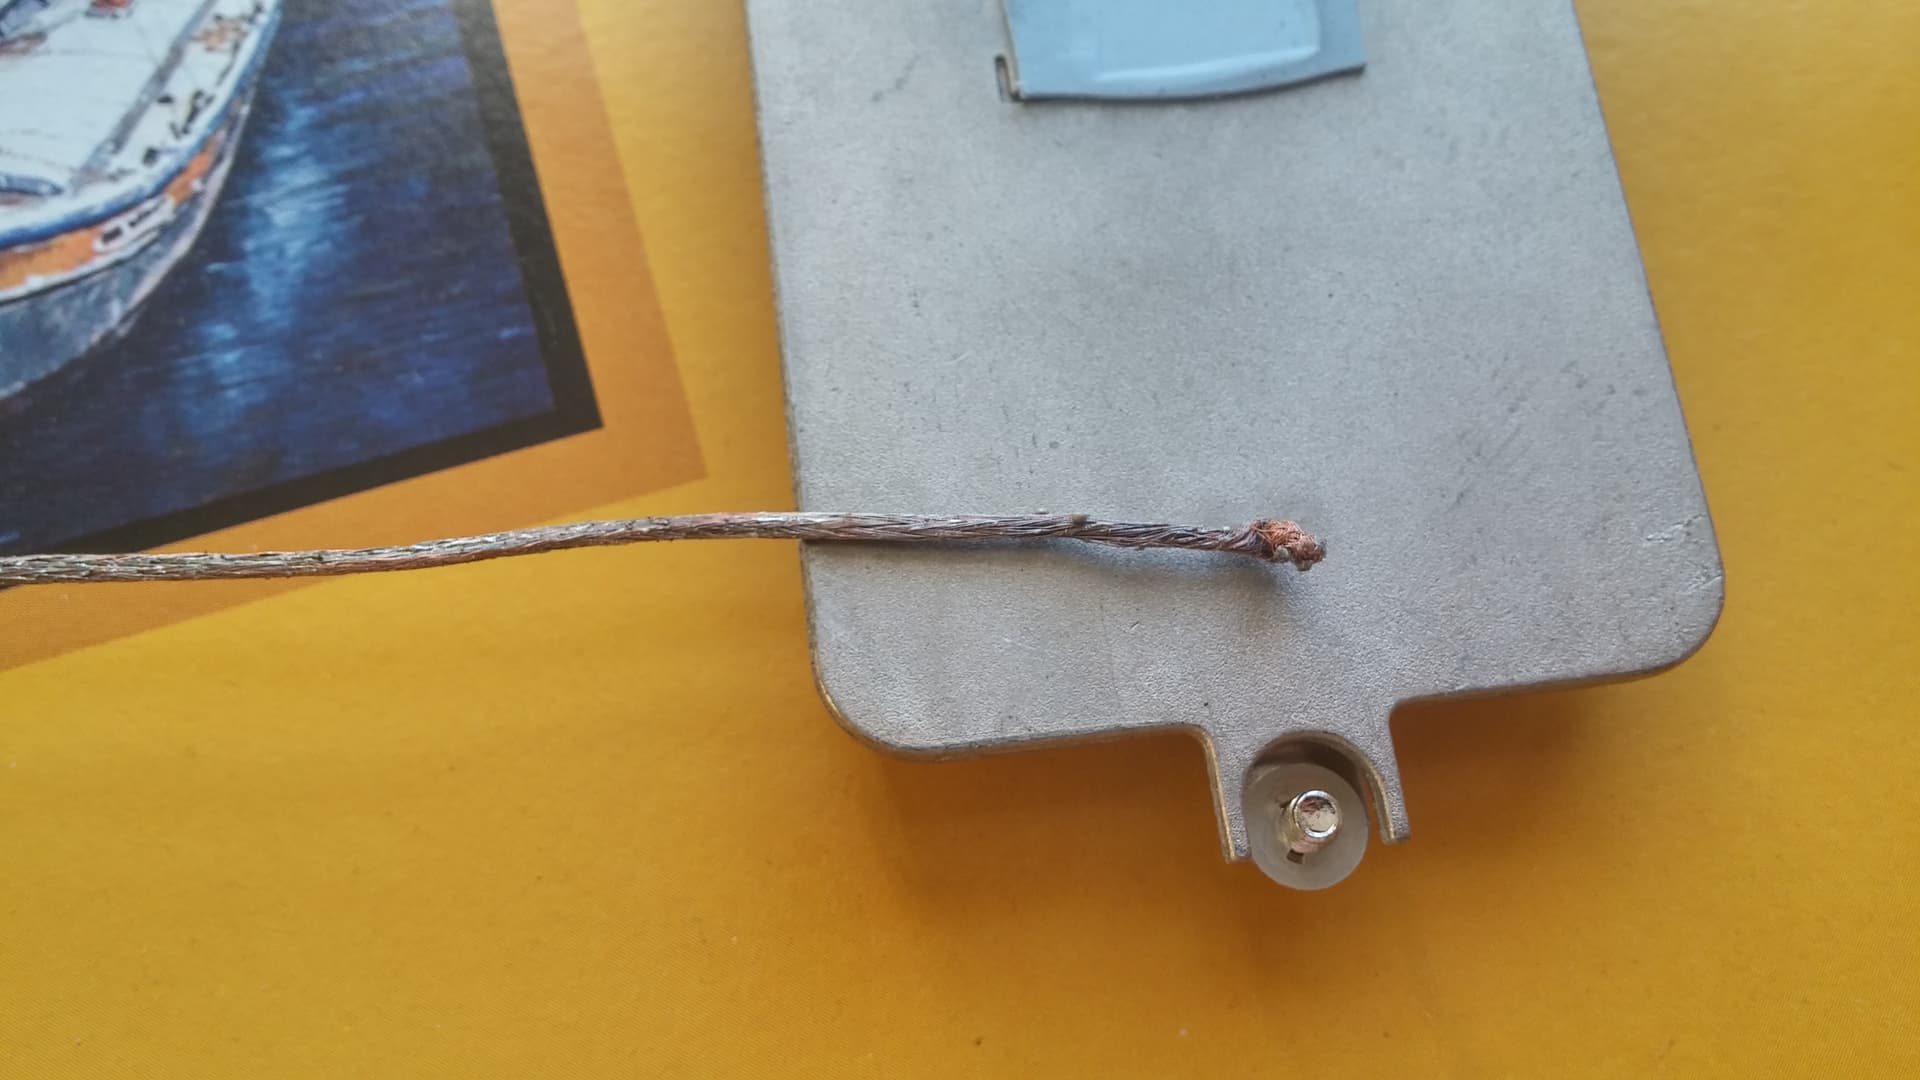
What I have found interesting is this wire. I accidentally discovered it when was extracting the mercury from the inside of the pipe.
This end was on the side of the fins. What do you think it was doing in the pipe?
As for the RAM, it seems like I got 2 modules dead after trying to read them via a flash programmer using a DDR2-DIP adapter. I need time to figure out what went wrong and if they can be brought back to life. Probably the SPD has died if it was overvoltage. Or it was erased instead. I’ll get back to you after checking
The laptop is not booting up at all with it. I’ll try the second method after figuring out what the problem is. Just need to get to my multimeter first. But one thing’s for sure - I don’t have a dump for the 4 GB stick (Hynix chips). I had 2 different sticks installed, the other one is Corsair). Probably, I decided to not flash the other (now dead) one because the laptop was using the lower timings from the first stick. I hope it would be ok, if I flash SPD from the first one. But luckily, I got 2 sticks of PC3200 1GB one of which is not recognized, so I can clone the other one. Just need to figure out if the SPD chip is alive.
I feel alright with hotswap of RAM as long as your experience was positive. I’ll give it a go tomorrow.
About that wire, that’s very interesting… what is it made of? Is it metal? Cause if it’s fabric I really wonder: what is it there for?
It looks completely made of copper, just a buch of thin copper wires. What do you think?
Also, I’m interested in knowing where you made the incision on the pipe to pour the mercury in and how you sealed it.
I cut off the small end on the side of the CPU fan. After pouring the mercury in, I just used thermal glue to close the hole from the inside. When I was trying to remove the glue from the inside of the pipe, I came across the wire and just took it out with leftovers of the glue.
Ok, tomorrow I will send you this one modified for 1GB, and will also provide you different ones. I will see if I can find a generic 1GB Kingston DDR2.
I’ll keep you updated on this. Let’s see if I can sort this out myself with the other 1GB stick
I’m back with some findings.
The adapter I was using for the programmer wasn’t made well. The guy who made it forgot to solder the ground pin on the RAM connector and left in floating which is why the programmer wasn’t recognizing the SPD. I’ve fixed that and now it’s working.
Now, the sad part is that the RAM is actually dead because both SPD chips are alive and readable. I don’t have a hardware RAM tester to figure out which chips are dead, but I’m still wondering how they could be killed. Static electricity? I doubt it would happen twice in a row considering the random nature of this event and both sticks died one after another. My only guess is increased voltage difference between VCC on the SPD chip and GND. It shouldn’t be sharing any common pins with RAM chips, but the floating GND pin was the cause I guess.
I just picked up one of these absolute units for $100 on Ebay. Just has a little chassis damage, but came complete in box, and I mean complete. Seeing its a rare find, I too want to dabble in modding and upgrading it. It was something of a dream of mine in college but who could afford a $5000 “laptop?”
So anyway, I have an old MSI laptop laying around that’s about for parts, and its got an MXM Radeon HD 8970M, and I was dabbling into the possibility of swapping it in to replace the 2600XT, but seeing that its BIOS locked had me coming here. Looks like its not possible to upgrade the GPU from what I see so far, so time to upgrade everything else I guess haha.
He managed to make it work on 800MHz FSB by configuring motherboard straps to override the limitation of PM965. Then OC-ed CPU bus to 266 to gain the genuine perfomance of the processor. It also required to overclock RAM.
The chipset is thinking it’s working on 800Mhz FSB, but the real clock is 1066. I broke BSEL1 line for PM965 by removing one end of R520 and connected the nearest VCCP to it. After installing X9100 the RAM will get overclocked automatically as a result, so we need to increase RAM voltage for stability, otherwise you get errors during RAM tests. Something around 1.96v should be enough. If I recall correctly, I only changed the resistance of R148. I also increased VCCP because PM965 would probably need more power as well.
The biggest problem with quads is insertion of the APIC table which is bigger than the original one. I have asked for help from Maxinator500 from the biosmods forum, but he said he will be able to get to work from summer.
R148 should be around 75K and R147 around 47K. Remember to always measure exact resistance before installing the resistors. Run memtest and complete at least 1 pass to see if you get any errors. If you do, need to increase voltage using the following equation where R1 is R148 and R2 is R147, Vout = 1.96:
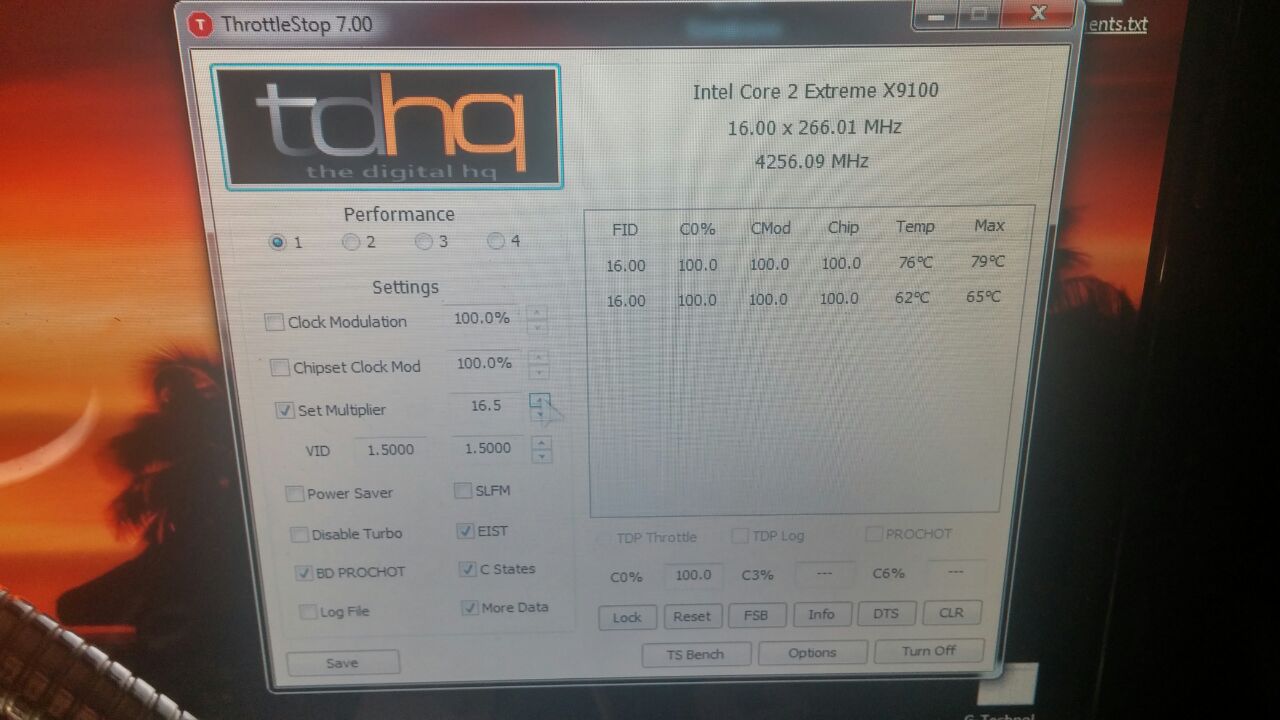
I was able to get as high as 4.25GHz with X9100, but I wasn’t even able to run a test because of BSODs and freezes. At max voltage 1.5V the CPU got as hot as 80 under no load even though I installed a huge copper heatsink with fans (but without heat pipes). I assume X9000 will behave in the same way.
You can adjust voltage through ThrottleStop. The connection between the CPU and the power controller is direct, so you can’t break it without cutting the traces if you want to install hardware switches for voltage control. Another option is to use a solder iron to remove the voltage control pins from the CPU. You will then be able to use testpoints on the motherboard to connect hardware switches. I did so on my Dell M6400, so I have one QX9300 with some pins removed
with ThrottleStop , I am limited to 1.2v for the CPU voltage I can not go above, do you know why?? I tried with ThrottleStop 5.0 and ThrottleStop 9.5. I would like to set a x9000 to 3.8ghz at least