Couple of weeks ago HP and I managed to brick my 640 G2 during a round of updates. During the BIOS update cycle I received a warning that new BIOS could not be found and once rebooted the system emitted 2 long / 2 short beeps for a minute but no display, no POST, only loud fan and blinking CAPS and NUM lock. I tried BIOS recovery hotkeys after making a USB stick, nada. Being an amateur (very) developer and sys admin with 23+ years in the field I delved into BIOS dumping (purchased programmer and SOIC from Amazon) dissection and reconstruction and soon was combining my very corrupted backup (taken via ch341a) with known good dumps of other users. While I did manage to modify the beep codes (lol) I didn’t make much progress. Work took precedence for a few days but a bit more reading and I happened across a post of someone experiencing similar symptoms with a similar HP, determination being corrupt ME. The guide here helped me to diagnose (ME Analyzer states there are 2 copies of ME in my BIOS backup) ME as the likely culprit and perhaps myself to blame as I believe I flashed ME prior to the BIOS which in this instance was the reverse order HP strongly recommended (oops). After combining my corrupt BIOS with a known good dump (with hopes that I would not lose my onboard MAC address or UUID or serial) and using your guide to clean the ME I have revived my laptop! Thank you very much for all of the information compiled and the tools linked and explained.
I have one issue that I cannot find information about and am asking for help resolving. My system fan seems to never run above idle. I don’t get the ramp up during boot nor does it seem to increase when temps rise under load in Windows. Anyone who has owned an Elitebook or Probook knows how noisy they can be and while the silence is great for a change I am aware that the heat is likely exceeding the parameters the manufacturer determined to be ‘safe’ for longevity of the system. How can I resolve this and get it back to its cool (albeit noisy) self again? IF it helps or matters any, my boot menu is completely different now including options to configure the ME, Intel CIRA, etc. When performing the ‘clean’ I used the current ME firmware for my Probook 640 G2 from HP’s site rather than the one in the repository download. Otherwise the process was followed to a tee twice and results compared.
Thank you for your help in getting me this far and the lessons on Intel’s little snitch ![]()
I almost forgot, the only other odd behavior is that the charging light does not activate but the system accepts and uses a/c while charging the battery.
Sounds like ME is still messed up, due to your fan comments. To fix this create another new verified backup with your programmer, so you can always return to current state.
Then modify that dump using a clean ME following the guide to transfer settings from another known working dump as the source file for the ME settings during transfer (For ME file, use latest from repository).
Then once finished with the build, so you use your BIOS as main BIOS source, remove the ME from the dump created clean ME BIOS using UEFITool, replace that into your dump and reprogram.
Hope that makes sense! It will fix your fan back to bothering you again, I know that doesn’t sound ideal but you want your fans working properly or you’ll burn up the laptop.
thank you for the insight, I believed ME was still ‘off’. Let me make sure I have this correct, please confirm if you don’t mind:
1) Backup current BIOS
2) Using known good dump (this is sketchy I admit, I cannot vouch for the source of the dumps I have ![]() ) perform clean ME process, using latest from repository rather than the HP version I got from support.hp.com
) perform clean ME process, using latest from repository rather than the HP version I got from support.hp.com
3) Extract ME Region from the finished BIOS.
4) Replace ME Region in the backup from step 1.
5) Flash and enjoy?
Thank you
You’re welcome! And yes, all steps you outline are exactly as I meant to do! As for the schetchy dumps, I know what you mean. Weren’t any that you found on forums where someone said "Here, I fixed your dump for you’ with a reply, “thanks it works”? If not, then all you can do is try
I would say try one dump, if same or worse, then try another dump, if continues to be the same maybe standard issue problem  .
.
Better yet, lets use Stock ME for your system as source for settings transfer, there should not be two ME’s in there but sometimes BIOS packages from OEM’s contain several actual BIOS files for different boards so maybe this is what it was catching.
Let me rip the package apart and see what’s going on. Wait for an edit on this and I’ll let you know, since you are here now too.
Which BIOS do you use, there is two there with different names but same version/date (N76) & (N87)
https://support.hp.com/us-en/drivers/sel…book-pc/8430730
I checked the release notes and can’t see any difference? I know higher number isn’t always newer too, and that N76/N87 may not even be a BIOS update revision type number, so I’m not sure which to use/which you would download etc.
Both apply to your system model generally, both have same date, both have same version number, yet clearly there is two different downloads? I believe it’s a “Family name”, so you need to check in your BIOS what is your family or system ID etc.
OK, while waiting I download both, clearly different BIOS one is N76_0133.bin and other is N87_0133.bin
Neither contain ME Firmware, so not sure which file you downloaded that had two ME’s?? Please link, lets check, thanks@
Thanks for getting involved, seeing as this is new to me it is very helpful. My BIOS family is N76 (cannot find any documentation as to what this refers to thought. mobo revision? BIOS chip? not sure).
The BIOS I am running now contains the ME from the latest available download on HP’s site for my laptop. Do you think I should stick with it and go through what you advise or use generic?
The “2 MEs” I can explain by either an incorrect assessment by ME Analyzer of my original (but possibly faulty) backup or by the failure that occurred that led to the issue in the first place. That or the fact that I was unable to get a dump of the BIOS in Windows that would verify, verification failed ~ 50% every time. I flippantly flashed the BIOS from Windows with one of those dumps that was as you say, supposedly good. Naturally that failed verification too. From then on I used flashrom on Ubuntu.
Let me know what time of day is good and I’ll schedule work around it so there isn’t so much latency in the dialogue.
Thanks again
You’re welcome! Yes, I am unsure of the family ID stuff either, just needed to know correct one to use. N76 (nor N87) BIOS image contains ME FW. I didn’t think to check their downloads for ME FW separately, are you saying the did host those files and you have them? if yes, then yes, please extract the ME FW from the exe they send in, then use that as your settings source in the guide. Using ME FW is different than BIOS File as source, so pay attention to what he guide says, and then use latest ME from that same series as your replacement ME when replacing the file. then once done, insert the outimage (ME) into the BIOS
Verification error was likely due to software version, or chip ID used (Sometimes you have to use exact ID, sometimes you can’t use exact ID or it will fail every time)
Not sure of a good time, 6 hours ago maybe for me, I’m leaving now. If you want, link me to the exact FW Download you have from HP and I will make the BIOS for you, And send a backup of your current BIOS, preferably verified with programmer, so you don’t loose board specific details.
Dumps from other users are not needed now, if there is actual ME FW Downloads from HP, those would contain any necessary settings already.
Awesome, I am including the link here to the downloads: https://support.hp.com/us-en/drivers/sel…731?sku=W3Q90US
Scroll down to “Firmware”, expand and scroll down to the 4th in that section. Now the one I am running now is a Frankenstein, I have my original MAC address, someone else’s serial number, and god know what else is not original. Not sure about UUID either. At any rather, I am posting the file that I flashed on this two days ago. If you think I should backup this one and send it I can do that too.
https://file-post.net/en/s9/d1/153726403…id=lfSyVnyOLTBf
thanks, I will look into this tonight. In the meantime if you see this before then, please also send me your original backed up BIOS even if messed up, the one with the double ME, that way I can try to find your board specific details if they are there
I also need a current output image of MEinfoWin
OK, I uploaded that backup, backup-1.bin to the link posted with the other dump. I will run meinfowin and post output in a couple of hours, have to run out for a bit now. Thank you!
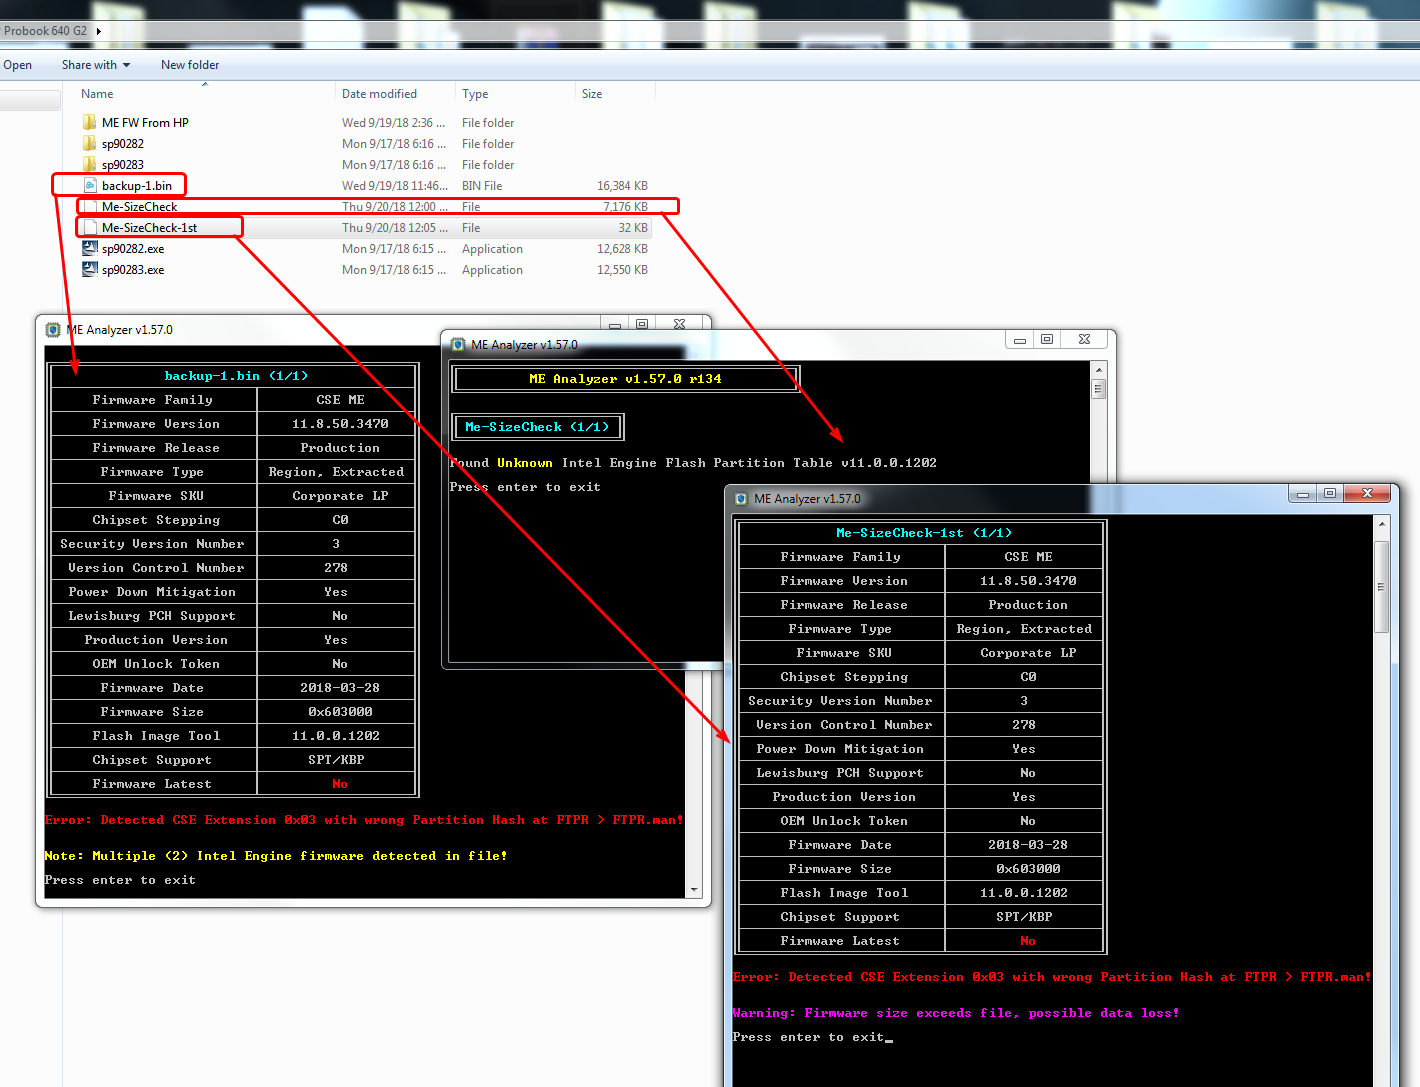
There is two ME in there, well at least two ME beginnings! One starting at 3000h and other at b000h, there is not enough room between first and second for entire ME, so first is cut and second is not valid either (11.0.0.1202), not sure where the 11.8 comes from ME Analyzer finds, maybe from first ME that’s cut?
I see, I cut each one out and saved as single files to check with ME Analyzer. First ME is 32KB, version 11.8.50.3470 and this is one causing all the errors shown in ME Analyzer. Second is correct size, but invalid and old version. So as you suspected something happened during the ME update and now that is the outcome.
Here is image showing size and ME Analyzer output of each file, so you can see where the error comes from
FIT table for CPU microcodes is also broken, along with a ton of other errors, so it’s all messed up
Working on this, but wanted to give you update so you’d know I’m on it. No need for MEinfowin now, I found correct ME Type to use in the larger (Old version) ME Download documentation
Can you add images of any/all stickers on the system, and if you have it opened up still, add images of any stickers you can see on the inside on the casing or front/back of the board.
Is your windows still activated? Check right click my computer, properties and wait for a while and be sure it still says activated there. You can also run MS update and then re-check this again once done.
First, thanks for all of the effort, I really appreciate it. Thank you for the update as well. I thought I’d posted the mewininfo output before I crashed but I suppose not. If you need it I have it.
Yes that is my MAC address. I can handle the sticker requests however I do need to know if there are any on the other side of the board as I haven’t pulled it completely yet. I will get these together soon, however I’d prefer to not post all of those.
If you don’t mind I am going to PM you my email address and we can exchange additional info that way.
Windows is still activated, however I don’t know if the PID has changed due to SLIC coming from the dumped BIOS.
No need for meinfowin now, and thanks for confirming MAC. I don’t know if there are stickers under keyboard side of laptop, but don’t take further apart if you have not already.
You can send zip file with password, attach here or to any file host you want so you can delete once I have it. Then PM me the password.
That is why I asked about the windows activation status, if it’s activated still then it’s OK even if UUID is now different. I guess I can go ahead really, my main concern was the UUID/Serial stuff, with windows activation, so was waiting for sticker images to hopefully maybe find it’s location in BIOS from some of that info, but since windows remains activated I think it will be OK as is and I can go ahead and make you new BIOS with clean corrected ME. Go ahead and reupdate (using software/exe) BIOS to latest version N76_0133.bin or sp90282.exe, then send new full dump and I will rebuild ME into that again for you to program with programmer.
I will update and dump shortly and reply back here.
I got stuck dealing with clients but just uploaded to that file share. Let me know if you need anything additional, and thank you again for your help LiB.
@badgenes - There’s no files there now on link above, “File does not exist. File was deleted due to passing expiration date”
that blows! im creating a new one now in my google drive.
https://drive.google.com/drive/folders/1…2iy?usp=sharing
please let me know if you have any issue getting to those. pictures included. thanks!
@badgenes - since that dump, ME is correct and latest version, so we can leave as it since it’s all working now. Wait! I forgot about the fan issue, so re-cleaned ME just to be sure, but since that is RGN-Stock in ME FW Download I planned to used part of the old ME extracted as shown in that image previously for the settings transfer but it fails due to broken ME still. I think that not being done, and you using the HP ME FW without any settings in it is maybe how the fans go messed up. I didn’t notice until tonight that was RGN Stock in the HP FW files, so possibly some missing settings we can’t see in FIT or XML compare, when installed with update tools those would be preserved/transferred but if inserted into BIOS using FIT then only settings from the dump source were used which may have been messed up or not correct for your exact model etc. Anyway, I hope this is the fix! If not, then we need to try and find a confirmed working dump from your exact model and N76 family and do a ME Settings transfer
GBE Region was incorrect type, and had some invalid duplicated data, so fixed that and put back in. I set Flash Descriptor (FD) to YES read/write for everything, put your MAC address back in correct location.
If HP SureStart kicks in and launches recovery (re-write it’s own BIOS), then we know this system has SureStart and we can’t make the modifications to FD. If that happens let me know I will make new BIOS for you again.
I am unable to confirm correct location to put in your serial, due to the original BIOS corruption and many regions missing, so I can’t compare with current dump as some locations where I thought may be it are not in the corrupted initial dump.
I was not able to find even partial beginning or end of the serial or the 607 number under that in the initial backup, so I think that part got corrupted and lost.
Areas in the NVRAM where this kind of thing is located is in your post-fix BIOS files, but those areas are not in the initial backup so I can’t verify exact spot to replace based on the fixed-hack BIOS I’d need to know it’s original serial to confirm the exact location.
I think this will be OK though, since your windows is still activated. Computrace may not work anymore though, so don’t rely on that if this is lost.
https://www.sendspace.com/file/6jdb6q
http://www.filedropper.com/outimage-fd-gbe-fixed
Put in there with programmer, then if you cannot remove main battery, CMOS battery and power from wall (For 1+ minute after programmed), then instead run the following with FPT from V11 Intel System Tools Package
fptw.exe -greset
Once done with either of the above, enter BIOS and load optimal or setup defaults, whatever it’s called in your BIOS. Then set SATA settings and hard drive boot priority same as you have now, check first if you need to
awesome thank you. I am trying to find cmos battery location OR Intel tools for Linux as I could never get the tools to read/write properly under Win10 Build 1803. I suppose I could try first with Intel tools…is there an Intel flash programmer along with those tools? I’ll look but just in case I miss it…
I do have 3 more 640G2 dumps, all using N76 I am uploading now to my drive. if you want to check them for any helpful info, by all means please do.
I’ll write back within an hour.
You’re welcome! Intel FPT does not need to read/write, so nothing for Linux needed for that command, it’s a software command global reset (FPTw.exe -greset)
Sorry for not linking, I assumed you had already, yes you need Intel Programming Tools package V11, FPTw is in the Flash Programming Tools folder
https://mega.nz/#!GB9XSBqZ!2lnEz1iVjW6Do…wS6ojpyYI29FUo0
Or did you mean flash programmer, to write the BIOS? For that, yes I meant to use your flash programmer tool (Hardware) to reprogram this BIOS onto the chip. Do however you did before, method does not matter, as long as you verify after write and it’s OK.
Then do the above command from within windows.
I don’t need those dumps now, if we end up looking for one, we will look on forums, and find one “Confirmed” working by someone’s reply, that way we know ME is working correctly, to then snag ME from and compare settings or transfer etc.
OK I just uploaded the files, but I cannot get the damn flash tool to run properly yet under an administrator started command shell. give me a few to sort this out, it’ll probably be easier than finding the CMOS battery…