Hi everyone, I have a Lenovo G470 I’d like to update. This notebook uses an Insyde BIOS, and uses Sandy Bridge CPUs (206A7) + HM65 chipset. Here’s the latest BIOS file, version 33
There’s an issue, the original microcode has a length of 2400 and new, spectre patched microcode has a size of 3000. I’ve successfully found the original microcode in the BIOS file with a hex editor, but there’s no padding at the end of the file to copy-paste-write the new microcode as it’s longer.
I don’t think that I can just casually increase the BIOS size by 600, correct checksum and flash, that would probably result in a 100% guaranteed brick.
How to proceed? I can’t seem to find a tool that can do this as with other BIOS brands.
-----------------
edit: Insyde H2OEZE can’t read the existing microcode files in the BIOS, if trying to add the newer microcode and saving the BIOS, it crashes…
There is a block of 5 microcodes from 351000 to 35BBFF, 206A7 being the first one. After that there’s > 30kB of “free” space (FF)? AndyPs Phoenixtool might work, too.
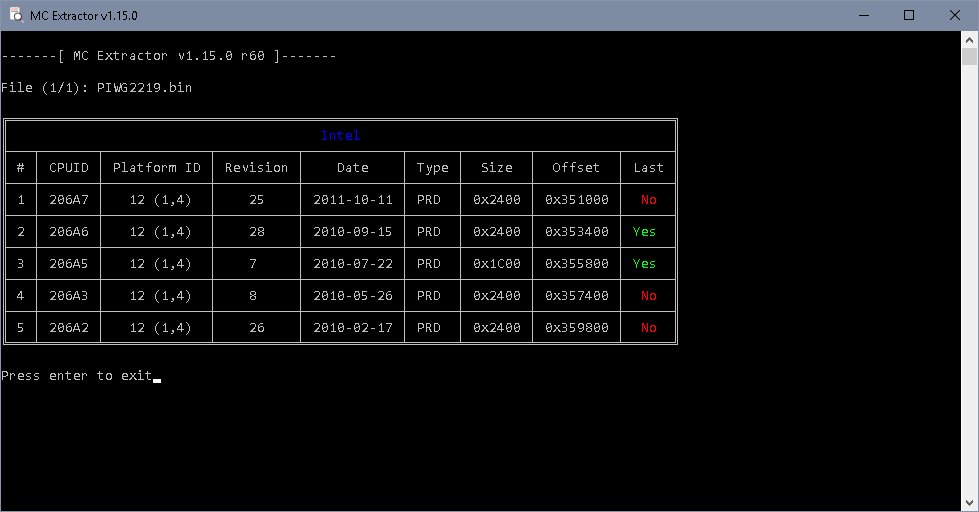
Oh… didn’t notice that. Interesting! You’re right, that’s the free space I was looking for! I did see the 5 microcodes thanks to the MC extractor tool, yet it didn’t occur to me to look further ahead…
As you say, there’s lots of free space after the last microcode file, more than enough room for an increase of 600… I suppose I can add the newer 206A7 microcode then shift the rest of the microcodes by 600 and it’d be alright after updating the checksum.
It seems to be ok… I’ll give it a try, hopefully the included flasher accepts the file, if not I have a CH341a USB BIOS flasher I could use to get the job done.
--------------------------------------------------------------------
edit: I’ll proceed with donovan6000’s guide
https://web.archive.org/web/201410160356…microcodes.html
He updates/adds the microcode files in the original BIOS with a hex editor, then uses insydeflash to update microcodes using the modded BIOS file without flashing it entirely by changing a few settings in the config file, effectively patching the existing BIOS file in the motherboard… let’s see.
--------------------------------------------------------------------
edit2: success!
Before:
After:

Well, one less thing to worry about. Thank you very much!
Good job!
I wasn’t aware that this works for Insyde, too. I learned that it’s possible for (some) Phoenix Bios. For those you don’t need to mod the bios file, it’s enough to have the new microcode as file and the old bios- file. (Link)
Does Donovan’s guide work on HM70 chipset too? I tried it but after reboot I got Incorrect Firmware please press any key to reset to defaults.
So I found an slightly easier method after reviewing donovon’s guide.
I first ran MC Extractor against the BIOS.
Once I figured out the microcode first line, for my BIOS it was “01 00 00 00 25 00 00 00 11 20 11 10 A7 06 02 00”, I utilized the UEFITool to narrow down the non-empty padded section. Then I exported that section, replaced all the microcodes using HxD, and then replaced that section again using UEFITool.
MC Extractor reports all updated!
*****
EDIT 1
MC Extractor reported everything ok however InsydeFLASH and H2OEZE did not recognize it. So I then utilized HxD to replace the new microcode section and double checked with the 64-bit version of H20EZE (v 3.04).
For a complete step by step guide.
1. Load your bios .bin or .fd file into UEFITool.
2. Using MC Extractor and the list of Intel Microcodes, determine the first line of the Microcode your looking for. For my BIOS it was "01 00 00 00 25 00 00 00 11 20 11 10 A7 06 02 00"
3. Export that section body “as is” and save it to a file, aka “cpu_mc.bin” and close UEFITool.
4. Load the newly created cpu_mc.bin file into HxD. This is the Microcode section as well as DMI and other information.
5. Now load each new microcode from the microcode database for the microcodes you wish to change.
6. Now starting at the top of the cpu_mc.bin file (or whatever you named it), “past write” (if using HxD) overwriting the first section of this file. You must REPLACE EACH ONE even if it does not need updating in order to keep the data continuous. Always start from Higher to Lower, for example, 206A7 then 206A5 then 206A3, etc.
7. Continue pasting into the file one after another all of the microcodes you are replacing.
8. Now carefully scroll through all of the microcodes until you encounter the first line that is all "FF FF FF FF FF FF FF FF FF FF FF FF FF FF FF FF"
9. Copy all of the micrcode data up until the line that is all FF.
10. Load your bios .bin or .fd file into HxD. Find the microcode starting line searching for the same string you did in UEFITool, "01 00 00 00 25 00 00 00 11 20 11 10 A7 06 02 00"
11. Starting at the first position, “past-write” all of the Microcode date. This will properly extend the micro-code data. Save your file.
12. Double check you new file by loading into H2OEZE and MC Extractor to make sure they are all correct.
I also used a similar method for replacing the WIFI card check.