Hello everyone,
I would like to ask for help with bios modding for this laptop:
- MEDION X7842 MD99690 := CLEVO P671RG ( as far i can find out )
I think except of the blue lights on back the displaycover, the barebone should be exactly the same. So maybe just overwrite the old Medion bios with Clevo bios could work !?
Would love to be able to readout Bios, modding and flash it back on my own. (I have a CH341a). But maybe this is a project for years for me, and some solutions are already here.
Maybe someone can help or give hints in the right direction.
Thank everyone for reading, greetings stoffl
Working on a solution, I will tell here, what i’m doing.
Please note, this are all just tests and guesses.
my first step in trying solving the problem:
- Finding the correct Chips which contain the bios.
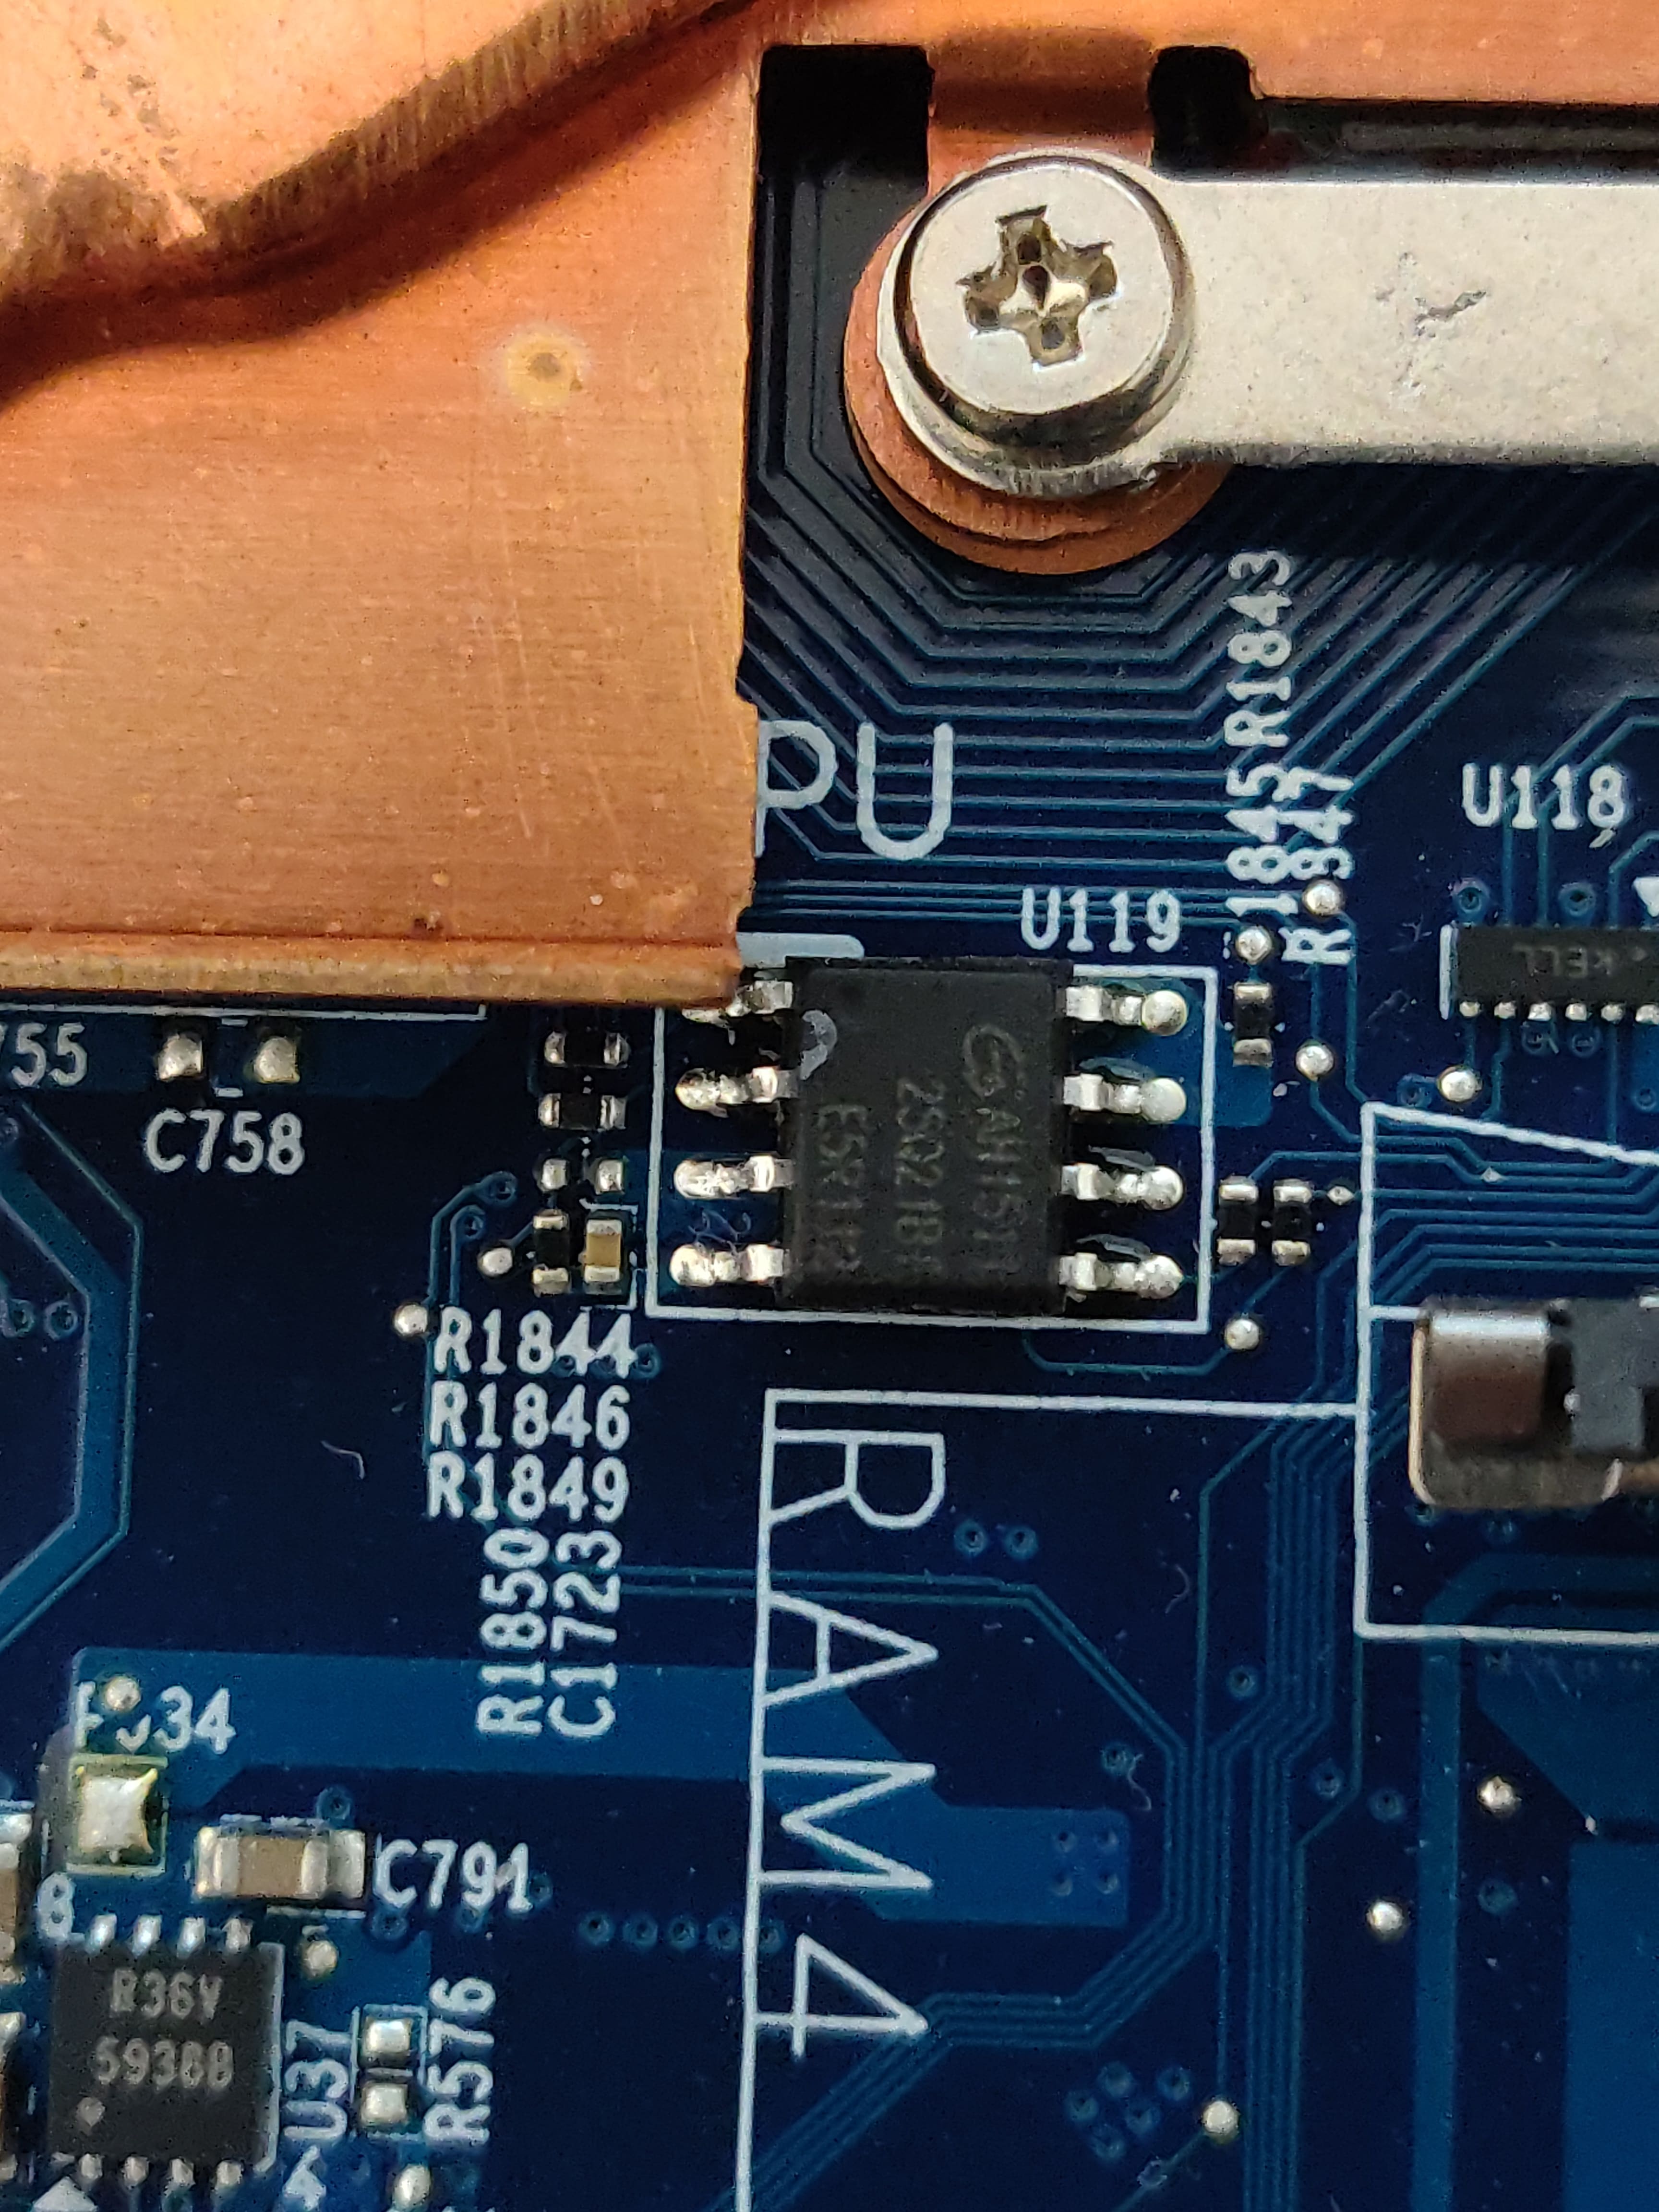
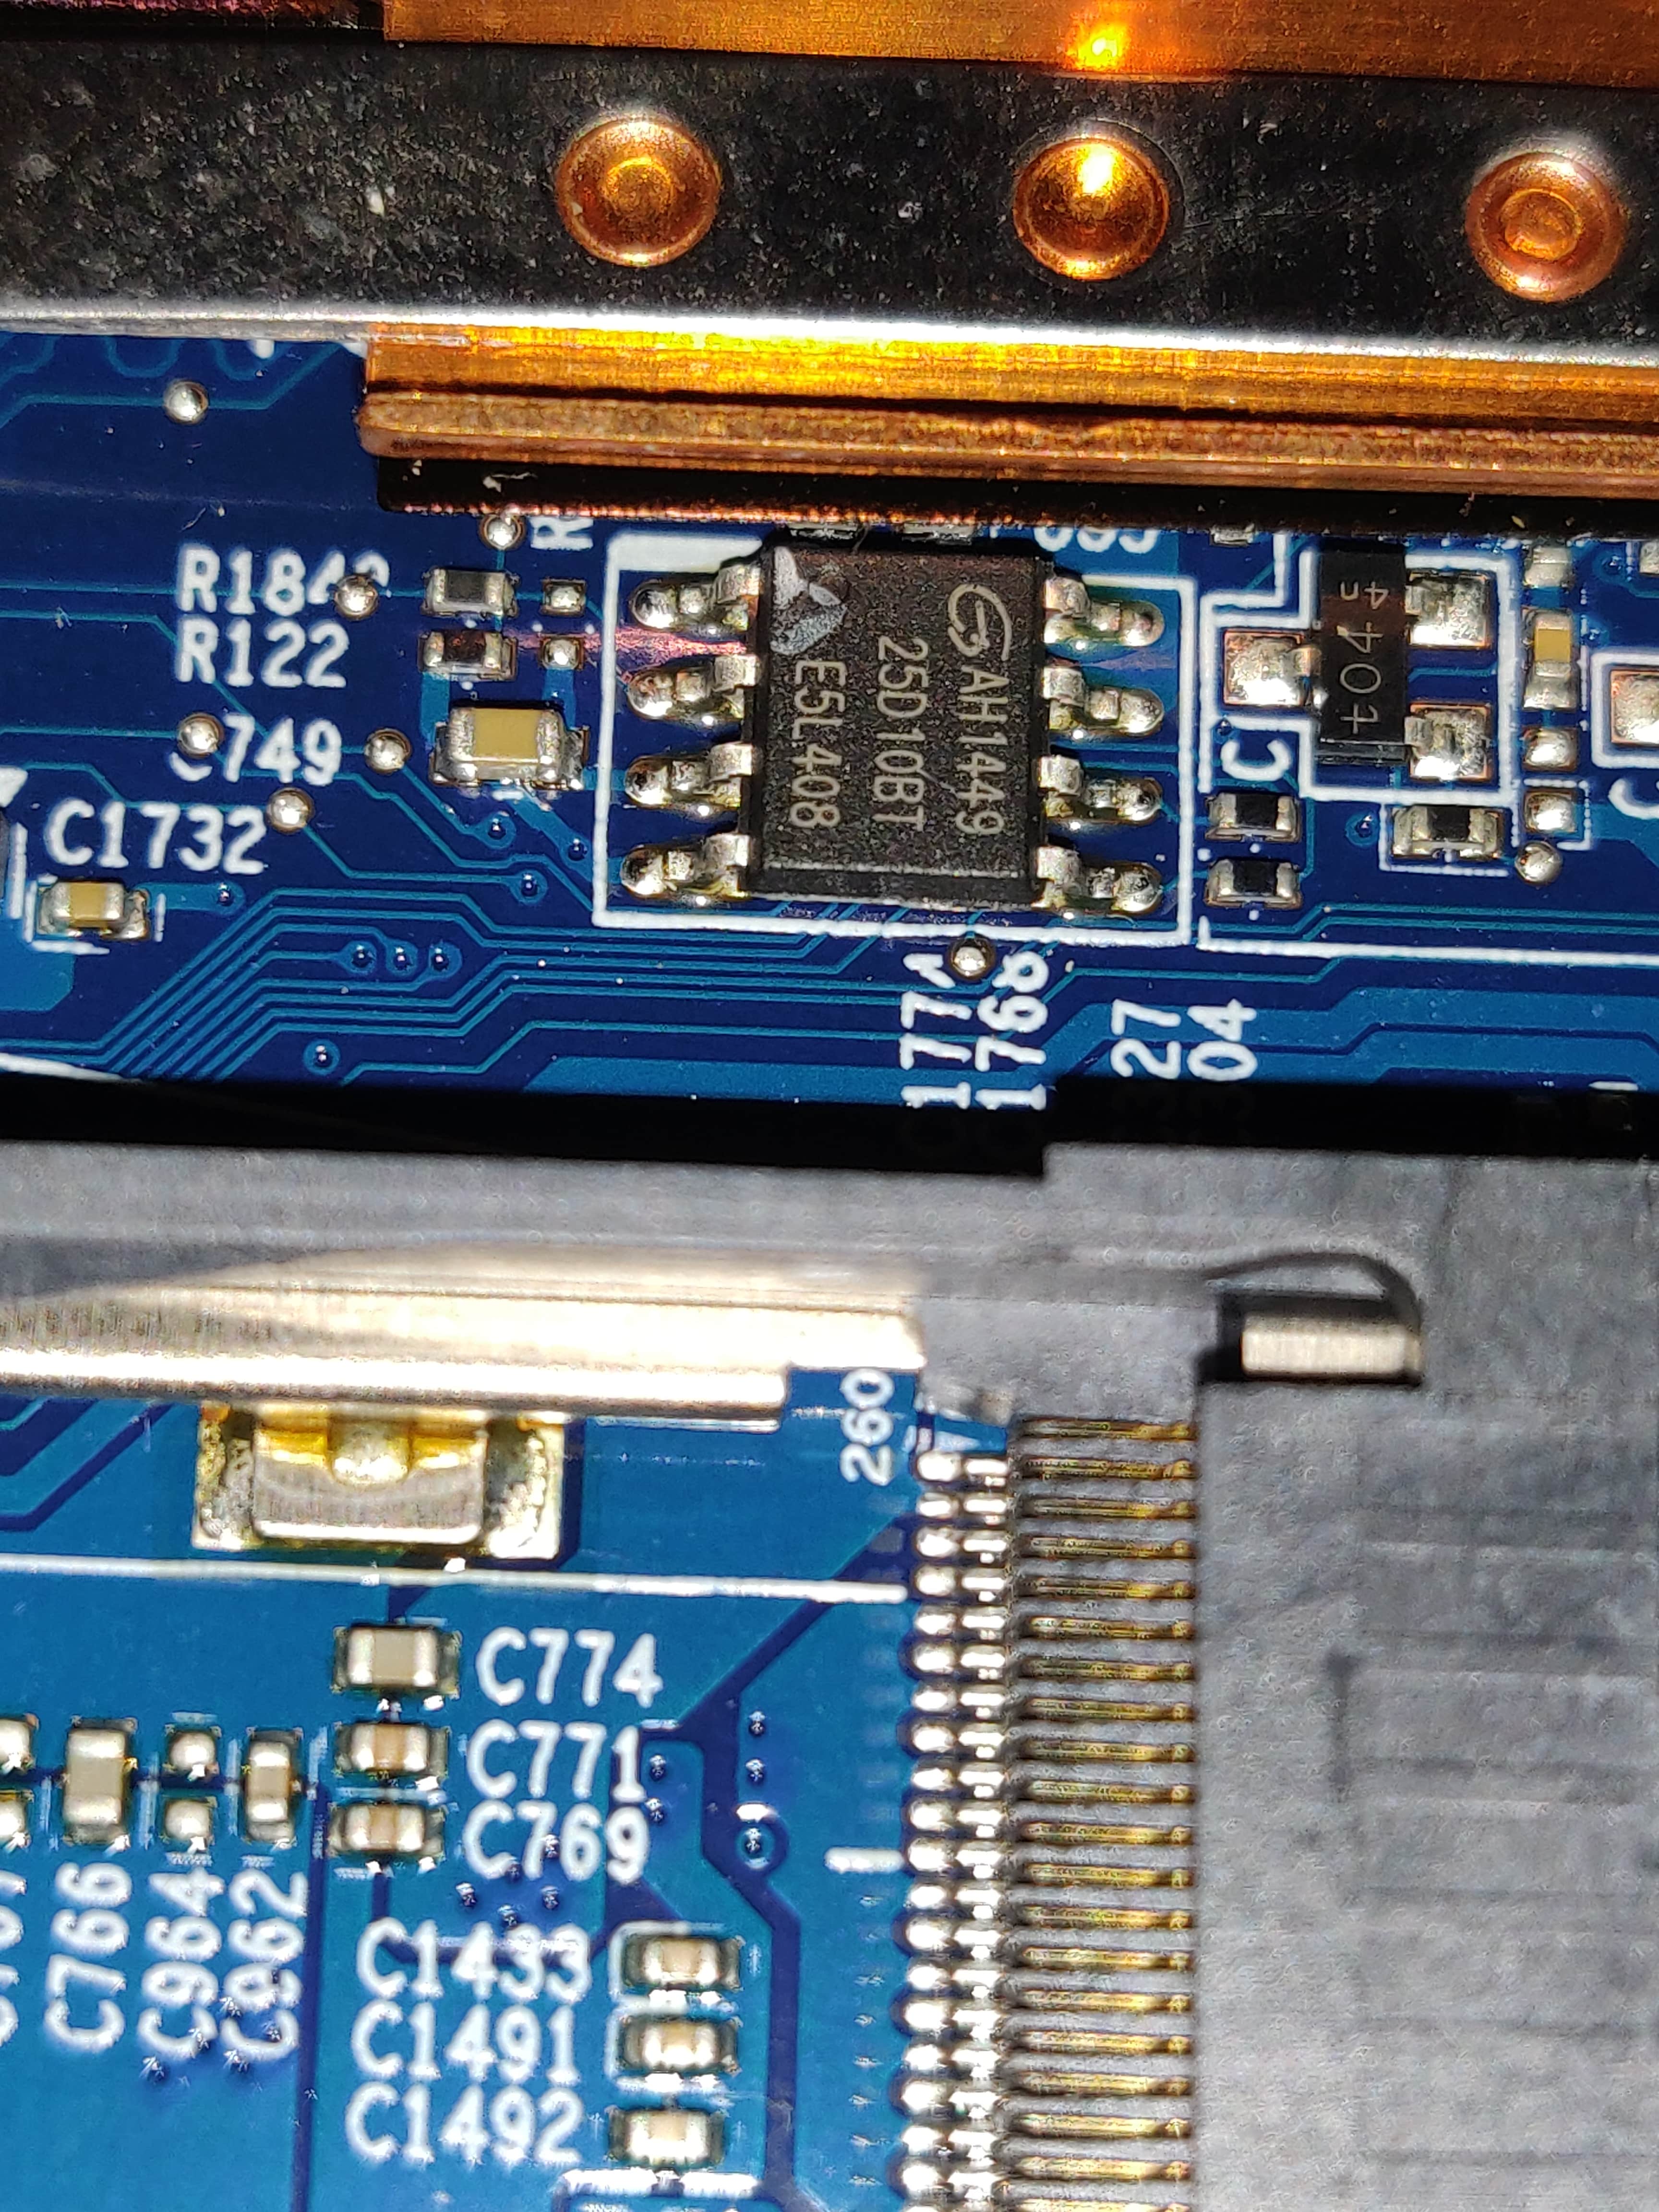
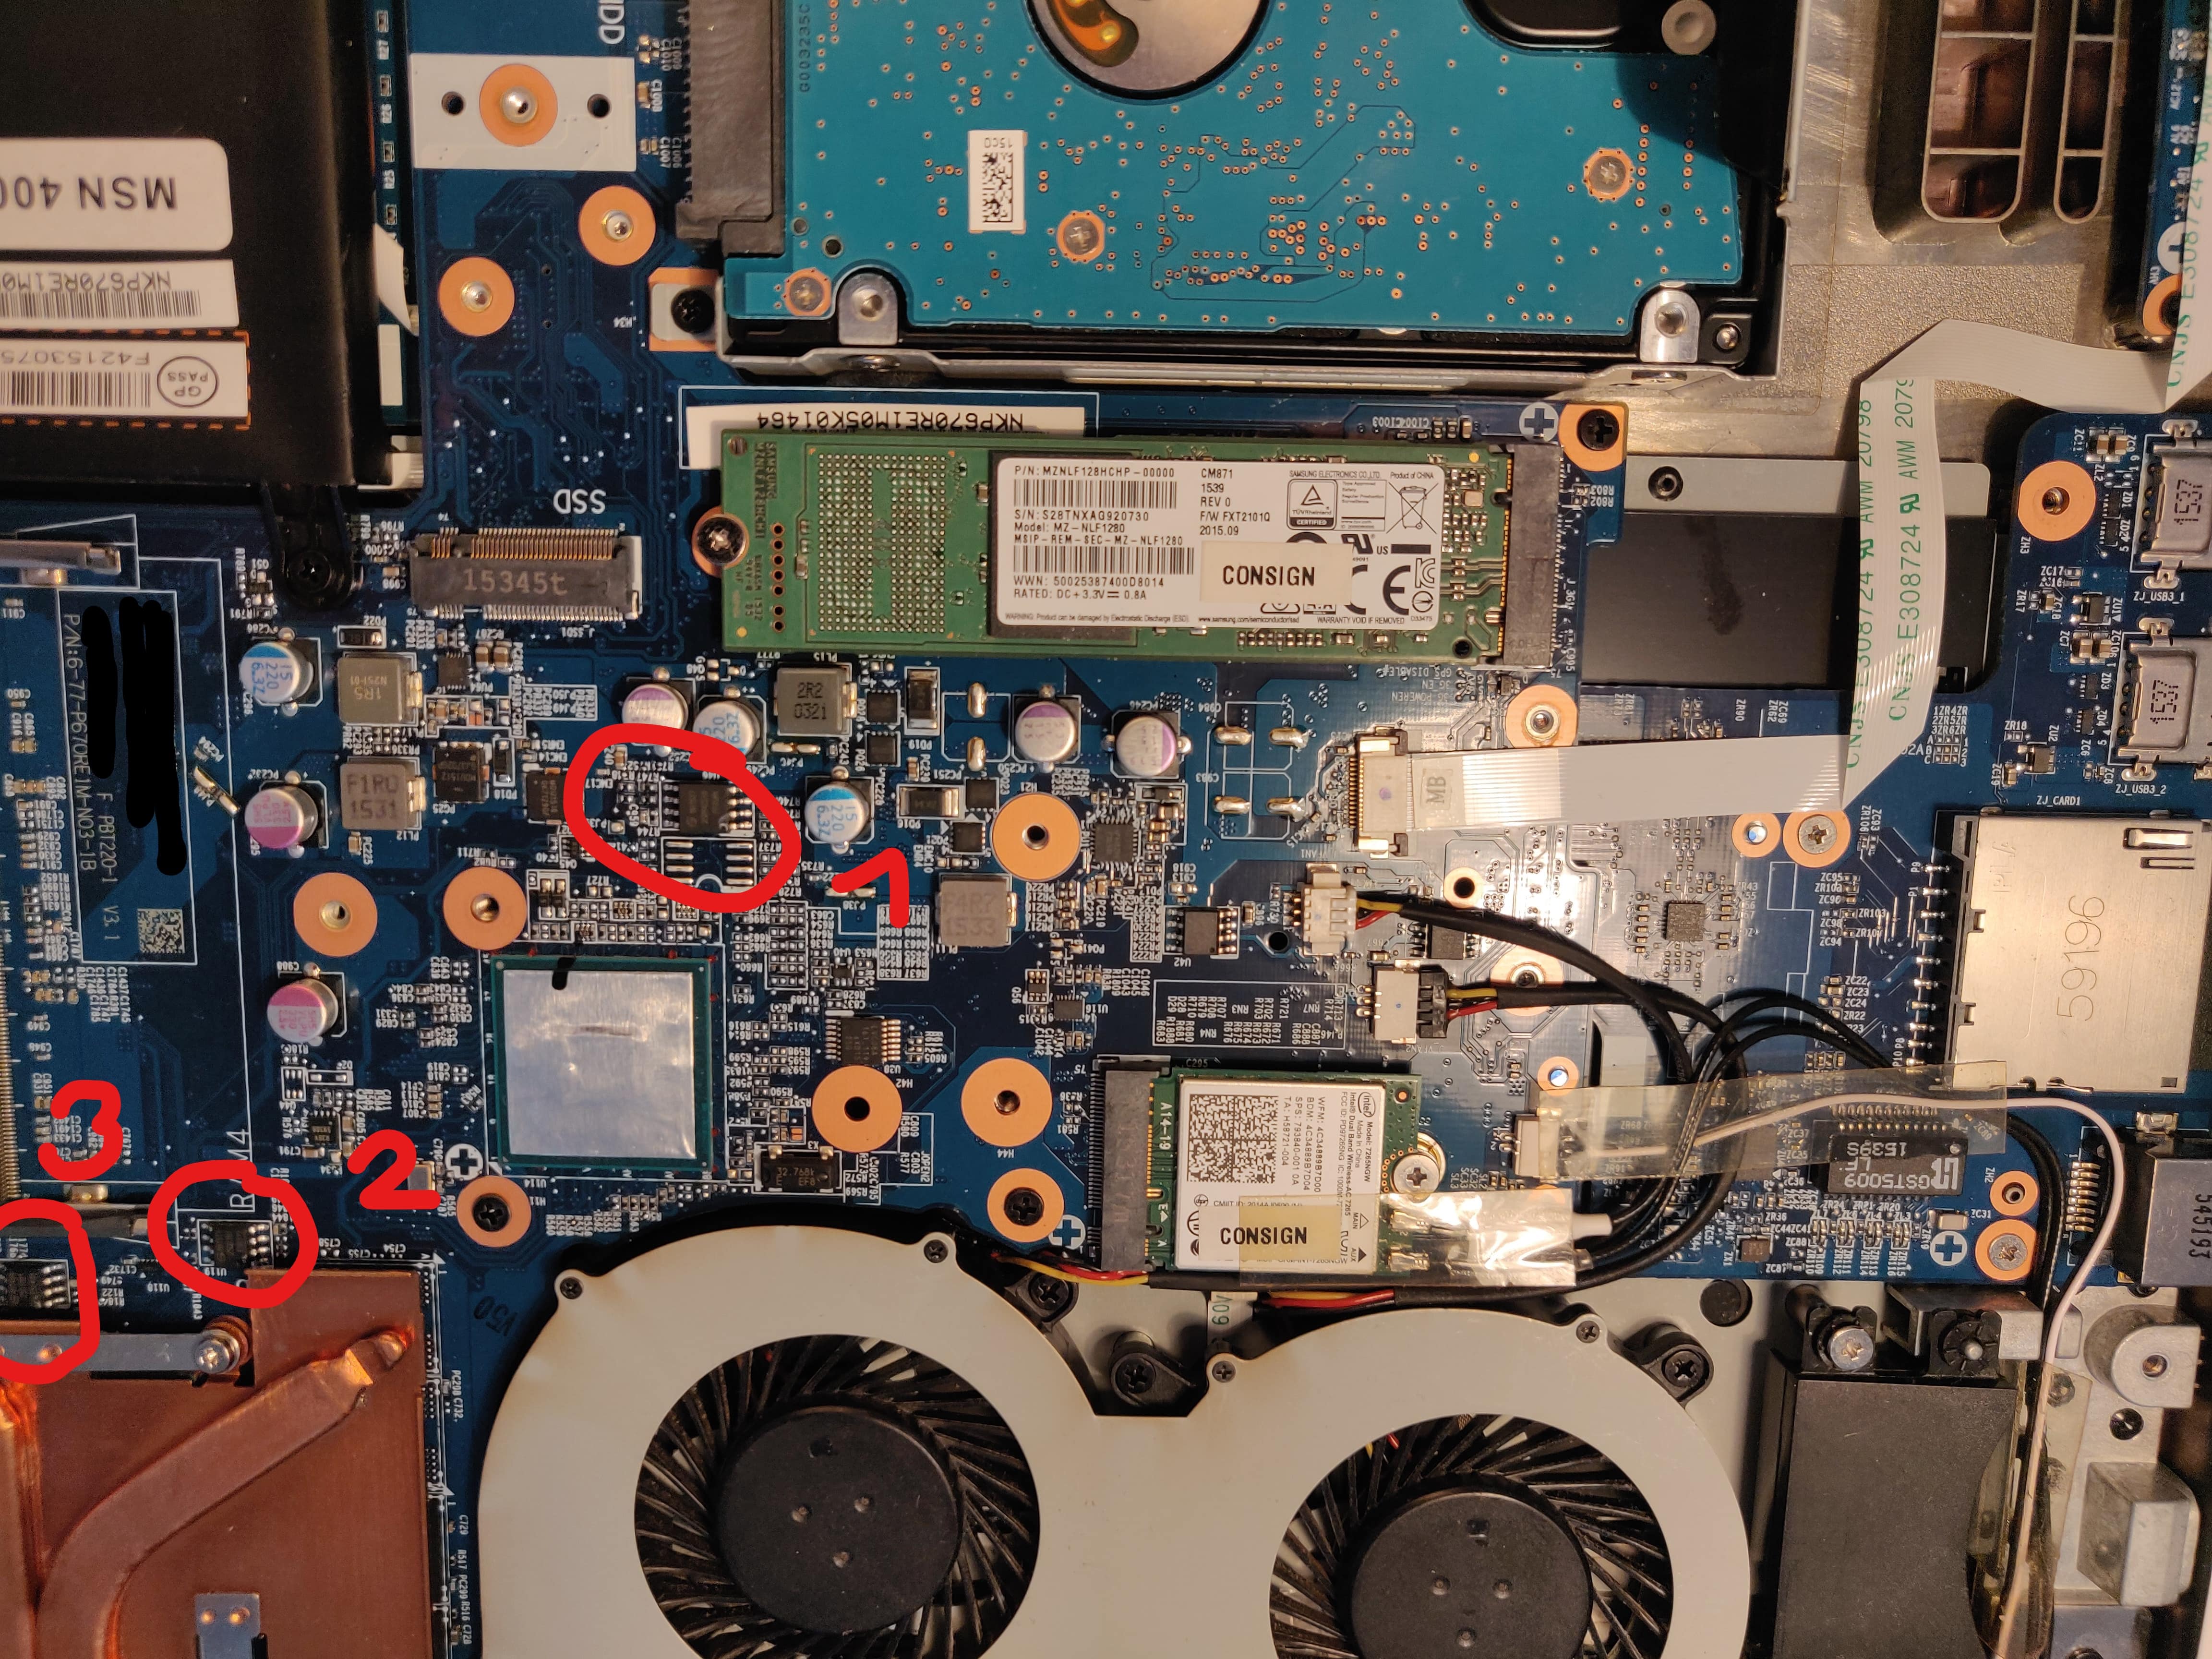
I guess 3 chips could be reliable. If someone knows it better, your welcome.
- testing software for readout bios for Backup and modify (picture prog.png)
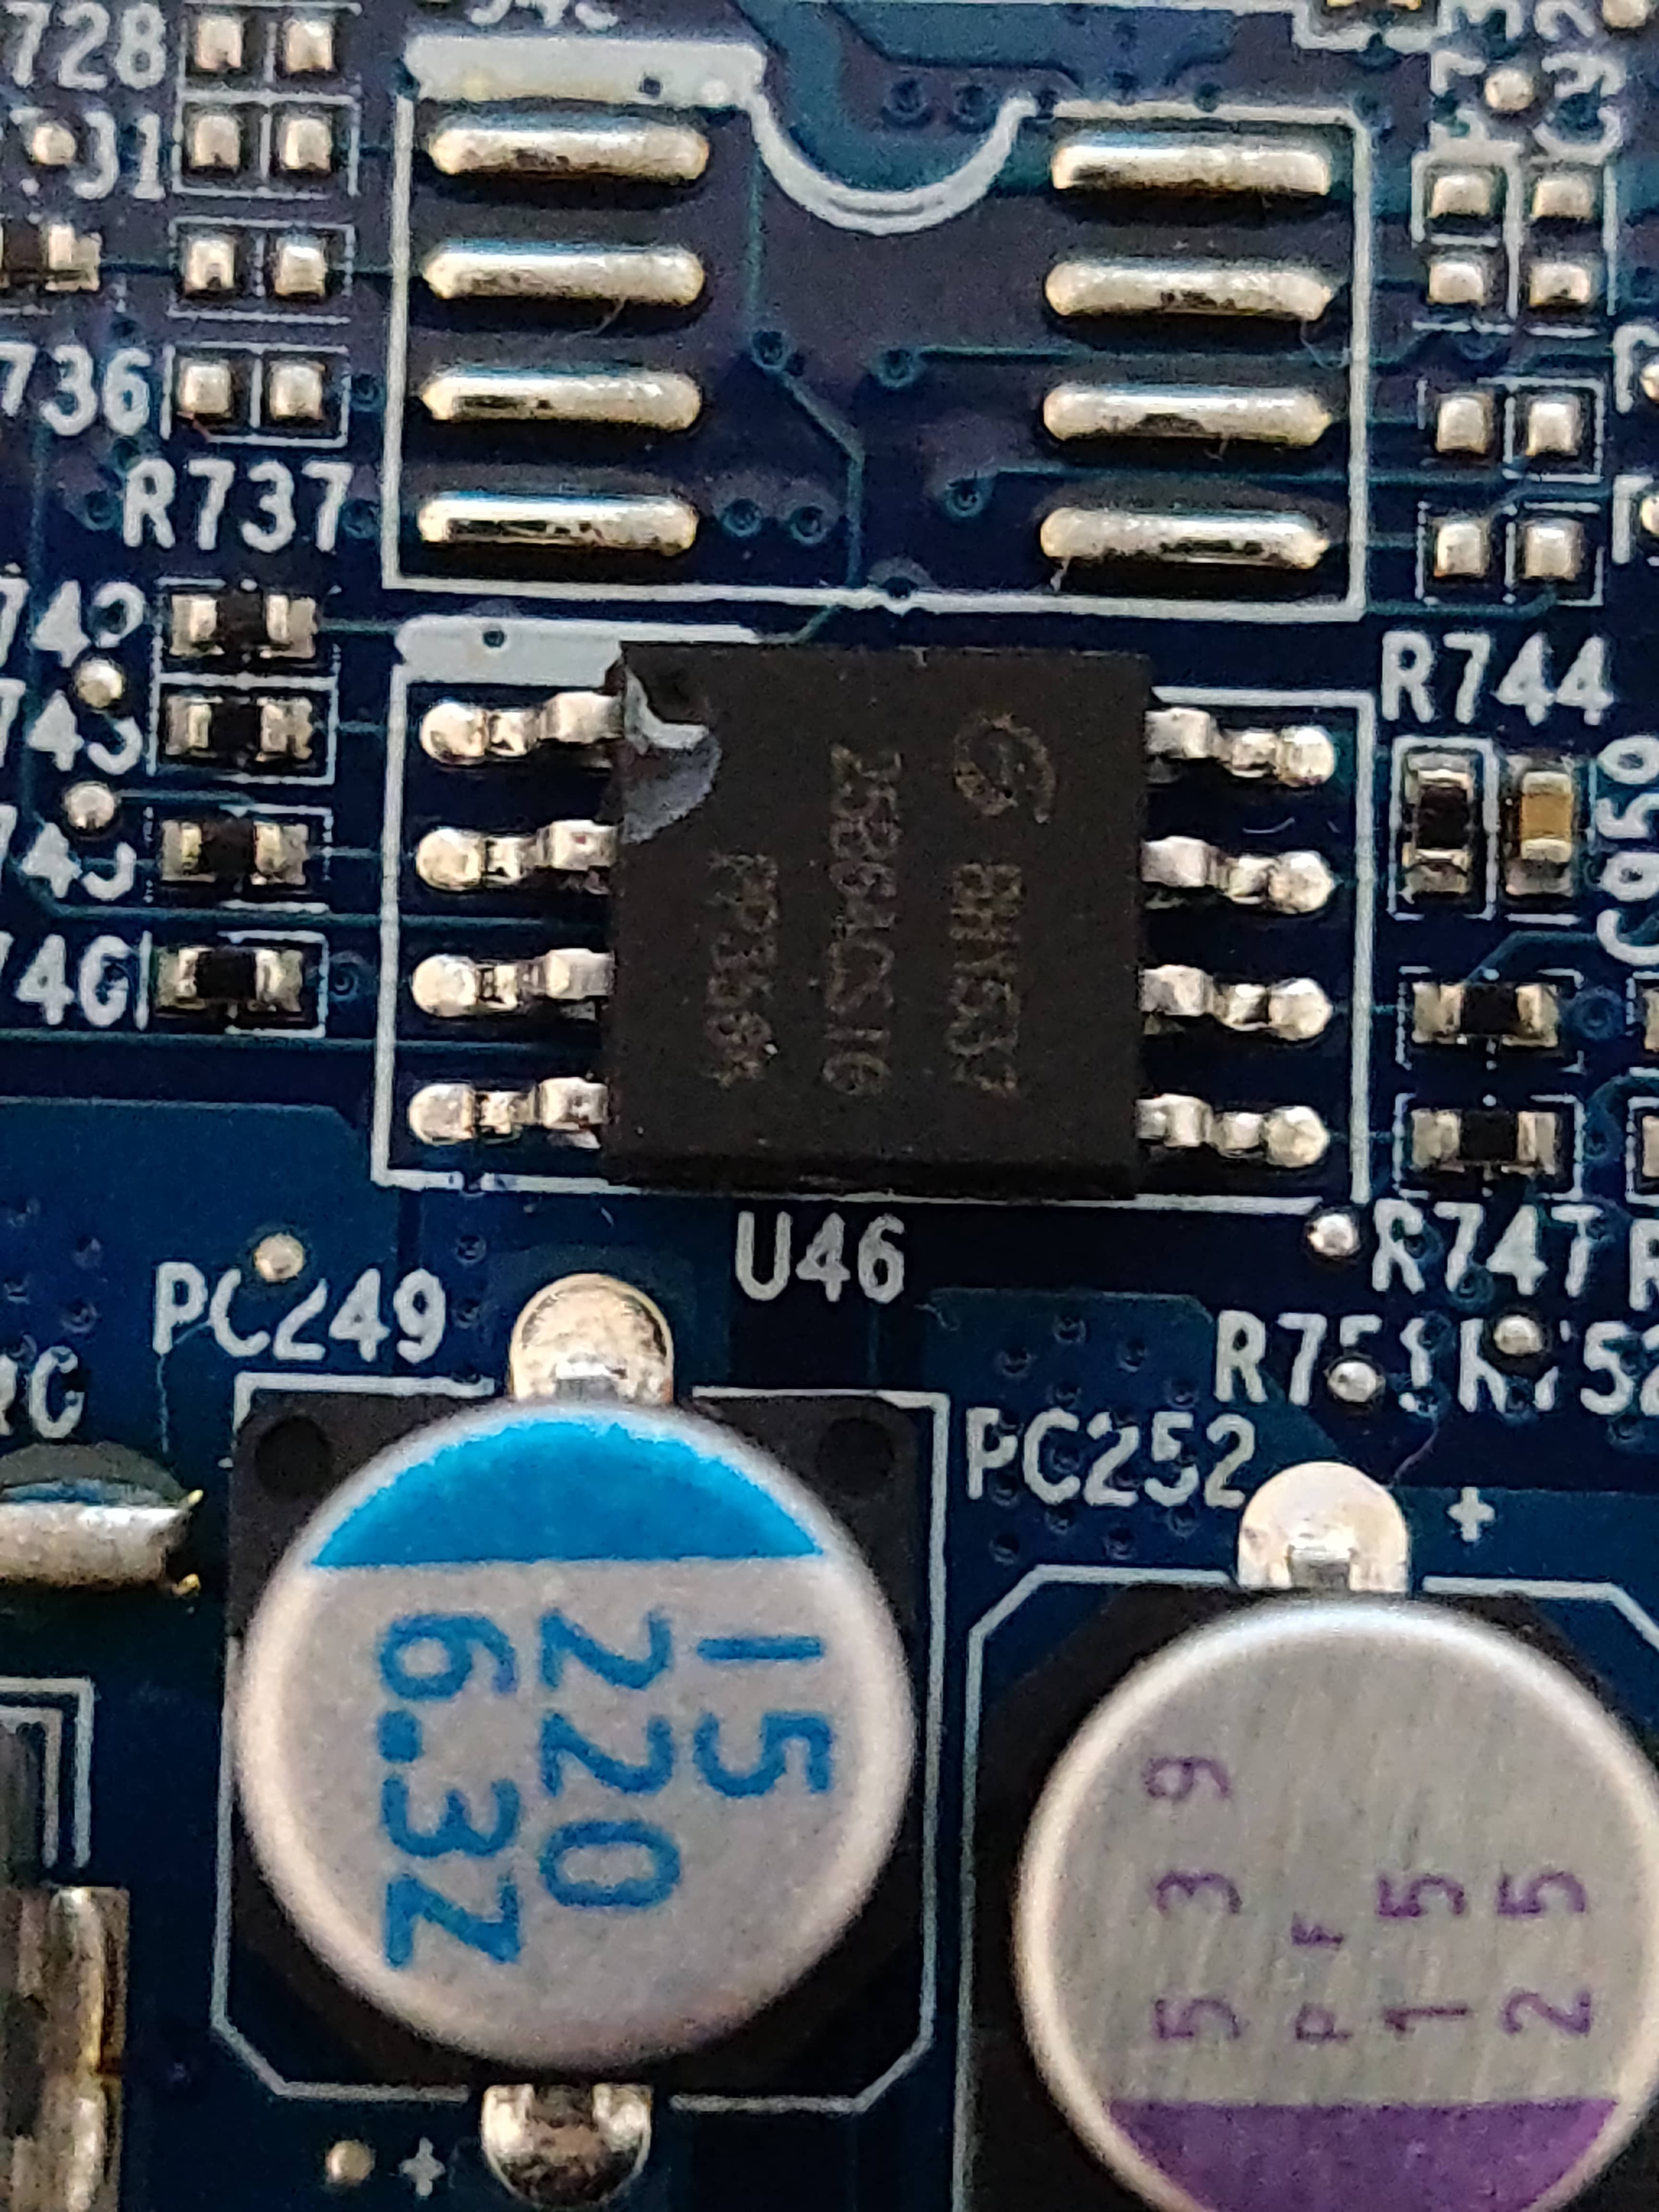
@stoffl_kartoffl - This is the BIOS >> 25B64CSIG, this is Gigadevice GD25B64CS - For that chip use version 1.34 software, linked below, and GD25Q64 ID or EON EN25B64 ID
http://s000.tinyupload.com/index.php?fil…213094641136166
I can help you do this without programmer if you want? Anyway, not sure what settings you need to change in this BIOS, but I can probably unlock the menus for you, and or we can also just change any setting you want directly too, without a BIOS mod (even hidden settings)
So all up to you, what you want/need to do.
@Lost_N_BIOS
Thank you very much for helping. This sounds great ! ![]()
So you think, there is no need for doing this with Programmer. I’m just at the beginning doing/trying such modding.
My thinking was: read out the Bios to have a Backup. If I change it without this way (extract, modify, flash) but with software within OS, and something went wrong, maybe also some other chips are flashed wrong. in that case, how could i recover the Laptop.
But I will obey your professional experience ![]()
Since this Medion Laptop is just a Clevo barebone (you can see it from the mainboard picture in RAM4 Bay: “P/N: 6-77-P670REIM-No3-1B”) and Clevo barebones accept Egpus, maybe this could already solve my problem. Flash a Clevo Bios to it. having a save Backup for worstcase and flashing the extracted Bios would once more be very important.
Anyway an unlocked and whitelistet bios maybe solves my problem.
Your help is very welcome, thanks alot !
You’re welcome! Yes, programmer may not be required to flash mod BIOS, and if you just need to change some settings mod BIOS is not even required, we can change settings directly via several methods.
You can dump chip anytime you want with programmer, so you have a known good backup in case you ever need to recover. Use info I gave you above.
I don’t know about Medion >> Clevo, you will have to see for your exact model if someone already flashed a Clevo BIOS to it, and if so, which. Then you can do that.
If you just want to unlock your current BIOS, please do the following and also link me to the stock BIOS download page
If you have already modified the BIOS in ANY way, you will need to re-flash it back to factory defaults using factory method (NOT FPT)!!!
Additionally, please remove all BIOS passwords, disable secure boot, and disable TPM or Encryption if you have enabled. Do this before moving on to below
If you do not have Intel ME drivers installed, install them now from your system driver download page, then start over here after reboot.
Check your BIOS’ main page and see if ME FW version is shown. If not then > DOWNLOAD HWINFO64 HERE <
Once HWINFO is open, look at the large window on the left side, expand motherboard, and find the ME area.
Inside that section is the ME Firmware version. Take note of the version. (ie. write it down or get a screenshot)
Once you have that, go to the thread linked below, and in the section “C.2” find and download the matching ME System Tools Package for your system.
(ie if ME FW version = 10.x get V10 package, if 9.0-9.1 get V9.1 package, if 9.5 or above get V9.5 package etc)
> DOWNLOAD " ME System Tools " packages HERE <
Once downloaded, inside you will find Flash Programming Tool folder, and then inside that a Windows or Win/Win32 folder (NOT x64).
Highlight that Win/Win32 folder, then hold shift and press right click. Choose “open command window here” (Not power shell! >> * See Registry file below *).
If you get an error, reply to this post with a screenshot of it, OR write down the EXACT command entered and the EXACT error given.
((If “open command window here” does not appear, look for the “Simple Registry Edit” below…))
Step #1
Now you should be at the command prompt.
You are going to BACKUP the factory un-modified firmware, so type the following command:
Command: " FPTw.exe -bios -d biosreg.bin "
>> Attach the saved "biosreg.bin ", placed into a compressed ZIP/RAR file, to your next post!!! <<
Step #2
Right after you do that, try to write back the BIOS Region dump and see if you get any error(s).
Command: " FPTw.exe -bios -f biosreg.bin "
^^ This step is important! Don’t forget! ^^
If you get an error, reply to this post with a screenshot of it, OR write down the EXACT command entered and the EXACT error given.
Here is a SIMPLE REGISTRY EDIT that adds “Open command window here as Administrator” to the right click menu, instead of Power Shell
Double-click downloaded file to install. Reboot after install may be required
> CLICK HERE TO DOWNLOAD CMD PROMPT REGISTRY ENTRY <
If the windows method above does NOT work for you…
Then you may have to copy all contents from the Flash Programming Tool \ DOS folder to the root of a Bootable USB disk and do the dump from DOS
( DOS command: " FPT.exe -bios -d biosreg.bin " )
todays results:
thanks to @Lost_N_BIOS links and tasks, I have now the “biosreg.bin”.
Finding the official Bios for laptop is pretty hard. It seems, they discontinued downloads for this device. ![]()
found following pages:
https://www.medion.com/gb/service/produc…TopicsPage=true
this is the best i could find:
http://www1.medion.de/downloads/index.pl…treiber&lang=uk
(it is the right now installed Bios. highest / latest one i can find )
biosreg.zip (2.77 MB)
@stoffl_kartoffl - What error did you get at step #2 of the FPT spoiler?
Also, please take images of all BIOS pages you can see now, put them in a max compressed zip, thanks. YOu may be able to use 12 to screenshot BIOS to USB, if not, use camera and please then resize images to 800-1000px wide, before zipping
@Lost_N_BIOS
thanks alot for support and helping.
( I tought there was no error while doing step 2 and the resulting bin file is the wanted thing)
attached are bios pictures from (nearly) all pages from bios and picture from command line from step 2. you can see the (no) error msg.
I hope the unlocked bios might also make Egpu over M.2 M key possible. (The Clevo barbone which is the same barebone can do this, according my research).
What do you think about the following:
If I flash the Clevo bios using the clevo bios update within windows/dos, and it doesn’t work, doesn’t boot anymore, can i just reflash the backup made with the ch341 from Chip “25B64CSIG, Gigadevice GD25B64CS” and everything works again?
or does the Bios update procedure (using the clevo bios update within windows) affect also other chips and the notebook will be bricked?
HWinfo + flash commandline (no) error.zip (2.52 MB)
bios_pictures.zip (742 KB)
@stoffl_kartoffl - You’re welcome, and thank you too! [cool 
If you did not get error at step #2, then all good, nothing more you need to do to flash mod BIOS, but if you did not do step #2, then check now, in case we need to unlock things first before you can flash in mod BIOS
Yes, I checked your image, all OK and nothing more needed to flash in mod BIOS
I have no experience with eGPU, but many have asked here and I’ve rarely seen success using, so it may only be possible on certain brands or series, models etc.
If the Clevo can do this, it may or may not matter on your board, if the PCB of the board and traces from M2 to SB/CPU etc are possibly not exactly 100% same. Just because BIOS works on your model does not always mean hardware is all 100% exactly same.
So, the only thing you can do is try and see what happens, or find success report from someone with your same model first and then you would know (This in regards to the BIOS cross-flash generally, and eGPU)
I do not know if Clevo BIOS updates BIOS only or BIOS + EC FW, ideally you would want that anyway, since most usually come in matching set where you have to flash EC or BIOS first followed by the other.
Yes, if you have a bad flash, you can recover with CH341A, but ideally you would have that in your hand already and a backup made and checked by someone to confirm it’s valid and good, so you know you can easily and quickly recover, before you test flashing in the Clevo BIOS
If you do not have CH341A, and have not seen success report of the exact Clevo BIOS you are wanting to use, successfully and easily flashed to your exact board, then best for yo to wait until you have programmer in and have known good backup made.
For GD25B64CS, use software 1.34 and GD25B64 ID - This is the only software/version I’ve seen confirmed working by members here, but I do see in google other software/versions may work too (Some you need to use EON EN25B64 ID)
Before I send you initial test BIOS, before doing full unlock, we need to check to confirm Boot Guard is not enabled with key burned into PCH.
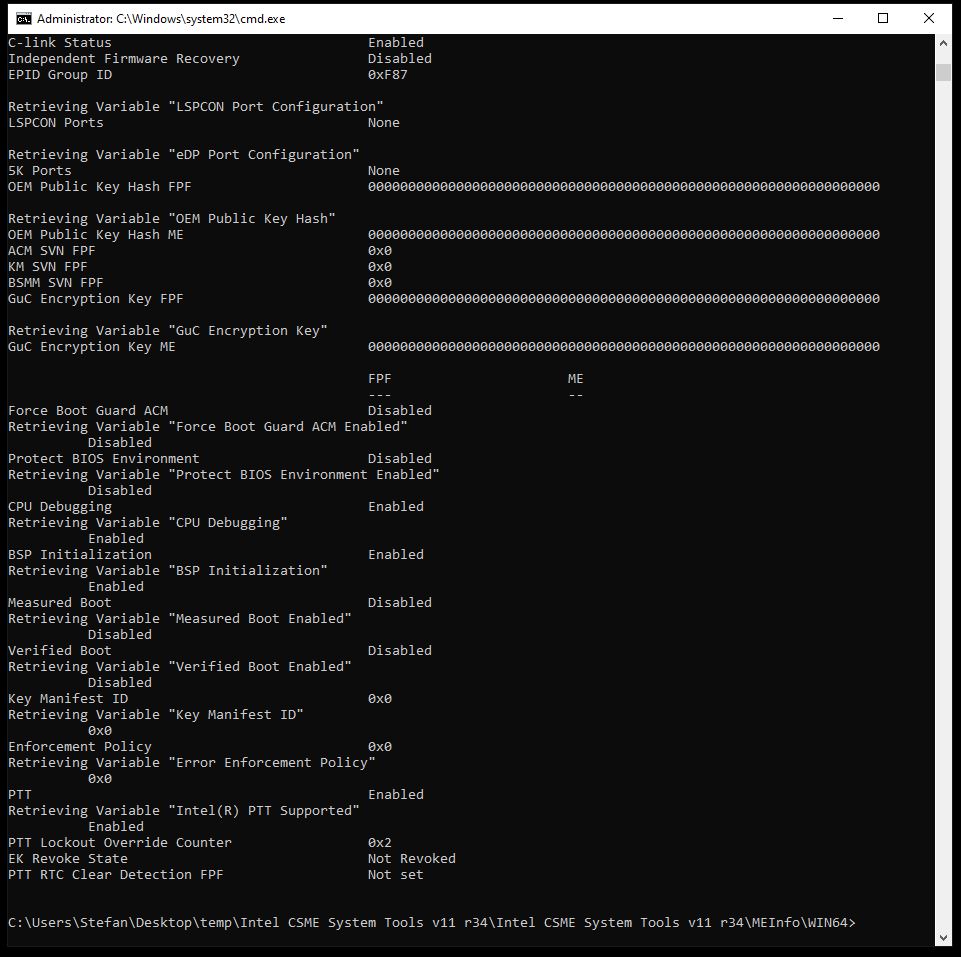
Please run this from MEINFO folder in system tools package, and show me image of the end of the report >> MEINFOWIN.exe -verbose
Hello,
the needed output is stored in the txt file below. Hope its ok.
MEINFOWIN.txt (7.83 KB)
@stoffl_kartoffl - Thanks, but text is not ideal for me to see this, due to broken layout, show me image of the bottom of the report from CMD window so we are sure, thanks
@Lost_N_BIOS
Oh I’m sorry, hope this time it works better:
@stoffl_kartoffl - It’s OK - Haha, same/same - So I guess this time, the issue is your default CMD window width is too short in properties/layout
But, at least I can see all around Measured/verified is disabled so I think both are disabled for both columns. So, I think it’s OK to continue and Boot Guard is not enabled.
OK, here is initial test I need you to do before we do full unlock. Please flash in these BIOS in the following order and STOP testing once you see “Chipset” menu appear in BIOS, then let me know which one it first showed with.
1. SetAMITO
2. SetAMITSDU
3. SetAMITSDS
Flash these in via >> FPTw.exe -bios -f filename.bin
http://s000.tinyupload.com/index.php?fil…980975190092726
This is just initial test, not meant to be full unlocked BIOS or anything like that, but due to what will be revealed now, please pay attention to the warning below
Especially because you are wanting to change graphics related things and “some” of those will now be visible to you during this test!
If you get an itch to change ANYTHING graphics related, make sure you make a full backup of chip with programmer first, and confirm it’s a valid BIOS backup by giving to me to check, or dropping in various BIOS tools and seeing if it all opens OK and looks similar to stock BIOS or FPT BIOS region dump
Otherwise you may have hassles trying to recover
At least, please also do this with FPT and save the files somewhere, this way you can rebuild full BIOS and it would be same as programmer dump
FPTw.exe -desc -d fd.bin
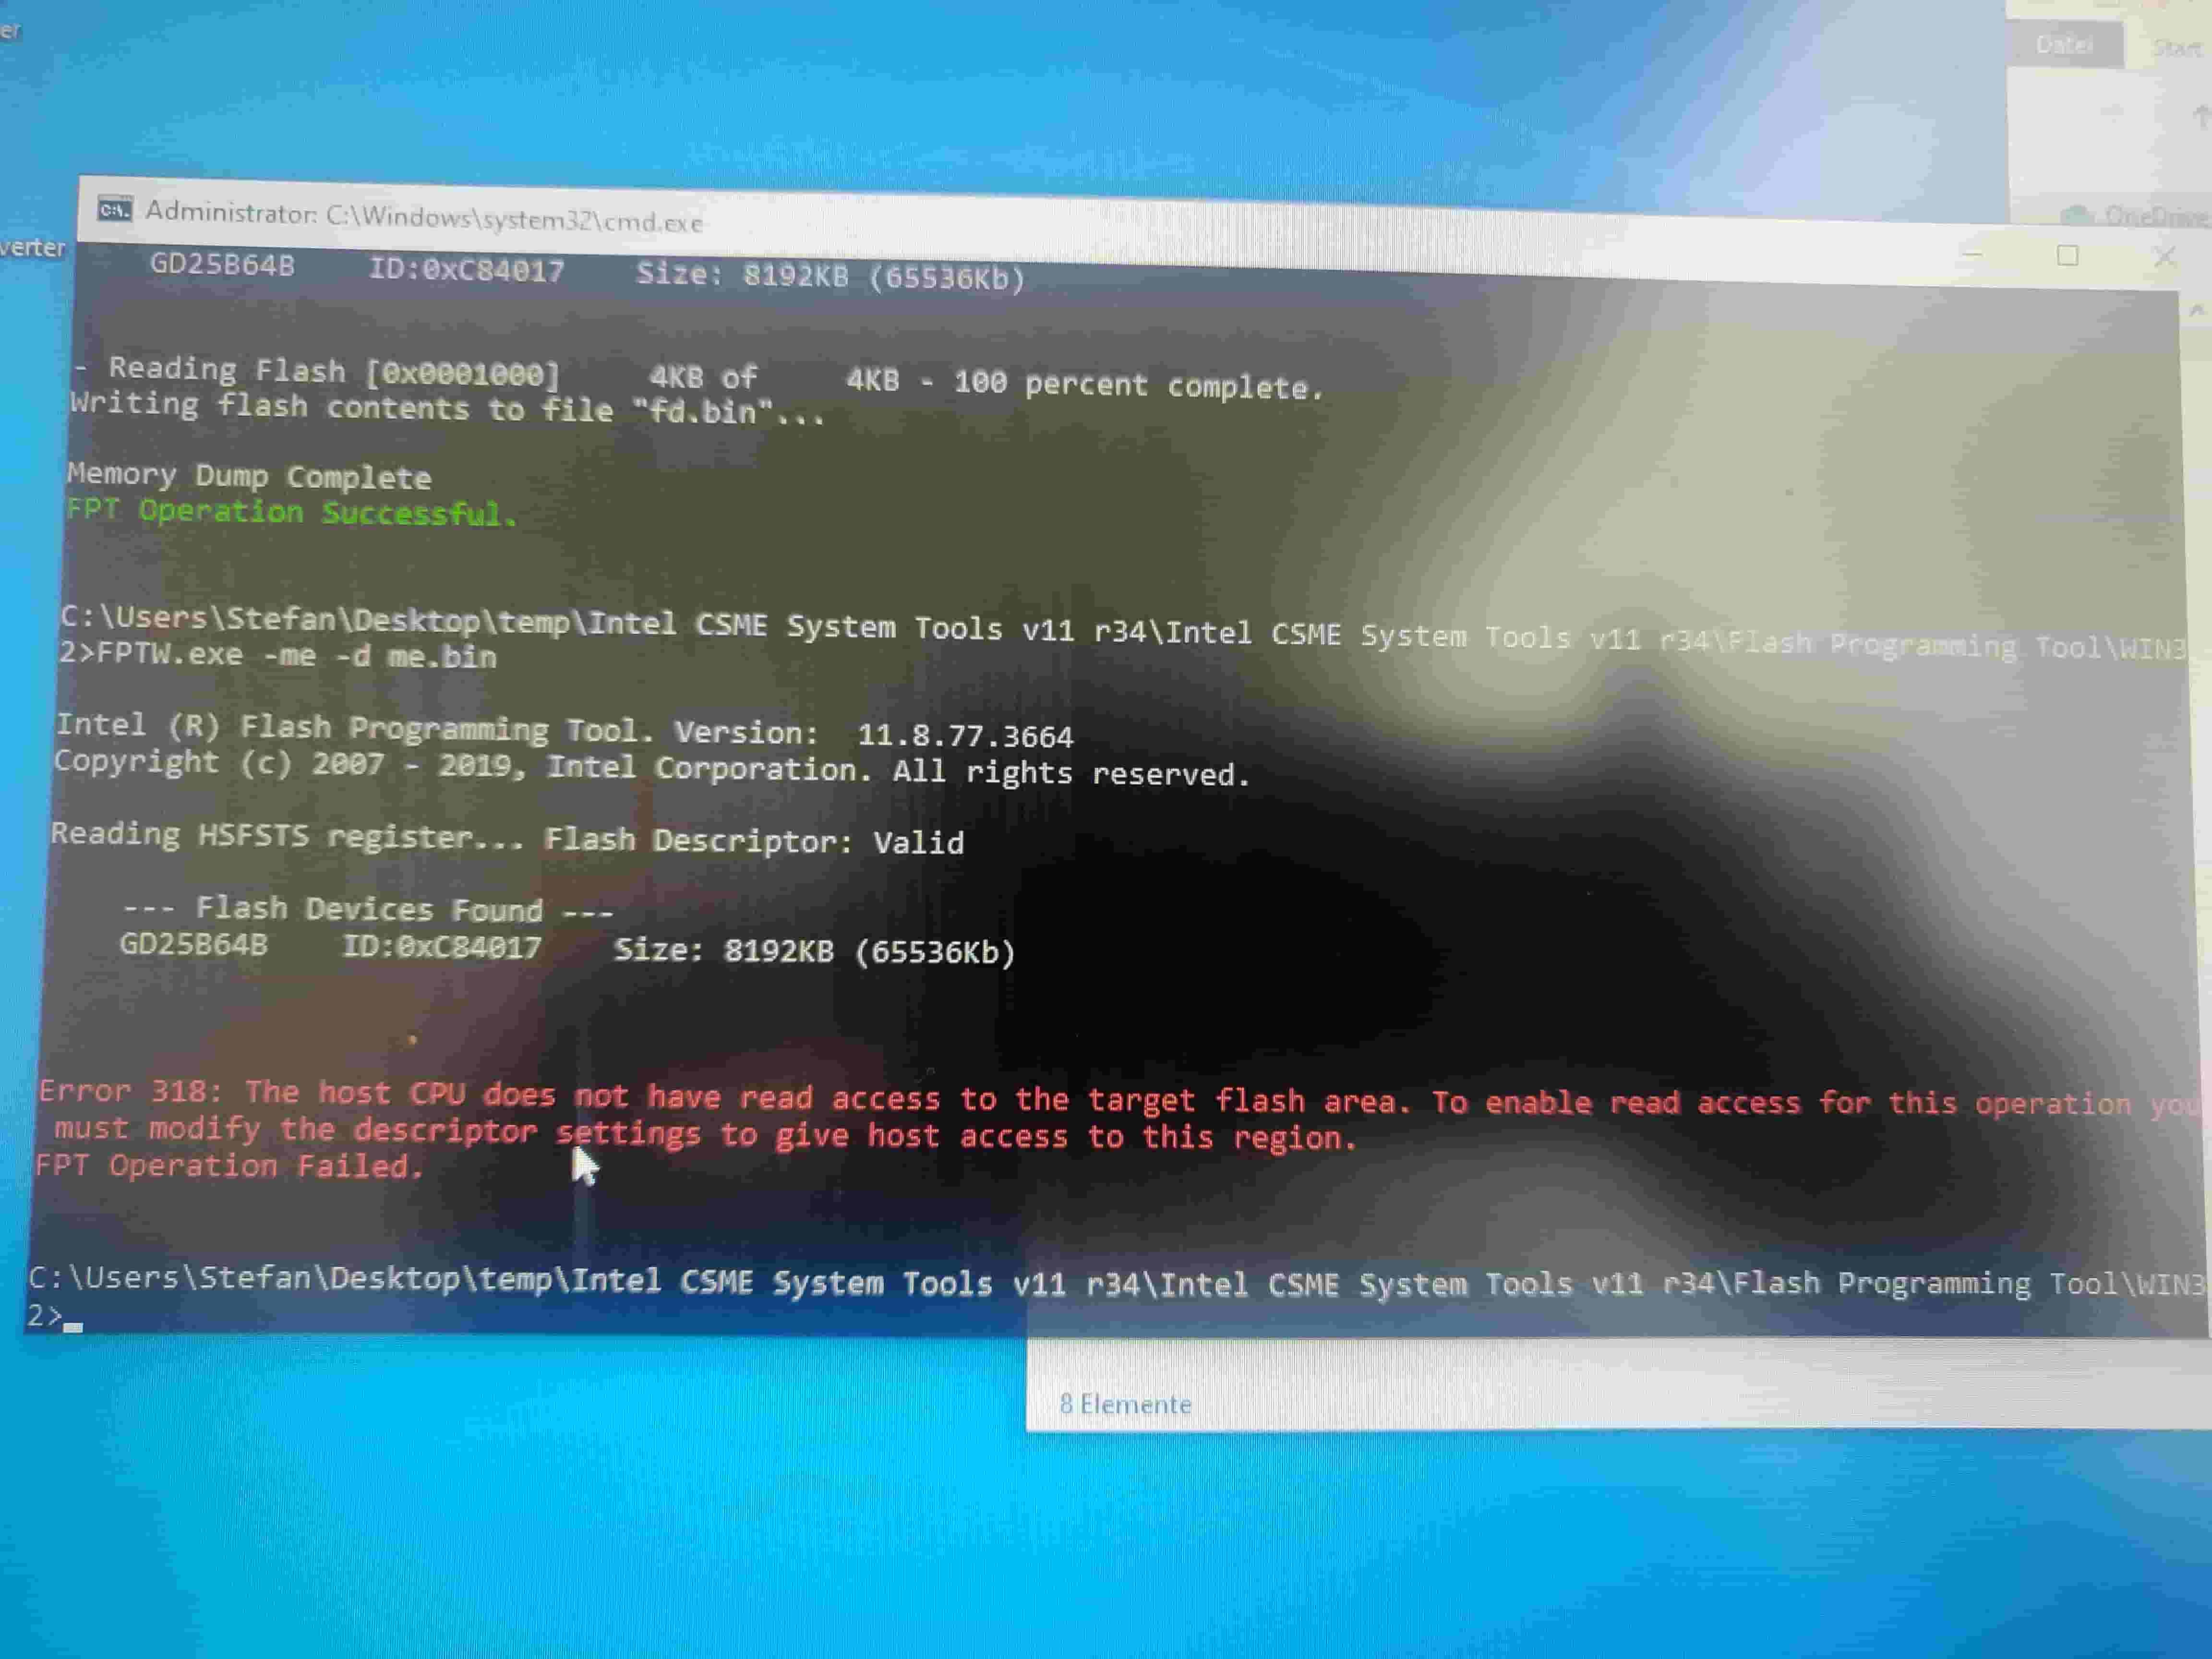
FPTw.exe -me -d me.bin
FPTw.exe -gbe -d gbe.bin << This may error, if no GbE present, it’s OK
*** WARNING - To ANYONE with laptop and unlocked BIOS!!! ***
DO NOT try to enable this graphics card or disable that card, switch cards etc. Otherwise you will end up with no display output (ie black screen) and no way to recover except by blind flash or with flash programmer.
You can change graphics related settings, like changing memory sizes, or core speeds etc, just don’t try to disable one card or change which is main etc.
Additionally, be very careful when trying to undervolt CPU, you can leave BIOS unbootable due to CPU voltage too low (Sometimes even 0.05 is too much)
@Lost_N_BIOS
sorry for the poor result ( command window picture) again making your help more difficult.
I did now some preparation before starting the bricking aaaahhhh flashing  process:
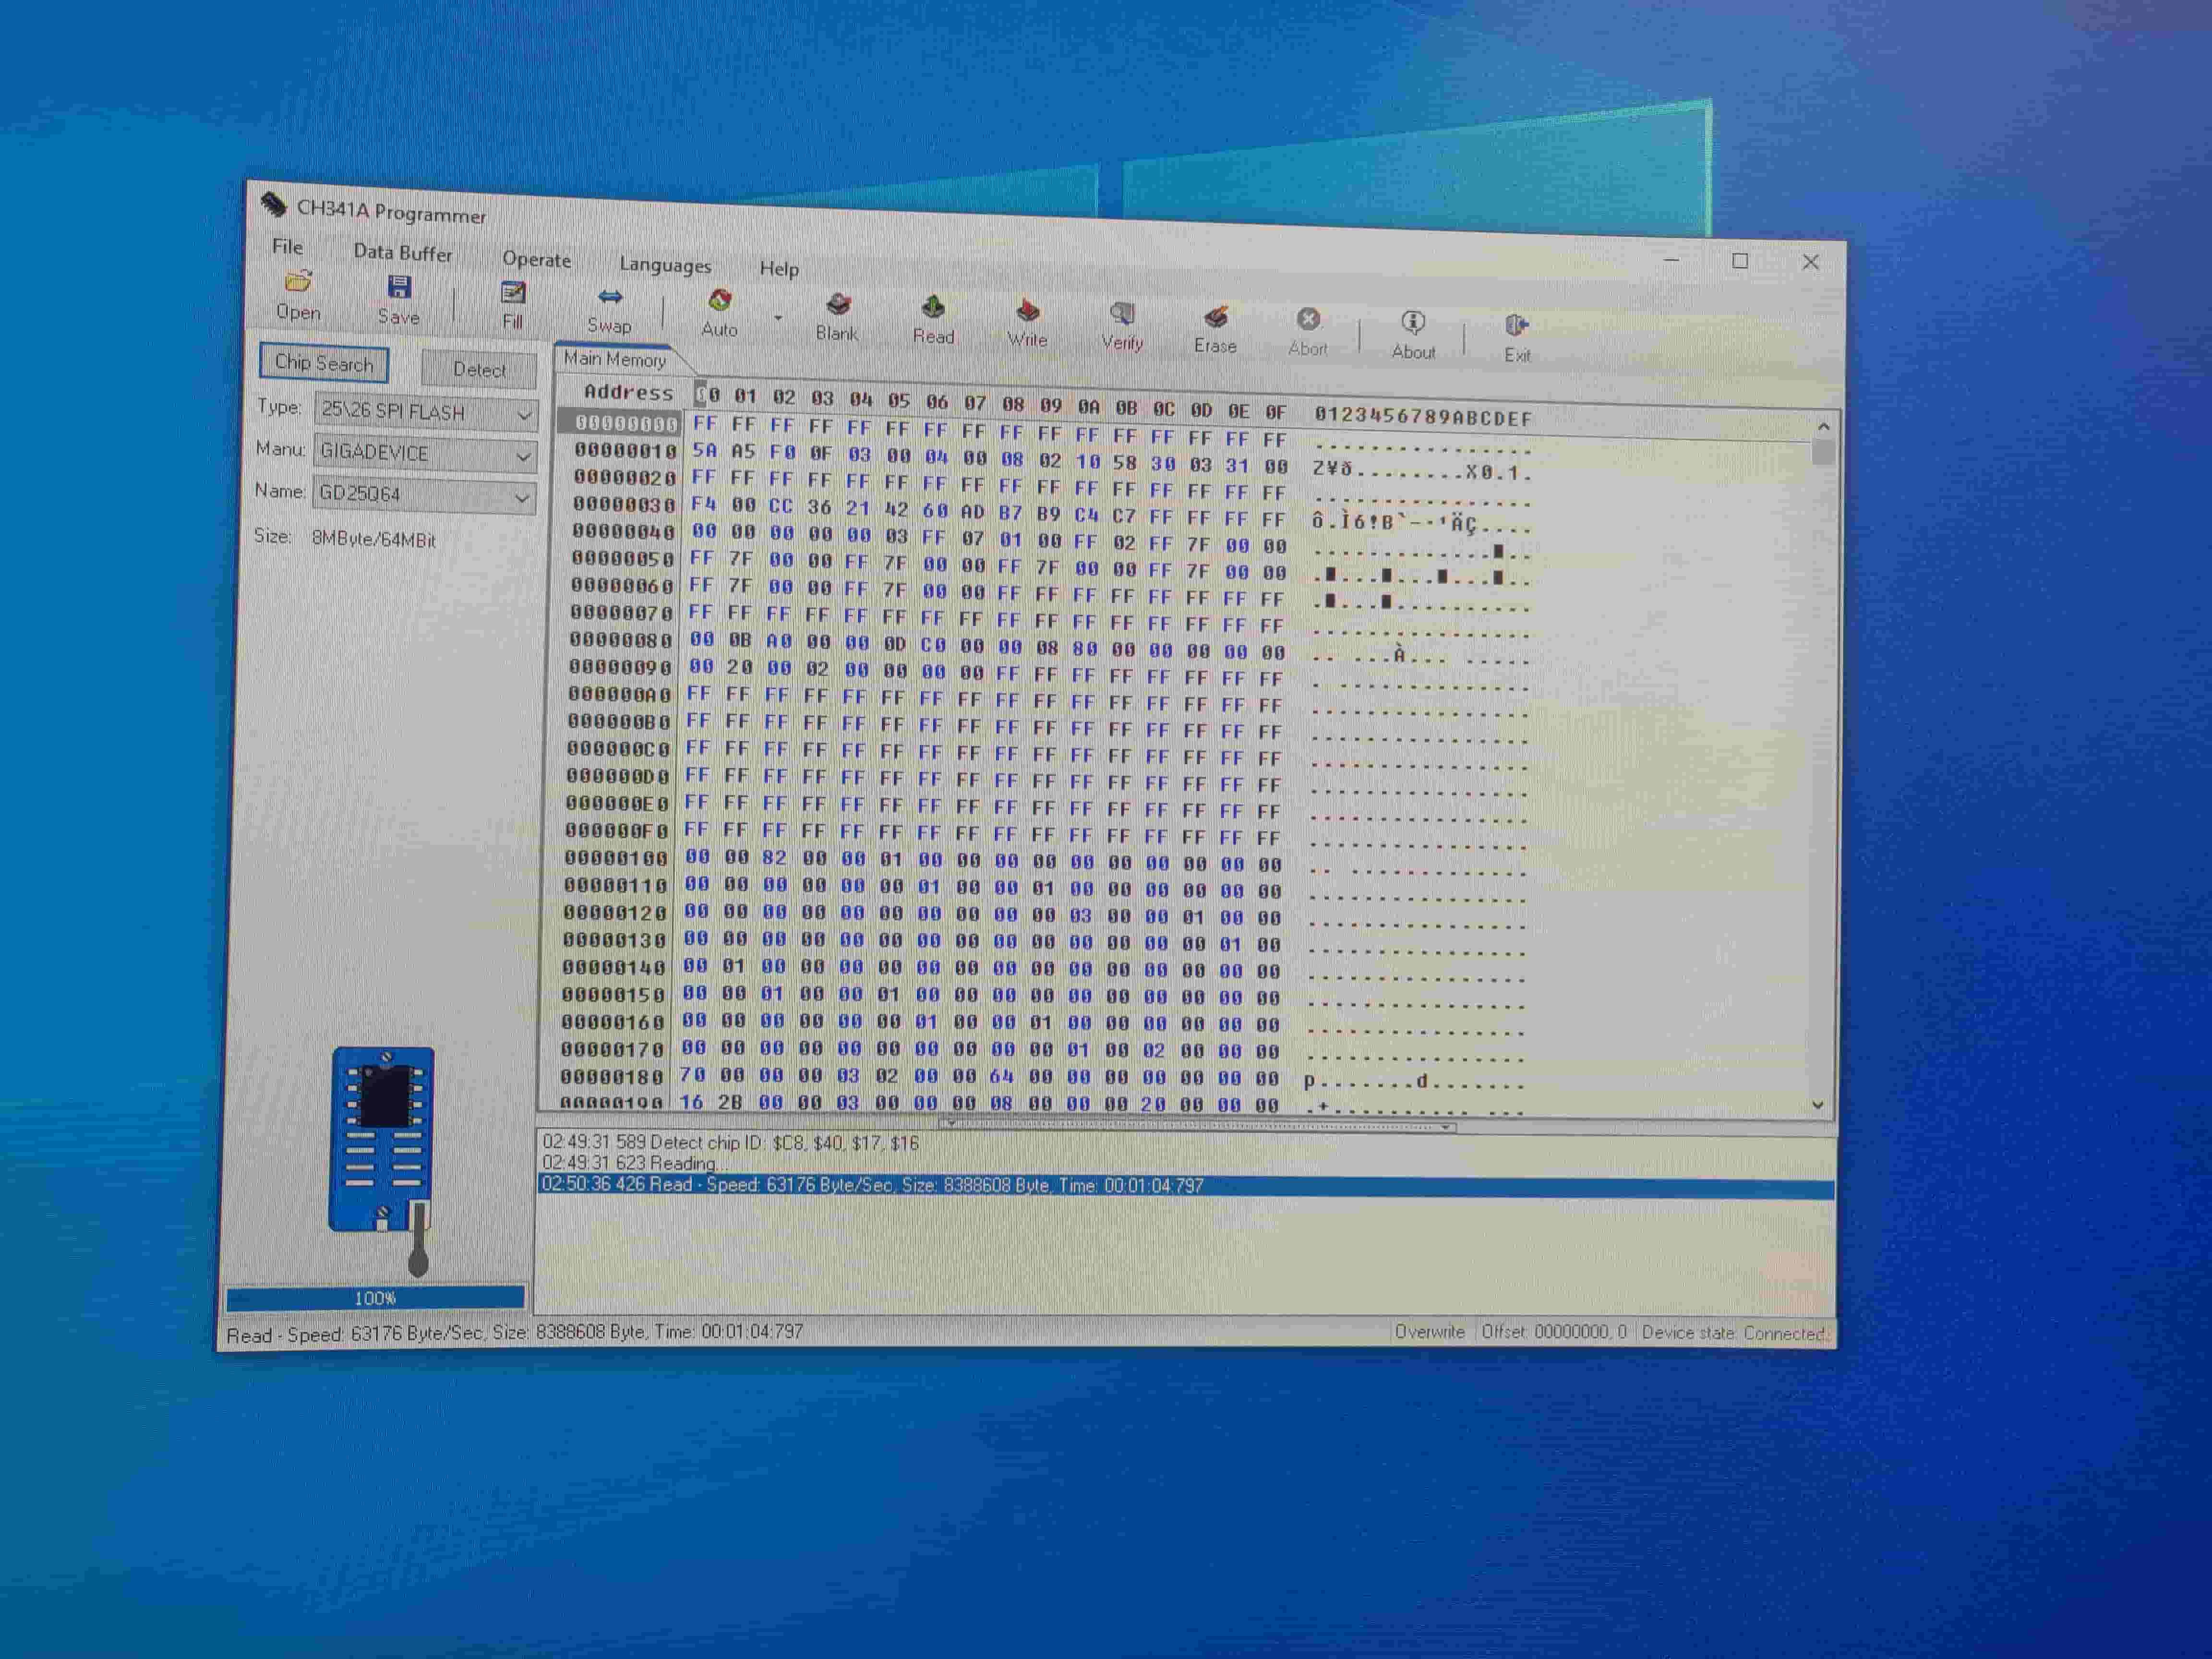
- read out the U47 chip ( 25B64CSIG, Gigadevice GD25B64CS ) 2 times and verifying in the ch341 programmer prog you recommend 1.34. -> have a 8MB bin file.
- wanted to do your commands for having a backup made within windows.
FPTw.exe -desc -d fd.bin
FPTw.exe -me -d me.bin
FPTw.exe -gbe -d gbe.bin
first worked, small 4KB output file.
The second gave me error, please see attached pic.
(Would be nice and make me more confident, if this procedure creates a file which is similar or can be converted to the hardware side readout file I did earlier. Do you think they are related? )
and one last question: If i readout my bios with the CH341, after I change settings in bios, then read out again, will the bios dumps be different? Are settings stored in these bios dumps? I could resolve your big red Warning with this 341 flash programmer?
sorry for all those questions, I just don’t want to brick my laptop ![]()
greetings,
@stoffl_kartoffl - It’s OK, I deal with all kinds of problems all day, so I’m used to this 
2nd command error is OK and sometimes expected, since you have full chip dump via programmer, you’ll already have this
4KB for fd.bin is correct. GbE size, I can’t be 100% sure since I don’t have your 8MB full BIOS dump, but I think it’s usually 4 or 8KB
ME FW size would probably be 2MB, but again I’d have to see your full 8MB dump to be sure - Unless you can link me to stock BIOS download page, and stock BIOS is complete/full BIOS, not BIOS upgrade/partial
Yes, anytime you power on, reboot, or change something in BIOS, dump will always be different due to changes, time stamps, compressed areas changing etc.
Yes, BIOS settings are stored in the BIOS. And yes, if you have good dump from programmer, and you brick your BIOS in any way, then you can fix easily with programmer and good dump
@Lost_N_BIOS
Hey, thanks alot. You are amazing ![]()
- Ok, very good to hear this. I hope my Bios dumps are good. Did a few. But the will be different, since did it with rebooting, and also bios changes, just to have more backups and see if the readout is proper (has changes also)
- I did the flashing like you said in this order and stopping after first appearance of chipset.
1. SetAMITO
2. SetAMITSDU
3. SetAMITSDS
Luckily already first had worked. now bios has menu point chipset with "SetAMITO"
Attached is one bios backup. what do you think, looks clean?
Thank you very mutch !
1.zip (4 MB)
@stoffl_kartoffl - Sorry for the delay! Thanks 

Yes, dump looks OK
Thanks for testing report Tonight I will unlock rest of menu for you
-----------------------
@stoffl_kartoffl - Midway-edit test needed since you only had to test one previously, sorry!
Please test this BIOS (MPWRBeepS) and let me know, if you can see these two things now, and then test as mentioned
https://ufile.io/jk9z2wkm
Advanced >> Boot Logo << Please test enabled and disabled, booting from powered down state, to windows, do you see any difference?
If not, follow up test on this will be next (it looks like they tried to make both = Enabled, we’ll fix and re-test, if both = enabled right now. (Similar thing below too)
Advanced >> Power On Boot Beep << Can you now see it, if not, then test 2nd BIOS (MPWRBeepS2U) - And, did it beep before when turning on?
If not, test enable/disable and let me know if it beeps either way or not, if not, we’ll change and test to see if fixing to allow actual enable/disable matters or not (if not, then we’ll just hide this back)
Along these same lines, is a third setting too, with similar concerns I have above >> “Battery Low Alarm Beep” Based on above “Beep” results and or follow up test, we’ll change, reveal, and or leave this hidden
@Lost_N_BIOS
Hello,
- Flashed MPWRBeepS: boot logo and peep are in bios. And they work as expected: boot logo ( "erazor" sign ) disapears and amibios screen is visible. Beep works also when turned on.
- Flashed MPWRBeepS2u: seems to have the same behavior.
the battery low test is difficult, because i dont use a battery.
i think so far this looks good ![]() thanks alot.
thanks alot.
@stoffl_kartoffl - Thanks for testing result! 
No worry about the Battery Low Beep, if the other beep works to enable/disable, I’m sure the batter low beep will work too once made visible to you. Then you can enable/disable as you see fit
You’re welcome! OK, should be able to do the rest now without further testing delays, I will get back to you shortly with full unlocked BIOS
@stoffl_kartoffl - Sorry for the delays! Here is unlocked BIOS
https://ufile.io/qle30y3o
There will be some dupes, and for those you can set in any location you want.
If this bothers you, please make a list of the dupes you want to remove, and their location, and which to keep/hide
Anything you see missing in BIOS vs what you can see in AMIBCP, make a list and let me know, some items may need follow up edit to further reveal
I can’t tell until you flash and show me images or tell me you see something missing etc