Other ways to flash the firmware
IMPORTANT! Before you flash anything to your board make sure Intel Boot Guard isn’t enabled, if it is and you flash a customized firmware your device won’t boot!
Refer to this guide: Determining whether the Intel Boot Guard is enabled
Luckily Intel Boot Guard is not enabled on the ASUS B760-I ROG STRIX firmware 1805, .
For most ASUS motherboards, the steps in the first post should work. However, if your motherboard doesn’t have the options Publish HII Resources and Password Protection of Runtime Variables, or if you’re following this guide to modify the firmware for a different brand or model, you could try turning the BIOS lock off with setup_var or RU.efi first.
You can find additional guides online, such as: [Guide] HowTo Fix Intel FPT Error 280 or 368
If that doesn’t work you’ll need to tinker with the hardware to disable the lock. The simplest method is to back up the full chip using FPTwin64 (as described earlier), modify the BIOS Lock in the dump, and flash it back using a hardware flasher.
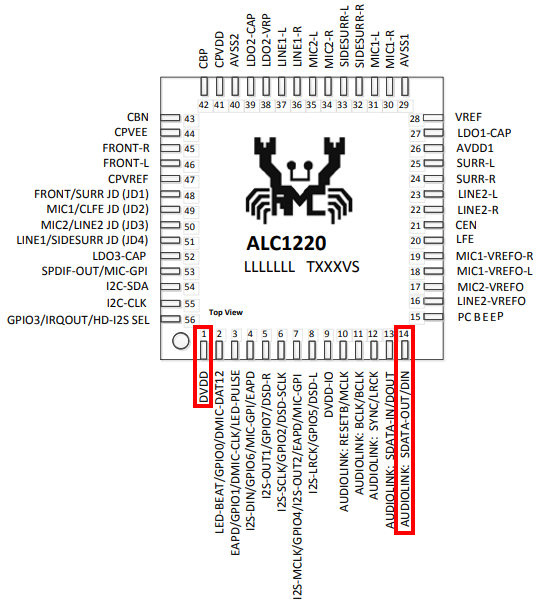
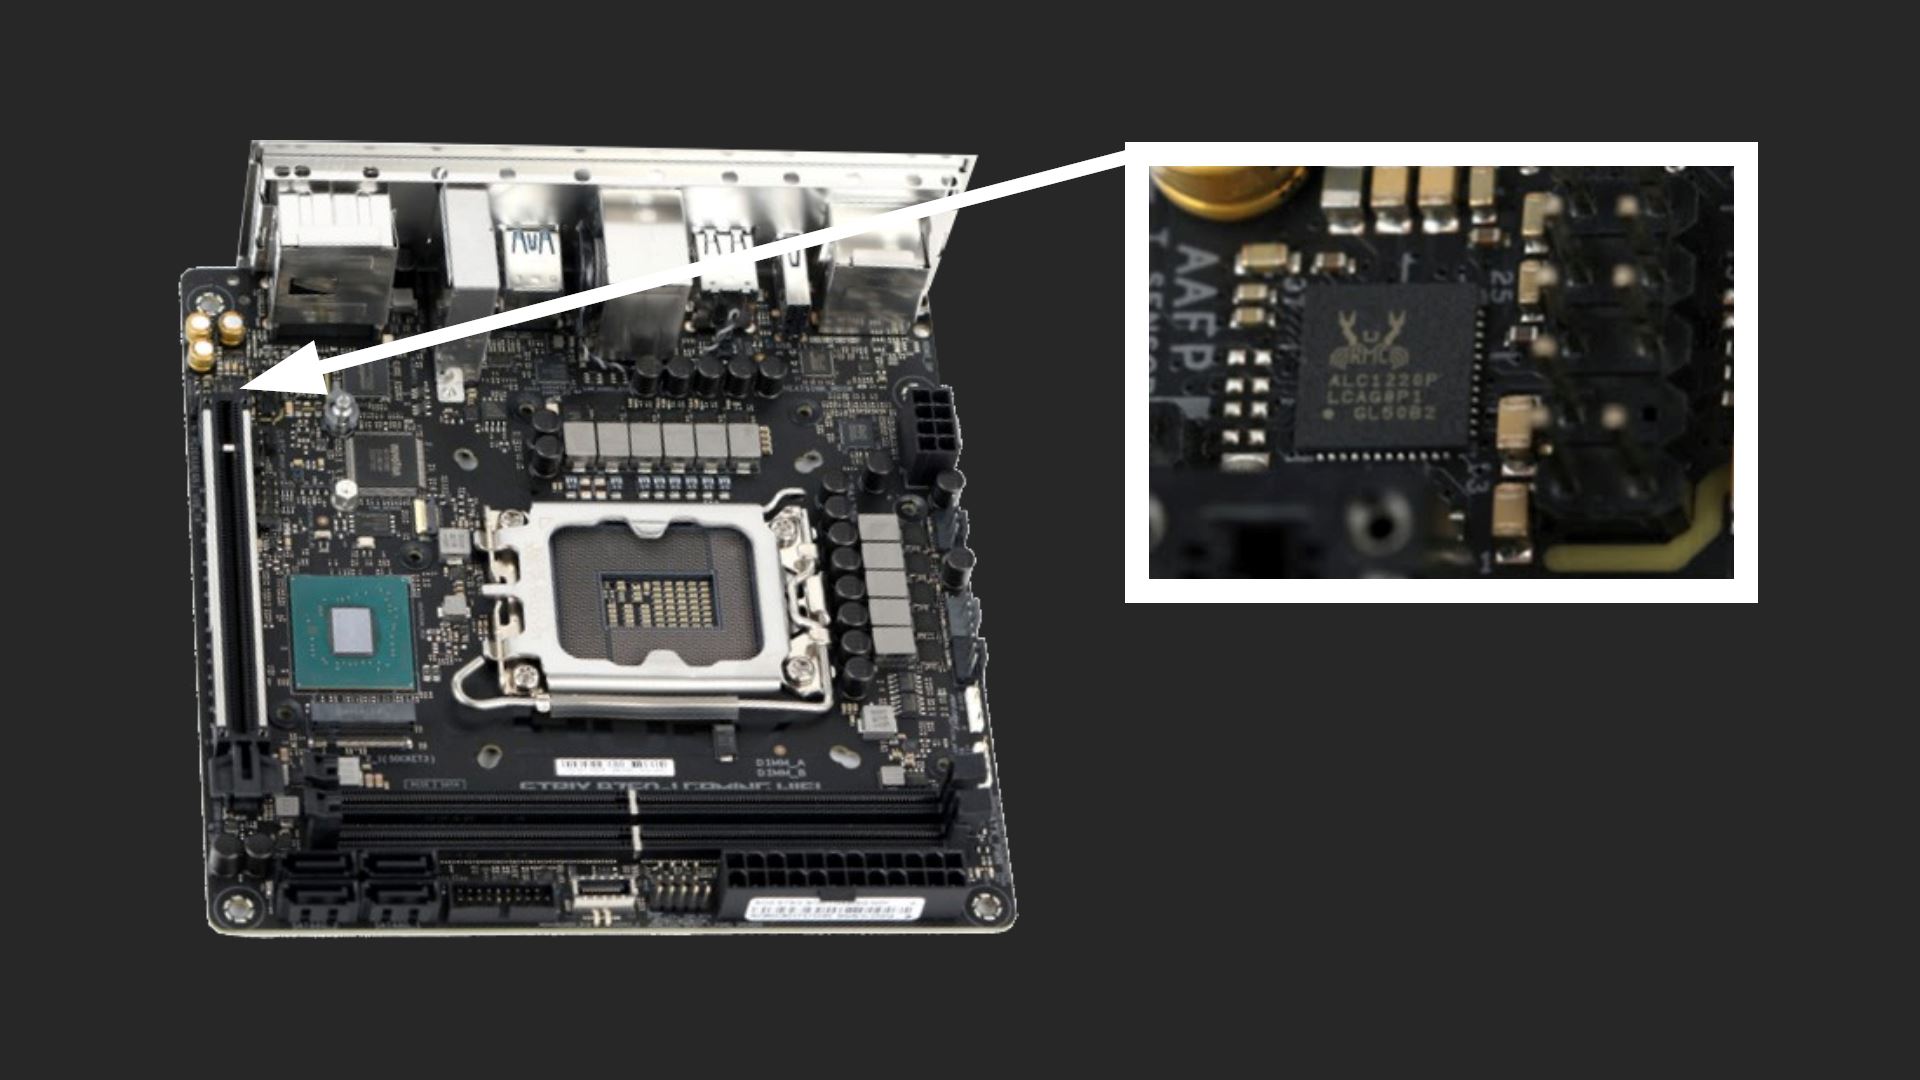
Another way is to unlock the full SPI, this is by using the pin-mod method, a technique officially described in Intel’s chipset documentation. This method is intended for motherboard service and requires connecting specific pins on your board’s audio chip.
ASUS ROG STRIX B760-I "Pinmod"
If your motherboard has a different audio chip, you’ll need to look up its datasheet online, as the pin locations can vary. Locate the pins named DVDD and SDATA_OUT on your audio chip. Refer to the chip’s datasheet or pinout table for this information. As the ASUS ROG STRIX B760-I uses the ALC1220P chip you can refer to the ALC1220 spec sheet.
Use a small wire, clip, or another conductive tool to temporarily connect (or “short”) the DVDD and SDATA_OUT pins. You’ll need to do this during system startup, specifically when the system reaches the PWROK state (right after pressing the power button).
Flash Your BIOS
Once the pins are successfully shorted, the motherboard’s full flash memory address range will be unlocked until the next reboot. This allows you to flash a modified BIOS with certain locks, like the BIOS Lock, disabled. The short needs to be removed after unlocking, before proceeding with the flash
Be extremely careful when shorting the pins. These chips are very small and delicate. Too much pressure from a needle or clip could damage the pins or cause an accidental short circuit elsewhere. Double-check the pin locations and your setup before powering on the system.
Creating a modified firmware
To modify the BIOS file, we’ll use @Brainlet’s incredible UEFI-Editor tool, which handles most of the heavy lifting. This tool has significantly simplified the process of unhiding settings compared to the past when everything had to be done manually using a hex editor or AMIBCP.
However, there are still a few tasks that require a hex editor, such as setting BIOS defaults by editing NVRAM variables (as discovered by @Tad91) and unhiding options in dropdown menus. I won’t be covering AMIBCP in this guide.
Acquiring the necessary files
#ToDo For now refer to the instructions on the UEFI-Editor GitHub page.
Unhiding Menus and Settings
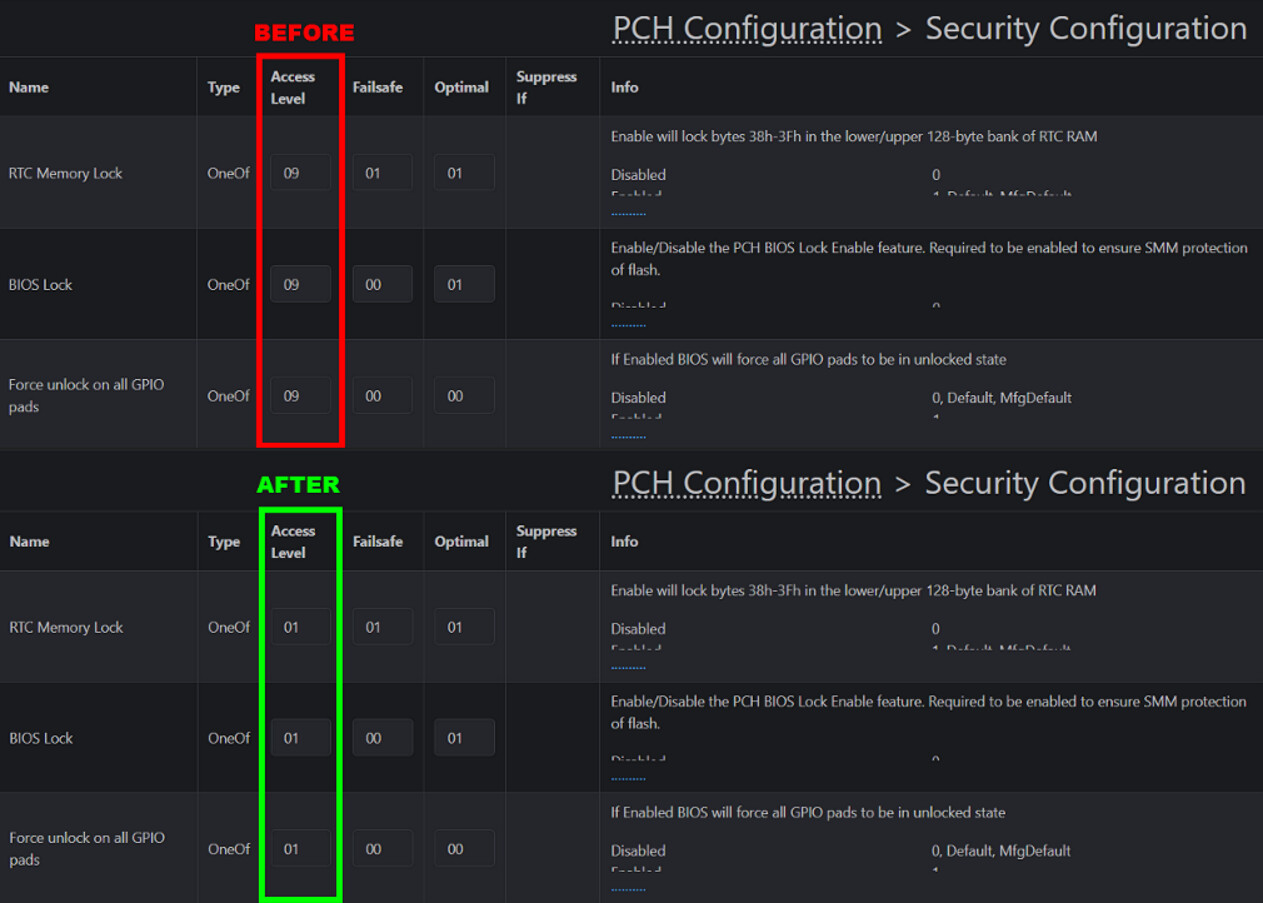
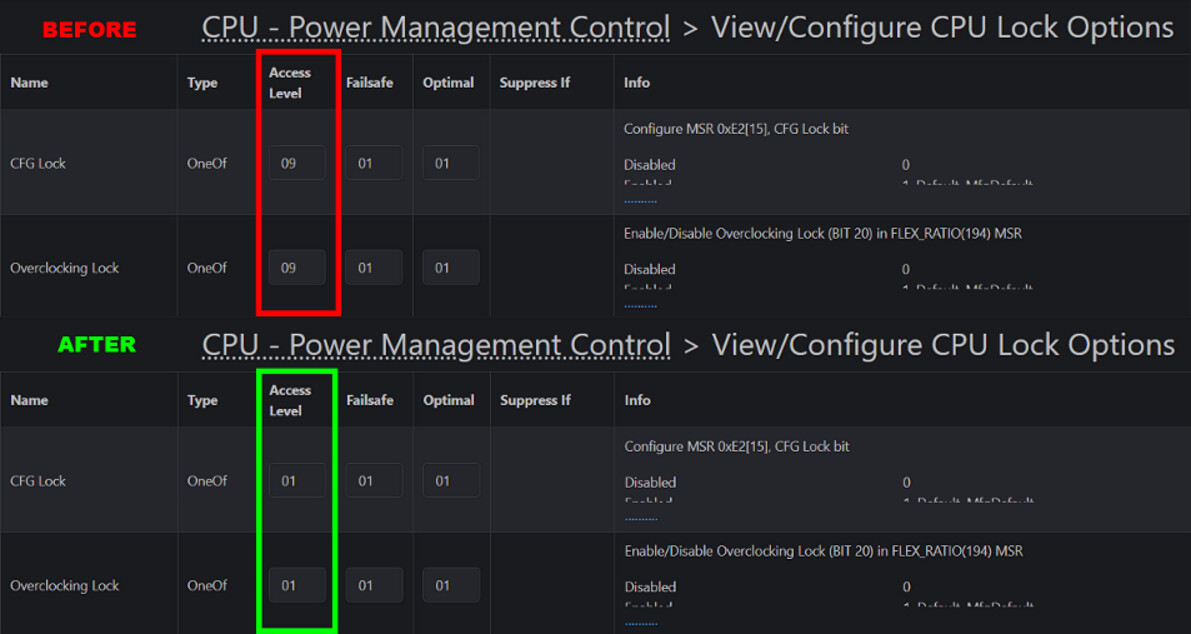
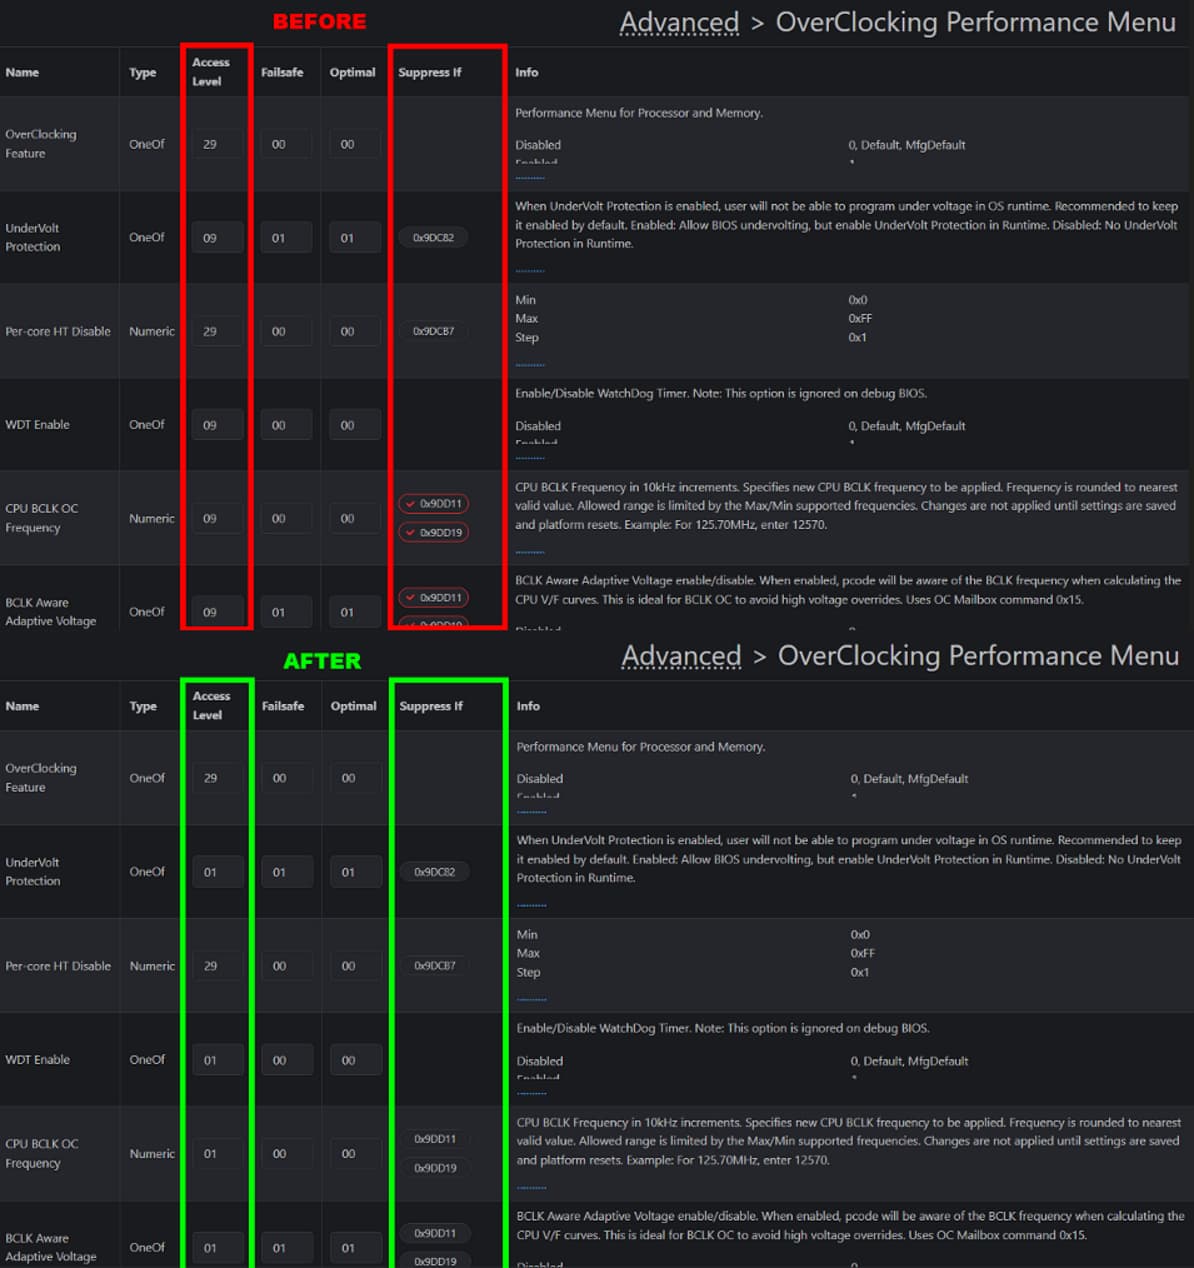
When using UEFI-Editor, the main goal is to change the Access Level of hidden settings so they become visible in the BIOS menu. To do this, we change the Access Level from 09 to 01 for any option we want to unhide.
Some settings have an Access Level of 29, which means they only appear if another option is enabled. Since these are conditional, we won’t modify them to avoid potential issues.
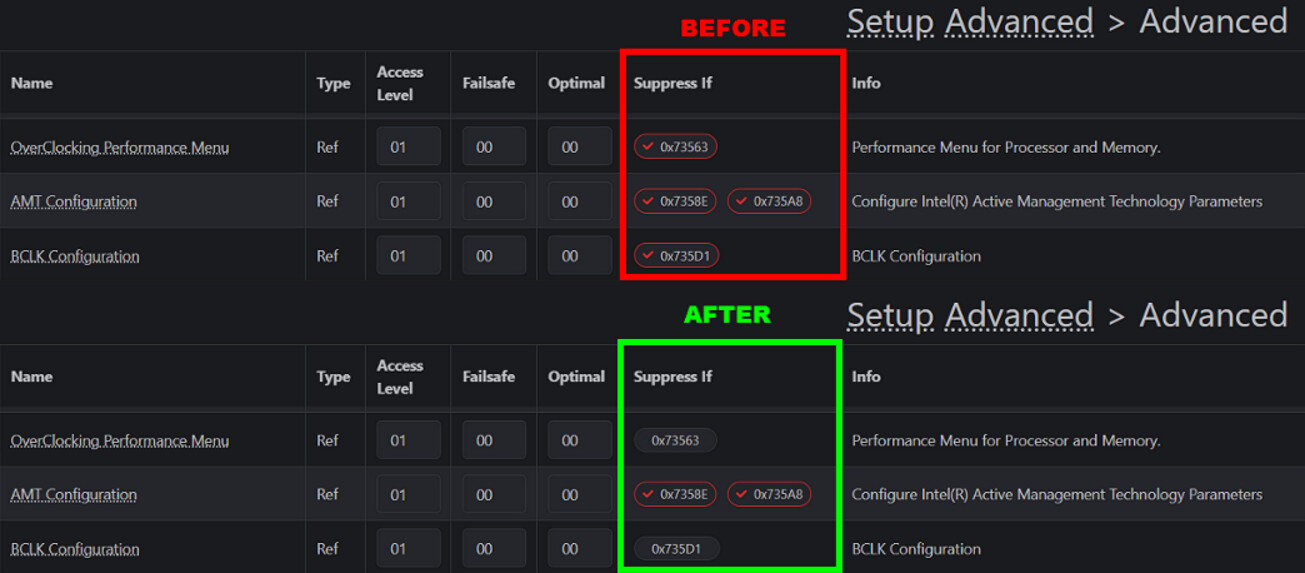
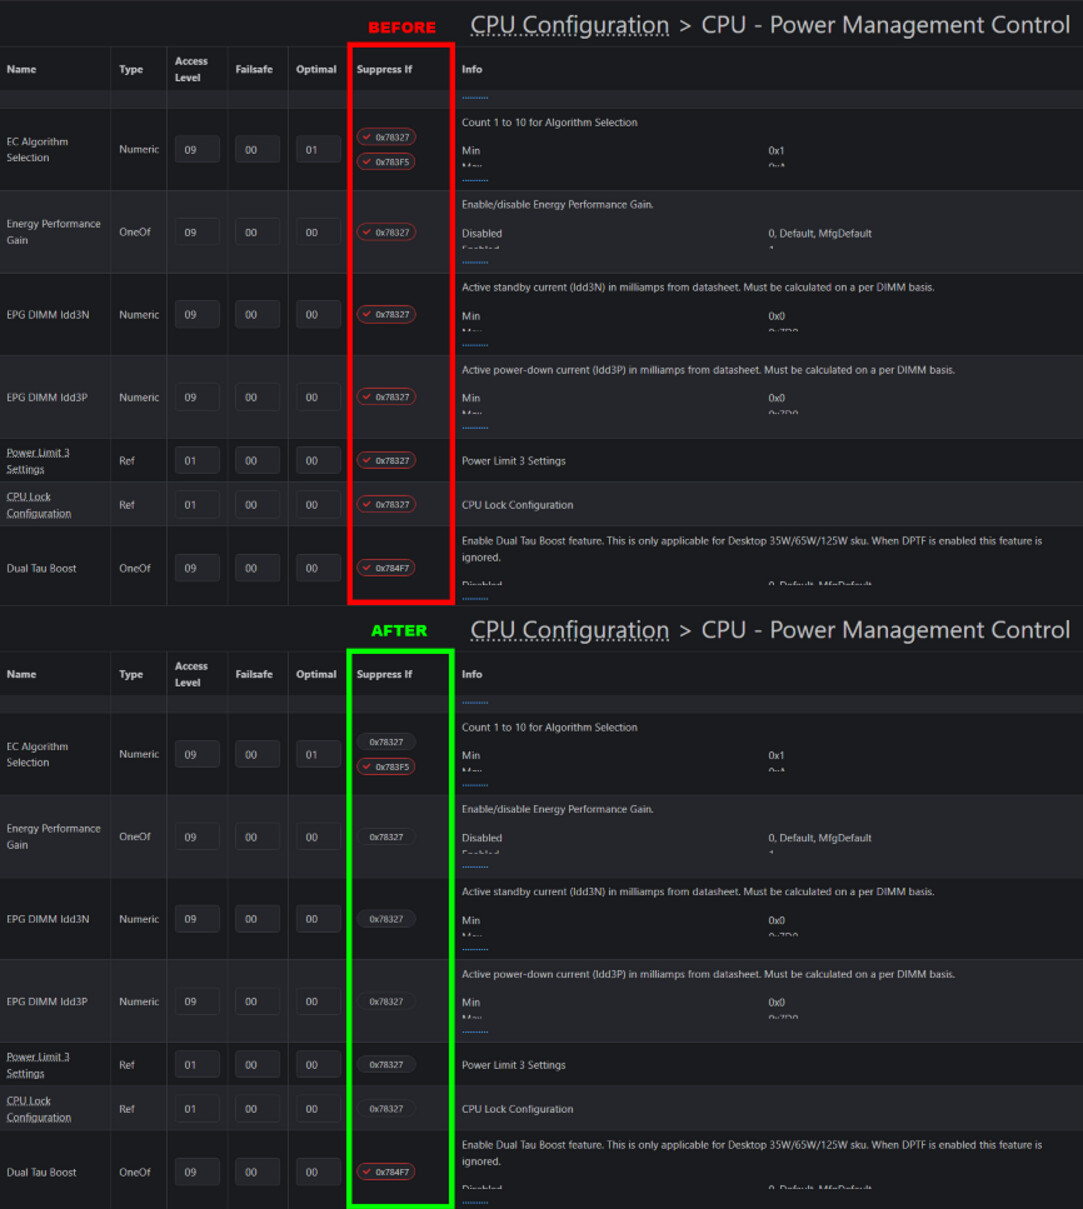
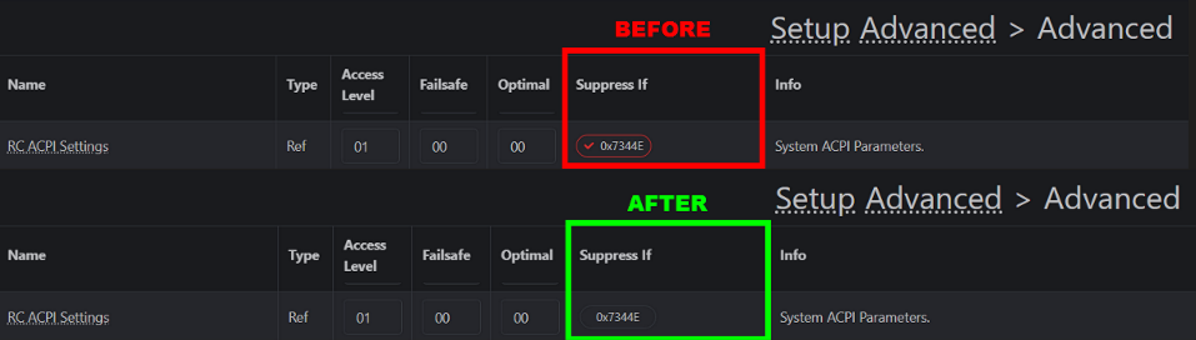
Some settings also have a SuppressIf condition, meaning they remain hidden unless a specific requirement is met. In some cases, this condition is clear like in the example below UnderVolt Protection option being hidden if the value of OverClocking Feature (question-ID 0x2830,) is equal to 0x0 (Disabled).

To unhide a setting, start by booting into the BIOS and checking the graphical interface to see if the condition it evaluates is visible. If it’s not, try searching for the QuestionId in UEFI-Editor.
If you still can’t find it, open the IRF file and manually compare the values, using the example above or those in the next chapter as references.
Unhiding drop-down menu options
Modifying SuppressIf and QuestionId conditions in your BIOS involves hex editing, which can lead to system instability if done incorrectly. Blindly altering suppress conditions without understanding their dependencies may cause unexpected behavior, including boot failures or inaccessible settings. To minimize risks, make incremental changes and test thoroughly after each modification. Avoid modifying multiple suppress conditions at once, and always maintain a backup of your original firmware.
Proceed with caution and at your own risk!
Some settings will appear in the BIOS menu after being unhidden with UEFI-Editor, but their drop-down options may still be missing. For example, the Global Core SVID Voltage setting becomes visible when we change its Access Level to 01, but the choices Offset Mode and Adaptive Mode will not show up in the drop-down menu.
On the ASUS ROG STRIX B760-I, all question IDs from 0x13DF to 0x15AB (a total of 461 settings) don’t have any description and are not visible in UEFI-Editor, only in the IRF file. Since we don’t know what these toggles control it’s safer to remove the SupressIf pointing to QuestionId instead of changing anything to the questions since we don’t know what they do.
When we extract the WinSCE NVRAM file (as shown in the previous post), we can also see that some options are missing in NVRAM.
// File Name : nvram.txt
// Created on 08/02/25 at 19:06:48
// AMISCE Utility. Ver 5.05.01.0002
// Copyright (c) 2021 AMI. All rights reserved.
HIICrc32= 7B139387
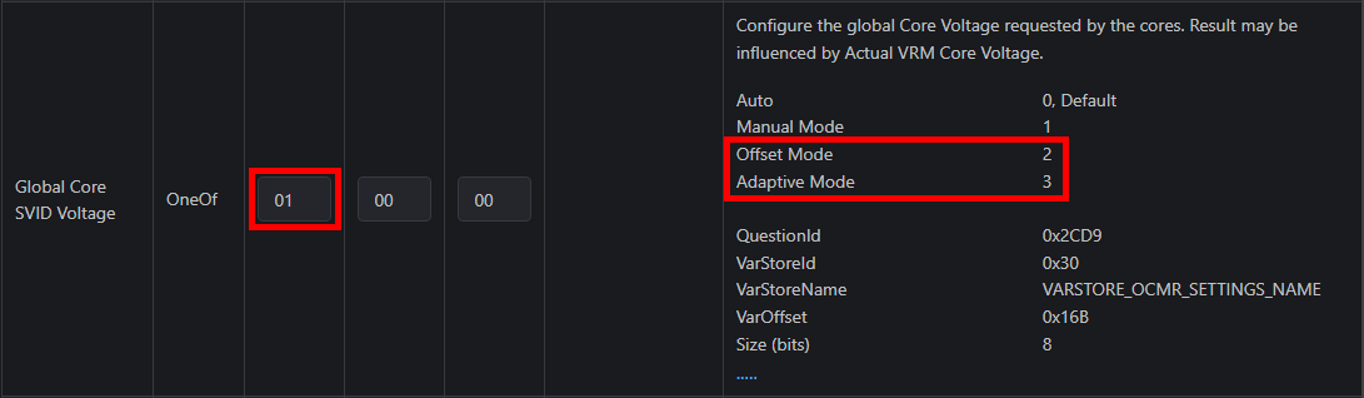
Setup Question = Global Core SVID Voltage
Help String = Configure the global Core Voltage requested by the cores.
Result may be influenced by ActualVRM Core Voltage.
Token =2CD9
Offset =16B
Width =01
BIOS Default =[00]Auto
Options =*[00]Auto
[01]Manual Mode
By looking at the IRF file we can see why these options don’t appear. Offset Mode only appears if Switch Microcode (Question ID: 0x2DAD) is set to 0x1.
0x6DC0F: 			OneOf Prompt: "Switch Microcode", Help: "Switch Microcode for 0xB0671 CPU. Changing the microcode to a version other than the current one may present security risks. Do it at your own risk.", QuestionFlags: 0x14, QuestionId: 0x2DAD, VarStoreId: 0x30, VarOffset: 0x12F, Flags: 0x10, Size: 8, Min: 0x0, Max: 0x2, Step: 0x0 { 05 91 2D 27 2E 27 AD 2D 30 00 2F 01 14 10 00 02 00 }
0x6DC20: 				OneOfOption Option: "Current Microcode" Value: 0, Default { 09 07 2F 27 10 00 00 }
0x6DC27: 				OneOfOption Option: "0x104 Microcode" Value: 2 { 09 07 30 27 00 00 02 }
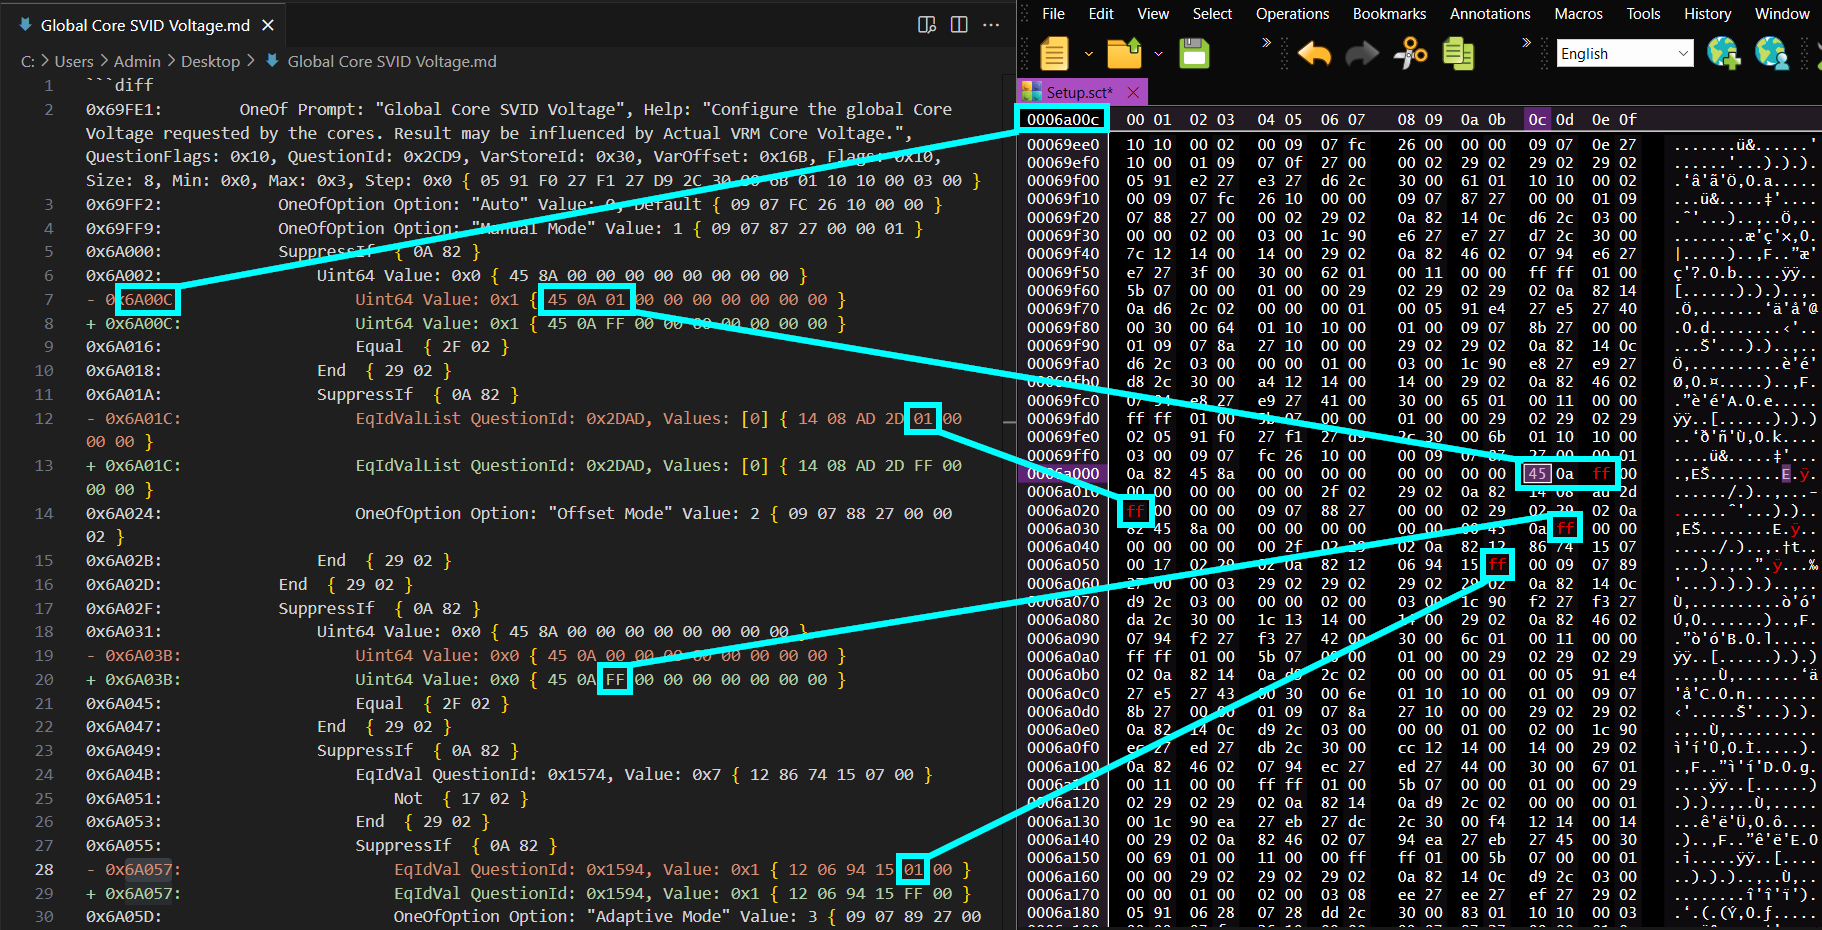
Adaptive Mode only appears if Question ID: 0x1574 is set to 0x1. The issue is that 0x1574 is one of these 461 settings (ranging from 0x13DF to 0x15AB, as discussed earlier) that have no descriptions, so we don’t know what they control.
0xAE3BD: Numeric Prompt: "", Help: "", QuestionFlags: 0x0, QuestionId: 0x1574, VarStoreId: 0x30, VarOffset: 0x25, Flags: 0x10, Size: 8, Min: 0x0, Max: 0xFF, Step: 0x0 { 07 91 00 00 00 00 74 15 30 00 25 00 00 10 00 FF 00 }
Because of this, it’s safer to modify the Suppression Conditions rather than changing the actual question value. To make these missing options visible, we need to edit the following code:
0x69FE1: 		OneOf Prompt: "Global Core SVID Voltage", Help: "Configure the global Core Voltage requested by the cores. Result may be influenced by Actual VRM Core Voltage.", QuestionFlags: 0x10, QuestionId: 0x2CD9, VarStoreId: 0x30, VarOffset: 0x16B, Flags: 0x10, Size: 8, Min: 0x0, Max: 0x3, Step: 0x0 { 05 91 F0 27 F1 27 D9 2C 30 00 6B 01 10 10 00 03 00 }
0x69FF2: 			OneOfOption Option: "Auto" Value: 0, Default { 09 07 FC 26 10 00 00 }
0x69FF9: 			OneOfOption Option: "Manual Mode" Value: 1 { 09 07 87 27 00 00 01 }
0x6A000: 			SuppressIf  { 0A 82 }
0x6A002: 				Uint64 Value: 0x0 { 45 8A 00 00 00 00 00 00 00 00 }
- 0x6A00C: 					Uint64 Value: 0x1 { 45 0A 01 00 00 00 00 00 00 00 }
+ 0x6A00C: 					Uint64 Value: 0x1 { 45 0A FF 00 00 00 00 00 00 00 }
0x6A016: 					Equal  { 2F 02 }
0x6A018: 				End  { 29 02 }
0x6A01A: 				SuppressIf  { 0A 82 }
- 0x6A01C: 					EqIdValList QuestionId: 0x2DAD, Values: [0] { 14 08 AD 2D 01 00 00 00 }
+ 0x6A01C: 					EqIdValList QuestionId: 0x2DAD, Values: [0] { 14 08 AD 2D FF 00 00 00 }
0x6A024: 					OneOfOption Option: "Offset Mode" Value: 2 { 09 07 88 27 00 00 02 }
0x6A02B: 				End  { 29 02 }
0x6A02D: 			End  { 29 02 }
0x6A02F: 			SuppressIf  { 0A 82 }
0x6A031: 				Uint64 Value: 0x0 { 45 8A 00 00 00 00 00 00 00 00 }
- 0x6A03B: 					Uint64 Value: 0x0 { 45 0A 00 00 00 00 00 00 00 00 }
+ 0x6A03B: 					Uint64 Value: 0x0 { 45 0A FF 00 00 00 00 00 00 00 }
0x6A045: 					Equal  { 2F 02 }
0x6A047: 				End  { 29 02 }
0x6A049: 				SuppressIf  { 0A 82 }
0x6A04B: 					EqIdVal QuestionId: 0x1574, Value: 0x7 { 12 86 74 15 07 00 }
0x6A051: 						Not  { 17 02 }
0x6A053: 					End  { 29 02 }
0x6A055: 					SuppressIf  { 0A 82 }
- 0x6A057: 						EqIdVal QuestionId: 0x1594, Value: 0x1 { 12 06 94 15 01 00 }
+ 0x6A057: 						EqIdVal QuestionId: 0x1594, Value: 0x1 { 12 06 94 15 FF 00 }
0x6A05D: 						OneOfOption Option: "Adaptive Mode" Value: 3 { 09 07 89 27 00 00 03 }
0x6A064: 					End  { 29 02 }
0x6A066: 				End  { 29 02 }
0x6A068: 			End  { 29 02 }
0x6A06A: 		End  { 29 02 }
0x6A06C: 		SuppressIf  { 0A 82 }
0x6A06E: 			EqIdValList QuestionId: 0x2CD9, Values: [0, 2, 3] { 14 0C D9 2C 03 00 00 00 02 00 03 00 }
0x6A07A: 			String Prompt: "  - CPU Core Voltage Override", Help: "Configure the voltage for the CPU Core.
I opened Visual Studio Code on the left side and Free Hex Editor Neo on the right to modify the values so the SupressIf values never evaluate to true. I replaced everything by FF which is hexadecimal for 255, which will never be true, since those are not options that can be set for those questionID’s.
Other options
Unhide ‘Extreme’ under Intel Default Settings
0x683DA: 		OneOf Prompt: "Performance Preferences", Help: "Performance Preferences offer options allowing you to adjust processor performance and power limit related settings based on your preferences.", QuestionFlags: 0x14, QuestionId: 0x2CB5, VarStoreId: 0x30, VarOffset: 0x15C, Flags: 0x10, Size: 8, Min: 0x0, Max: 0x2, Step: 0x0 { 05 91 B0 2B B1 2B B5 2C 30 00 5C 01 14 10 00 02 00 }
0x683EB: 			OneOfOption Option: "Intel Default Settings" Value: 0, Default { 09 07 B2 2B 10 00 00 }
0x683F2: 			OneOfOption Option: "ASUS Advanced OC Profile" Value: 2 { 09 07 B4 2B 00 00 02 }
0x683F9: 		End  { 29 02 }
0x683FB: 		SuppressIf  { 0A 82 }
0x683FD: 			EqIdVal QuestionId: 0x15A1, Value: 0x0 { 12 06 A1 15 00 00 }
0x68403: 			OneOf Prompt: "Intel Default Settings", Help: "Load the Intel Default Settings and operate within Intel's recommended parameters.", QuestionFlags: 0x14, QuestionId: 0x2CB6, VarStoreId: 0x30, VarOffset: 0x160, Flags: 0x10, Size: 8, Min: 0x1, Max: 0x2, Step: 0x0 { 05 91 B5 2B B6 2B B6 2C 30 00 60 01 14 10 01 02 00 }
0x68414: 				OneOfOption Option: "Performance" Value: 1, Default { 09 07 B8 2B 10 00 01 }
0x6841B: 				SuppressIf  { 0A 82 }
- 0x6841D: 					EqIdVal QuestionId: 0x15A0, Value: 0x1 { 12 06 A0 15 01 00 }
+ 0x6841D: 					EqIdVal QuestionId: 0x15A0, Value: 0x1 { 12 06 A0 15 FF 00 }
0x68423: 					OneOfOption Option: "Extreme" Value: 2 { 09 07 B9 2B 00 00 02 }
0x6842A: 				End  { 29 02 }
0x6842C: 			End  { 29 02 }
0x6842E: 		End  { 29 02 }
Unhide ‘Trained’ under SVID Behavior
0x687A2: 			OneOf Prompt: "SVID Behavior"
, Help: "Programs the CPU’s SVID behavior based on CPU’s quality.
The more optimistic the mode selected, the lower the temperature of the CPU. Intel’s Fail Safe is the default behavior of the processor oblivious to the actual Motherboard design. Trained optimizes SVID behavior to match input parameters such as VRM Loadline and Target Frequencies.", QuestionFlags: 0x10, QuestionId: 0x1E, VarStoreId: 0x30, VarOffset: 0x2E, Flags: 0x10, Size: 8, Min: 0x0, Max: 0x5, Step: 0x0 { 05 91 15 27 16 27 1E 00 30 00 2E 00 10 10 00 05 00 }
0x687B3: 				OneOfOption Option: "Auto" Value: 0 { 09 07 FC 26 00 00 00 }
0x687BA: 				OneOfOption Option: "Best-Case Scenario" Value: 1 { 09 07 17 27 00 00 01 }
0x687C1: 				OneOfOption Option: "Typical Scenario" Value: 2 { 09 07 18 27 00 00 02 }
0x687C8: 				OneOfOption Option: "Worst-Case Scenario" Value: 3 { 09 07 19 27 00 00 03 }
0x687CF: 				OneOfOption Option: "Intel’s Fail Safe" Value: 4, Default { 09 07 1A 27 10 00 04 }
0x687D6: 				SuppressIf  { 0A 82 }
0x687D8: 					Uint64 Value: 0x0 { 45 8A 00 00 00 00 00 00 00 00 }
- 0x687E2: 						Uint64 Value: 0x0 { 45 0A 00 00 00 00 00 00 00 00 }
+ 0x687E2: 						Uint64 Value: 0x0 { 45 0A FF 00 00 00 00 00 00 00 }
0x687EC: 						Equal  { 2F 02 }
0x687EE: 					End  { 29 02 }
0x687F0: 					OneOfOption Option: "Trained" Value: 5 { 09 07 1B 27 00 00 05 }
0x687F7: 				End  { 29 02 }
0x687F9: 			End  { 29 02 }
0x687FB: 		End  { 29 02 }
Changing Default settings
#ToDo Add more instructions.
This is based on the instructions from point 4 from this post: [Guide] Enabling hidden BIOS settings on Gigabyte Z690 mainboards

VarStor PchSetup Offset (0x1792) + VarOffset BIOS Lock (0x1D) = NVRAM BIOS Lock (17AF)
To ensure we’re editing the correct value, verify that the values in NVAR_…_PchSetup_body.bin and NVRAM.bin are identical.

If the above matches change the value of 0x17AF to 00 to turn off ‘BIOS LOCK’ in NVRAM.bin
