@chinobino I am glad that you are posting these updates, continue update if something changes in this BIOS
wanted to ask what are your drivers for Creative Sound this one? > https://ftp.station-drivers.com/index.ph…id=4300&lang=en
or are there any better ones?
@Oneshot Yes I am using those exact audio drivers ![]()
there are just 2 drivers for Sound blaster recon3di and more Sound blaster ZxRi to install the second one, you need to manually install .inf in the creative_recon3di_6.0.101.1061 folder(station-drivers.com) Pacman\Audio\program files\Creative\Sound Blaster Recon3Di\Program\Driver\ctHda.inf
they differ in sound
so I asked which one
[[File:??? 2020-04-29 150446.png|none|auto]] [[File:??? 2020-04-29 164306.png|none|auto]]


@OneShot It doesn’t make any difference which you choose, as they both use the Creative CA0132 codec and therefore the same driver.
If you read the inf you can see the device hardware ID’s for each, the sub-system ID’s are slightly different designs and/or form factors (i.e. desktop/laptop/pci/pcie);
“Sound Blaster Recon3Di” CTDev1 = DEV_0011
"Sound Blaster ZxRi" CTDev2 = DEV_0011
The ZxRi came out around 2015 and has replaceable OP-AMPs so it can be custom “tuned”, whereas the Recon3Di came out around 2013 and has fixed hardware.
Wow, this is great! Thanks for doing this.
I recently got the Z370 Classified K and installed a new 9900K. It’s my first EVGA board, and I was a little unhappy with the gimped BIOS. I started poking around at solutions to unlock more robust overclocking features and stumbled across this thread. I’ve never had a custom/modded BIOS before; is it as simple as flashing the file you uploaded?
PS. Noticed there was a hidden Thunderbolt 3 setting in the images you uploaded! That’s a surprise… this board doesn’t have a TB3 chip does it?
You’re welcome, although I can’t take all the credit I had some help nods in Lost_N_BIOS direction
Yes, it’s that simple.
No unfortunately and without a THB_C header a Thunderbolt PCIe card won’t function properly either.
Here is another BIOS update (changes from previous mod in bold);
• CPU Type, Signature (CPUID), Stepping & µcode displayed on ‘Overclock’ page at the bottom
• Memory ‘RTL-IOL Configuration’ menu unlocked (read only)
• Advanced ‘Power & Performance’ Menu unlocked
• Advanced ‘OverClocking Performance Menu’ unlocked
• Advanced ‘System Agent (SA) Configuration’ menu unlocked
• Advanced ‘PCH-IO Configuration’ menu unlocked
• Speedshift enabled by default
• XTU Interface enabled (shows ‘Memory’ tuning option in Intel XTU)
• XTU ‘Real Time Memory’ timing unlocked in XTU (shows Secondary and Tertiary RAM timings - read only)
• PL4 limit increased to maximum 1023999
• iGPU enabled by default
• IRST Premium & OPTANE enabled by default
• RAID OROM & EFI modules updated to 17.8.3.4687
• VBIOS updated to 1062 (VBT 209)
• GOP updated to 1108 (VBT 228)
• 906EA µcode downgraded to 70
• 906EB µcode downgraded to 72
• 906EC µcode downgraded to 84
• 906ED µcode downgraded to AA
1E379114_mod5.zip
[Edit] Note that this BIOS has earliest Coffee Lake microcodes to avoid performance penalties, if you want the latest microcodes for added security you can use UBU to update all of them at the same time.
Thank you again for sharing this! I’ll have to give it a try in the next couple of days, and I’ll report back. If I’m not mistaken, this board has a dual BIOS switch so I should be safe even if I somehow manage to brick it.
I’m assuming the Intel microcode changes were security fixes for some of their recently disclosed vulnerabilities. Did you see a big performance increase when reverting to the earlier versions?
I’m also curious how you feel about the board in general; my chip is a R0-stepping that I purchased recently, and apparently they are much worse than the pre-9900KS chips in terms of silicon quality. I first installed the CPU a couple of weeks ago, and results have been mixed so far. I’ve been wondering if its just a mediocre chip, or if EVGA hasn’t optimized the board’s power delivery for 8-core CPUs.
Yes, you can recover from bad flash/brick easily by switching to the other (working) BIOS chip and booting into BIOS and then flick the switch back to the bad BIOS chip (while the system is running) and flash working BIOS to the bricked chip.
Yes some there were some errata fixes and security patches. Through my own testing I would say that post-spectre microcodes reduce performance equivalent to ~100 MHz on an 8 core CPU. Although the R0 revision has had many of the vulnerabilites patched in-silicon (i.e. Spectre V2, Meltdown V3, Foreshadow, MFBDS RIDL, Fallout, MLPDS, MDSUM/Zombieload) and therefore doesn’t suffer the same penalties as the P0 revision.
The board has an excellent VRM that is very well designed and can handle 8-core CPU’s without any VRM throttling (i.e. 300W on AVX is no issue). I have a R0 9700K that clocks the same as my P0 9900K so I am not convinced that stepping makes much difference to overclocking. I am using air cooling and can’t keep either CPU cool enough, when using AVX I hit Tjunction (100°C) along with the massive current draw (e.g. 5GHz all core @ 1.31 V running AIDA64 FPU test AVX2 = 256 W = ~195 A). LLC can have a massive effect on the voltage range under load, I have mine set to -75% and don’t let Vcore exceed ~1.32 V (reading VR OUT in HWInfo). Hope that helps
Сan you show what overclocking you use in the BIOS with a screenshot?
this is overdrive and -75%
or is it adaptive with -75% ± ?
I am very interested in these figures
is it even possible to edit these timings on this Board? >
• Memory ‘RTL-IOL Configuration’ menu unlocked (read only)
it didn’t work out for me
Yes, you can recover from bad flash/brick easily by switching to the other (working) BIOS chip and booting into BIOS and then flick the switch back to the bad BIOS chip (while the system is running) and flash working BIOS to the bricked chip.
Yes some there were some errata fixes and security patches. Through my own testing I would say that post-spectre microcodes reduce performance equivalent to ~100 MHz on an 8 core CPU. Although the R0 revision has had many of the vulnerabilites patched in-silicon (i.e. Spectre V2, Meltdown V3, Foreshadow, MFBDS RIDL, Fallout, MLPDS, MDSUM/Zombieload) and therefore doesn’t suffer the same penalties as the P0 revision.
The board has an excellent VRM that is very well designed and can handle 8-core CPU’s without any VRM throttling (i.e. 300W on AVX is no issue). I have a R0 9700K that clocks the same as my P0 9900K so I am not convinced that stepping makes much difference to overclocking. I am using air cooling and can’t keep either CPU cool enough, when using AVX I hit Tjunction (100°C) along with the massive current draw (e.g. 5GHz all core @ 1.31 V running AIDA64 FPU test AVX2 = 256 W = ~195 A). LLC can have a massive effect on the voltage range under load, I have mine set to -75% and don’t let Vcore exceed ~1.32 V (reading VR OUT in HWInfo). Hope that helps
My setup is a head-scratcher because I’m experiencing the opposite issue. This is going to sound absolutely bizarre, but I can’t seem to draw the appropriate amount of current for a 9900K. It could be my particular BIOS settings, but I’m wondering if its the board’s VRM or my relatively mediocre CPU.
5.0GHz (-1 AVX offset) @ 1.38V BIOS Vcore
+50% vDroop
So when running Prime95 Small FFT (4.9GHz), the VR VOUT droops to 1.160V with 143.75A for a total of a 166W POUT. Temperature maxes out at 88°C with a 280mm AIO. If I’m not mistaken, the 9900K should max out around 250W, making it practically un-coolable without a custom loop while pulling much more current.
I did try the opposite power approach first (like yours) with lower BIOS Vcore and minimal vDroop. But I can’t get it stable at 5.0GHz, even at 1.35V. This is why I was so interested in flashing your modded BIOS (I’ll test it this weekend when I get some time); wondering if there’s something up with the stock v1.14 BIOS. I don’t know, what do you think?
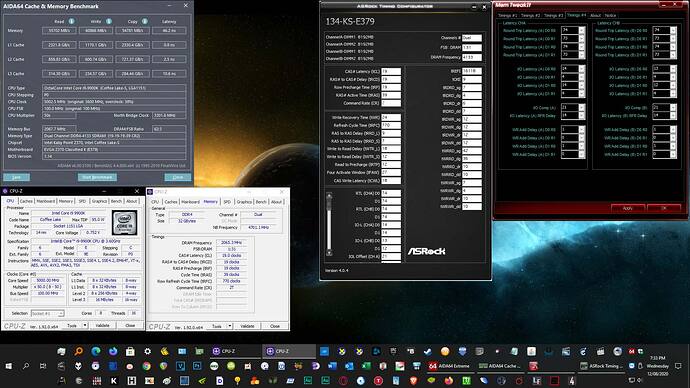
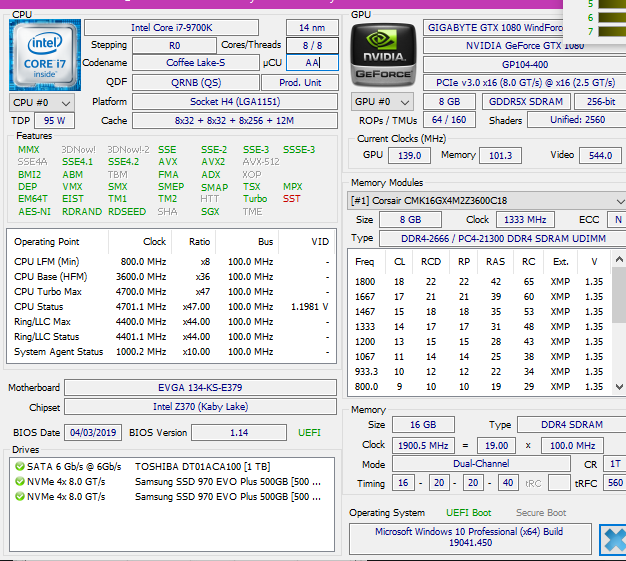
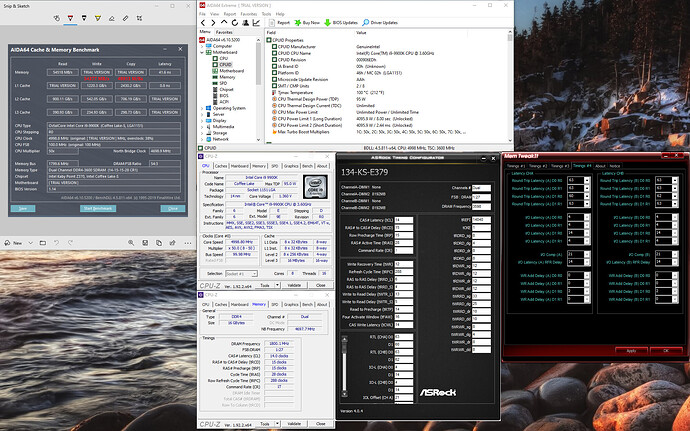
@OneShot Sure
[[File:CPU1.jpg|none|auto]][[File:CPU2.jpg|none|auto]][[File:5GHz 4133 90.91°C Extreme.jpg|none|auto]]
5GHz all core stable running AVX2;
Vcore Override
Target 1.37
Vdroop -75%
Idle Vcore 1.371 V Hwinfo VR OUT in Windows (1.352 V in BIOS)
Max Load Voltage 1.373 V Hwinfo VR OUT
Max Load Temp 90.91°C 3DMark Timespy Extreme AVX2 CPU Test
3DMark Timespy Extreme AVX2 CPU Score 5,591
RAM 4133 MHz vs 2133 MHz (+5.9% CPU Test)
3DMark Timespy AVX2 CPU score 12,374
RAM 4133 MHz vs 2133 MHz (+15.9% CPU Test)
Override and -75%, as you can see in the screenshot above.
Adaptive requires higher voltage for the same frequency to be stable, as the CPU can change frequency extremely fast (especially with Speedshift enabled) and the VRM must change very quickly to match it otherwise BSOD or WHEA errors occur.
As I said it is ‘read only’ which means you can’t change it. It is very useful for memory overclocking to make sure that the motherboard trains the RAM correctly, your RTL channels should not be more than 1 apart in either direction or your performance will suffer a lot. Here are my RTL’s for 4133 MHz using 4 x 8GB;
[[File:RAM2 RTL.jpg|none|auto]]
These are single rank DIMMs so;
Channel A
RTL DIMM0 R0 = 74
RTL DIMM1 R0 = 74
Channel B
RTL DIMM0 R0 = 74
RTL DIMM1 R0 = 73
@enthusiastdre That is because +50% vDroop adds more vDroop and ideally you want to reduce Vcore Vdroop when overclocking and under heavy load.
Start by using Override (if you are using Adaptive) and try setting Vcore to 1.37 V with -75% vDroop, this should give you approx. 1.35 V Vcore in the BIOS and about 1.37 V in Windows when Idle. Under heavy load you should not see much voltage drop at all and you may even see a very slight increase under AVX loads (which is normal). If it is still not stable you may need to increase by 0.01 V at a time until it stabilises or hits the thermal limit of your cooling. I have run up to 1.475 V with -50% droop @ 5.1GHz and the CPU survived several 3Dmark bench runs for 9900K and GTX1060 3GB Night Raid highest score (43,196) although I don’t recommend it long term.
Just wanted to report back and say thanks after I successfully flashed the BIOS a couple of days ago. It seems to be running smoothly so far - while there’s been no discernable performance increase (benchmarks are within margin of error), I haven’t had any problems either.
I don’t know anything about RTL’s, but I might have to dial in my memory settings a bit further. Here’s what my board is set to:
Channel A
RTL DIMM0 R0 = 63
RTL DIMM1 R0 = 60
Channel B
RTL DIMM0 R0 = 63
RTL DIMM1 R0 = 60
How would I force the board to re-train? I still have most of the tertiary timings set to Auto for now; should I set those manually to see if the board re-trains with a narrower RTL gap?
One interesting thing with the flashed BIOS is that I did have to increase Vcore to 1.39V to maintain stability at 5.0GHz (still using Override; +50% vDroop). 
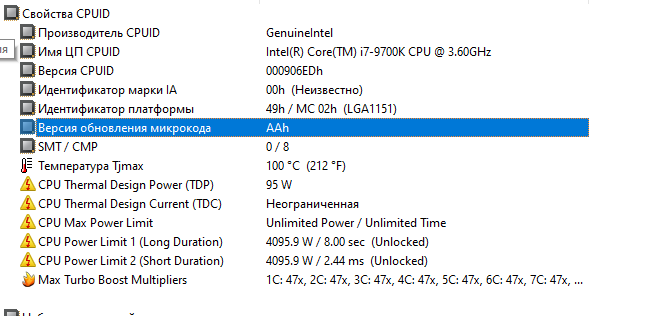
Any performance increase from the modified BIOS will only come from the earlier microcode and if you don’t rename ‘mcupdate_genuineintel.dll’ in Windows then you won’t be using the microcode in BIOS anyway as Windows will override it with a later version. If you want to check which microcode is currently being used you can check with AIDA64 (Motherboard –> CPUID –> Microcode Update Revision)
Everytime you reboot you force the motherboard to retrain the memory, if you check your RTL’s after each boot you may notice them change occasionally. If it fails to train you will see 4C on the Debug LED and the motherboard will go into a boot loop.
Before you adjust your tertiary timings - I need to know if all four of your DIMMs are the same speed/brand or are you using mixed kits? What speed are they rated for and are you using XMP? If you run AIDA64 cache and memory benchmark you should check if you are getting the expected bandwidth. When your RTL’s are off the bandwidth usually decreases noticeably.
[quote="enthusiastdre, post:52, topic:34145"] One interesting thing with the flashed BIOS is that I did have to increase Vcore to 1.39V to maintain stability at 5.0GHz (still using Override; +50% vDroop).
 This is no big deal, but it did come as a bit of a surprise since I had previously tested at 1.38V extensively (Prime95, Linpack Xtreme, Cinebench, etc). This board's VRM + my particular CPU does not seem to like lower voltages + reduced vDroop at all. I think it's just a reality of the reduced silicon quality after the 9900KS models were introduced. But if anything, I prefer having the larger vDroop to protect against transient overshoot.
[/quote]
If you are using +50% vDroop you are adding 50% more vDroop than the Intel default spec, if you are worried about transients then I would suggest to try using 'Default' LLC (Intel spec) with a lower vcore to see how it compares to your current settings. The 'VR OUT' *should* be very accurate on this board and I trust it not to overshoot by ~150 to 200mV when using -75% vDroop but I understand your concern - the 9900K is not cheap and you want it to last without degrading. I've had mine for over a year and it still does 5GHz all core @ 1.37 Vcore with -75% vDroop, although I usually run it at 4.9GHz all core @ 1.32 V with -75% vDroop.
What does it mean to rename as it is currently being done AIDA64 shows > how to do it?
[[File:??? 2020-08-12 180541.png|none|fullsize]]

@OneShot You need to first take ownership of the file and then rename it to something like ‘mcupdate_genuineintel.bak’.
Instructions;
1. Navigate to the file using Windows File Explorer i.e. C:\Windows\System32\mcupdate_genuineintel.dll
2. Right click on the file and select "Properties"
3. Go to the “security” tab
4. Click the “Advanced” button
5. Near the top of the resulting window there should be an “Owner:” line and “TrustedInstaller” is likely going to be the currently listed owner.
6. Next to that click "Change"
7. In the resulting window there is a field “Enter the object name to select (examples):”; type your username in this window and click on the “Check Names” button. This should change the contents of the field to something with an underline. The format should be COMPUTERNAME\USERNAME.
8. Hit OK
9. Now back on the window titled “Advanced Security Settings for mcupdate_GenuineIntel.dll” click the “Add” button near the bottom left of the window.
10. Near the top of the resulting window click "Select a principal"
11. Same window as step 6, same thing needing to be done as well
12. Click OK to return to the "Premission Entry for mcupdate_GenuineIntel.dll"
13. Place a checkmark in the box labeled “Full Control” and then hit the “OK” button on the window.
14. On the “Advanced Security Settings for mcupdate_GenuineIntel.dll” window click the “OK” button
15. On “mcupdate_GenuineIntel.dll” click "OK"
16. Now you should be able to rename it. If you have UAC enabled it will give you two UAC prompts when you try, but you just need to click through them.
If it gives you an error after the two windows that you need permission from yourself or from TrustedInstaller then go back through the steps as you may have missed one.
Thanks to Kezika on Reddit for writing out the instructions in detail (you saved me a lot of time).
Note that a future Windows 10 update may reinstate the file and that every major update (i.e. new build) will also cause the file be updated or reinstated.
Also note that running sytem file check will also reinstate the file i.e sfc /scannow
[Edit]For your CPU revision (R0) AA is the earliest microcode available and you are currently running it.
Until recently, I was using the same Patriot DDR4-4133 kit that you have in your signature (except in 2x8GB configuration). That kit wouldn’t clock past 3733MHz no matter what I tried, so I RMA’ed it and changed back to a 16GB Corsair Dominator Platinum DDR4-3200 kit that I previously had. Despite being a lower inferior kit on paper compared to the Vipers, I actually prefer the Corsair since it has the built-in temperature sensor. I’ve manually set most of the timings to "standard" B-die timings.
I could definitely be wrong about this, but here’s the interesting thing. I don’t think this board adheres to the Intel spec for vDroop, which is apparently 1.6 mOhms for 8-core CPUs. This actually drove me crazy while setting up my overclock when I first got the board a few weeks ago. For example, here are some of my test results using Cinebench R15:
+90% vDroop
BIOS Voltage: 1.40V
VR VOUT: 1.119V
Current Draw: 99.25A
Est. Loadline: 2.02 mOhms
+50% vDroop
BIOS Voltage: 1.40V
VR VOUT: 1.238V
Current Draw: 107.5A
Est. Loadline: 1.50 mOhms
+25% vDroop
BIOS Voltage: 1.375V
VR VOUT: 1.244v
Current Draw: 109.75A
Est. Loadline: 1.19 mOhms
Default vDroop
BIOS Voltage: 1.368V
VR VOUT: 1.254V
Current Draw: 111.5A
Est. Loadline: 1.022 mOhms
-50% vDroop
BIOS Voltage: 1.35V
VR VOUT: 1.293V
Current Draw: 121.0A
Est. Loadline: 0.471 mOhms
-75% vDroop
BIOS Voltage: 1.25V
VR VOUT: 1.225V
Current Draw: 100A
Est. Loadline: 0.25 mOhms
I didn’t run all of these tests at 5.0GHz consistently, but that doesn’t affect the data at hand. Unless I’m missing something, it seems it’s actually EVGA’s +50% vDroop setting (1.5 mOhms) that comes closest to the Intel standard. This confused the heck out of me at first, so I’d be curious to see if your boards behave the same way.
Coincidentally, the only way my system passes Prime95 is using my current voltage settings (BIOS 1.385V with +50% vDroop; VR VOUT 1.236V under load). If I try anything lower (e.g. 1.35V) with minimal vDroop, my system immediately locks up during stress testing. This doesn’t make sense to me since I’m actually feeding the chip more voltage, but I figure it’s a combination of the VRM not being able to keep up + a CPU with average/poor silicon. At 1.35V, I’m able to run Cinebench R15 and R20 successfully (most of the time anyway), but definitely not Prime95 or Linpack. Of course, I don’t do anything that intensive on my computer, so I’ve strongly considered ignoring it and using 1.35V anyway, but the fact that the system wasn’t entirely stable was nagging at me.
Ok, so you are using 2 DIMMs and your RTL’s on each channel are the same (63) so there is nothing to fix;
RTL Channel A DIMM 0 = 63
RTL Channel B DIMM 0 = 63
You have 2 empty RAM slots so ignore any values reported for these;
RTL Channel A DIMM 1
RTL Channel B DIMM 1
Your Read bandwidth looks correct (very nice btw) for 3600 14-15-15-28 1T and I can see you’ve also tightened tRFC and tFAW. Single-word read latency is also super low @ 7.78ns with CL14 @ 3600 MHz.
As you say it should be 1.6 mOhms for 8-core CFL CPUs but as your data shows it appears to be closer to 1.0 mOhms. Trying to apply LLC in a methodical way becomes difficult when specifications aren’t adhered to and there is no way of measuring transients. Realistically my PC is idle most of the time or running light loads when browsing (and even gaming does not seem to pull much current) and when I do run really heavy loads (encoding h265 for example) it is usually only for a few hours at most. I don’t like seeing vcore above 1.35 V, especially when idle (which is probably irrational) likely as a result of reading years of Intel hardware reviewers stating it as max safe sustained voltage before electromigration may occur (since at least 45nm Yorkfield). I guess there is a chance that I could have some voltage spikes when a heavy load stops but I don’t think they would reach dangerous levels (+1.52 Vcore).
TLDR; You should run with whatever you feel gives you stability with safe temperatures + voltages, it’s personal preference
And you can somehow change the RTL-IOL block I was told that if "with the wrong training, tuning timings makes no sense" IOLs should be 6-7
we all have them 14-12 at him @enthusiastdre 14-14
Ok, so you are using 2 DIMMs and your RTL’s on each channel are the same (63) so there is nothing to fix;
RTL Channel A DIMM 0 = 63
RTL Channel B DIMM 0 = 63
You have 2 empty RAM slots so ignore any values reported for these;
RTL Channel A DIMM 1
RTL Channel B DIMM 1
Oh duh. Sorry, I’m stupid; no wonder you thought I was running 4x8GB sticks.
I’m pretty OCD about keeping voltage to a minimum too, so I really dislike seeing 1.35V+ as well. All of my problems go away if I simply downclock 100MHz to 4.9GHz, but it’s just too sad to spend 9900K money and not run it at 5.0GHz. Of course, that’s where I become irrational.
Would I be safe to assume that the "AAh" microcode is the earliest revision for the 9900K as well?
@enthusiastdre For P0 revision 84 is earliest and for R0 revision AA is earliest.


