here with MMTool, just check the microcode using hwinfo now should be FA.
hi @karfel
Much appreciated thanks for your assistance !
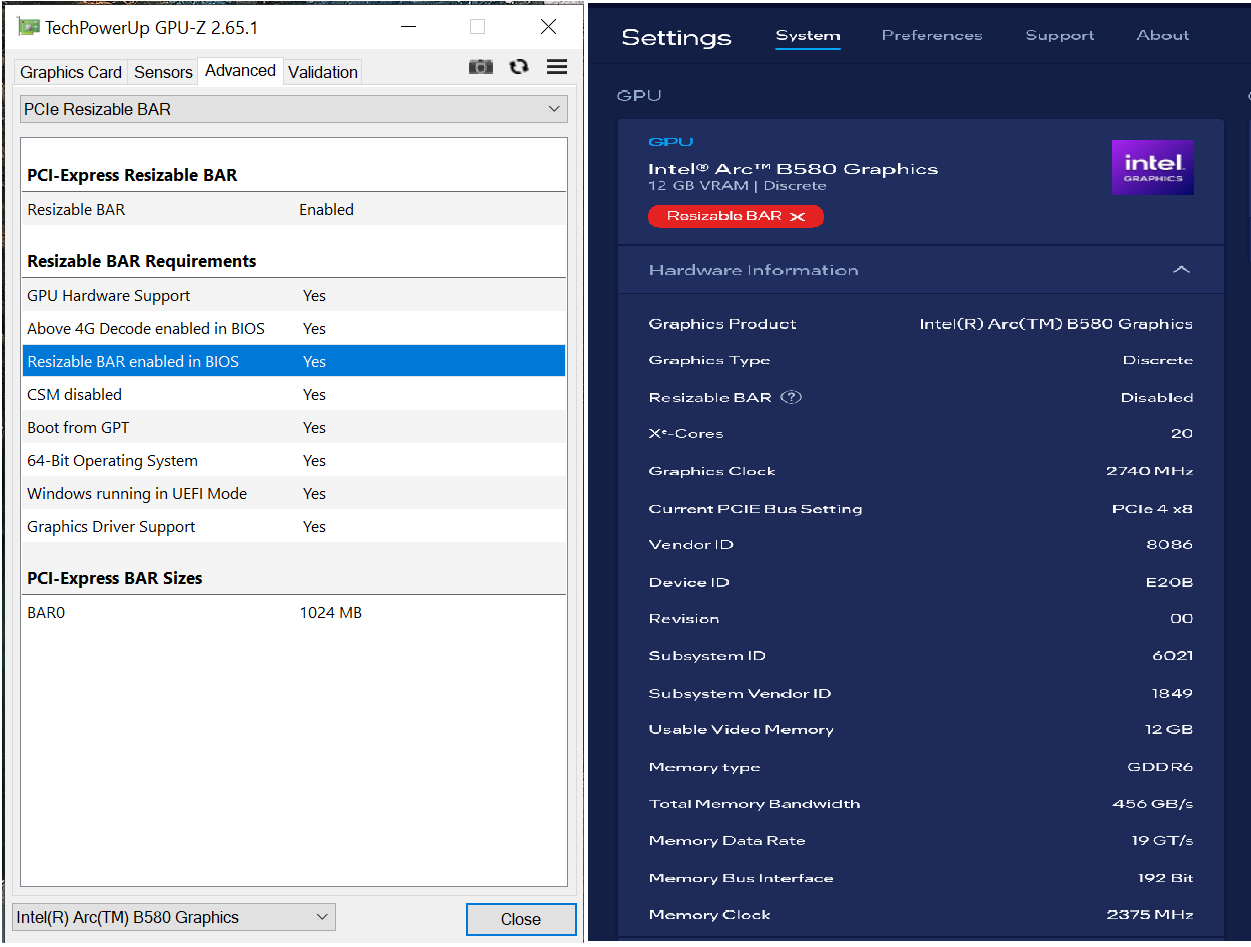
the Intel Graphics Software still reports RBAR disabled not sure what to say about that
how high can i go with BAR0 size ?
frankly i am a little concern to go higher then 1024MB, saw other user posts with no video display during POST or freeze after POST.
in case i run in to any troubles with higher BAR0 size, is it safe to assume that i can reset and get back to default 256MB ?
I also noticed that i need to move the M2 SSD to the other slot as is limiting the PCIe to x8
Anyone have any ideas what I could do to get this working on an ASUS Z77 Maximus V Formula?
I’ve patched ASRock boards without issues before. The issue I’m having is that the ASUS motherboard keeps getting a duplicate pad file after patching pcibus. Even when I attempt to extract the patched modules from the corrupt image and reinsert them into the original, the duplicate pad file still shows up.
I’ve seen suggestions to manually patch the image using a hex editor, but the strings that are being patched do not appear in the full BIOS image. It seems that I can only find the strings if I extract pcihostbridge, runtime, and pcibus uncompressed. Once I extract them uncompressed, I cannot reinsert them compressed.
I guess I could technically remove the duplicate pad file, but that seems like a bad idea.
you should extract and insert/replace as-is
When I extract as-is and replace the patched modules into the unpatched image, the pad file issue shows up.
If I extract as-is and try to manually patch the image via hex editor, I can’t find the bytes that need ro be patched. They’re only visible if I extract the modules decompressed.
I also noticed that i need to move the M2 SSD to the other slot as is limiting the PCIe to x8
Here, I am just messing around with FIT, it might brick the device. As for your question, you have to answer it yourself because I don’t have the device.
in case i run in to any troubles with higher BAR0 size, is it safe to assume that i can reset and get back to default 256MB ?
CMOS reset.
2 posts were split to a new topic: Dell Precision 5820 bios file content reconstruct
Heya, just wanted to drop in here as well since the topic itself seems a bit less active.
I’ve got a Gigabyte motherboard that’s stuck with the invalid bios image issue. See here (last post as of current): Flashing Gigabyte while avoiding "Invalid BIOS image" - #401 by chinobino
Apologies if im breaking any rules linking across, I’m new to all this and just so exhausted from this so if anyone here can help i would appreciate it beyond words.
@Lost Hi, what model of Gigabyte motherboard do you have?
Hi Chino, thanks for replying ![]()
I have a ga-z170x-gaming-7
And here is the bios I believe I have created correctly that I am having trouble with the invalid bios image issue (I can’t upload directly as a new user): https://drive.google.com/file/d/1kvG9NsmjXryyhSDMqDmOdxrJ5Poh-kCw/view?usp=drive_link
@Lost I can’t access your Google drive but I would strongly suggest you try using Intel Flash Programming Tool (FPT) instead of Q-flash or EFIFlash.
WARNING: Unlike Qflash or Efiflash, FPT will not check if you are flashing the correct BIOS to a matching motherboard so you can brick your motherboard if you cross-flash the wrong BIOS or your modification(s) corrupt the BIOS. Be very careful!
2ND WARNING: The Z170x-gaming-7 has an Intel Gigabit Ethernet Adapter. Intel’s FPT can overwrite (erase) the MAC address causing the Ethernet adapter to no longer function! Although the MAC address may be recoverable it is a big hassle that you will want to avoid. You will know if you have erased it if it displays 888888888788 as the MAC address.
DISCLAIMER There is always a risk when flashing the firmware of any motherboard. You must decide if you think the risk is worth it - if you don’t know how to recover your motherboard from a bad flash then I don’t recommend that you attempt to use Intel FPT. I am not responsible for any problems that arise from your actions. Having a hardware programmer to recover from a bad flash (or brick) is always recommended when flashing any heavily modified BIOS.
Please backup your current BIOS before attempting to upgrade using FPT.
You can backup you current BIOS from an elevated command prompt using the command:
fptw64 -d bios.bin
To flash the modified BIOS from Windows using an elevated command prompt:
fptw64 -SAVEMAC -f BIOSNAME.BIN
The command -SAVEMAC will retain your Intel MAC address so don’t leave it out!
Once the modified BIOS has been written successfully type the following command to restart the system:
fptw64 -greset
Note that your PC will restart instantly without any warning as though you have pressed the reset button.
Hi Chino, thank you again for all your help so far!
Sorry about that, i believe i’ve fixed the access on the Drive link so you should be able to access it now.
As to your two warnings - That’s kinda exactly why i’d rather a rundown on how the initial poster (here: Flashing Gigabyte while avoiding "Invalid BIOS image" - #401 by chinobino ) modified the image to flash it with Q-flash if at all possible. Or, at the very least, for someone to confirm I haven’t stuffed up the one i made before I apply it without safety
I’m reasonably sure I’ve done it correctly up to that point but not to the level I wouldn’t rather the safety of Q-flash if at all possible. I have had Q-flash create a backup of my Bios already in case that helps.
@Lost The BIOS structure looks ok but I have not completed a Re-Bar mod to see if it was done correctly, perhaps @Kuri0 @68k-dude @Koekieezz could take a look.
Thanks for taking a look and if any of the linked posters do have a look it is greatly appreciated! Thank you in advance! ![]()
Hello @Lost o/
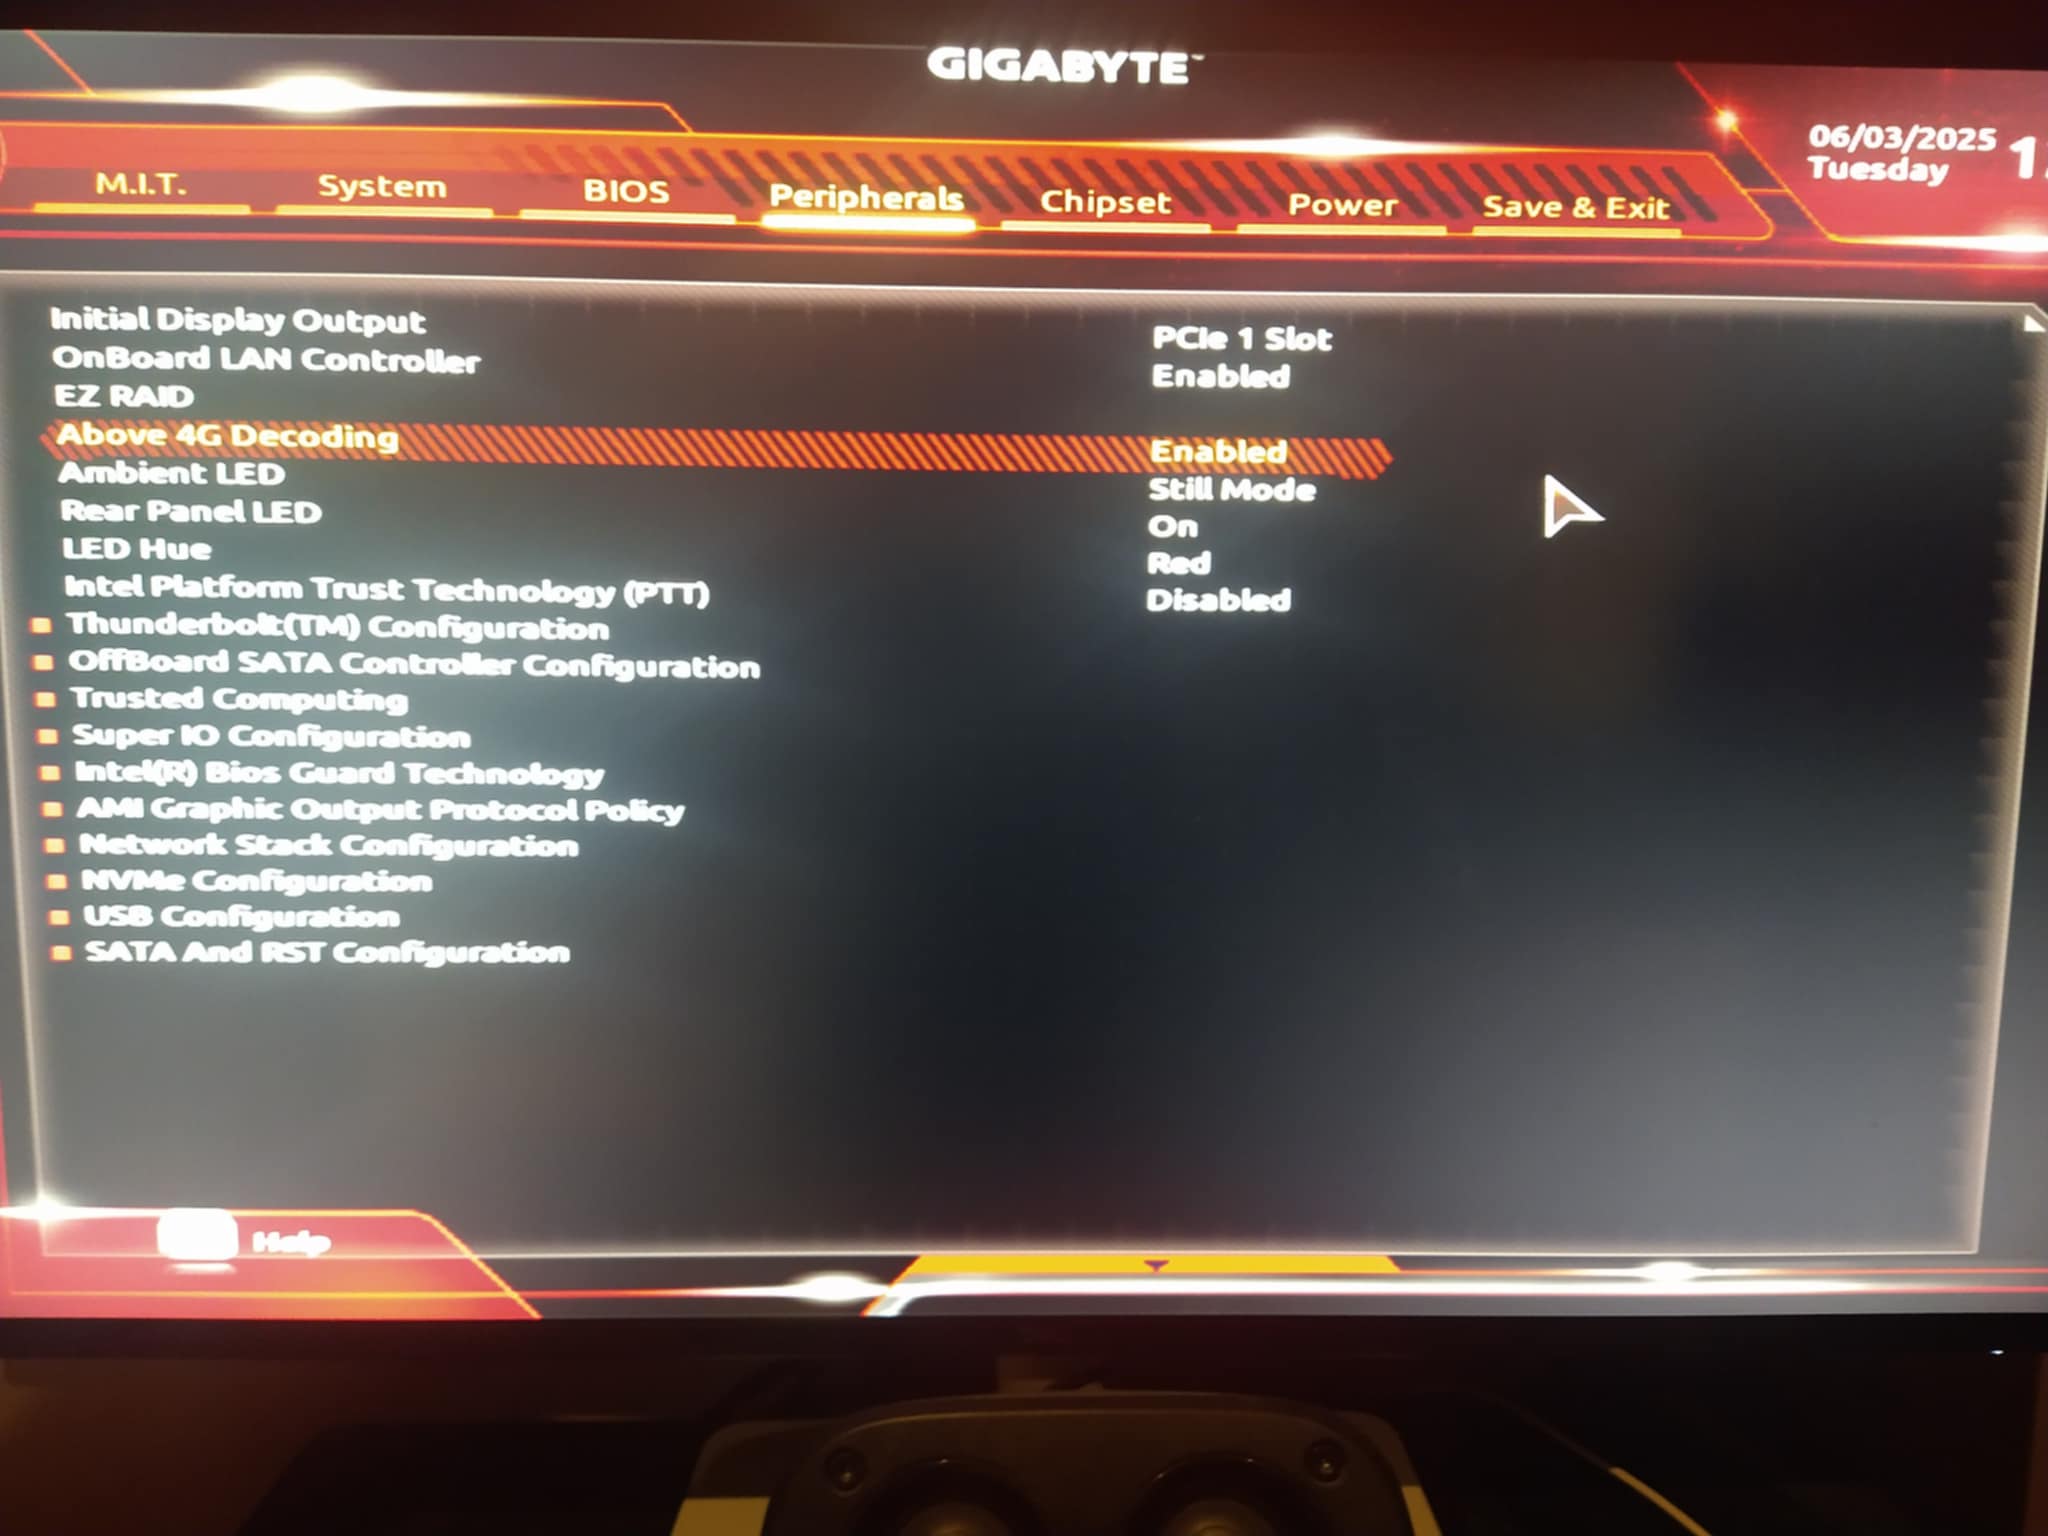
Are you able to set the Above 4GB Decode in the Setup?
Some Gigabyte boards of this generation had issues with it.
If So, I’ll take a look
Best regards,
-68k
Edit:- It looks like I did something with the Gaming 7 a few years ago. I have a few files for it. I have a Setup.ifr and some other UEFI things. Maybe not a good sign ![]()
What GPU are you trying to use with it? Intel ARC B580, just found your other post.
As Chinobino pointed out, there is a space for a MAC address in the file you posted. We can put that back in if you make note of it.
Also as Chinobino said, make a full backup of the current chip.
Hi 68k! ![]()
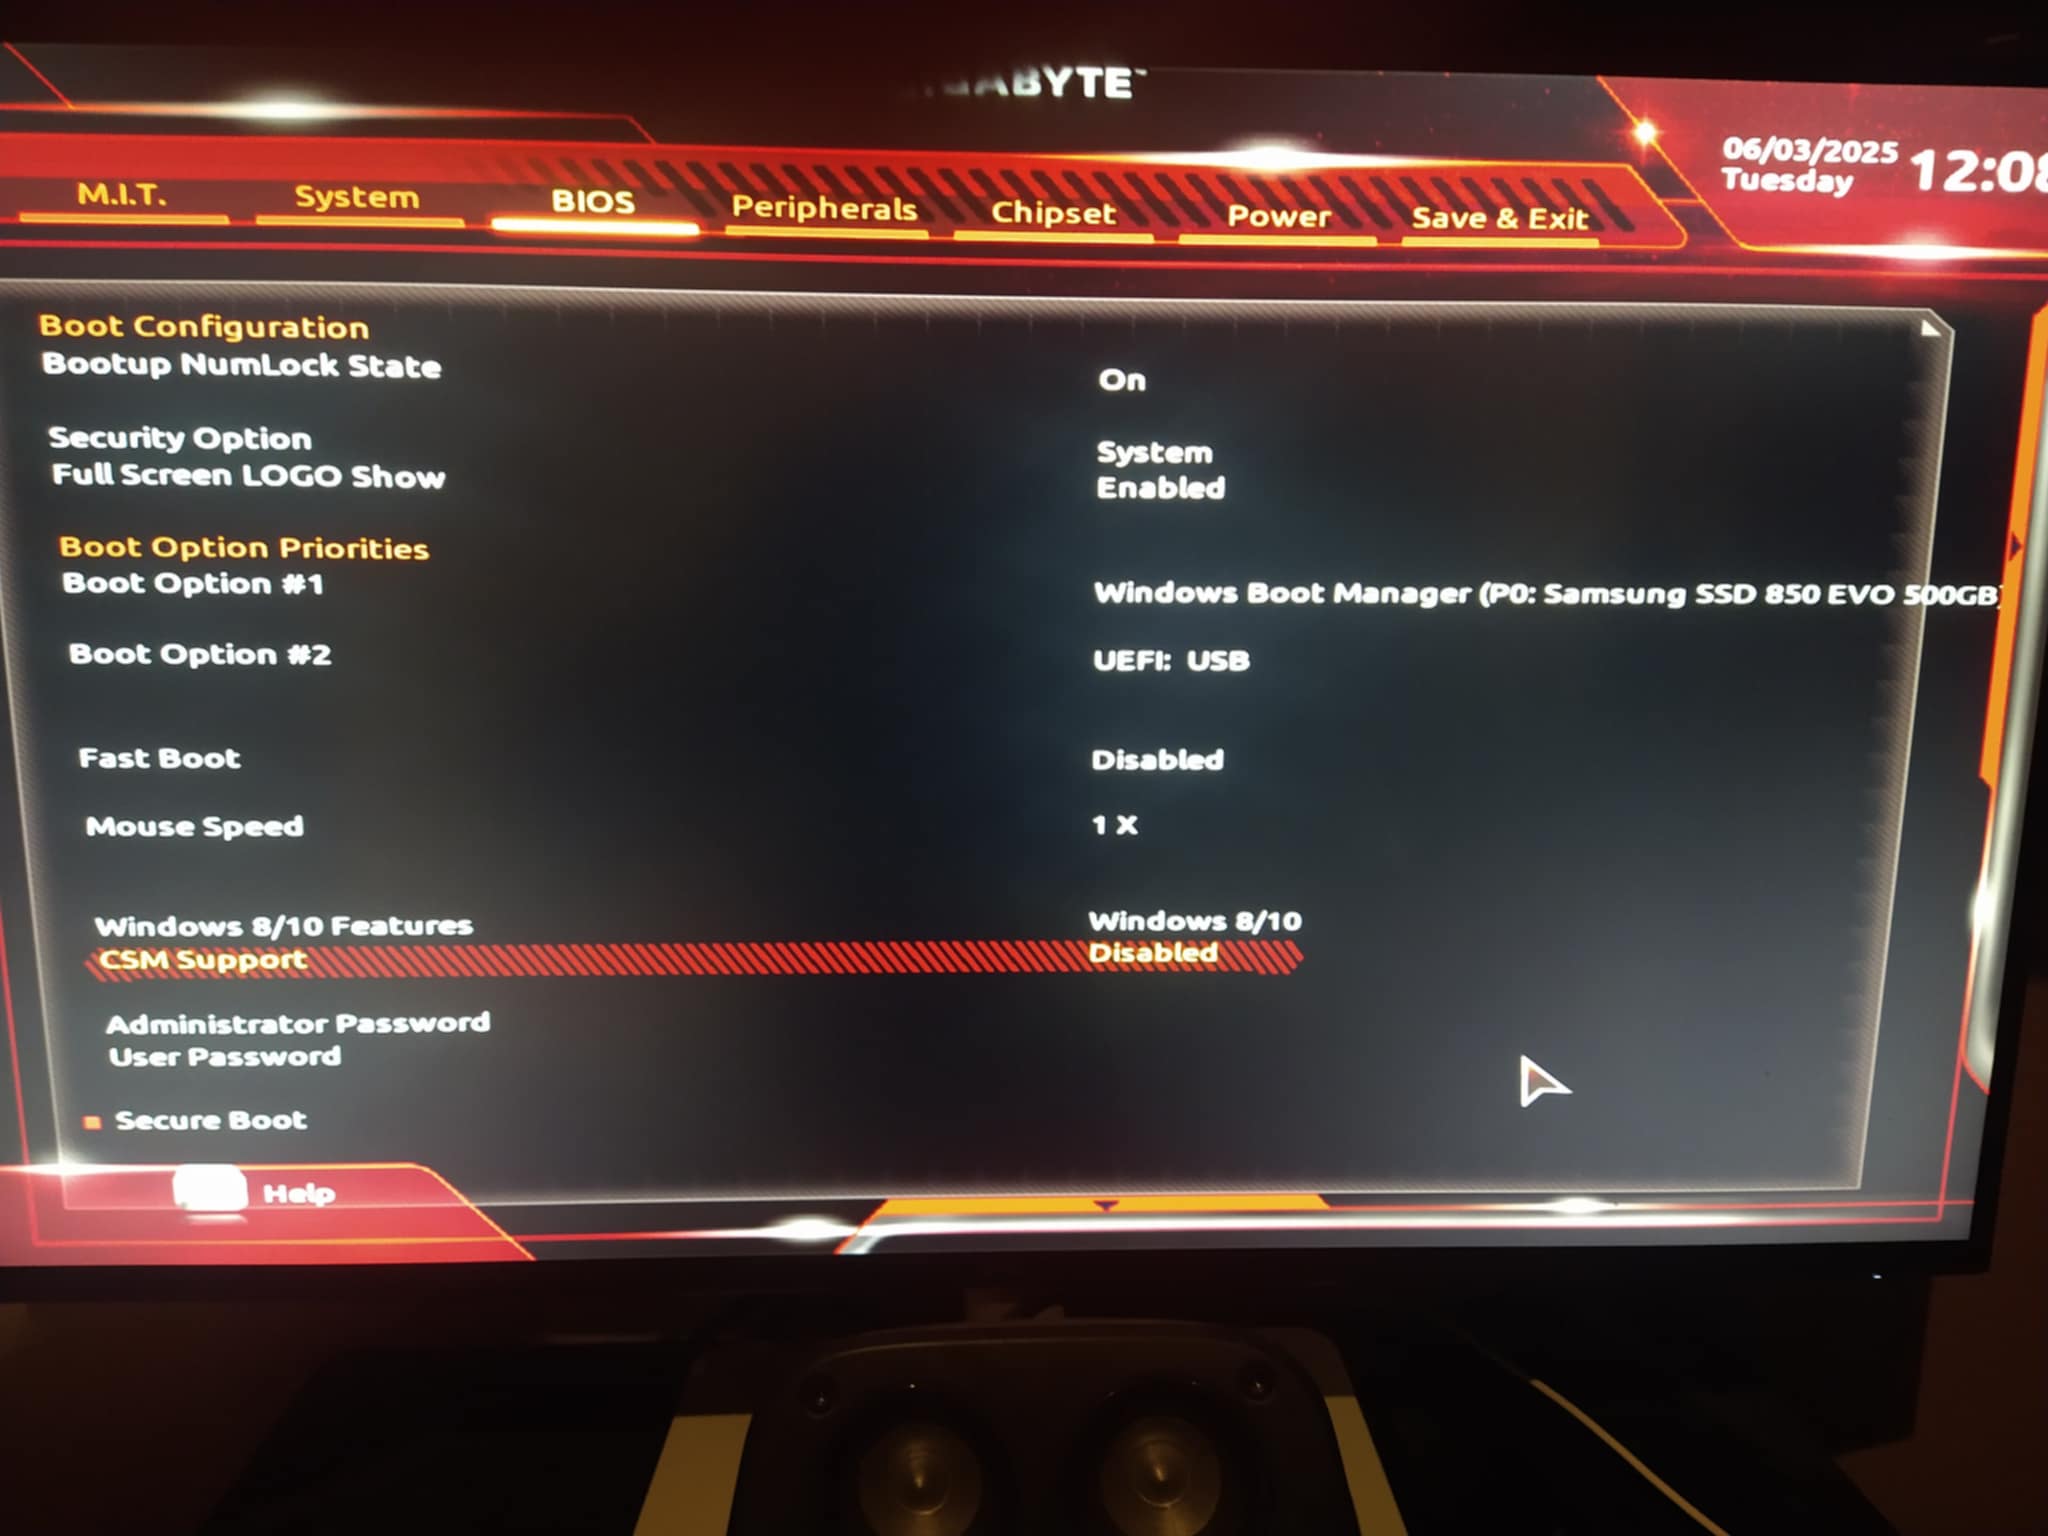
If i’m looking at the right setting then I think i may be one of the luckier ones there because I seem to be able to enable it. I also have CSM support disabled and it boots fine. Attached pictures of both options in my Bios if you don’t mind doublechecking I’m looking at the right things.
Based on an ipconfig /all command prompt I believe the mac address should be:
40-8D-5C-5C-52-AF
Thanks again for all the help so far! ![]()
Hello @Lost ,
I’ll move everything over to a PM so we don’t clog up this topic.
Once everything is happy, maybe you could post a follow-up post here.
Best regards,
-68k
I followed the guide and got rebar enabled and working, but the xmp no longer works. The voltage for dram will not change from 1.5v which is the default. Is there something I’m missing?
Thank you
I can only get 16GB bar if I run with 16GB of RAM (1 CPU only configuration). If I run with 32GB of RAM the best I can achieve is 8GB.
I believe that this is the 64bit as 32-bit addresses problem. I have tried to apply the discussed patches with UEFI Patch but it said that this could not be applied to the Dell A34 bios that I modified with rebardxe.ffs.
Did you run into the same problem?
Were you able to patch PciBus to solve this?