May I please get some assistance modding my BIOS in order to support Ivy Bridge CPUs on a LGA 1155 platform with an H61 Intel Chipset. I want to add support for an i5-3470. If possible I would also like to add UEFI support to the BIOS as Dell has disabled support for it, but it is an Aptio IV BIOS, so it should in theory support it. The link to the BIOS .bin file is here : https://files.fm/u/vtdrjxyv (can’t hyperlink). Please take a look at the BIOS, thank you.
1 Like
Malwarebytes blocks your link, so I downloaded latest BIOS from Dell directly (Same hotlink you could have provided to Dell as files.fm?)
https://downloads.dell.com/FOLDER01639275M/1/MS-A10.exe
I can mod this BIOS, already updated microcodes for you, looking at the BIOS options now. What exactly is it you want enabled UEFI related?
This is a UEFI BIOS, UEFI is a type of BIOS, but I assume you mean some UEFI Setting so I’m asking which one do you need/think Dell disabled?
I can enable many settings, so need to know which specific ones you are referring to.
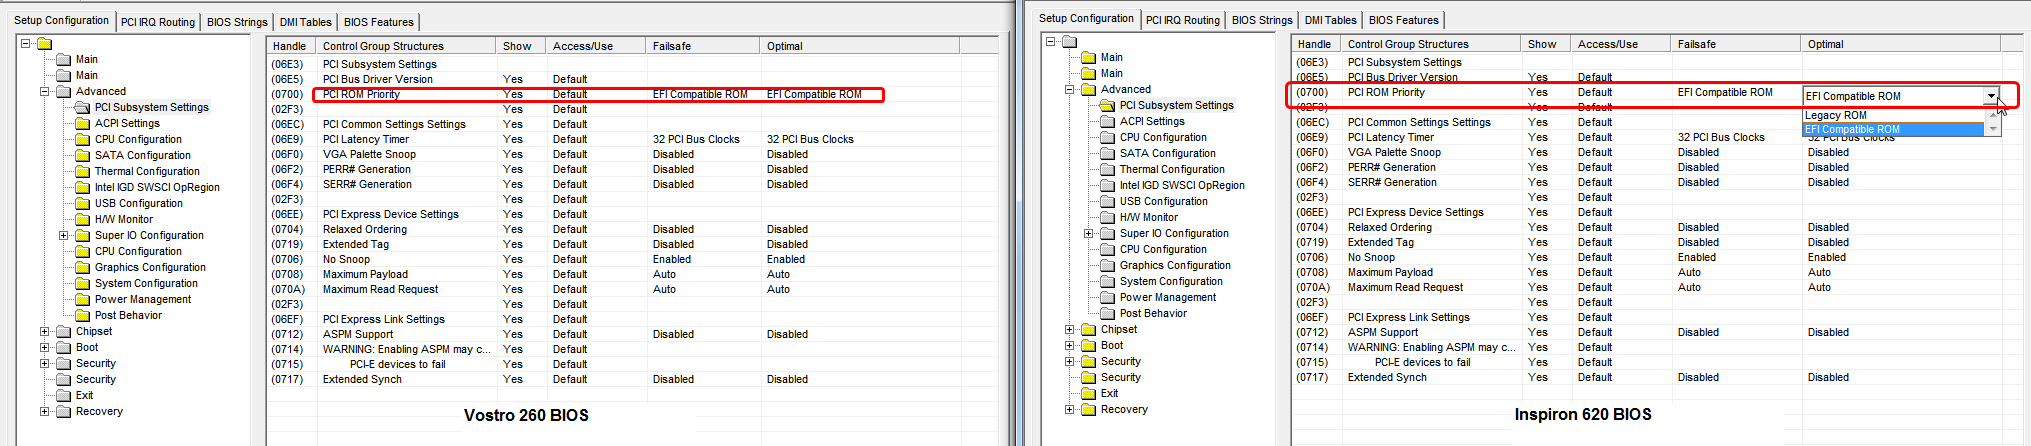
At first glance I see PCI EFI option rom (PCI/Legacy etc) is enabled for you to adjust and offers both EFI or legacy - so I assume it’s not that. This setting is at the top of “Advanced/PCI Subsystem Settings”
This mod may not work, unsure about that since that CPUID (306A9) is not in the BIOS already.
If this failed, other CPU’s should be working fine, but not CPUID 306A9 Ivy, if that happens you know this mod is not possible.
I’ll assume you already know how to use command prompt in windows (Or DOS If you need to flash with ES version from DOS)
Dell Vostro 260 BIOS A10 (12/19/2013)
Update x7 microcodes
cpu206A1_Ver07-12-23-2009
cpu206A2_Ver27-05-02-2010
cpu206A3_Ver09-06-09-2010
cpu206A5_Ver07-07-22-2010
cpu206A6_Ver28-09-15-2010
cpu206A7_Ver2D-02-07-2018
cpu306A9_Ver1F-02-07-2018 (Add-In)
http://www.filedropper.com/dell-vostro-260-mod-bios-a10
First, update BIOS with stock unmodified BIOS from Dell (included, original BIOS exe).
This is suggested so that Intel ME get’s updated to correct version, included in the stock BIOS flashing package
Reboot back to BIOS and load optimal and (set RAID if needed), then save and reboot to windows.
Now, to flash the modified BIOS. First try AFUWin from in windows, files are included
When flashing in windows, use same commands as below, for AFUWIN or AFUWINx64 from command prompt in windows
DOS flashing as follows - same for windows except use above filename (AFUWIN/AFUWINx64) from elevated command prompt
afudos MS-A10M.BIN /x /p /b /k /L2
Or, if error, use one of the included AFUDOS ES Versions (included in AFUDOS ES Folder) and try again with these commands
afudos MS-A10M.BIN /x /p /b /k /L2 /GAN
/X Do not check ROM ID
/P Program main bios image
/B Program Boot Block
/K Program all non-critical blocks
/Ln Load CMOS default (n=0 - 1)
L0: Load current CMOS optimal settings
L1: Load current CMOS failsafe settings
L2: Load CMOS optimal settings from ROM file
L3: Load CMOS failsafe settings from ROM
If all that fails, try flashing with the AFUWin included on this guide, be sure to reveal hidden contents in step five to see image about "program all blocks"
It’s about other BIOS mod, but should be good to follow for flashing mod BIOS in this situation.
https://linustechtips.com/main/topic/555…ll-vostro-220s/
Also guide here at win-raid too for flashing Mod BIOS with AFU - [Guide] Flashing modified AMI Aptio UEFI using AFU
Thank you for your help, Bugger Vance. I will attempt to do your instructions. What I mean is that, though this BIOS and motherboard are capable of UEFI booting, Dell has removed most mentions of it within the BIOS and I do not know how to add the option for UEFI booting back. Some similar BIOSes that use the same board from Dell and chipset are the BIOS from Optiplex 390, Optiplex 3010, Inspiron 620, Inspiron 630, and the Vostro 270. All of these models use the same board from Dell, the BIOS and BIOS ROM chip may be different sizes between them.
The BIOS that I attached has modifications to enable all menus and enable AHCI. However you downloaded a stock BIOS, so when you mod it, could you please do that also. Thanks for your help.
No dice, I flashed the BIOS, not getting and video, but it seems that it is passing POST, this may be due to the Sandy and Ivy Bridge VBIOS module not being present in the BIOS. It has this issue when I insert the Ivy Bridge i5, but when I switch it back, it is fine.
Hi! New user account here ![]() You’re welcome!
You’re welcome!
Thanks for the info on your first post. I do not see any UEFI booting options hidden in there, the only mention is the one I mentioned about EFI/Legacy PCIE booting choice.
As for AHCI, I will check that out and redo the mod for you if you want? For the current BIOS you tried, that sounds correct, like it’s working but not properly with the Ivy.
With the Ivy, did you try onboard and PCIE graphics card, both gave no graphics output? If neither does, it’s probably not actually a graphic problem, just the board running but not booting further with the Ivy, you’d see that in debug code progress stopping at a certain point mid-windows-loading with a PCI Debug card.
Back to AHCI. Can you please upload your “AHCI” enabled BIOS file again from the first post, so I can see exactly how they are setting that so I can do for you on new mod too. It can be done a few ways, and without being able to test myself, I’d like to set it how they did for best chances of it working smoothly.Please upload to this site and send link, thanks - https://www.filedropper.com/ - Never mind, I was able to get via proxy, will check and edit or add more below
Then I’ll make you new BIOS, same as your old one, but with the updated Microcodes. That way at least you have the latest for Sandy Bridge in there.
As for UEFI, I’ll check out Vostro 270 BIOS and Inspiron 620 since some BIOS strings in your BIOS still say Insprion 620s, and see what settings are there, but I do think the only thing in this BIOS possibly related is the EFI PCI/Legacy option rom setting which looks like should already be visible to you.
----
I see Inspiron 620 has same BIOS file, so you may be able to force flash an Inspiron 620 BIOS in there.
If using Official Dell Image, you’d have to use /forceit or /forcetype, but if using extracted bin/rom file you can force with AFU easily with the /f and /x flags or those along with ES AFU and /gan
If you have BIOS recovery tools and soldering skills that’s no problem, but if not don’t do it until you can buy a CH341A USB Programmer and have someone help you with soldering, in case it fails to boot.
But all that seems pointless given wheat I see below.
Insprion 660 and Vostro 270 also use same BIOS. Those BIOS are much larger, so don’t use the same motherboard/chipset. Our interest needs to be in same chipset board/BIOS, so 620 is better bet, I will look into it’s BIOS and see.
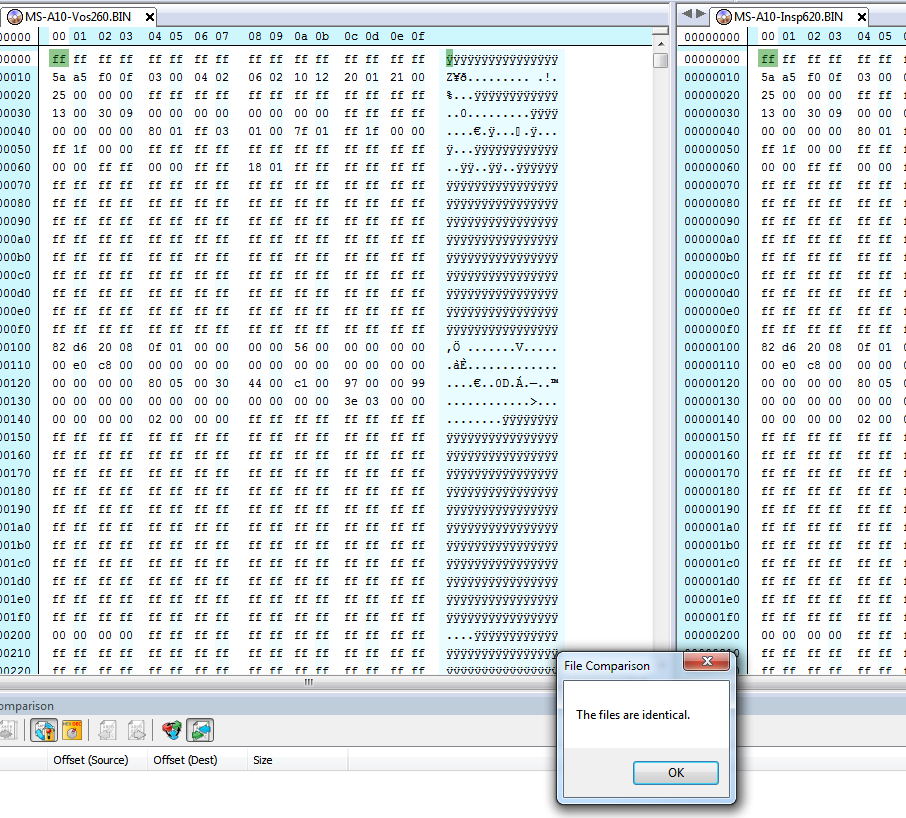
I compared Vostro 260 and Insprion 620, BIOS files are exactly the same byte for byte compared in hex editor. I also checked in BIOS editing software to enable settings options, all set the same for each.
Can you show me an image of Insprion BIOS 620 showing what you wanted, that’s not there in your 260 BIOS.
The only settings regarding booting are like I mentioned above, about the EFI PCI Option Rom (Legacy or UEFI) and it’s enabled/visible in each BIOS so you should be able to adjust. It’s set to EFI compatible by default.
This setting is at the top of “Advanced > PCI Subsystem Settings” page.
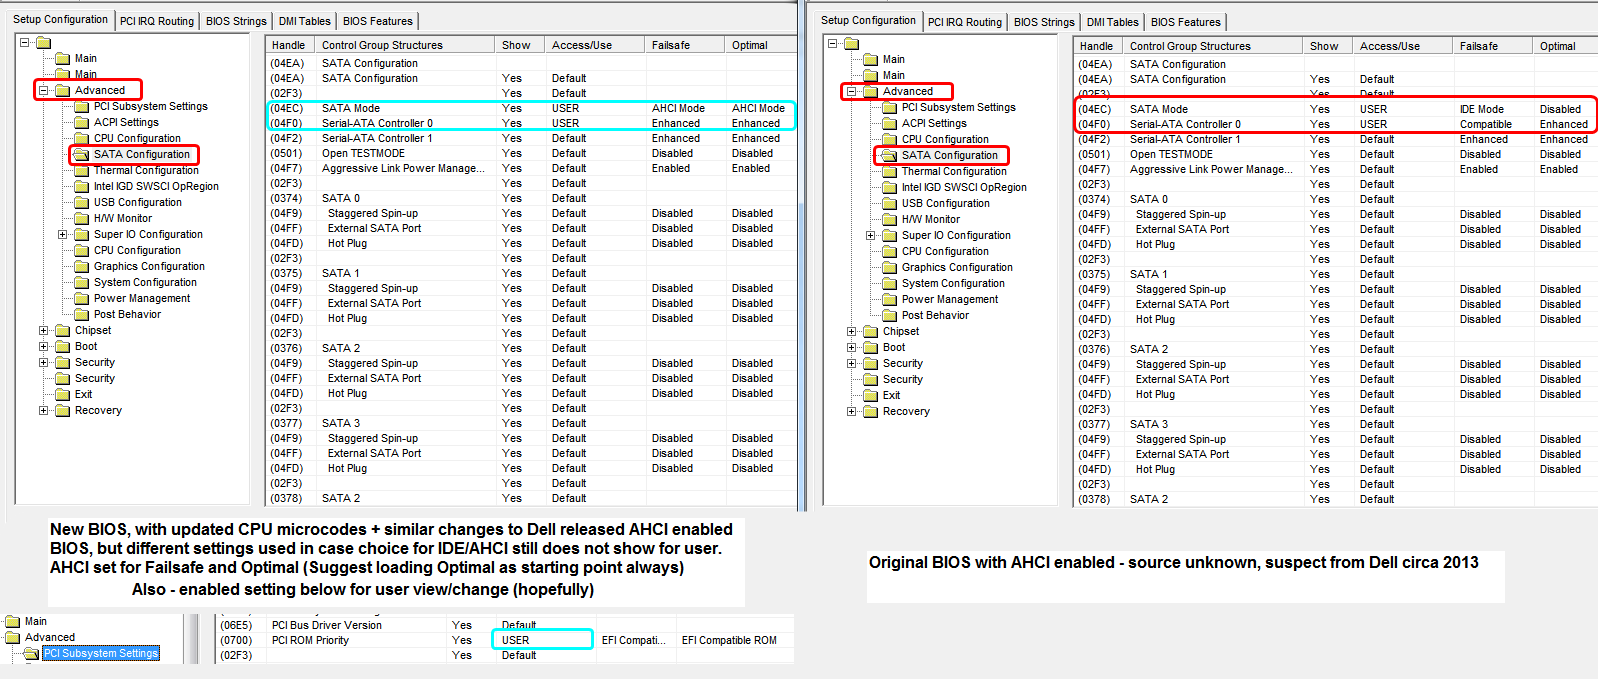
I see both BIOS have AHCI option, set to IDE by default though for optimal and fail safe, and it looks “enabled” for user to view and change.
However, I have read the thread at Dell about this and I know it’s not so unsure how that’s possible to be set visible to user and hidden at same time (Dell trickery!)
I’ll set that to AHCI by default, but would like to see that BIOS you originally linked first so I can see how they set to be on the safe side. I even tried disabling Malwarebytes and Eset, still page does not load to download, 403 ad 404 pages many different ways, even at main files.fm homepage, so please upload to the host I linked above. - never mind, was able to get via proxy
In normal BIOS, not Dell, I’d set the option itself to “User” view instead of default, but that may not be good for Dell BIOS since all setting is set “Default” instead of “User”, even ones I know you can adjust.
It would be nice to see some of these BIOS pages, what you actually see, and especially on some settings you can adjust, so I can check them out in setting program and see how they look in person vs what is set in BIOS programming.
—
Is the BIOS you linked in first post a “BIOS Dump”, like you made “Backup” from your already flashed BIOS? Or, is this direct BIOS posted by someone or on the Dell forum (I could never find good link recently, from Dell helpers when they posted this BIOS years back)
If this is a dump or backup, do you have the original BIOS you flashed with? If you do have it, please upload it and post link, thanks!
Settings in BIOS programming setup, most look same as the original official BIOS but one change, like posted above which you say AHCI Doesn’t work.
But in Hex edit 100’s of changes, missing bytes, added bytes, modified bytes, ect. where I’d expect to see only a few bytes changed reflecting the settings change I see in the programming setup.
That’s why I was thinking this is a backup or dump, looks like a lot of changes that usually only happen after a BIOS is flashed into a board.
—
I see they set to “User” instead of default, like I mentioned we’d normally do for all other non-Dell BIOS. Here is newly edited BIOS, with similar but not exact same AHCI changes set, and updated microcodes as noted above
Enabled User View/Adjust -
Advanced PCI Subsystem Settings >> PCI Rom Priority (EFI Compatible / Legacy)
Advanced SATA Configuration >> SATA Mode - Choice enabled IDE/AHCI - Default set AHCI For both “Failsafe” & “When Loading Optimal BIOS Settings” after flash (Suggested)
View Advanced CPU Configurations - Enabled
View Advanced Graphics Configuration - Enabled Multi-monitor
On the right side in this image, is the BIOS you linked in first post
http://s000.tinyupload.com/index.php?fil…896483348377267
Let me know how it works for you, thanks, if it’s good I’ll add to Dell’s thread about this so others can find in the future.
If it fails to load AHCI let me know, I’ll set exactly the same as the other BIOS. I think this way is better than how they did and should work, plus give you option to set IDE if needed for some reason later
Well, first off thank you for your help and time. The BIOS .bins are extracted from the RosaBuu BIOS Updating Utility that Dell packages the BIOS in. Which menus would you like to have pictures of, before flashing your provided BIOS, with a stock BIOS, or with the BIOS that I unlocked AHCI with?
—
The reason there are many changes in the BIOS that I have provided is because that I one by one unlocked every single option and menu in AMIBCP by setting it to USER. I also attempted to update CPU microcodes, and update the PXE boot Ethernet BIOS module.
@Lost_N_BIOS :
Welcome to the Win-RAID Forum and thanks for your input!
Off-topic remarks:
- If you want to add anything to a previously posted contribution, it is better to edit the previous post than to write and submit 4 separate posts one after the other regarding the same topic.
- Your inserted pictures are too big sized for this Forum and use too much space.
If you would have used the “Attach file” option of the Forum (look >here<), the inserted pictures would have been much smaller, but can be enlarged at any time by clicking onto them.
Dieter (alias Fernando)
Thanks for the welcome, and sorry about that @Fernando ! I did consider editing all into 1-2 posts, but was unsure if the char limit would then be reached, so went ahead and added few more posts. In the future I’ll keep editing same post when needed and possible.
I’ll fix the images now, sorry about that as well. I dislike attach file for images, because (in most forums) they are never placed where you want them in a post, but I see your forum addresses that issue ![]()
It would be cool if the images resized in place when clicked by user, pop-up blockers stop that new tab/window from image clicking every time and then you have to make several more clicks just to view an image.
I initially meant where did you get this BIOS, what forum or who gave etc, but not a big deal now. Same for the image request, I wasn’t sure if setting "User" instead of "Default" worked for these particular Dell BIOS because everything is set default already and yet some stuff is shown to you while other stuff set the same was not.
Once I was able to download the BIOS you posted in the first message, I could see you set "User" for several settings, thus letting me know "Default" was not showing you everything.
Thanks, I only noticed a few changes set to "User" maybe 5-6 or so that I mentioned above in the modification info and set the same. In hex I saw few chunks of "Inserted" byte regions and "missing" byte regions, and some modified regions as well (more than 20-100/200 lines of code in several places, some much larger).
The larger ones probably the Ethernet you changed around and microcodes you mentioned
Since you are familiar with AMIBCP really no need for my BIOS edits ![]() you can set all how you want with your copy of AMIBCP (I used 4.55.0070).
you can set all how you want with your copy of AMIBCP (I used 4.55.0070).
I updated the microcodes with combination of UBU and MMTool, in certain way due to MMTool always messed it up one way or another without UBU.
I’m sure you probably saw similar, it couldn’t see all microcode files, couldn’t add certain ones etc, if using MMTool before UBU.
So, I updated all microcodes with UBU, keeping all the old and modifying UBU batch file to update each one to latest but not adding Ivy code yet. Then save that file with UBU.
Now, back to MMTool you can then add/delete microcode properly. From there, I deleted all, and reinserted in order adding in the Ivy one this time around.
Let me know how that BIOS goes, thanks! If it doesn’t work, edit again and change those SATA Settings to match more similar to the ones you had set initially, but I can’t see how "Disabled" enabled AHCI mode? That’s why I set directly AHCI.
When you enabled "User" for that, did you see the setting in BIOS, but not before, and were you then able to choose IDE or AHCI like expected.
If you still need something updated you can’t figure out, maybe we can figure it out together.
I flashed the BIOS and it works fine with the Sandy Bridge chip, but with the Ivy Bridge chip I get no display output on integrated or discrete graphics, but when it boots I can see the computer on the network and remote into it.
Well that is a good sign about Ivy, being able to remote into the PC means it is running and not just stalled out on a debug code!
I am not knowledgeable enough to help more address the graphics issue, but surely someone could probably fix it since it is actually booting with the Ivy but only not giving a graphical output.
It may need some other BIOS module edited, or updated. If someone can tell you which might need updated, I can do that, but editing I would not be able to do without a guide showing what needed changed. If there was a guide I could do it, but need to know what needs done.
So if you can find some guide somewhere, maybe back when Ivy launched there was similar issues on some boards (Like coffee lake needs PCIE edits to BIOS today to run on certain board).
Hope someone else can help, or you can find more info or a guide about similar issues in the past, if you do post here and let me know I will help more.
Maybe this user @Mov_AX_0xDEAD can help here or via PM, since he made the PCIE fix for Coffee Lake, maybe he better suited to advise about this or show us what we might need to look at to try and address the graphic issue.
I suspect that the issue is that the VBIOS for Ivy Bridge chips is not there.
That could be the issue! How much do you know about vBIOS? I can look into it, I know I have updated (just newer version) before for other BIOS.
Do you know if we can I simply insert it, or replace SB with IVY one? Do you know where a similar BIOS would be, maybe same chipset, that has Ivy support? If you can link, I’ll look into it and see what I can see (in the meantime I’ll be looking myself too)
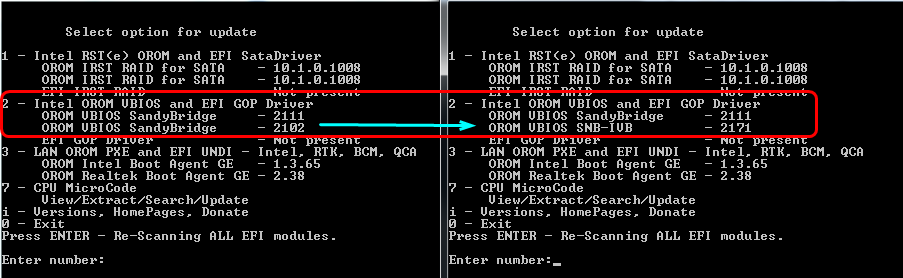
I found vBIOS latest for Ivy in UBU, and only a single file, so looks like it’s not chipset specific or anything, so maybe we can just insert? I’ll try a few ways to do that and see if BIOS comes out looking “OK” from what I can see without actually being able to test it.
* I found latest version (2171) is combined Sandy Bridge / Ivy! Now to figure out how to correctly insert
OK, here is new BIOS mod, I think should be working, at least has updated Ivy vBIOS now. The old sandy vBIOS is still there too, but new vBIOS is Sandy/Ivy combined.
If this still fails too, I will try once more, and see about removing the old Sandy and have the new Sandy/Ivy only but that might be a risky flash if it doesn’t work with either CPU for you (You’d need to recover BIOS via flash programmer)
ME 8 firmware is required for Ivy Bridge support aside from everything else (ucode, vbios, rst etc). It’s the bare minimum for the platform to even boot. You can open one FITC v7 instance with Dell’s SPI and another FITC v8 instance with the latest ME 8 1.5MB RGN and manually transfer settings (some will differ). Then use UEFITool to replace the old ME 7 region with the output from FITC v8 after adding padding to make them the same size.
Thank you @plutomaniac I will work on this later tonight and see if I can get it correct! Maybe we can be the first to get this working!
In the original Dell BIOS, the ME update included is outside the BIOS, separately updated by the exe. But it is also included in the BIOS?
So it may not need to be inserted into the BIOS, only updated with Dell’s Update ME tool included as part of the original BIOS exe download.
I’ll have to check it all out, at least since it is included I’d assume if I can’t make it flash with their tool, FPT can get it done probably
@flaggers - don’t flash the above linked BIOS, I’ll make a new one tonight with correct ME or give you updated ME to flash along with the above BIOS.
@plutomaniac - Do you think he can update ME to 8, before flashing an updated BIOS with the Ivy code?
Trying to think out what would be the correct, and or easier way to do that, since they (BIOS and ME) are separate and combined.
The .bin file you’re working with is a full SPI image if I remember properly so it can be used directly with FITC. You cannot upgrade from ME7 to ME8 via FWUpdate tool, it has to be done manually. Honestly, this might still not work as the BIOS source-compiled code should also need changes to work with IVB, something that only the OEM can do. It has been done in the past on platforms which supported such upgrade (mainly desktop, not mobile) but it usually worked because the OEM has already used a newer IVB-compatible BIOS source code but had not upgraded the ME, uCode, vBIOS, RST etc.
@plutomaniac Thanks! I assumed maybe it could be done via FWUpdate tool or FTP, because in the packed EXE from Dell is a separate ME FW and fwupdatelcl, and the same ME FW s also included in the BIOS.
So it looked to me like the FW may update itself, outside of whether or not the actual BIOS update applies the ME FW or not. And I assume as you said, that probably does not apply for V7 Upgrade >> To V8
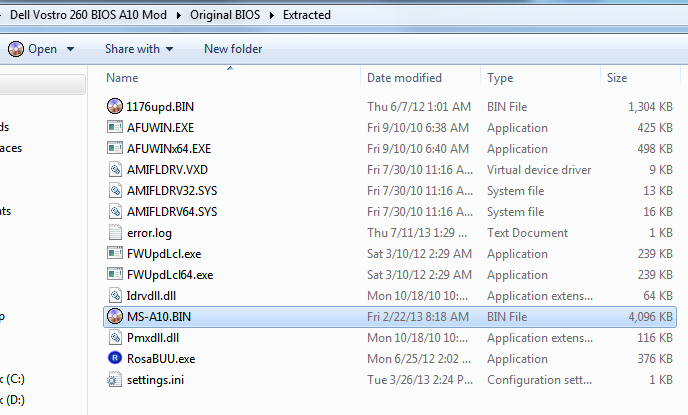
Here is an image of what’s included in the EXE if you wanted to take a quick glance, I assume you could extract and check if you wanted, so I didn’t upload files or anything - orig BIOS exe here https://downloads.dell.com/FOLDER01639275M/1/MS-A10.exe
The 1176upd.bin is the same ME included in the MS-A10 BIOS itself
I extracted the ME contained within the BIOS, and compared with the ME included in the EXE package. they are same versions, but are not the same
I assumed it might not work too, but enjoying trying when it seems there might be a chance. Not many people work on, or request, Dell BIOS usually either, so it’s always good challenge.
So far we’ve got upgraded vBIOS and microcodes, and before vBIOS or ME update even the system does appears to be booting into windows (checked via networking into running PC)
So there may be a good chance the vBIOS and ME will get it fully working. Fingers crossed 
*Edit - Progress! Thanks again for your help and guidance on this Plutomaniac! It’s not for me, I’m helping someone else, so I hope you don’t mind offering your thoughts for a little bit so we can both help him, and maybe make this magically happen! 
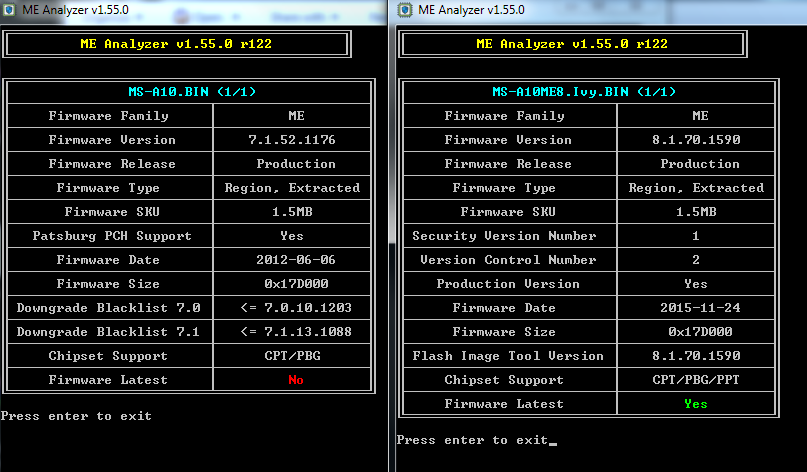
I went ahead with using the original BIOS bin itself as the source for v7, and latest v8 RGN download. Looks good after mod, opens in all apps properly.
But I do see a few things missing when compared with MEA, does it look OK? No “Blacklist x2” and no “Patsburg PCH Support” shown in modified BIOS MEA
These are the issues I came across while copying over settings from v7 to v8 - no errors when building outimage
1. In “Component section” - Flash Component 2 Density (greyed out, locked at 8MB, original 2MB)
a. I was able to set flash Component 1 density to correct 4MB - Does this mean I need to use the new “Descriptor” that is built too - or leave original in BIOS?
2. In “Upper Map” - unable to change VSCC Table Length (original BIOS 0x0E - in ME v8 greyed out at 0x04)
3. In "VSCC Table’ - Unable to added 7x entries to match original (due to cannot add VSCC Register Value to any of the entries, even when creating new table entry)
On these, I see these are flash chips, many noted in the original descriptor, so I assumed not being able to properly add these, I should probably leave old original descriptor in place.
Is that OK, and correct thing to do? Does this cause any issue with issue 1 above?
I mean, does that #1 component section flash setting get put into the newly built descriptor, and if yes and I do not use that descriptor, will the old descriptor with different settings for that section matter in regards to using v8 ME
I’m wondering after looking at the guide, about XMP compare etc, is it possible to make the above issues go away by editing the XMP and making the changes I want so they wont be greyed out and add the VSCC register values too after adding in the table entries?
Well, did that, and the values still do not show up in FITC8 - and I see this only applies if I make and use a new FD, is this required or will the old FD left as is be OK?
@Flagers - Waiting for feedback on above thoughts, but I have final package ready now. Hopefully this will be the one! 

I can easily and quickly make any needed changes regarding the ME reset/copy over, but wanted to be sure on that before uploading another package

I know for the Thinkpad T420 BIOS they were not able to correctly add Ivy Bridge support. Something with the BIOS needing to be able to select correct VBIOS on boot depending on which CPU is used.
The differences in MEA are to be expected since ME 7 and ME 8 are different firmware generations. For example the Blacklist was the predecessor of VCN/SVN/PV and so on. File 1176upd.bin is an UPD image, for FWUpdate only, which is useless. The 6/7-series FD is pretty much the same with some slight changes but you should still generate a new one via FITC v8.
1. It’s grayed out because 1 SPI was selected so that setting does not apply and does not need to be altered.
2. The Upper Map is automatically adjusted based on the changes at the VSCC entries.
3. The VSCC Register Value is not used at FITC v8 so you can ignore it and manually add all 7 entries. The first two are already there and their SPI names don’t matter as they’re not stored anywhere in the FD.
XMP has to do with RAM, not VSCC. The latter is used for the ME to properly communicate with the SPI flash controller. Check 2 & 3 above to set it properly.
I opened “MS-A10.bin” in a FITC v7 instance. At the clean/default FITC v8 instance I added “8.1.70.1590_1.5MB_PRD_RGN.bin” at ME, “BIOS Region.bin” at BIOS, disabled GbE & PDR and then manually adjusted Flash Descriptor and ME settings based on “MS-A10.bin” SPI image. Attached is the final “MS-A10_ME8.bin” SPI image which is the stock from Dell but upgraded to ME 8 firmware. The BIOS region is untouched and will require changes for IVB compliance. The CPU microcode & RST are easy. For vBIOS you must use BMP tool via this guide.
Once again, I have to emphasize that this might not end up working after all due to older BIOS source code. You need to flash the entire 4MB SPI image and remove all AC power for at least 1 minute afterwards to maybe kick-start the system.
MS-A10_ME8.rar (2.69 MB)
@bankkopf - Thanks for the info. Who is “they”? Do you mean someone here, if so where is the thread?
I looked at your posts and couldn’t see anything related. If it’s another forum, send me link in PM, thanks. Just want to read and see what all was done, attempted, discussed etc
I’ve been thinking about that, since now Sandy and Ivy are one vBIOS file and when I added the SNB/IVB it kept the SNB too.
I wondered if I could/should try to remove the single Sandy entry and only have the Sandy/Ivy one.
If it was me, since I have proper recovery tools and skills I could test myself easy, but I hate to send out BIOS like that when I’d be really unsure of how that would act with his Sandy CPU.
If it failed with only that Sandy/Ivy he wouldn’t be able to recover easily without knowledge in advance and tools to do that.
@plutomaniac , sorry about that XMP, I meant editing the XML manually. Thanks for your time editing that ME!
I had never done it before, and after a few tries I think I have it correct now, but will use yours in the new BIOS I will create.
I will redo myself too, so I can compare and verify if I’m getting it right yet
I already know how to add the microcodes, and have already edited and transferred in a vBIOS too. So I think we’ll have this all covered now.
I sent you my final edit from tonight, but probably ME not 100% correct due to me not using FD and those VSCC settings messing with me a little too.
I’ll use your ME and FD, the rest I’ve done 100’s of times properly, except for vBIOS edit/insert (I edited following guide, used UBU to insert). RST needs updated too for Ivy, required or just “We should”?