Hi, just joined. I’m trying to update an older machine to NVME boot utilizing an extra Samsung 960 evo M.2 via a PCI express adaptor. It works fine for storage with awesome read/write speeds but although I can install windows it will not boot.
I am currently running Gigabytes U1j beta BIOS for UEFI support. BIOS ID 8A11AG0B, it’s dated 03/06/2013.
I even cloned a SATA install, that worked great at first, but only booted a few times (Possibly just once…) and failed, not sure why.
Any help given would be greatly appreciated, you are doing an awesome thing here!
Thanks to all!
You need mod BIOS to boot from NVME, that is why your attempts are failing, and you can’t clone previous OS from SSD to NVME without doing things in a certain way (must be converted to GPT initilized disk etc)
Here’s a few ways to clone if you wanted, but I do suggest a clean install
Installing Clean Win7x64 on M2.2280 PCIe Gen3x4 SSD A-DATA SX8200 Pro << My way, will work for Win7 or Win10 (if cloning Win10- start at step #4, skip #5)
[Guide] How to get full NVMe support for all Systems with an AMI UEFI BIOS (330)
[Guide] How to migrate Windows 7 64bit boot drive from MBR SATA to UEFI NVMe without data lose
Once you install NVME mod BIOS, if not cloning drive and doing clean OS install as suggested, you need to follow at steps at #4 exactly in the “This is what you should do” section of this guide
[Guide] How to get full NVMe support for all Systems with an AMI UEFI BIOS
Here, flash via Qflash (Suggested) or FLASHEFI
http://s000.tinyupload.com/index.php?fil…169931245446666
Thank you!!! Modded BIOS in like a minute and the cloned OS I already had on the NVME drive booted on the very first try!
It’s truly awesome when more knowledgeable people freely and kindly share their expertise, thanks again!!!
@ktmaniac - You’re welcome  And thank you for the quick test and report back!!
Hi Im hoping you could help me I have a somewhat similar board and wanted to mod as well Gigabyte Z68XP-UD3R to support nvme im not able to open up the bios using mmtool how were you able to open the bios file?
@kryan.supan : Welcome to the Win-RAID Forum!
To whom is your request addressed? This thread is about the GA-Z68XP-UD3. Your mainboard is the UD3R model and needs another BIOS.
As you can see here, it is no problem to open the latest BIOS for your specific mainboard by using the AMI Aptio IV MMTool v4.50.0.23:
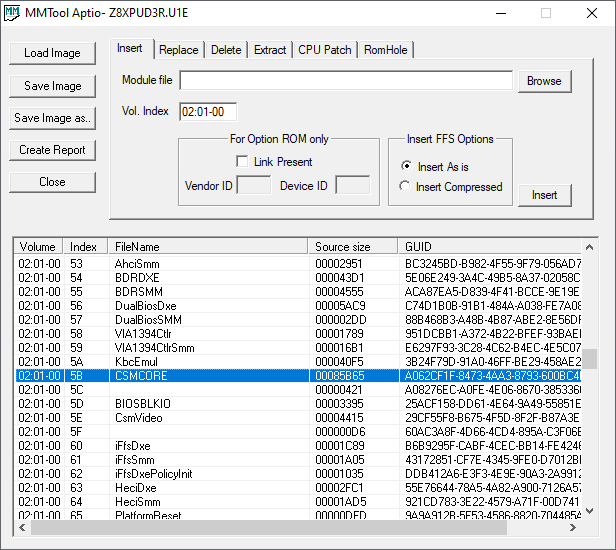
Tip: When you are going to open the BIOS, you should choose the option "All Files (.)" from the drop-down menu of the "File type" box.
If you want to insert the NVMe module into the BIOS yourself (it is very easy), you should follow >this< guide. If the BIOS modification should be done by someone else, I recommend to start a new request thread within >this< Sub-Forum.
Good luck!
Dieter (alias Fernando)
Hi.
Sorry for reviving this old post, but I am unable to create a thread.
Can you please provide me with a modded BIOS for the Rev. 1.3?
I have two Gigabyte GA-Z68XP-UD3, but one is Rev. 1.0 and the other Rev. 1.3.
I believe that the BIOS you posted here won’t work for both, correct?
Thanks in advance.
You who? use @username for a user notification.
Both bios are identical 1.0 or 1.3
Be warned that these board uses a very earlier UEFI bios, transitions bioses, so called Hybrid bios, it has been occasionally reported some instability when modding it.
EDIT:
If you say so…
No…why would? The support for PCIe3.0 was add later on both revisions, by the Ivy Bridge introduction, the initial 2nd Gen Sandy Bridge only had PCIe2.0 support.
Hi.
They are similar, but not the same.
If I install the Rev. 1.0 BIOS, won’t the motherboard lose PCI-E 3.0?
I think it’s the most important feature of the newer revision.
You could try this: Z68XPUD3Mod.rar (2.8 MB)
Resizable bar is possible too with this.
Seriously? Resizable bar is great!
I currently have 32 GB of RAM.
Should I update to this BIOS version using an USB stick (MS DOS) or @BIOS is fine?
qflash only, but DWYOR. Report to me if it bricked your bios, surely you know how to kick in duual bios right?
or before you flash the bios, while your pc is off, press and hold power + reset button for 11 seconds, it would power on like booting for quick and it would turn off, and after 11 seconds passed power on the device like normal, you would see “Main bios is corrupted” msg which means the backup bios is going to copy its contents to your main bios. If you feel your backup bios isn’t updated yet, then you could manually update it with Alt + F10 while powering your pc.
if you already take some countermeasure with bios flashing failure, then flashing the provided bios should be okay, since you backed everything uup.
I managed to update the BIOS through Q-Flash successfully!
Under boot devices, a new one called “PATA SS” showed up, so I think it is working.
I suppose the BIOS you provided me with is for the Rev. 1.3, since the PCI-E is still running @ 3.0 speeds.
I just had a minor issue, which was a pop-up about the case being opened flashing on the screen, and I had to restart. No issues since then. I had to adjust the CPU clock, disable HPET and set the SATA controller mode to Raid, but I didn’t lose the Raid array.
Now I will try to clone the OS (Windows 11) from the Raid 0 array to the NVMe SSD (Lexar NM620 1 TB). If it does not work, I will unfortunately have to format the whole thing again. Hopefully, for the last time.
1 Like
Yup. Everything is working great!
https://i.imgur.com/EpUzMmu.jpg
https://i.imgur.com/ULydPKr.jpg
1 Like
For enabling Above 4G Decoding, you need to set CSM Support as off, then enable above 4G Decoding in System > Invisible Settings below “Ata Port Information”, and there should be Above 4G Decoding toggle enable it. Above 4G should be usable as long as csm support is disabled.
To enable Rebar, run this app as admin, set it to 13 (2^13 = 8192 = 8GiB) since you use 32GiB of ram you could only allocate to max of 8GiB or else it wont work (due to limitations), reboot and Rebar is enabled.
How to make sure rebar is actually applied? Go to Device Manager > View > Resource By Type and see if your gpu is inside Large Memory.
Then go to GPU-Z > Advanced > Vulkan > and see the Memory part, where “Device Local, Host Visible” is the same size as your applied bar size, or near to it (like 8192MiB and bar size on vulkan is 8038MiB).
Hi.
Sorry, what is 4G Decoding necessary for?
About Resizable Bar, I think it is great, but my graphics card (GTX 1080) is not compatible with the feature, as far as I know. GPU-Z also states that is is not supported.
Above 4g decoding is necesarry for rebar.
Its fine, i’ll leave that to you, who knows you’ll upgrade to amd rdna or nvidia rtx 3000 and wants to use rebar
If my GTX 1080 ever dies, I think that’s something neat to consider! Thanks.
By the way, I have two similar setups (same motherboard, different revision), but the other one has an i7-2700K instead of an i7-3770.
The Sandy Bridge/Ivy Bridge generation was so mind-bending that I never considered upgrading since them. The only game I was unable to run properly is Call of Duty: Modern Warfare 2, but even so I just played the game over a weekend because it was free, and not because I particularly wanted to or bought it.
If I ever enable Resizable Bar I will let you know here, so anyone else in the future will able to find the report.
1 Like
Hi, Koekieezz.
Thanks you for this BIOS. I did the upgrade back in day and flashed, but went back to the original. I used a PCIe are and it would cut my x16 lane in half if I used it, so I changed my mind.
Now I found out about the rebar mod and this page came up again on my search and I noticed you did the mod and linked the file.
My problem is I need access to my bios to set XMP profile. Can’t get TouchBIOS to install anymore. But when I use your BIOS file and try to access BIOS, it just blue screens with no error. Just a blue screen…
Do you know is there a BIOS option I have to change? Thanks!
Try to revert to original uefibios, using the official package, then after you went with original U1j bios, flash this: Z68XPUD3-Rbar.rar (3.9 MB)
If bios original to bios mod flash succeed (using original bios q-flash), boot up to windows, go to the bios mod folder, run cmd as admin, then type cd /d (your path to the bios mod folder), and type fwupd -allowsv -f me.bin and enter, let the process finish, and reboot system. If it booted successfully, you’re good to go to set xmp, above 4g decoding, etc.
The difference between the old file is that this one have the addition of NvStrapsRebar, which is nvidia rebar for GTX16/RTX2000 series, use this to activate rebar for those cards and do not use it together with the original RebarState.exe, cause they’re both separate modules.