I’m trying to patch my bios with the latest Spectre patched microcode since Dell no longer supports my laptop. I have an AMI Aptio IV bios, but MTool will only show the first microcode in my bios. Every version of UEFITool I’ve tried either has the FIT tab grayed out or missing entirely. I tried using the UEFI BIOS Updater, but because of the issues with MMTool it didn’t work. Well it did patch the BIOS but it seemed to replace all of the microcodes with the one I want to upgrade to.
It did however turn me on to plutomaniac’s Microcode Extractor Tool. It was able to see all of the microcodes in my original BIOS file and gave me accurate addresses for them. I used Phoenix48’s guide here to get an idea of how to manually edit the bios in a hex editor. I know it is for a different type of bios, but it seemed the principles should work.
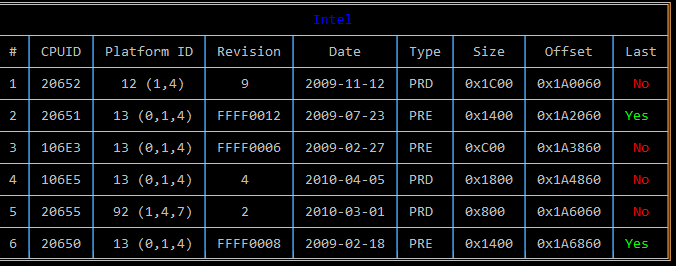
The new microcode is longer than the original microcode for my CPUID 20655. The next CPUID after it is 20650 which I have no use for. I decided to zero out the 20650 block in the hex editor and then pasted in the new longer 20655 microcode at the same starting address of 0x1A6060 as the out of date code. I am however wondering if I should have used FF instead of 00 to delete 20650? It looks like the space right after is using FF as the filler.
This appeared to work and MC Extractor now shows the updated microcode and 5 CPUIDs instead of 6.
This is the original BIOS from Dell
This is the newest microcode.
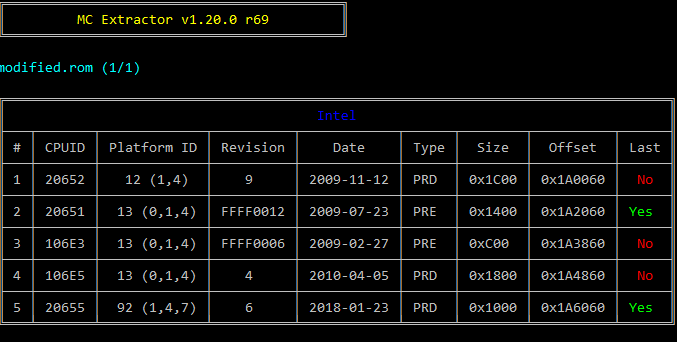
This is the rom I’ve modified.
Does the work I did look correct? Will this work if I flash it? I do have a hardware flasher if I have to manually recover, but I’d really rather avoid going through process of de-soldering the chip if I can. (I’ve already been there and done that on a previously failed attempt)
Lastly are there any tips I need to be aware of to flash this? Last time I used AFUDOS to flash the modified rom. Is that still the best way to go? If so what command combination should I use?
Thank you to all of the people who have helped me get this far, and thank you in advance for any additional assistance.
There is ways around the issues you mentioned, with UBU replacing everything into one single. For that you can edit the batch file, and put in the codes you want into the UBU microcode update folder in correct place.
MMTool error, may be wrong version, there are many and only some work with some BIOS. I will have to look. FF or 00 should be OK for microcode filler
You don’t have to desolder, you can get jumper cable for your flash programmer, they are cheap, like this for example
https://www.ebay.com/itm/263708580560
AFU or Intel Flash Programming Tool (FPT) would be good to use.
AFU use /p /b /k
If using FPT don’t forget -savemac unless you already know how to put back your MAC Address
I am leaving right now, so can’t check your files tonight, but will as soon as I can, hopefully you can wait so no extra soldering is needed 
If you can open the file in UEFITool, rebuild all the sections you modified, at least the GUID that contains the microcodes.
You can get that specific GUID with UBU, when it does the scan at first it will show you microcode GUID before giving the options
I don’t think the version of MMTool is the problem. I’ve tried all of the ones compatible with Aptio IV and tried the modified version of 5.02. Someone who is helping me on another forum said MMTool doesn’t support microcode volumes with alignment and that’s why it can’t find them.
When I run UBU I only see two GUIDs. One for VBIOS and one for OROM. Is it supposed to have microcodes listed as an option there?
@woowoo :
Welcome to the Win-RAID Forum!
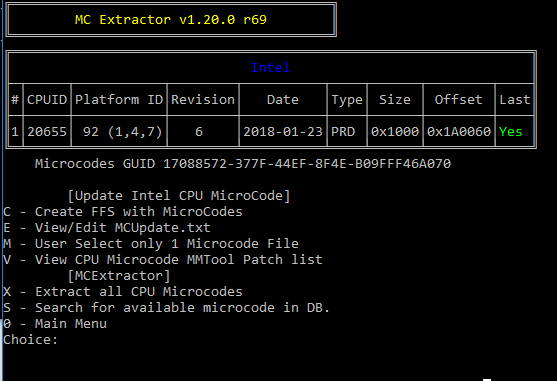
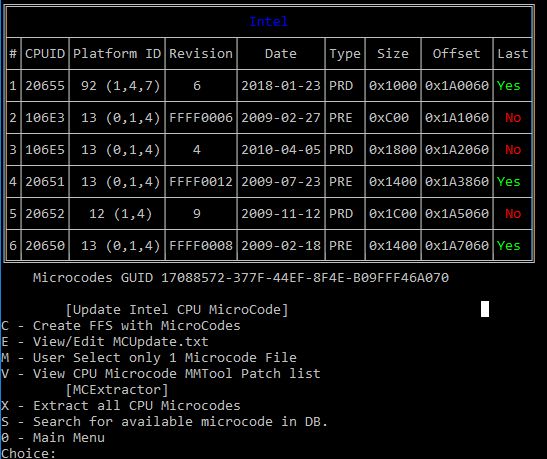
As you see here, the Main Menu of the UBU tool doesn’t show the CPU Microcodes, which are within the BIOS:
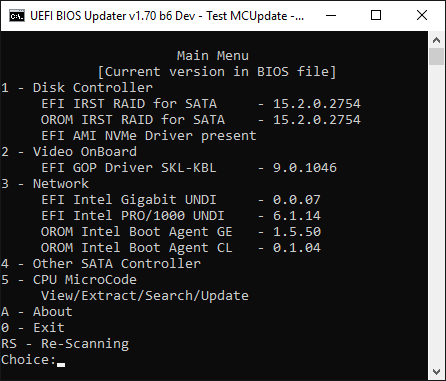
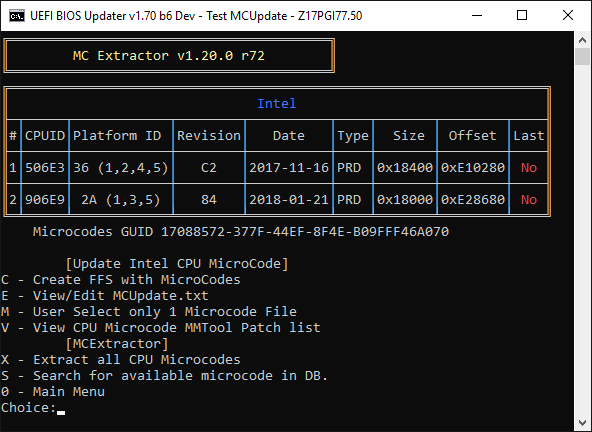
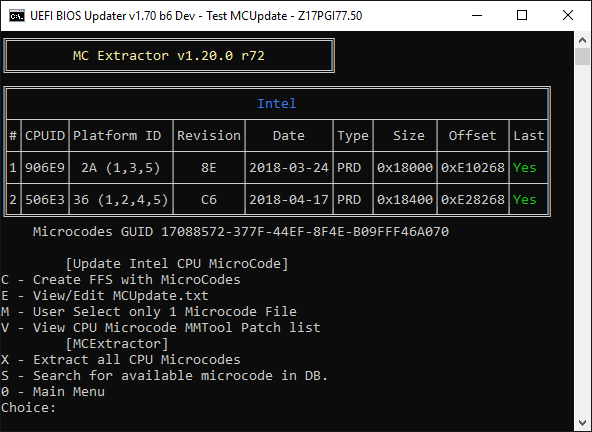
If you want to see the CPU Microcodes, you have to choose the update option 5 of the Main Menu (left picture: before the update, right picture: after the update)
Regards
Dieter (alias Fernando)
Hi Fernando. Thank you for hosting such a great resource and following up.
UBU is actually what turned me on to MCE tool. I was able to select that option to see my microcodes. However when I let UBU make the update to my microcode it deleted all of the other codes except the one I was updating to and moved the address.
This is how it looks before the update:
This is what it looks like when I let UBU make the update. See how there is only one microcode listed now and it is at the wrong address?
This is what it looks like when I manually update it with a hex editor:
Okay I see what you are talking about now. I had originally only edited the MCUpdate.txt to include the microcode I wanted to add. I didn’t realize it had to have all of them in there. I extracted all of the microcodes and then added them to the mCode folder and updated the MCUpdate.txt file. Now it shows all of them there along with the update for my processor (didn’t bother finding updates for the others). However it moved all of the addresses. I’m assuming that’s what you mean by checking in this step.
However I’m not really sure what that means, or how to do that. Are there any tutorials on that step, or any tips you can provide?
I tried flashing both the file I hex edited and the one UBU did for me. Both are giving me the ROMID is incompatible with existing BIOS ROMID error. Is there something else I need to do? Should I Tell AFUDOS to skip that check, or use another program?
Here is the file UBU created
@woowoo :
Please read the start post of >this< thread. There you will find tips about how to flash a modded AMI UEFI BIOS.
I see the section about flashing modded AMI Aptio IV bios, but I don’t see the options to modify it in UBU. When I try UEFITool directly, I don’t get the options in the guide. Mine says "Intel image" and not "AMI Aptio Capsule". None of the areas I right click on give me the option to "Extract body".
If you are getting ROM ID error, exactly, then something is wrong. Modified BIOS should maybe give integrity or security check fail, so you need to work around that, but usually if ROM ID or board ID error then BIOS is not done correctly, stop there and make new mod.
It does not always mean this, could be OK but I would not force a flash until you’ve tried several BIOS and see this as normal for your board or BIOS to react with modified files.
This is the guide for flashing you want to use for for general/generic AMI BIOS, other thread was more about mainstream brands and how to work around their security stops - [Guide] Flashing modified AMI Aptio UEFI using AFU
You may need ES versions of AFU with /GAN option enabled, send me PM if you want my copies to try and can’t find them, I have 3 versions (3.06.01, 2.29 and 2.36)
Intel Flash Programming Tool (FPT) is another option. You can find that here in the “System Tools” section -Intel Management Engine: Drivers, Firmware & System Tools
You want one of these two, not sure which is best for your setup (Your ME is 6.1.10.1052)
Intel ME System Tools v6 IBX r2 - (2018-02-09)
For 5/34xx-series systems which come with ME 1.5MB, 5MB DT, 5MB MB, Ignition IBX v6
•Intel ME System Tools v6 CCK r1 - (2018-01-25)
For 89xx-series systems which come with ME Ignition CCK v6.0.50
If using FPT, always use the -savemac switch
When you open BIOS in EUFITool you have to expand where it says “Intel Image” (Capsule already removed if you see Intel Image, probably by UBU). I mentioned start UBU, when it opens, before you press anything you see a bunch of rom ID’s and GUID. You have to press 7 or 5 depending on UBU version, then when it shows you all the microcodes it will show you GUID Location (Sometimes it shows first, depending on BIOS)
You want to write down the GUID is says CPU Microcodes are located at GUID- xxxx.
Once you’ve done your modifications, open file in EUFITool and then take that GUID and go file search at the top, GUID tab and put in that GUID.
Then at bottom area it will say GUID Found at xxx as xxx ect double click that and it will open in top area. Right click that entire GUID, if it opened to something sub/below the GUID, and select rebuild, then at top click save file as and give new name.
That’s rebuilt the place you modified now and it’s ready to flash.
What I meant you got right, about making UBU insert all the microcodes you want via putting in more codes in folder then editing batch file to their correct locations. If that’s what you did? Sounds like you did correct
This way is better, no hex editing and zero/FF fill etc.
It will be easier for me to do the mod, then explain steps in detail, do you mind that or do you want me to write out steps I do for this mod? I can, but it’s quicker to do it than explain.
Sorry for the delay, been helping in many threads this week. I will look at the original BIOS in few minutes tonight and mod myself, then tell you how/what I did, that way you have both method and modified BIOS to use to compare if you want or to flash in.
* Edit *
Dell Inspiron N5010 BIOS A15 Mar 5 2014 BIOS Mod - the long way.
Short way described above with UBU, editing UBU batch file, adding new ucodes and old to UBU folder, update, rebuild in UEFITool (May not be necessary after UBU, unsure with Dell).
UBU may also need older version MMTool in folder. I see UBU does not have anything for BGA1288 socket, not sure if this method would work at all even if selecting single ucode update, and may be why you had error of only single update
I see same, but it’s not valid, gives error if you attempt etc, this may be cause of your ROM ID Issue, not sure.
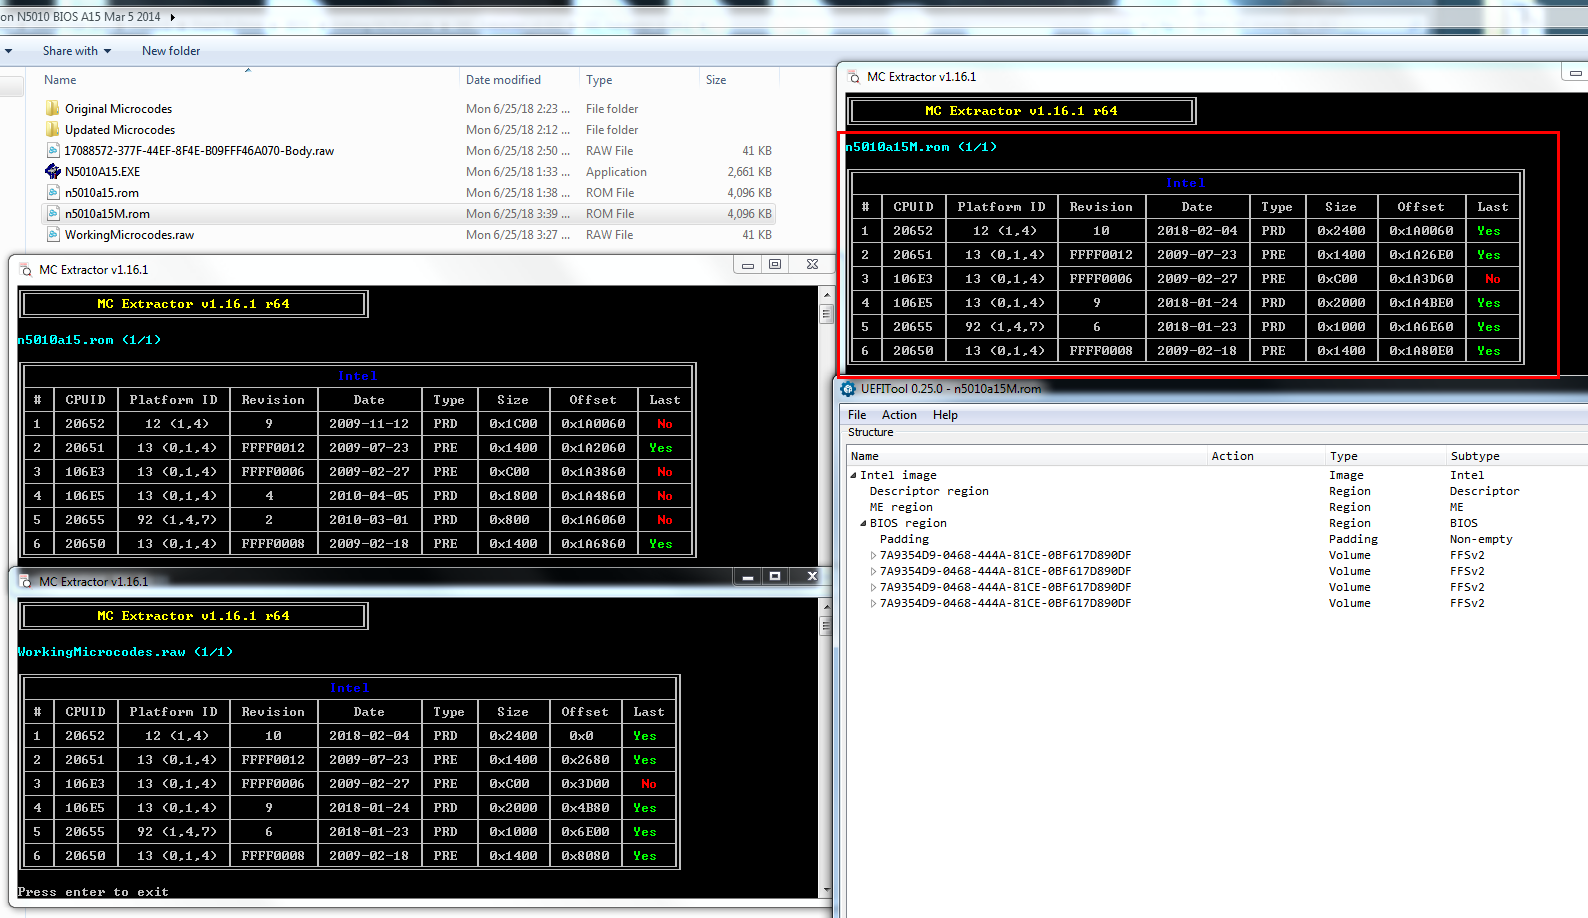
1. Downloaded A15 BIOS from - http://www.dell.com/support/home/us/en/0…l-n5010/drivers
2. Extracted via N5010A15.EXE /writeromfile
3. Check original microcodes with MCE
4. Grab the two already up to date codes (20650/20651), compile new folder w/ updated remainng microcodes
5. Download remaining microcode (except 106E3, leaving as is, since it’s pre-production) (/106E5/20652/20655) updates at Plutomaniac’s github repository - https://github.com/platomav/CPUMicrocodes/tree/master/Intel
6. Open any extracted old microcode from MCE extracted folder, with hex editor. Copy first line of hex
7. Open BIOS file w/ UEFITool (0.25 used), search the above hex string to find GUID that contains microcodes
8. Double click bottom message area in UEFITool where is says search data found - GUID 17088572-377F-44EF-8F4E-B09FFF46A070
9. Right click that GUID and extract “Body” - this is all the microcodes, this we hex edit in new microcodes.
10. Do hex dance! I use Hex Editor Neo - search each old via open old in hex select all, search GUID File via “find all”, copy paste replace with new. They will be in order MCE Shown
10-a. Or, what I did for easier working process. Create all new file from scratch compiling all microcodes into file, less or = to original file length 0000a06f (40 lines of FF (64 per line) / 1280 FF’s or 640 two digit bytes FF’s) between each microcode is plenty, fill ending remainder with FF.
Keep exact overall size, double check end digit is same in hex after creation/mod/edit/save etc
11. Re-insert via UEFITool at GUID of extraction, inserting same as extracted via “Replace Body” - GUID 17088572-377F-44EF-8F4E-B09FFF46A070
12. Rebuild will be shown after you re-insert, this is what I mean about “rebuilding” with UEFITool. Shown in image below #14
13. Save image w/ modified name, verify opens in as many BIOS editing tools as you can, then it’s done
14. success, hopefully! flash per proper method to flash modified BIOS to your board, or program if have flash programmer.

You can simply open your already modified file, and find this GUID and "rebuild" via right click, this is what you edited already in Hex.
Remove/replace will not be shown if you are "Rebuilding only"
Workflow, images as I go, finished.
BIOS attached!
If you want to update yourself, using this method or similar, and remove some old code, to insert another new larger single code leaving the rest as it, that’s fine too.
I suggest doing this way, for your single code update too, but remove whatever one you want to make room and FF out that entire code, then insert your updated one in it’s place (Anywhere not microcode FF).
There is plenty of empty FF space between each code already, so you may be able to fit without removal of any other codes, but you might have to dance around
It’s probably OK for you to use the files you already have, except you should rebuild via UEFITool as outlined above. Unless! If you do rebuild and still get the ID error again, something is wrong, do not attempt to use file any more!
I will check your files now and see if anything looks off to me, but as I mentioned that ROM ID error does not sound good or correct, I would not flash any BIOS if I saw that without a CH341A flash programmer to recover if things go wrong.
Security or Integrity check stop or error OK, flash with know methods around that for modified BIOS, but ROM ID Check error when you know your not trying to cross-flash the wrong BIOS means stop something is not right.
I will also look into if UBU batch files can be modified to work for this CPU socket or not, I didn’t realize until now that this is BGA1288 socket, so anything I said in regards to UBU is invalid for now!
* Edit, I tried, and cannot edit batch files in a way that properly views or recognizes this boards CPUIDs etc. That would have to be done by @SoniX
Best to do manually for now as you had been, and toss any files made with UBU because as it is that single microcode update it shows is not valid for this BIOS/Board/CPU Socket.
Looking over your Mod BIOS now - Looks OK in everything I can open it in, AMIBCP, MCE, UBU, UEFITool, MMTool, EZH20, so it just may be how this board or BIOS acts when trying to flash modified BIOS and another flash method is required.
It’s hard to know for sure, if you get the same error when trying to flash mine, that’s probably what it is, and you’ll need to try flashing another method.
I’d go ahead and pickup a I’d go ahead and pickup a CH341A flash programmer, they’re cheap usually only $2.50-$4
https://www.ebay.com/itm/263458010112 - Choose “Blue” model, and if $$ is no issue, get black one below too, it’s cheaper than ordering same one from this seller. Or get both from same seller, add blue to cart, go back and add black from same seller, then checkout.
https://www.ebay.com/itm/223021931206
I suggest both types, because often people have issue with one or the other in various situations, and they’re so cheap everyone might as well get both.
If your BIOS is soldered to the board, grab one of these too
https://www.ebay.com/itm/263708580560
BIOS attached is confirmed working, for anyone reading in the future, thanks to @woowoo for confirmation 
Dell Inspiron N5010 BIOS A15-MOD.zip (1.81 MB)
@Lost_N_BIOS you are amazing! Thank you for the incredibly detailed breakdown of all of the steps. I had painfully gotten most of the way there, but you painlessly filled everything else in. I really appreciate it.
I tried your BIOS and got the same “ROM file ROMID is not compatible with existing BIOS ROMID” error as I did with mine. I think this computer is just persnickety like that. I ended up flashing with AFUDOS with /GAN support and that did the trick. The BIOS I modified with the single microcode worked, and so did your extensively updated file.
As for editing UBU to find all of the microcodes, you don’t actually have to edit the batch file. Just UBU\Files\intel\mCode\MCUpdate.txt file. I added all of my microcodes in the root directory of mCode and then edited the txt file to include them in the bottom. I could have put them in a folder, but I’m lazy.
This is what the bottom of my MCUPdate.txt looks like:
#LGA1155
306A9 1155\cpu306A9_plat12_ver0000001F_2018-02-07_PRD_3023E347.bin
206A7 1155\cpu206A7_plat12_ver0000002D_2018-02-07_PRD_1BDB79EA.bin
#Laptop
20655 cpu20655_plat92_ver00000006_2018-01-23_PRD_74A55BFF.bin
106E3 cpu106E3_plat13_verFFFF0006_2009-02-27_PRE_79E1C091.bin
106E5 cpu106E5_plat13_ver00000004_2010-04-05_PRD_F7762473.bin
20651 cpu20651_plat13_verFFFF0012_2009-07-23_PRE_7D62F211.bin
20652 cpu20652_plat12_ver00000009_2009-11-12_PRD_E580B1FE.bin
20650 cpu20650_plat13_verFFFF0008_2009-02-18_PRE_41248CB2.bin
Once that adjustment is made UBU can find the specific files for my BIOS without any issue. Note all of my files are old except for the one for my processor, because again, lazy.
I do have a CH341A programmer, that’s why I said to heck with it and flashed with the /GAN command. I don’t have a test clip because I have soldering equipment to remove the chip and put it back, it’s just kind of annoying vs something socketed. If I brick it again I may get one of the cable adapters you linked, or I may just order a socket for it and solder that in instead. The cable is probably the better/easier solution.
All in all, this has been very frustrating and fun. Thank you for all of the help in teaching me how to make this work. Spectre is now showing as protected in InSpectre, so mission accomplished!
You’re welcome! I may take the long way around sometimes, or the harder way sometimes if I’m used to a certain way of doing it, so my method may not always be same as others mention.
Good /GAN got the BIOS flashed for you! And it’s good info to know sometimes boards may give ROM ID error when it’s really blocking modified BIOS, this is first I’ve seen that, it’s usually security or integrity error.
See, the reason I stopped, and then went ahead and tried modding UBU is because your board is not any of the standard sockets it normally checks for. You’re board is not 1155, correct?
When I looked up the microcodes, 2-3 of them, I found all BGA1288 socketed chips, so I assumed that’s what this was. It didn’t even occur to me that it could also be another regular desktop socket, or I could have modified UBU my usual way and sent method on that too.
I was probably tired is why I didn’t notice, spent probably half an hour w/ editing attempts, if it’s not socket 1288 that may be why those failed too
I know what you mean, soldering is a hassle sometimes, especially if you have to get everything out and setup each time. I’d get a cable, for future uses, and a socket to solder on there too!
I still can’t believe about my UBU kerfuffle! 
You’re welcome again, and thanks to you for letting me know my BIOS edit is working also, I’ll make note of it in this thread on the link and in my BIOS folder in case asked for it in the future!
It’s actually a 988 chip. Or more specifically PGA988A. I think it’s the same as BGA1288 but with pins and a typical socket instead of a ball grid array, but don’t quote me on that.
I was close at least! I’m surprised UBU handled throwing that at it like you did, I didn’t even think to leave it labeled at a mainstream socket like 1155, was trying to figure out how to add in mobile instead
I think the # comments out whatever is after it. So UBU doesn’t really see them by the type of socket. It is just using that .txt file as an index of the microcode it needs based on the CPUIDs it has loaded. I think the folders are just to make it easier to organize and find specific files. I’m pretty sure you could put all of them together in the root directory and edit the text file to delete the sub folders and it would work the same.
You’re probably right, I’ll have to check that out and see what happens, thanks!