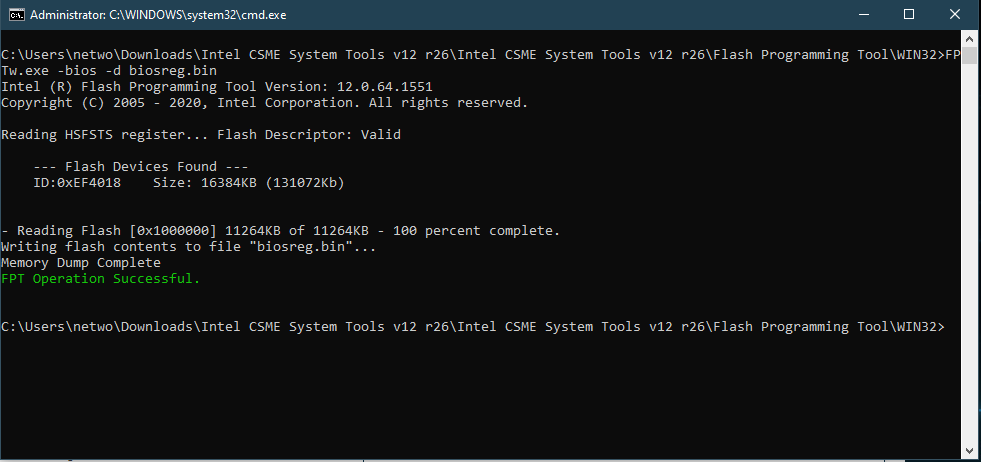
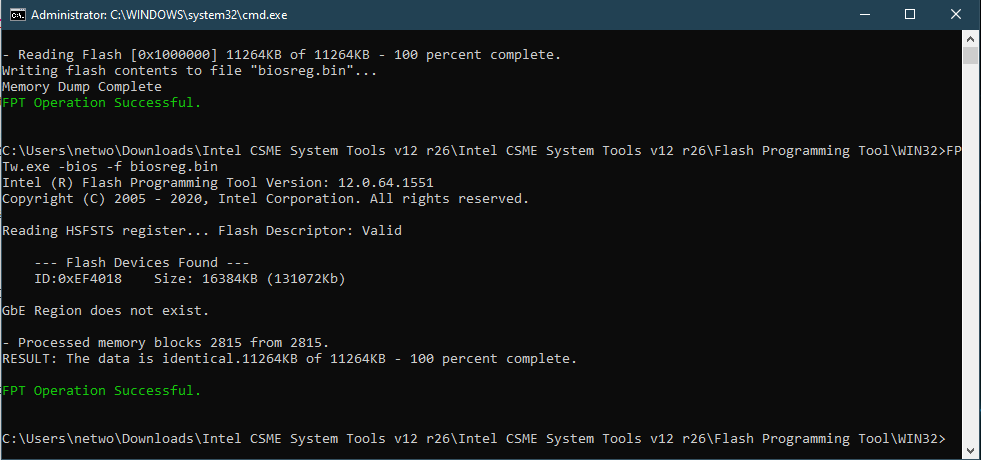
This was the state of my bios before taking the Vars
TPM is gray
@Ahmad - Thanks!
Here is unlocked vars, drop varsm.txt into H20UVE_100.00.16.08 folder, then run command >>> H2OUVE.exe -sv varsM.txt
http://s000.tinyupload.com/index.php?fil…199922359223413
Then reboot, and do FPT Step #1 from above spoiler and send me the created file 
Here is the Bios file is the size correct 11 mb 
http://s000.tinyupload.com/index.php?fil…282398202356636
Do your magic @Lost_N_BIOS , Thanks a lot
Edit: forget step 2 
but did check it now and it’s good 
@Ahmad - Thanks, yes, step #2 will pass now that you flashed in unlocked vars
Here is your mod unlocked BIOS, flash it back via >> FPTw.exe -bios -f biosregm.bin
http://s000.tinyupload.com/index.php?fil…231487322589000
*** WARNING - To ANYONE with laptop and unlocked BIOS!!!
DO NOT try to enable this graphics card or disable that card, switch cards etc. Otherwise you will end up with no display output (ie black screen) and no way to recover except by blind flash or with flash programmer.
You can change graphics related settings, like changing memory sizes, or core speeds etc, just don’t try to disable one card or change which is main etc.
Additionally, be very careful when trying to undervolt CPU, you can leave BIOS unbootable due to CPU voltage too low (Sometimes even 0.05 is too much)
WARNING *** - This BIOS is user specific! If you are not user Ahmad at Win-RAID.com forum, DO NOT USE THIS BIOS!!
If you do, and you are not Ahmad, then you will loose your serial, UUID, OG NVRAM, and possibly LAN MAC ID as well.
You have been warned!!!
Great job , It’s working.
And sorry for late replay I almost fall asleep, I read an article at bed last night at 12 am.
and asked my self why only desktop have intel® extreme memory (Intel® XMP)
So I turned on my laptop trying to find a method which turned to be BIOS Unlocking and could done perfectly
by the wonderful @Lost_N_BIOS .
So my eye fail on this topic and I kept read the topic until the sun rise that I couldn’t sleep until to find how it could be done and what are the benefits, which almost by now I complete more than 24 hours awake and losing my focus after filling relief to get it done.
Thanks again for you 
Sorry for my bad English
@Ahmad - Thanks for quick test and report back, glad to hear all went smoothly! 
I think maybe some laptop memory has XMP, but I am not 100% certain, but almost swear I think some users have shown me XMP info from HWINFO64/CPU-z, or gave me DDR3/DDR4 SPD dumps that had XMP in them.
If no XMP on your memory kit, you’ll have to tweak the timings best you can manually, you can do it 

@Lost_N_BIOS Hi, is it possible to unlock my bios as im using the latest 1.12 version and I’m using the PH-317-53 model. I’m kind of new to this so could you explain what i need to do if you can unlock using the software method.Thanks in advance ![]()
Edit: Uploaded my vars file
vars_PH317_53.rar (29.8 KB)
@moonzz - Please confirm, this is your BIOS download page? https://www.acer.com/ac/en/US/content/su…roduct/8051?b=1
If yes, then flash back this modified vars using command below, then do stuff in spoiler but only do step #1 & #2, do not reflash stock BIOS etc as mentioned at beginning of spoiler
However, if you have secure boot enabled, TPM enabled, or a BIOS password set, then you DO need to start over and disable everything mentioned in the spoiler, make a new vars dump and send to me and DO NOT Flash the one below
After you flash in mod vars, there will be a list of success/failure, then reboot and do step #1-2 of spoiler, if it passes #2 without error, then upload file created at #1
Make sure you put this back into 100.00.16.08 folder and flash it with that version - http://s000.tinyupload.com/index.php?fil…152668580442178
H2OUVE.exe -sv varsM.txt
Additionally, please remove all BIOS passwords, disable secure boot, and disable TPM or Encryption if you have enabled. Do this before moving on to below
If you do not have Intel ME drivers installed, install them now from your system driver download page, then start over here after reboot.
Check your BIOS’ main page and see if ME FW version is shown. If not then > DOWNLOAD HWINFO64 HERE <
Once HWINFO is open, look at the large window on the left side, expand motherboard, and find the ME area.
Inside that section is the ME Firmware version. Take note of the version. (ie. write it down or get a screenshot)
Once you have that, go to the thread linked below, and in the section “C.2” find and download the matching ME System Tools Package for your system.
(ie if ME FW version = 10.x get V10 package, if 9.0-9.1 get V9.1 package, if 9.5 or above get V9.5 package etc)
> DOWNLOAD " ME System Tools " packages HERE <
Once downloaded, inside you will find Flash Programming Tool folder, and then inside that a Windows or Win/Win32 folder (NOT x64).
Highlight that Win/Win32 folder, then hold shift and press right click. Choose “open command window here” (Not power shell! >> * See Registry file below *).
If you get an error, reply to this post with a screenshot of it, OR write down the EXACT command entered and the EXACT error given.
((If “open command window here” does not appear, look for the “Simple Registry Edit” below…))
Step #1
Now you should be at the command prompt.
You are going to BACKUP the factory un-modified firmware, so type the following command:
Command: " FPTw.exe -bios -d biosreg.bin "
>> Attach the saved "biosreg.bin ", placed into a compressed ZIP/RAR file, to your next post!!! <<
Step #2
Right after you do that, try to write back the BIOS Region dump and see if you get any error(s).
Command: " FPTw.exe -bios -f biosreg.bin "
^^ This step is important! Don’t forget! ^^
If you get an error, reply to this post with a screenshot of it, OR write down the EXACT command entered and the EXACT error given.
Here is a SIMPLE REGISTRY EDIT that adds “Open command window here as Administrator” to the right click menu, instead of Power Shell
Double-click downloaded file to install. Reboot after install may be required
> CLICK HERE TO DOWNLOAD CMD PROMPT REGISTRY ENTRY <
If the windows method above does NOT work for you…
Then you may have to copy all contents from the Flash Programming Tool \ DOS folder to the root of a Bootable USB disk and do the dump from DOS
( DOS command: " FPT.exe -bios -d biosreg.bin " )
@Lost_N_BIOS Thank you for the reply ![]()
Yes, that is the page i got the bios from.
I had already disabled secureboot and tpm prior to getting the vars file so it should be safe to flash it right?
Edit: So i’ve flashed the modded vars you gave me and done step 1 and 2 in the spoiler with no errors


heres the bios file: http://s000.tinyupload.com/index.php?fil…589323419628528
@moonzz - Yes, if you hadn’t disabled all that, then it would have just failed at step #2 when you tried still.
Here is your unlocked BIOS, flash it back via >> FPTw.exe -bios -f biosregm.bin
http://s000.tinyupload.com/index.php?fil…025427191239369
*** WARNING - To ANYONE with laptop and unlocked BIOS!!!
DO NOT try to enable this graphics card or disable that card, switch cards etc. Otherwise you will end up with no display output (ie black screen) and no way to recover except by blind flash or with flash programmer.
You can change graphics related settings, like changing memory sizes, or core speeds etc, just don’t try to disable one card or change which is main etc.
Additionally, be very careful when trying to undervolt CPU, you can leave BIOS unbootable due to CPU voltage too low (Sometimes even 0.05 is too much)
WARNING *** - This BIOS is user specific! If you are not user moonzz at Win-RAID.com forum, DO NOT USE THIS BIOS!!
If you do, and you are not moonzz, then you will loose your serial, UUID, OG NVRAM, and possibly LAN MAC ID as well.
You have been warned!!!
@Lost_N_BIOS Thank you so much man! It worked flawlessly i really appreciate your help! Now to get into some tweaking ![]() I’ll just go through this thread and see what options have worked for other users. Thank you once more you have my complete gratitude!
I’ll just go through this thread and see what options have worked for other users. Thank you once more you have my complete gratitude! ![]()
Hey, sorry to bother again i just wanted some help with ram OCing.
It seems i can tighten and change the timings but whenever i try to change the frequency the laptop POSTs but will give a black screen and eventually reset the ram config to default. I’m wondering if theres another setting i need to enable to OC ram or maybe my ram isnt compatible since I’m using the stock Samsung ram. If its just my ram it’s alright i’ll look into upgrading it.
Thanks again
Then probably timings are too tight for what speed you are trying to run, or not enough voltages (ram, VccIO, VccSA)
That, or your ram wont run the speed you are trying. Stock ram can probably OC, but maybe not super high. What is the stock speed and timings? What speed and timings are you trying to run? How much memory total is this?
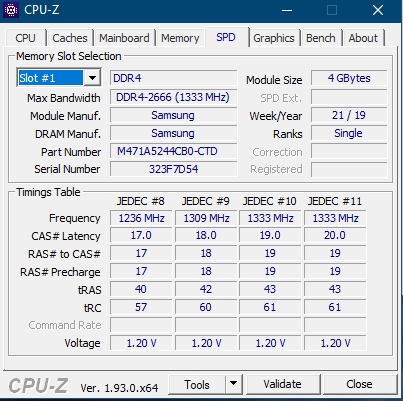
Show me SPD tab of CPU-z, with one of the memory sticks selected.
Ah that makes sense. Where would i increase the VccIO or VccSA voltages and if i do what do you recommend I increase them by.
I’ve experimented increasing the frequency to 2800 for starters but even then it wouldnt work.
I’m using 8GB in dual rank 2666mhz, i was thinking maybe i can try to get it to 2933 or maybe even 3000 and whatever timings would work, i’d adjust them to see the best i can do.

any chance i could get a copy of the modded bios for this laptop? i have the 9750h and 2060 version of the laptop and want to set my upgraded memory to 3200mhz like its rated for.
@moonzz - Advanced >> OverClocking Performance Menu >> Processor >> Platform Voltage Overrides
See page 37, and or some previous pages, other users discuss what worked for them. If 20/21-22-22-48 (or maybe 21-21-21-48 ) + stock voltages don’t let 2800 work for you, then that memory just may not be able to do 2800, or you need to try 3000/3200 instead
Or, as mentioned on page #37, some of the other subtimings may be too tight, you’ll have to loosen first too
@lowrck - Please give me your exact full model name and a link to your BIOS download page.
First disable secure boot, TPM/Encryption if enabled, remove any BIOS password, then dump your vars and send to me per below
download the following package, and run the command below from each versions folder that directly contains it’s exe. Before doing this, make sure you have secure boot disabled in BIOS, any BIOS password removed, and TPM/Encryption disabled.
Once done, copy the entire folder somewhere, delete everything but any created vars.txt and then repackage this and send to me, this way all created vars.txt remain in place in the folders of the version that created them.
http://s000.tinyupload.com/index.php?fil…212104496994806
H2OUVE.exe -gv vars.txt
Then do step #1 of this spoiler only, and send me the file. Then delete it, we will make new #1 file after I send you back modified vars, then you will be able to do step #1-2 after you flash back in mod vars
Additionally, please remove all BIOS passwords, disable secure boot, and disable TPM or Encryption if you have enabled. Do this before moving on to below
If you do not have Intel ME drivers installed, install them now from your system driver download page, then start over here after reboot.
Check your BIOS’ main page and see if ME FW version is shown. If not then > DOWNLOAD HWINFO64 HERE <
Once HWINFO is open, look at the large window on the left side, expand motherboard, and find the ME area.
Inside that section is the ME Firmware version. Take note of the version. (ie. write it down or get a screenshot)
Once you have that, go to the thread linked below, and in the section “C.2” find and download the matching ME System Tools Package for your system.
(ie if ME FW version = 10.x get V10 package, if 9.0-9.1 get V9.1 package, if 9.5 or above get V9.5 package etc)
> DOWNLOAD " ME System Tools " packages HERE <
Once downloaded, inside you will find Flash Programming Tool folder, and then inside that a Windows or Win/Win32 folder (NOT x64).
Highlight that Win/Win32 folder, then hold shift and press right click. Choose “open command window here” (Not power shell! >> * See Registry file below *).
If you get an error, reply to this post with a screenshot of it, OR write down the EXACT command entered and the EXACT error given.
((If “open command window here” does not appear, look for the “Simple Registry Edit” below…))
Step #1
Now you should be at the command prompt.
You are going to BACKUP the factory un-modified firmware, so type the following command:
Command: " FPTw.exe -bios -d biosreg.bin "
>> Attach the saved "biosreg.bin ", placed into a compressed ZIP/RAR file, to your next post!!! <<
Step #2
Right after you do that, try to write back the BIOS Region dump and see if you get any error(s).
Command: " FPTw.exe -bios -f biosreg.bin "
^^ This step is important! Don’t forget! ^^
If you get an error, reply to this post with a screenshot of it, OR write down the EXACT command entered and the EXACT error given.
Here is a SIMPLE REGISTRY EDIT that adds “Open command window here as Administrator” to the right click menu, instead of Power Shell
Double-click downloaded file to install. Reboot after install may be required
> CLICK HERE TO DOWNLOAD CMD PROMPT REGISTRY ENTRY <
If the windows method above does NOT work for you…
Then you may have to copy all contents from the Flash Programming Tool \ DOS folder to the root of a Bootable USB disk and do the dump from DOS
( DOS command: " FPT.exe -bios -d biosreg.bin " )
EDIT: sorry forgot to tag you so this would show up in your mentions. @Lost_N_BIOS
ph315-52-72EV is the model number, https://www.acer.com/ac/en/US/content/su…002920061DB2600 is the download page for it from acer. im running 1.08 because of bugs in newer versions. don’t know if that matters though.
vars link: https://gofile.io/d/td1j6a
bios link: https://gofile.io/d/YeJEVw
me version is: 12.0, Build 1416, Hot Fix 31
note:
tinyupload is currently down at time of writing. so i used a similar service from gofile. sorry for any inconvience, but i figured you would rather have something rather than nothing while i waited.
---------------------------------------
@Lost_N_BIOS i forgot to ask. i have flashed an asus 90 watt vbios to the graphics card. it uses, from what i can tell, an independent eeprom from the system bios so i don’t think it will effect it but i can flash back the stock vbios if that is required but i’d prefer to not potentially cause complications by reflashing over the “upgraded” vbios.
@lowrck - BIOS version only matters if I’m grabbing pre-edited modules that I have done for other versions, most do not use older BIOS like that so I will just redo edits on your exact BIOS.
How did you flash the vBIOS? If via NVFlash or ATIFlash, then what you flashed in will remain. Also, really, even if vBIOS was inside BIOS, it would remain untouched and as-is during reflash, because I will be editing your dumped BIOS and will only touch one file (Setup)
Yes, tinyupload has been VERY slow to load past day or so, and of course, not GoFile.io not loading out for me either. Upload to uploadfiles.io instead, thanks
GoFile finally loaded for me, around about same time it took tinyupload to finally load out too, maybe 2 minutes for each. Next time, please zip BIOS, thanks
Here is unlocked vars, put this into 100.00.16.08 version folder, then flash back using following command >> H2OUVE.exe -sv varsM.txt
https://ufile.io/jfv2me4t
There will be list of success/fail, reboot and then redo FPT spoiler step #1-2 and confirm #2 goes without error, then upload the new #1 file for me.
Use new name for step #1-2, if you did not already delete original biosreg.bin, or delete it now
@Lost_N_BIOS yes i just used nvflash for the graphics chipset.
here is the file generated by fptw.exe:
https://ufile.io/vtgbzb98
it completed successfully and said that the existing data and new data were identical. so i’m guessing your var mod succeeded. sorry about the host, they were just one of the first i found when searching for small file upload, and sorry for the non zipped bios. i couldn’t remember if i was supposed to zip the bin or not. i have this time. thanks for doing this, its awesome to have the ability to xmp my ram.

