Hello and Thank You for this very helpful post.
I maintain a small fleet of these Flex5 laptops and one of our users just had their BIOS corrupted exactly as described.
The most disturbing thing is that the BIOS admin password had been set. Also the user was operating from an unprivileged
account. How is it that the Flex5 BIOS can be upgraded w/o presenting the BIOS admin password ?
Perhaps the Lenovo "VANTAGE" tool is responsible for this? I have removed that feature from all my Flex5s until I get a clearer understanding of what is going on.
-ST
thank you for this post, I am expecting my cheapie knockoff programmer and 1.8V adapter in the mail this week and I had read comments in the Amazon reviews alluding to this issue caused by questionable build quality. I will be sure to test mine closely as I do not want to fry my board or any chips in the process. ![]()
I think it’s better to consider this thing too fix v.3.3 on CH341A :
https://www.youtube.com/watch?v=-ln3VIZKKaE
And then use the ASProgrammer v.1.30
https://www.youtube.com/watch?v=-ln3VIZKKaE
[GUIDE] Flash BIOS with CH341A programmer
https://github.com/nofeletru/UsbAsp-flash/releases
Regards
I did that fix, but I don’t think it’s necessary when using a 1.8V adapter.
That version doesn’t have GD25LB128D_1.8V or MX25U12873F_1.8V (the two known to be used in this laptop so far). Closest compatible are GD25LQ128C_1.8V and MX25U12835F_1.8V. I know NeoProgrammer 2.2.0.3 has them both, but haven’t tried it.
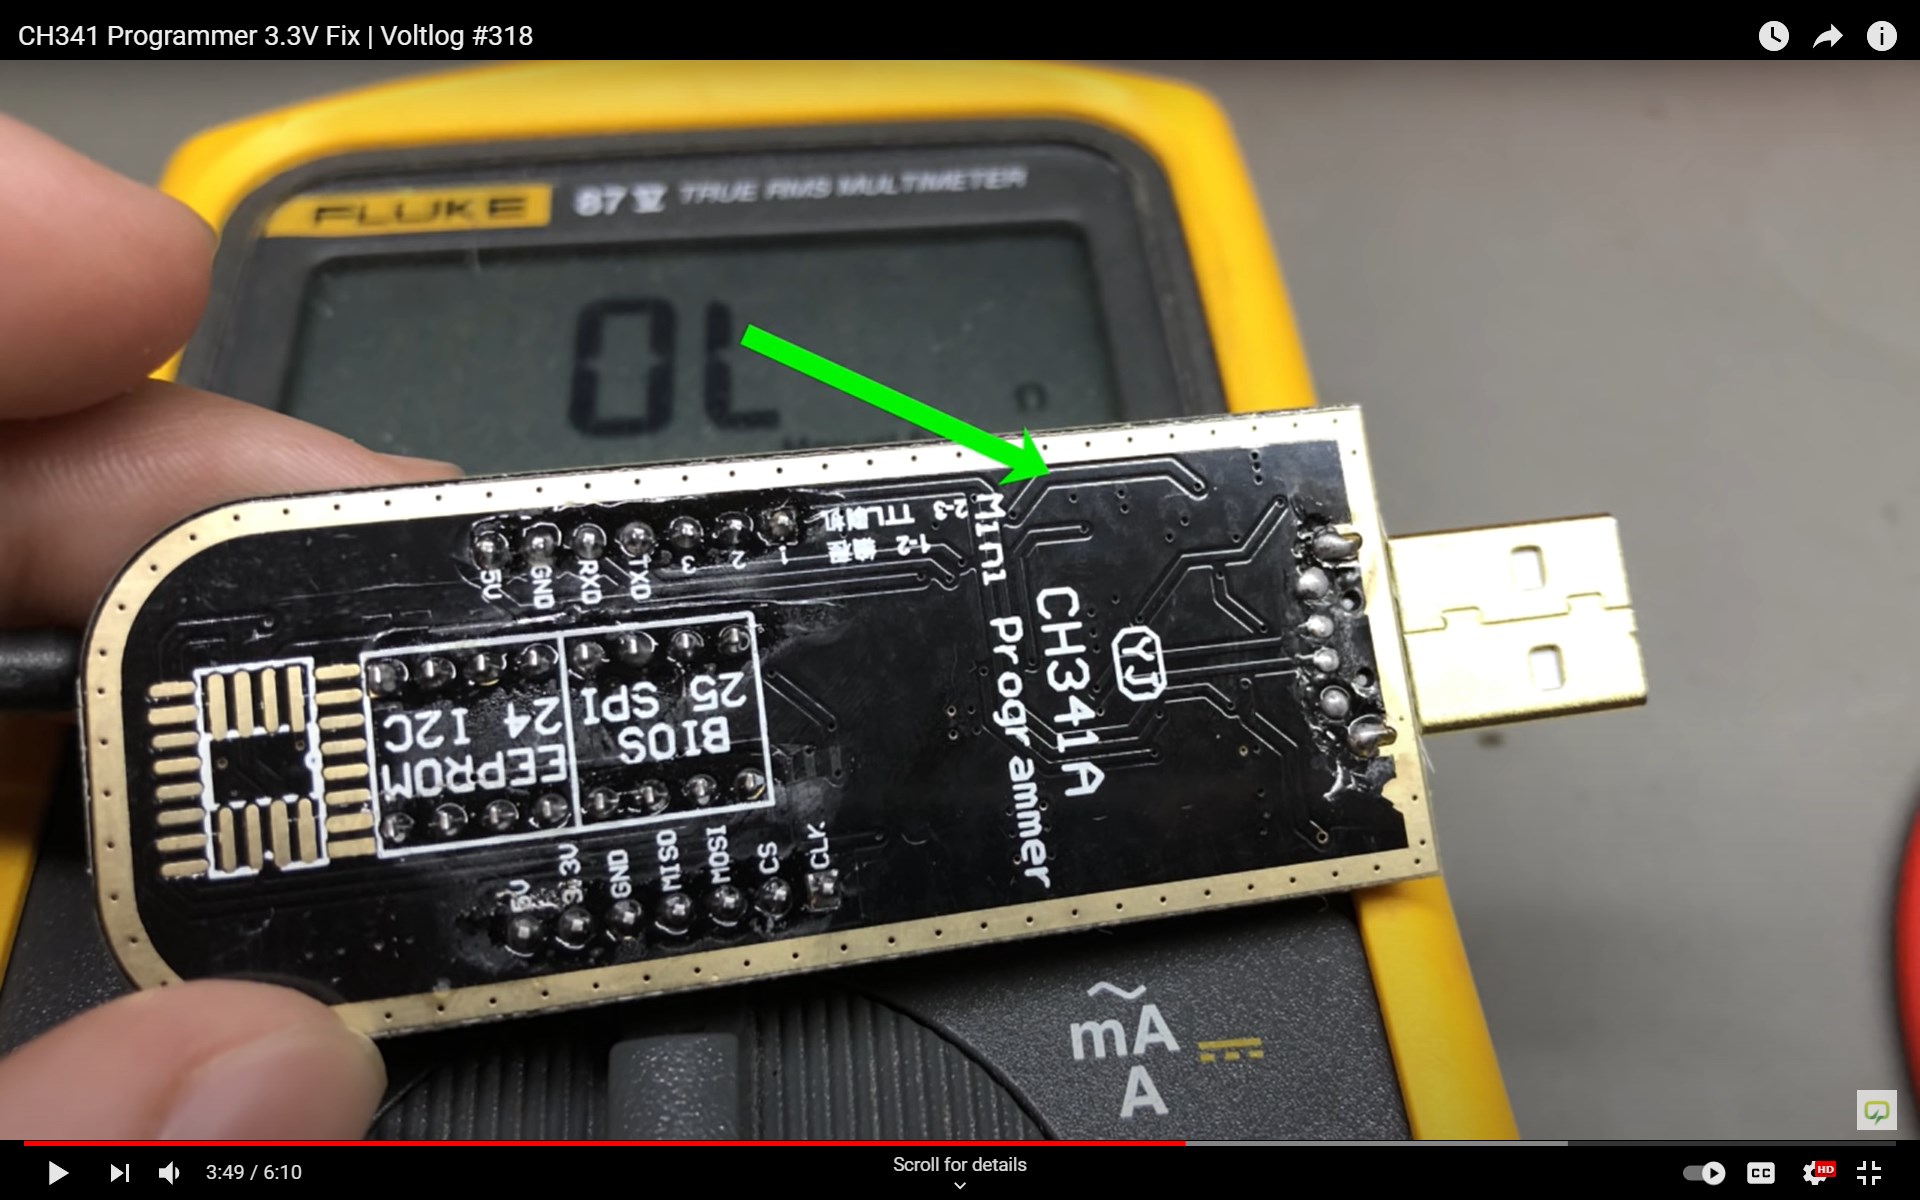
I watched that video and compared mine to his. At 3:48 into the video, I paused it and compared to my PCB traces. The PCB trace design is different from what’s in the YT video. I noted my voltages on my unit while plugged into a USB power port, no computer/drivers involved. See below:
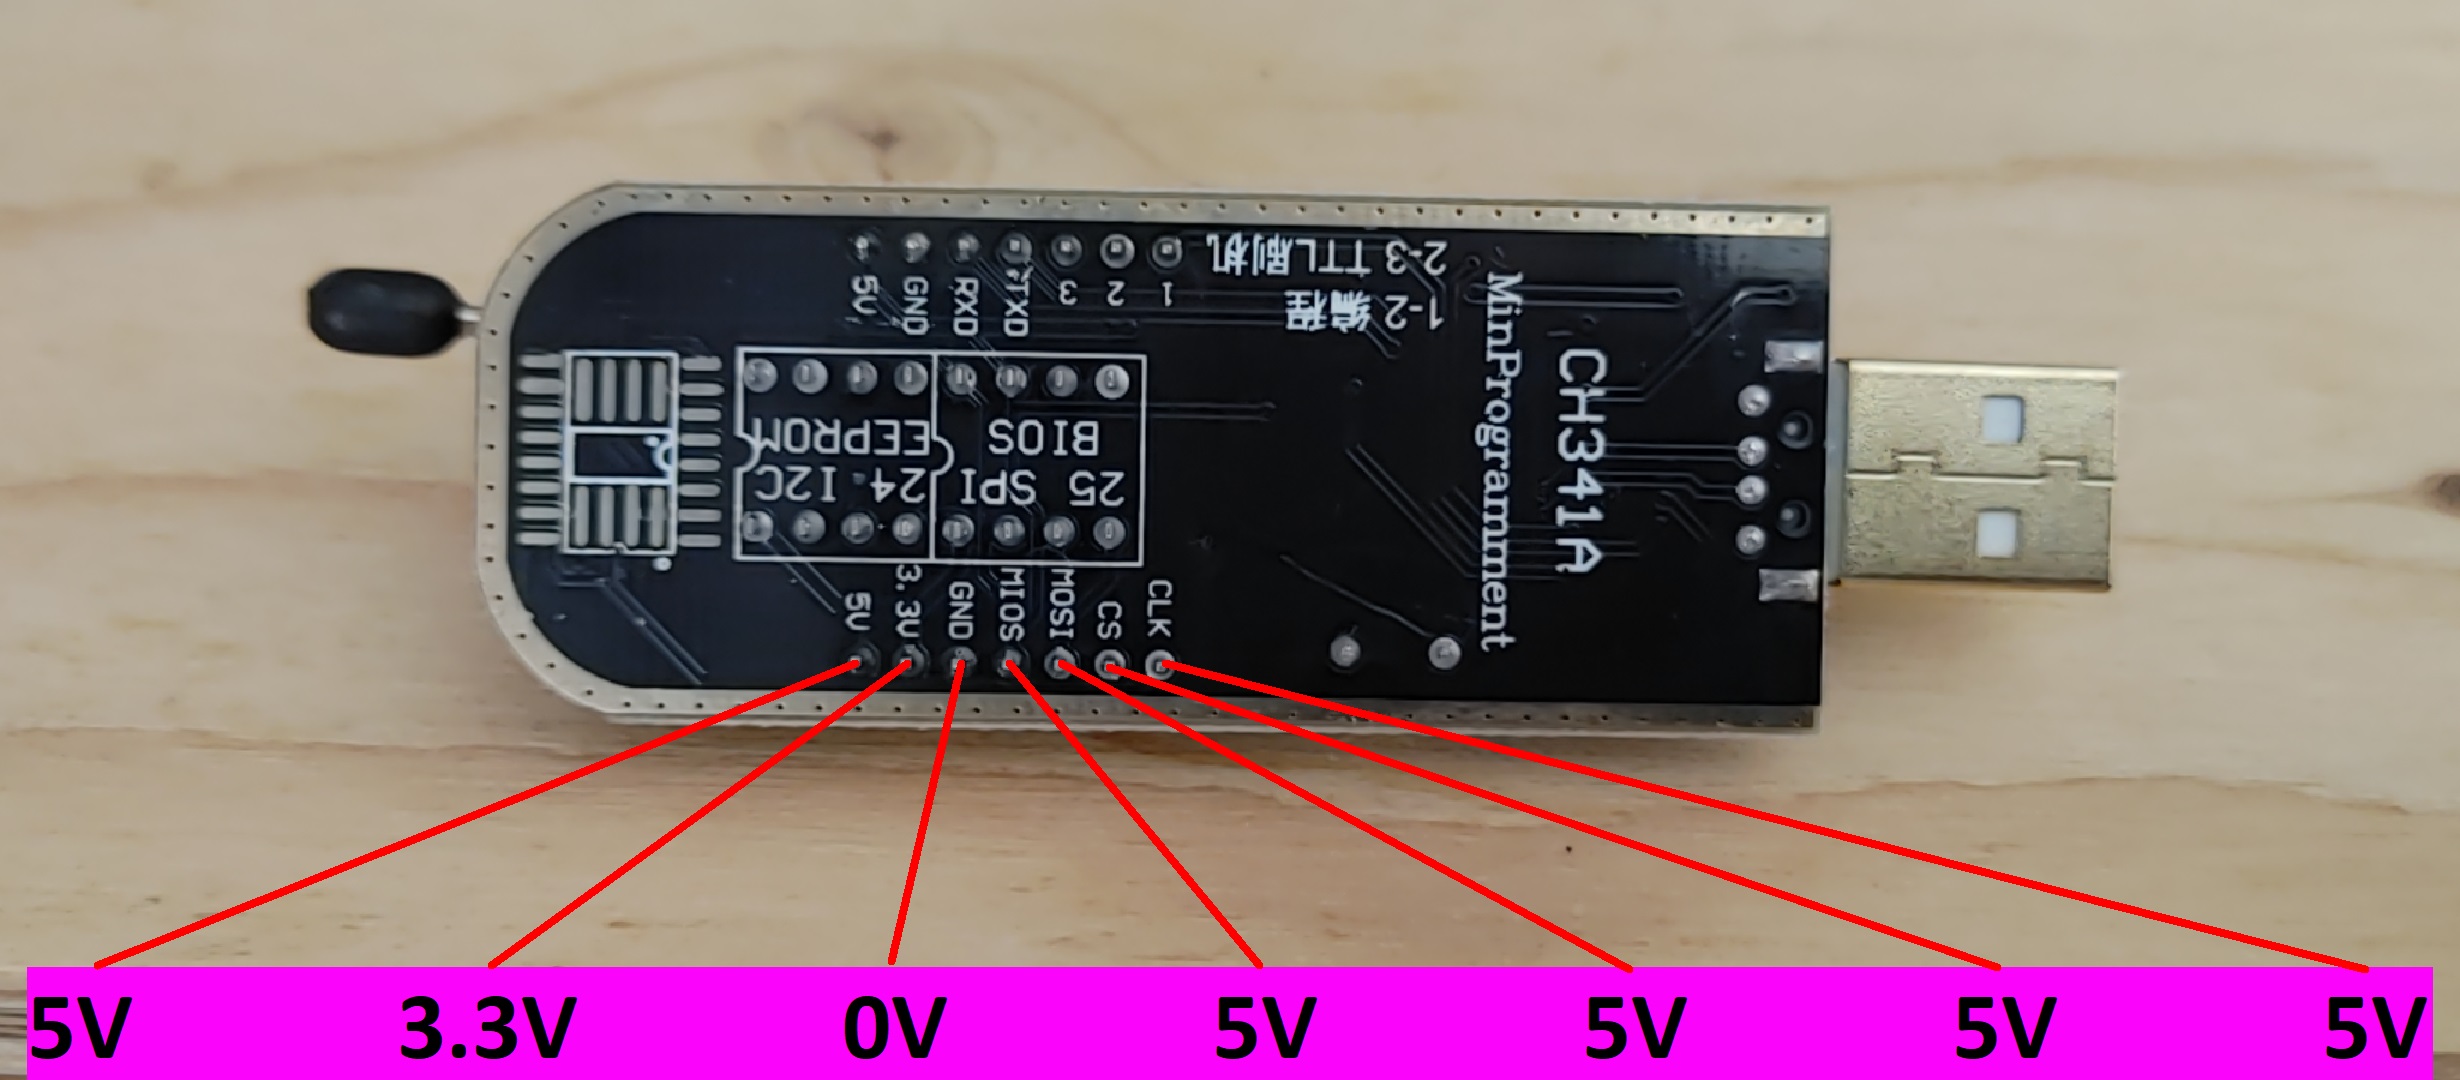
[[File:MyCH341A_traces (Large).jpg|none|auto]]
I have finals next week, then should have some time to play. ![]() thanks for all the links and guides and suggestions thus far.
thanks for all the links and guides and suggestions thus far.
The trace layout is irrelevant. Mine looks different than both yours and the one in the video. After doing the "fix", RXD/TXD/CLK/CS/MOSI/MISO (labelled MIOS on your board, lol) will all be at 3.3V.
Like I’ve mentioned already, if you only plan to use this with 1.8V adapter then the fix is probably not needed. I’ve read a couple of amazon reviews of people using it as-is on 1.8V chips. Now, if you already have the tools and abilities to complete the fix, then I would go with "better safe than sorry" and do it.
Hello,
I applied your technique using the latest BIOS update from Lenovo, eecn35ww.exe.
Everything worked fine.
After I got the laptop running I applied the same update again, this time by running the execuitable on the OS (W10).
I then extracted a copy of the binary and compared my edited version with the “real thing”. There is a lot of
difference in the data! Evidently these images aren’t protected with a check sum or the system is very forgiving.
Anyway thanks again for the helpful tutorial.
-ST
Hi and thank you so much for this guide. I also had my Lenovo Flex 5 bricked a while ago, I’ve followed your instructions but I’m missing that intuition to know which parts of the hex file to copy, and so I’m stuck and I must ask for assistance.
I attach a zip file with three bios: the extracted from the UEFI of the manufacturer, the one my bricked laptop had, and my fix (extracted body of your mentioned region and then copied to it the B21000-B21280 region from the bricked one, which is also evident to me since it has the specs of the laptop. But I’m afraid I cannot determine which other region to copy, and so I must ask for assistance here. I think this is the last step to make it work, since before this fix the keyboard’s light was permanently on, and after the fix it makes a change in intensity and then turns off, so it means the overall process is having some effect.
I would appreciate any help here ![]()
www(dot)file-upload(dot)com/xb82x5u2plwp
Hi friends, i made a tool for me so i will share with you too :
https://www.mediafire.com/file/p6cisx7ob…XE_CAP.rar/file
Just run the .bat program and extract from exe and cap files …
@Quireno please upload on www.mediafire,com
Regards
@BDMaster thanks for the tool, I personally already went through the steps outlined by @Plastixx , I’ve downloaded the official BIOS/UEFI for my laptop, using UEFItool and Innoextract to get the BIOS, then bought the CH341A + 1.8V adapter + clip and installed AsProgrammer to use it. I’m on the last step, which is actually writing the BIOS for my bricked laptop, I don’t have the intuition to be able to tell which parts to copy apart from the region that has the specs of the laptop. I’ve been trying copying some sectors, but it’s a guessing game, and the number of possible combinations of sectors make it unviable for me to keep guessing which combination is the correct one (in part because every time I go through the process of writing I have to pinch my tiny bios on the motherboard and I’m afraid of breaking it somehow); that’s why I’m asking for help here. Do you use another tool besides HexCmp2 to do the job? Or maybe you guys with more experience and intuition for these things can do it in a minute?
Here’s the mediafire link, by the way: www(dot)mediafire(dot)com/file/yow3y9ykeqt569m/bioses.zip/file (I cannot post a link because I don’t have 3 comments yet on this forum since I basically joined for this thread). It has the bricked bios (with the correct serial number still in place), the manufacturer’s bios, and my attempt to fix it.
link
I did it! I also copied the 21000 - 41000 region from the bricked bios to the clean one and it worked!
I’m thrilled, for me this is quite a feat. Thank you guys and specially the original poster for the guide ![]()
Bye, guys.
Could anyone here type up a guide that someone as clueless as me could follow? I have 0 programming experience, I’m just trying to fix my daughter’s laptop ![]() Apologies for the tall order and no worries if it’s too much of a hassle.
Apologies for the tall order and no worries if it’s too much of a hassle.
Theres no easy way in this operation and it differs in all cases… basically u need to describe wot happen and reproduce steps of the failure in order to provide as much info as u can to some one that may help u.
Always a MUST is the backup of the the current SPI data dump AS IS in order to recover as much data as we can, related to the system unique ID.
Read all the posts of this thread and other guides in the forum, in the use of an SPI programmer, software used, videos, etc…
Visual ID of the SPI chip on the motherboard for Manufacturer/Model.
Patience as it can be very tricky making a firm connection by the clip/spi pins, and for a 0 programming experience user it can be very frustrating… thats why there is professional payed Techs in doing this, but with
dedication everyone can get close to it.
So provide all this info and wait for some one to help u.
It’s the exact same scenario as the OP. She shut it down in the middle of an update and since then, it doesn’t boot. Screen remains black while the fans ramp up and keyboard lights on. I tried reseating the ram, putting in a new SSD and draining the power to no avail.
Have you tried booting from usb?
Yes, basically I’m asking for someone to explain the instructions OP provided but in a way someone not-in-the-know could understand.
Ask specific questions or provide your bios.