Hi, I need some help.
Last week I bought a new Syba SI-PEX40057 SATA III 4 Port PCI-e 2.0x 2 Card with Marvell HyperDuo RAID Mode. 88SE9230 Marvell chip.
I managed to install it ok, turn off legacy boot in my dell optiplex 3070 which was only way I can boot into windows 10. I have system in uefi boot mode. Win 10 on nvme m2 drive.
Then 2x sata disks connect to the syba sata card (pci). Raid 1 array.
The problem is the boot time. Without the card in the slot the pc boots fast.
With the card in the slot it hangs for approx 5 minutes before booting windows. Even if I hit f12 upon turning system on, it takes 5 minutes to enter the bios. Once booted into windows everything works OK. Nothing is on screen apart from dell logo.
Details from marvel storage utility below.
BIOS: 1.0.0.1028
FIRMWARE:2.3.0.1708
Bootloader: 2.1.0.1009
Driver: 1.2.0.1045
Chip revision: a1
Software download from here,
https://www.sybausa.com/index.php?route=…&product_id=183
Main problem is hanging boot but it would also be nice to know if I can boot into cards bios (pre-windows) in uefi mode.
Thanks guys
EDIT by Fernando: Thread moved into the “Hardware” Sub-Forum and thread title specified
@PhilPhil7000 Several people have reported long boot times with the newer revision A1 firmware (1070, 1076, 1078) but I have not experienced it myself.
If you want to test different firmware versions for the A1 revision of the Marvell 9230 you can download this zip archive;
Marvell_92xx_A1_Firmware.zip
The archive below contains the tools to flash the firmware (sourced from Supermicro in 2018);
CDR-A1-UP_1.01_for_Intel_A1_UP_platform.zip
Note that the Supermicro tools have the 1070 firmware image included (ImageA1.bin) which you can swap with any firmware file you wish to test.
You should read the Go.bat file in a text editor to familiarise yourself with the commands for mvf_mag.exe
echo type ‘go -e’ Erase every sector
echo type ‘go -a’ Flash only autoload
echo type ‘go -b’ Flash only BIOS on MAGNI
echo type ‘go -b -e’ Erase only BIOS
echo type ‘go -x’ Flash only Firmware on MAGNI
echo type ‘go -x -e’ Erase only Firmware on MAGNI
echo type ‘go -v’ Show verbose message
echo type ‘go -r’ Read back binary file, no flashing
echo type ‘go -ra’ Dump the data of Spiflash to a binary file
echo type ‘go -aid 0’ Update the specified the adapter 0
each type ‘go -ver’ Components version
Before you attempt to flash another firmware please make a complete backup of your current firmware so you can reflash it back to stock.
Could you also please upload your current firmware as it contains the new bootloader 2.1.0.1009 (the latest I have is 2.1.0.1008) and I would like to test it on my PEX40054 to see if I also get the hang on boot issue.
Hi
Thanks for the reply @chinobino.
I haven’t used a tool like this before.
What would be the command to extract a backup?
Also does it matter what file I choose to flash onto the card depending on whether I am booting legacy or uefi (I currently have my pc set to boot uefi only).
I would still like the ability to be able to boot legacy if I have to at any point.
The only way I can get into the card prior to windows is ctrl m on legacy boot. Is there any update I could make so I could get into card prior to windows in uefi boot mode?
I am happy to share the files I extract. Which of them do you want?
Thanks
@PhilPhil7000 : Since your boot problem obviously is Firmware and not "Storage Drivers" related, I have moved this thread into the "Interesting PC Hardware & Software" Sub-Forum.
Additionally I have customized the thread title to make clear what sort of device the Syba SI-PEX40057 is and which Controller it has.
Hoping, that this is ok for you
Dieter (alias Fernando)
@chinobino : JFYI
@PhilPhil7000 Hi, IIRC (using a DOS bootable USB stick) the command ‘go -ra’ (without the quotes) will dump the entire contents of the flash ROM to a file called BKIMG0.BIN, or you can do it manually using the command ‘mvf_mag -ra <FILENAME.BIN>’ (without the quotes).
All of the ImageA1.bin files from Supermicro share the same hashes, meaning that the two BIOS image in the ‘DOS_MODE’ folders (i.e. ‘BIOS_PG’ & ‘UEFI_PG’) are the same as the BIOS image in the ‘UEFI_MODE’ folder (‘UEFI’), the only difference being the tool used to flash.
To flash from DOS (Legacy mode boot) you must use ‘mvf_mag.exe’ and to flash from UEFI ‘pure mode’ (CSM disabled) requires you to boot into a UEFI shell use ‘mvf.efi’ (although I have never been successful in getting it to work).
Apparently it is possible to boot into a UEFI shell, load the driver for the 9230 and then access the UEFI configuration utility.
You might want to read this page from ASRock support and download the UEFI utility found in 9230_UEFI.zip.
I have tried using different UEFI shells to get it to work but have been unsuccessful. I tried using this UEFI shell to load the driver but was unable to launch the utility as it asks to "PLEASE REBOOT SYSTEM" on loading ‘ui64.efi’.
Maybe you will have better luck.
The entire contents of your SPI flash ROM, it should be 512 KB is size, cheers.
OK thanks I think I will try legacy boot way. What is the command to flash the new firmware once I have the backup?
I
The entire contents of your SPI flash ROM, it should be 512 KB is size, cheers
Is this what I get from the backup go -ra?
Thanks sorry I am very new to hardware troubleshooting.
Also if I need to restore original firmware file What would the command be?
Use the preconfigured Go.bat file and just swap the firmware file you want onto the USB stick you will flash from e.g.
Copy ‘Go.bat’ and the ‘bin’ folder from CDR-A1-UP_1.01_for_Intel_A1_UP_platform\Marvell\EEPROM_update_tool\firmware\92xx\DOS_MODE\BIOS_PG\CpuAHCI\9230</b> to your DOS bootable USB stick.
If you look inside the ‘bin’ folder you will see ‘ImageA1.bin’ (which is currently firmware 1070), simply swap it with the firmware you want to test from the firmware archive I uploaded.
Then run ‘go -ra’ to make a backup, it should be 512 KB in size and finally just type ‘go’ to flash the new firmware or ‘go -v’ to use the verbose mode (which should tell you the incoming version first and then the existing version, then shows adapter information, asks for confirmation to write and then flashes the new image).
Yes 
Same technique as above, copy your backup to the ‘bin’ folder and rename it ‘ImageA1.bin’, then use the ‘go’ command to flash it back.
Hi,
Ok so I successfully dumped the existing firmware from the card using go -ra.
Note. it puts the image in the “bin” folder.
Thankfully I read your other forum post and realised i needed MSDos and not free dos as it only worked when using the original MSdos.
See attached file you were looking for.
SHA256 Hash = 32D9EF6AAAB227AD1A868B652AF0E23C526AEEB72BB5FE88E34BFF6F5AC604F4
(Once Unzipped)
now what? which of the firmware versions do you think I should try?
BIOS_1.0.0.1024_FW_2.3.0.1065 maybe?
so i take the file ImageA1.bin from that folder and copy it into the “Bin” folder of the usb and run “go -v” ?
I want to go for the verbose mode like you said.
also one thing i noticed is the card doesn’t present the CTRL-M menu on the screen anymore, do you have any idea how i can revert to this on a dell optiplex 3070, i can’t seem to work out how I did it before, does it need the drives connected? Because I disconnected them for this testing.
BKIMG0.zip (171 KB)
Excellent, glad you got it to work.
Ah yes, good catch, thanks for the file (and hash also).
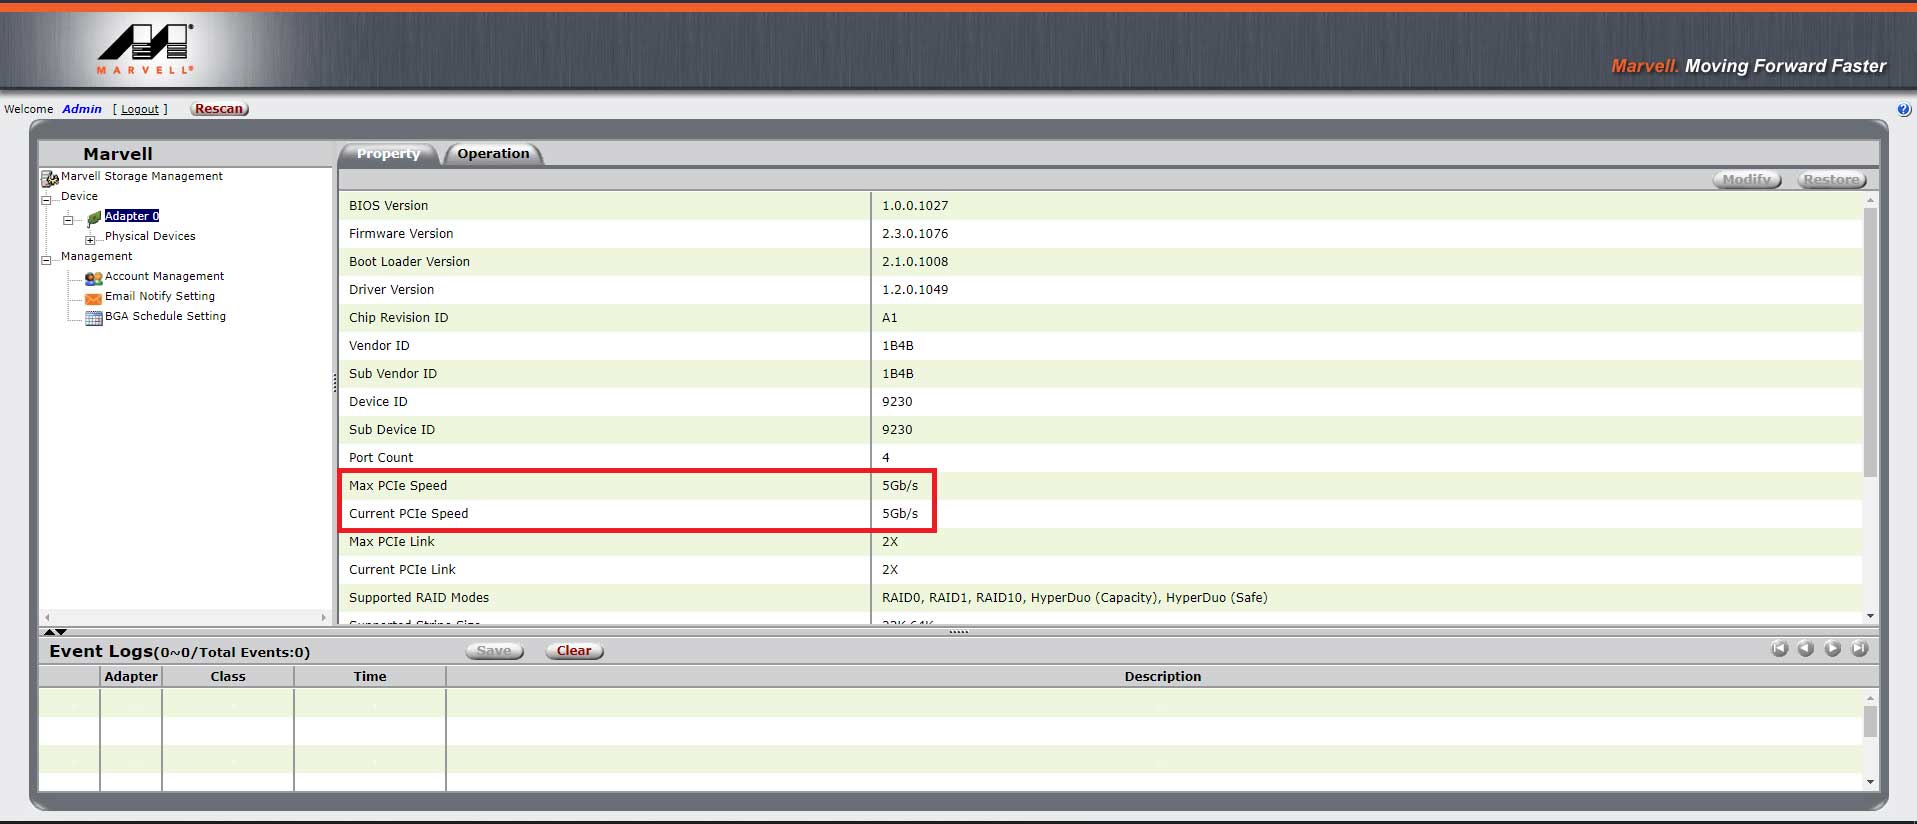
Yes, I think that is what I would try first, make sure to check to the PCIe link speed as some people reported lowered link speed (2.5Gb/s instead of 5Gb/s) with that firmware.
Correct.
Is there a BIOS option to enable loading legacy PCI option ROM’s after enabling CSM?
Hey, you are welcome. I sorted out boot issue. It only boots once the physical drives are plugged in.
How would I check the speed once I have done the flash.
Do you think it’s maybe worth starting at 1076 and going back from there?
@PhilPhil7000 Ah nice sleuthing! Interesting quirk.
Open the Marvell Storage Utility and check "Current PCIe Speed"
[quote="PhilPhil7000, post:10, topic:36941"] Do you think it's maybe worth starting at 1076 and going back from there? [/quote] Yes, 1076 or 1065 take your pick, I have not seen any issues with FW 1076 (I currently have it installed).
If you need to boot into the card bios (ctrl m) you need to have the drives attached. If you have to boot into Dos USB key you have to disconnect the drives for some reason. This could just be unique to my system though.
@PhilPhil7000 We have some very good news!
I quickly flashed the Startech PEXSAT34RH 1078 UEFI firmware from DOS and fired up the ui64.efi utility from a UEFI shell and finally saw this;
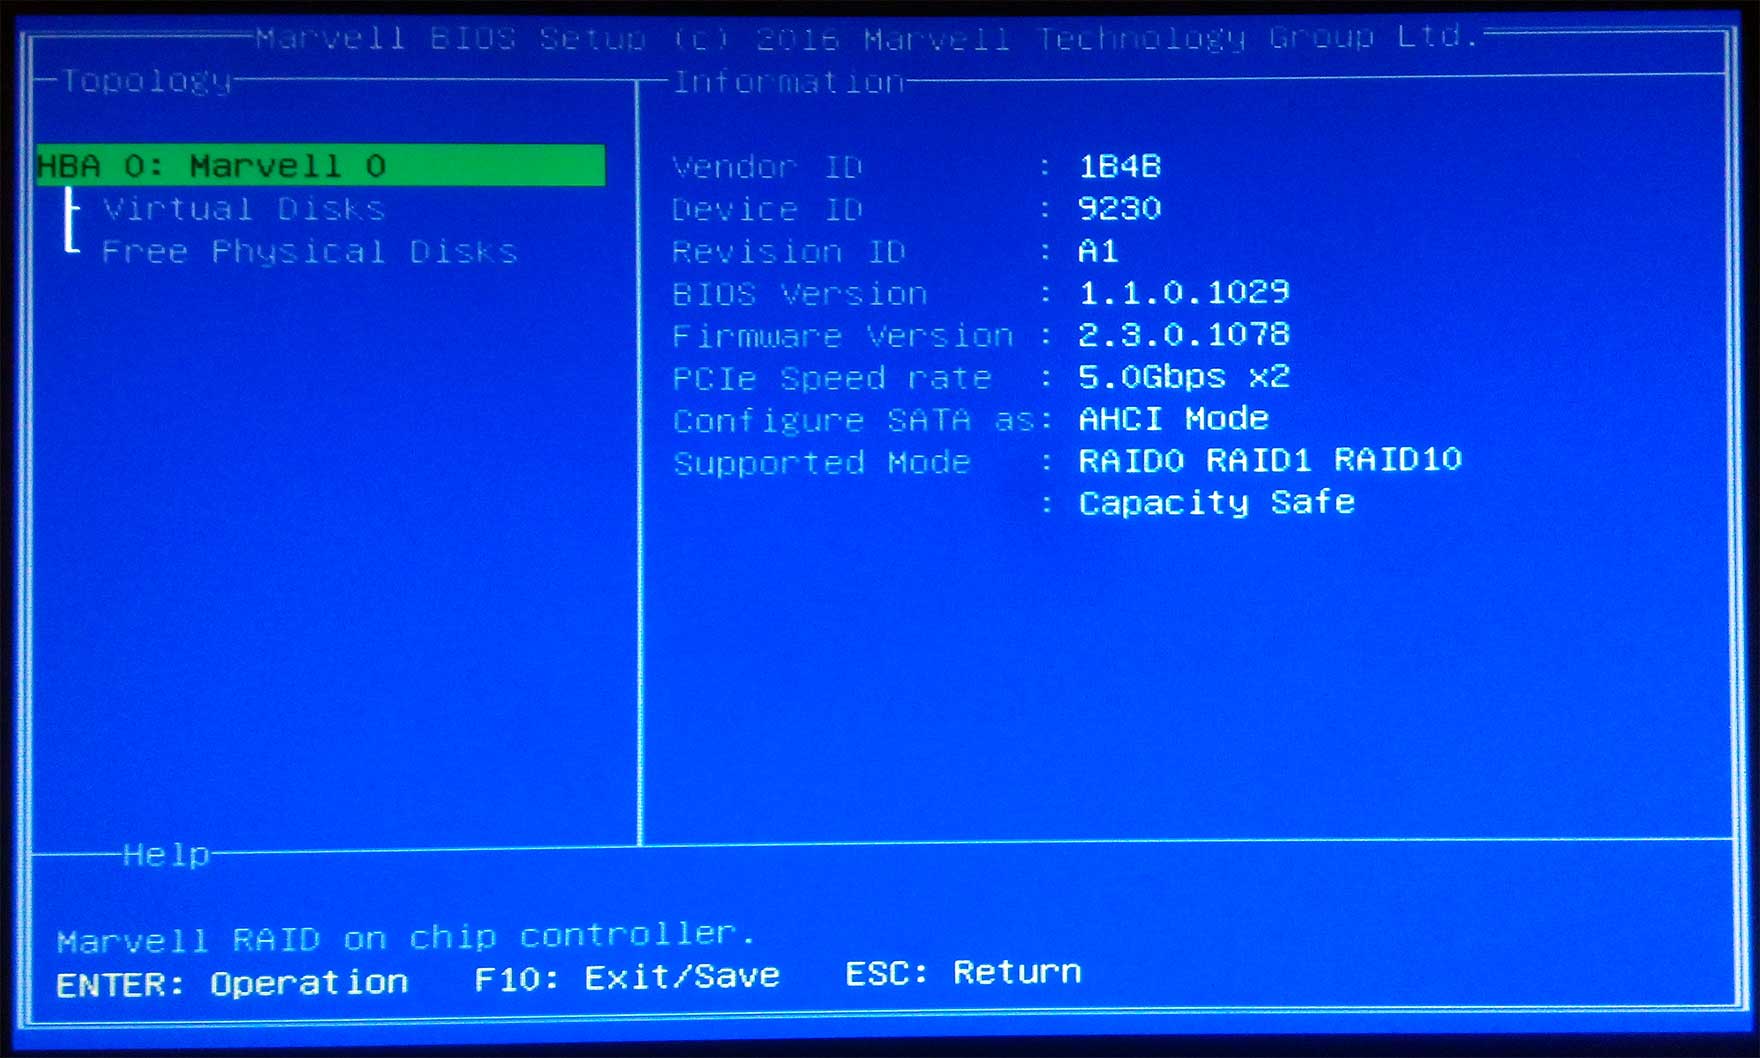
You should be able to replicate this with the UEFI shell I used.
Looks like we have found the solution 
Glad you are happy. So u used dos USB key to flash the uefi file like we have been talking about or did u use the startech tool?was it this file?
[88se9230]_uefi_boot_firmware_update.zip
I Don’t understand using the uefi though
"fired up the ui64.efi utility from a UEFI shell and finally saw this"
Can you expand on this?
@PhilPhil7000 Yes, I used the file ‘ImageA1.bin’ found in ‘[88se9230]_uefi_boot_firmware_update\RE9230.A15\RE9230.P15\FIRMWARE\CPUAHCI\bin</b>’ and copied it into the bin folder on my DOS bootable USB stick and flashed it with ‘go.bat -v’.
I’ll try to explain better.
The UEFI configuration utility is not on the PCIe card or part of the firmware, it is an external file that must be executed within a UEFI shell.
I swapped my motherboard into ‘pure’ UEFI mode (i.e. disabled CSM) and boot from the USB stick that has the UEFI shell that I copied to it.
The folder structure on the USB stick is ‘x:\EFI\BOOT\BOOTX64.EFI’
Once the PC booted into the UEFI shell I used the ‘page up’ key to find out which file system partition was my USB stick, in my case it was fs0.
I changed into that partition using the change directory command ‘cd fs0:’
I had previously copied the ASRock UEFI Utility to the USB stick so I already had the ‘9230_UEFI’ folder on the USB stick.
I went into the directory with the UEFI tool with the command ‘cd 9230_UEFI\Utility’ and then ran the Marvell configuration utility with the command ‘ui64.efi’
Does it make more sense now?
Hiya @chinobino
I actually got a reply from Syba with an attachment.
It has got .efi files in it, and from the instructions mentions uefi, so i am guessing i can copy these files to a usb key and boot into UEFI tool and run go.
now the only problem i have is how to format the usb key to be suitable for uefi boot?
See attached file, you may find useful, don’t know what firmware it has on it though.
Thanks
PHil
9230 Firmware.rar (1.27 MB)
Ok, so I have fixed it now. Didn’t use the file from Syba although someone may have some use for it.
I used the files from Startech to upgrade the card and it worked. Boot time has gone down from 5min+ to 22seconds, Wow.
@chinobino
Full details below of steps I took to fix it:
1. Download and extract,
CDR-A1-UP_1.01_for_Intel_A1_UP_platform.zip
Marvell_92xx_A1_Firmware.zip
(From earlier posts in the thread)
2. Copy ‘Go.bat’ and the ‘bin’ folder from CDR-A1-UP_1.01_for_Intel_A1_UP_platform\Marvell\EEPROM_update_tool\firmware\92xx\DOS_MODE\BIOS_PG\CpuAHCI\9230\ to folder in preparation for DOS bootable USB stick…
3. Make USB Boot stick - MSDOS
followed steps here to create usb dos disk: https://rumorscity.com/2013/12/04/how-to…able-usb-drive/
5. Disconnect Sata Cables to leave simply card only (I had to do this, you may not need this step on your pc).
6. Untick NVME Drive in bios so only hardware present is the Marvell card
7. enable legacy boot in Dell
8. Reboot pc and hit F12 and then choose to boot from USB Stick
9. once booted into dos run: go -ra
10. copy BKIMG0.BIN from “bin” folder of usb stick onto computer for backup on a separate drive to the usb (and keep)
11. Used diskpart in windows to wipe USB Stick (make sure you are 100% sure you selected the USB Stick).
12. created usb key as in step 3 this time I copied files from startech uefi patch (Folder RE9230.A15).[88se9230]_uefi_boot_firmware_update.zip
https://sgcdn.startech.com/005329/media/…e9230_firmware/[88se9230]_uefi_boot_firmware_update.zip
13. rebooted PC and booted (legacy) into the new USB Drive.
14. in dos cd into C:\RE9230.A15
15. Type “ autoexec.bat ” to start update firmware.
16. Rebooted and entered bios again.
17. setup bios how it was before. UEFI Boot, re-enabled NVME Drive etc.
18. connected SATA cables to add drive again.
19. rebooted PC and go into windows. Created virtual disk with Marvel storage Utility and it all worked fine.
*** To Get into Marvell Bios on the card before booting into Windows you first need to boot into a uefi shell.
To create on a usb do steps 20-25.
To copy files to hidden system partion on system drive (Windows10) do steps 26-50
20. make a bootable usb key with windows10 image using tool such as rufus.
21. rename /efi/boot/bootx64.efi to bootx64.old (this is to preserve it for using as a win10 boot key in the future)
22. copy Shell_full.efi into folder /efi/boot/ and rename shell_full.efi to bootx64.efi
23. copy ui64.efi to root of usb drive
24. boot into PC and choose usb key.
25. at shell > type ui64.efi and it will boot into Marvell Chip
Alternative: Copy Shell_full.efi & ui64.efi to hidden windows partition on the hard drive.
26. copy ui64.efi & shell_full.efi onto Win10 install usb key, in folder called MarvUtil
27. boot into Win10 install on usb key upon system startup (f12 on dell)
28. press shift F10 to get into a command prompt
29. "Diskpart"
30. "list disk"
31. “Select disk 0” (you will need to change this to the disk with windows on)
32. "detail disk"
33. note hidden partition number for use in 34.
34. "Select partition 3"
35. "assign letter=q"
36. detail disk
37. check hidden partition now has a letter of Q for the drive.
38. if usb key is e: for example.
39. "e:"
40. "xcopy marvutil q:\efi\microsoft\boot\marvutil" (Answer D for directory when prompted to create a new directory in the hidden system partition on the drive).
41. Reboot then enter bios of system.
42. Add uefi boot option pointed at Shell_full.efi in file system from bios, this will in the “marvutil” folder. on dell example is here:
https://www.dell.com/support/kbdoc/en-uk…indows-10-8-1-8
43. reboot and boot into the shell
44. should show list of filesystems and disks upon entering shell.
45. In uefi shell now >
46. “fs0:” (this is most likely going to be filesystem but could be a different one on another pc)
47. "cd efi\microsoft\boot\marvutil"
48. prompt should now look like this "fs0:\efi\microsoft\boot\marvutil>"
49. type ui64.efi
50. should enter Marvell Bios Setup screen. F10 to exit then reboot.
any questions let me know.
Phil
In your post #15 it says you can run ui64.efi to get into the card prior to booting windows.
is it possible to copy this onto the hard disk of the windows drive? there is an option within the bios of the dell bios to add a uefi boot option, and then select a .efi file.
That way i wouldn’t need to create a usb stick?
@PhilPhil7000 Looks like you’ve made a lot of progress
Yes, some motherboards have a UEFI shell built into the BIOS (such as Asus and some server boards) and if yours does then you should be able to do exactly what you say and copy the .efi to the server.
[Edit] The firmware that Syba gave you is the ‘BIOS VERSION’ 1078 that was already on your card, you made the right decision when you flashed the StarTech ‘UEFI VERSION’ 1078.
Yeah was hard but worth it.
OK so where do I copy the efi file now then? When I use the bios ui on dell i can browse to a files system dialog box but it doesn’t look like the normal root of c: it looks like some other directories on hdd somewhere.
I feel like I’m close to the end of this now.
Thanks @chinobino