@t0rcke
So just to be clear, there are software and firmware microcodes, and the software ones take precedence?
Correct, Windows will only override the BIOS microcode with a ‘newer’ (i.e. higher number) version.
Would this change be reflected in HWiNFO?
Yes and AIDA64.
Is there a guide on this forum specifically for changing Gigabyte BIOS microcodes?
Not specifically for Gigabyte but the process is generally the same for Aptio V BIOS.
You can use UBU to do this by modifying the file ‘MCUpdate.txt’ found in:
X:\UBU_v1_79_17\Files\intel\mCode
For example, this is how the original file looks for socket 1155v2:
#LGA1151v2
906ED 1151v2\cpu906ED_plat22_ver000000EA_2021-01-05_PRD_B05D764E.bin
906EC 1151v2\cpu906EC_plat22_ver000000EA_2021-01-05_PRD_8F16A419.bin
906EB 1151v2\cpu906EB_plat02_ver000000EA_2021-01-05_PRD_311405CC.bin
906EA 1151v2\cpu906EA_plat22_ver000000EA_2021-01-05_PRD_AB6894CF.bin
You can download the microcodes you want from this thread and copy their names into the text file, like this:
#LGA1151v2
906ED 1151v2\cpu906ED_plat22_ver000000AA_2018-11-29_PRD_05A0A797.bin
906EC 1151v2\cpu906EC_plat22_ver00000084_2018-02-19_PRD_F3514131.bin
906EB 1151v2\cpu906EB_plat02_ver00000072_2017-09-20_PRD_A08C2841.bin
906EA 1151v2\cpu906EA_plat22_ver00000070_2017-08-23_PRD_711B866C.bin
Then you must copy each microcode binary that you have changed in the text file to the corresponding folder in UBU, found at:
X:\UBU_v1_79_17\Files\intel\mCode\1151v2
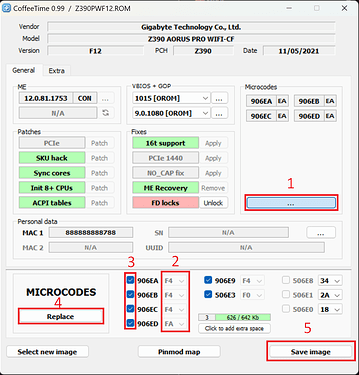
You can also do this with CoffeeTime v0.99 (which has a nice GUI) by copying the microcodes you want into the custom folder found at:
X:\CoffeeTime_0.99\data\custom
Then open the F12 BIOS file and click on each area in order of the number in the image below:
I’m also curious where you found the specific information regarding the CPUID and OS versions and their respective microcode versions.
Plutomaniac (Win-raid admin) has a Github under the name platomav where he maintains an application called MCExtractor that can be used to extract the microcodes from various BIOS files and also the Windows file ‘mcupdate_GenuineIntel.dll’.
However, the decoded text doesn’t display GIGA-BYTE TECHNOLOGY CO.,LTD. for some reason
That is correct, you won’t see that in the hex editor, however you can look up the 24-bit vendor ID on various sites such as https://macvendors.com/ (e.g. try typing 18C04D into that site and hit enter).
Each OEM/vendor generally has a set of ID’s that they use, it is explained well here:
A MAC address is made up of 48 bits. And those 48 bits, they're divided into two different groupings, 24 bits each. The first 24 bits, those are unique to the specific manufacturer or vendor. Those bits are called the OUI, or organizationally unique identifier. The OUI is also commonly referred to as the vendor code.
Alright. I know the older versions of the CH431A have a notorious flaw where the data lines are 5V which is too much for most chips, however this can be fixed with a mod.
Yes, the black PCB versions of the CH431A have been known to supply 5V instead of 3.3V IIRC.
As long as the voltage is correct, there is no risk of damaging the board by using a clip instead of de soldering the chip?
Damaging the board - No, damaging the clip yes  but seriously - take care with the clip as you only get so many uses out of them and they wear down quickly with repeated use (or worse break if they get violently ripped off), so treat it with care.


