SO I have a bricked M92p Tower Board with a Q77 chip, that was bricked due to a stuck BIOS Update from within Windows.
I got a CH341A Programmer with a SOP8 Testing clip and successfully managed to dump the binaries from the two chips that are close to the BIOS Battery.
One of these Dumps is 2MB and the other is 8MB. But the CAP file from the BIOS update downloaded form the Lenovo webiste is 4MB in Size.
Now how do I procede? Did I dump the correct chips? I thought the 4MB Official BIOS needs to be flashed on a 4MB chip, but both the chips I dumped have different sizes. Also I examined the binary dumps and they do contain data and there is no empty region.
Anyone can help? How do I procede now? Did I dump the correct chips? Can I write the 4MB cap file to the 8MB chip or will that make matters worse?
Please Help!
EDIT:
So I browsed some in the dumped binary files and opend it in EFI Tool and could derive the following Infos:
Intel ME Version is: 8.1.65.1586
Original ROM seems to have been: 9SKT90A.ROM
The last good BIOS Version I have obtained from here: https://think.lenovo.com.cn/support/driv…26wherePage%3D2
I can see my MAC address in the file. So that may be useful when recovering later.
BTW: The Bios Chips I dumped were: Eon Eon EN25QH16 2048 and Eon EN25QH64 8192.
EDIT 2:
I found this post: Lenovo M92P SFF, no post/video, 2 beeps…
There someone posted working 2MB and 8MB dumps from an M92p Q77 SFF build. But they were from WINBOND chips and I have EOn chips on my board. I compared the binaries to mine and I see some similarities, But on mi failed flash dump, I have large sections with FFFFFFFF-only. WHich is probably exactly what happened. I started the BIOS flash inside windows, and then the Update utility rebooted and the Update process was stuck at 1% and never made it past that. SO you guys think I should flash the BIos dumps of the SFF build?
I’d be glad to hear some advice from those more experienced guys here.
EDIT 3:
Coming from this post: Enabling “Headless display emulation” BIOS Option on Intel AMT Platforms. (3)
Where I tried to mod the BIOS of my Lenovo Q77 Board to allow headless operation, I managed to briok the Board again, after trying to flash a modded BIOS via AFUDOS and /RECOVERY commandline.
Unfortunately I had to learn that Lenovo CAP files are signed and flashing of modified BIOS files is not possible. I tried to force it by using AFUDOS and /RECOVERY and /GAN. Don’t try it.
Also flashing via FPTW is not possible, as Lenovo also enforces the secure BIOS region even if the ME is Disabled. (I do believe that I did flash a 10 MB Image via FPTW on this Board in the past, that was provided by Lost n Bios, why I was able to do so, I don’t know). I think it was because of this Trick: There is a trick you can try, BIOS bug, to see if it’s still left in your BIOS. Put the system to sleep (S3) for one minute, wake it up and try FPT again, see if you get same error (If you do, manufacturer has fixed this bug already in your BIOS).
But as I had managed to unbrick the Board before and had proper working Backups of my BIOS chips, I went ahead to unbrick it.
But this time the experience was more difficult. Mainly because the tools for whatever reason didn’t properly erase the chips.
CH341A version 1.34 reported erasing done within a second, but the chip wasn’t properly erased, and after flashing the chip with the working BIOS, the verification failed everytime. In fact the read from the chip was different everytime I made a new dump regardless of what program I used, from flashrom to latest version (1.41) of ASProgrammer - https://github.com/nofeletru/UsbAsp-flash/releases/
but all dumped inconsistent Binaries.
After several hours of troubleshooting, I understood that the CHIP is not properly erased. Soemtimes reporting that the chip is in an unknown state.
I fianaly managed to erase the chip with flashrom v.1. It did come back with errors, but I did run the erase command several times, then checked with ASProgrammer and CH341A version 1.34 that the chip was erased.
Curiously, I was not able to flash the chips with the same program. The 8 MB chip was finally flashed properly with the ASProgrammer and the 2 MB Chip with flashrom. For whatever reasons unlike last time, the flashing tools wouldn’t allow me to flash without issues.
But after many erase, flash and verifies, with 3 different tools, I managed to flash working BIOS on the Q77 Board again.
This time I used a FPTW dump from my second M92p, which has a DPK in the BIOS.
EDIT: The mistake I made was not cleaning the ME region and so ME willl not work and show as N/A in the BIOS. Please read this INTEL ME => Update FW or Driver-Install fails / Version in BIOS N/A (3) and [Guide] Clean Dumped Intel Engine (CS)ME/(CS)TXE Regions with Data Initialization
To generate clean and Updated ME region with Flash Image Tool and the respositories and flash the -ME region sperately to fix ME. Region. Hint, also unlock the different regions in the Descriptor region to have a unlocked access to the BIOS chip to later flash from within DOS/Windows and be able to easily flash modified BIOS files with FTPW.
Now I also have a DPK in this Board. But I forgot to change the MAC and now have two PC’s with the same MAC ;-). But thats OK, as one PC is connected only via WIFI.
EDIT: The MAC can be corrected by flashing the GBE region from the old M92p. Just do “fptw.exe -f old10mbdum.bin -GBE”. And the original MAC will be restored.
- Another lesson Learned is how to turn a combined 10MB FPTW DUmp into 2 separate files. Its done with Flash Image Tool, which is part of the ME Package made available on this forum.
Just open the 10 MB file and choose “Build”. The files are then split automatically and you get a 10 MB, a 2 MB and and a 8 MB file.
- Another Lesson Learned is regarding the Lenovo BIOS flashback procedure.
It is very important, that after you move the jumper to Clear CMOS position, boot with the BIOS USB Stick and let Flash Back update the BIOS, the system shuts itself down.
Here YOU HAVE TO MOVE THE JUMPER BACK TO DEFAULT BEFORE YOU REMOVE USB AND BOOT up again. Only then is the flash Back procedure finished.
Finally, the error message given by Lenovos BIOS Update utility “Child process failed…” or something like that means, that you need to use a newer version of the flashing tools. For example if you want to downgrade, you have to use the latest flashing tools and replace the old Image file to downgrade.
But the good thing is that the Board is revived after all this flashing nightmare. And I have learned how to use the flashing tools and am not afraid of it anymore, not even flashrom, which is actually the most simple one to use.
And BTW the CH341A USB Progarmmer can be used as a serial TTL device, by moving the jumper from 1 2 to 2 3 position. I was in need of such thing and din’t know that I already had one so I have more use for the programmer than just flashing.
@Spam00r - can you please shorten that title, thanks. Lenovo M92p Q77 Tower BIOS Bricked << Is plenty
This is all normal, BIOS download is often only a partial download. Please attach a zip with both your dumped files, we need to verify they are correctly and valid dumps before you write anything to the chips. Doing this allows you to preserved any board specific details that may still be OK in the BIOS, and it helps you to figure out what software version works with your BIOS chips (verified after reading is not always valid, sometimes it can verify a file of complete FF or 00 if the software version isn’t correct for your chips and that’s all it reads). So we need to check before you do anything.
Do not program anything to the chips yet! I will make you new files to use, this way you will preserve your board details (Serial, UUID, LAN MAC ID etc) and hopefully only have to write to the chips once.
Hi,
I attached both the 2MB and 8MB files to this post.
I read and saved the chips three times and checked that they match each time.
I used Ch341A_Ver_134 to read the chips with a Black and Golden "CH341a Mini Programmer" and a SOP8 Clip.
If you need any other Info please let me know.
Thank you for your Help!
CH25QH16.Backup.1.rar (1.03 MB)
EN25QH64.Backup.1.rar (4.67 MB)
@Spam00r - Here, BIOS region replaced with stock, SMBIOSFlashData transferred, NVRAM volumes x2 transferred In (May fail due to this, will leave out next time if it does), ME Updated and cleaned.
http://s000.tinyupload.com/index.php?fil…192423558996896
The issue is, there is something wrong with the stock BIOS, when cleaning and updating the ME, the generated BIOS files (x3 files - 1x10MB and 2MB+ 8MB) are all broken like your dumps (Missing few volumes).
This normally happens when the FD is messed up from the manufacturer, but I checked and from what I can see all of it’s region location assignments look OK, maybe something in the stock ME settings, not sure
Plutomaniac would be able to tell you if he sees this and has time to check, but it’s not important I suppose (note for him * I get the PDF warning with 8.1.10, not 8.1.40?)
OK Thanks! I will try flashing these files.
Before I flash: Are my Backups OK? I mean is it the best precaution I can do before flashing a new Bios so that I may go back to my current (bricked) state the board is in right now or shall/can I do some more/different backups and precautions?
What is the 10MB file about? What do I do with it? How did you create these files?
Did you check the 2MB file? Did it also look broken to you? I have no reason to believe that the 2 MB BIOS should be broken too. When I started the doomed Bios Update from Windows, the progress bar made several runs, first “Checking” then “Erasing” and then it got stuck at writing/flashing at 1% or so and never progressed from that.
The reason I believe the 2MB BIOS should be fine is that I can still do “Boot Block Recovery” with this board and a official Bios on USB STick or CD. The BootBlock Recovery shows video and the “Recovery BIOS Progress” reaches 100% and apparently completes just fine, but nothing changes, I still get 2 repeating beeps and no Video/POST. So not the whole BIOS is fried. SO my guess is/was that the 2MB Chip contains the “BootBlock recovery”. But I’m not sure maybe the BootBlock can also reside on the same chip at some earlier or later section of the chip. And in my case maybe that section was left unharmed but still the function of the BootBlockFRecovery fails in my case eventhough it executes just fine.
I compared the 8MB and 2MB binary dumps with the ones posted in this therad: Lenovo M92P SFF, no post/video, 2 beeps…
And I agree that my 8MB file has large sections with FFFF’s in it, while the good ones posted in the other thread has some systematical data and strings in it. But I’m not sure about the 2MB file.
Shall we wait for Plutomaniac’s input about the errors you get or can we later come back to the current state and try again? If you tell me to go ahead, I will try flashing the 8MB chip first and see whether the Board POSTS and if not then also flash the 2MB Chip.
You’re welcome. No, your backups aren’t OK to use, at least not to recover the board with. You can put them back in and be a brick again if you wanted, but that makes no sense for you or me to even type out 
10MB file is the combined BIOS, not useful for you right now but could later be used via Intel FPT if you unlock the FD first (I didn’t do that, since you didn’t mention) - guide is here if you want to do it, if you do, you’ll then need to split the 10MB file into 8MB and 2MB after you make the edit (8MB is the first half)
See second spoiler in section “B”, first image, for the actual edit - [Guide] Unlock Intel Flash Descriptor Read/Write Access Permissions for SPI Servicing
10MB file is created by combining your 8+2MB BIOS files, this is done via hex to make a complete BIOS file. Then that is used with Intel FIT to clean and update the ME FW, then it puts out all three files once it’s done (10MB + 8MB + 2MB - broken in this case, as mentioned)
I take the 10MB broken file it made, pull the clean and fixed ME, and then put back into pre Intel FIT program 10MB file I already created prior from your original BIOS dumped + board specific info I pulled and the stock BIOS region in the download package, then rebuild it all.
I checked BIOS as a whole, worked on that, split once done. The BIOS you’re comparing with are not same BIOS as your system.
These 2MB and 8MB BIOS are not separate things like you think, the BIOS is split in the middle and put on both chips and the split is not at any “This here, that there” kind of way, it’s split right in the middle of a BIOS module.
No need to wait, go ahead, I was only dropping that there for him to inspect if/when he had time, since he writes the guides for using the ME tools and knows how to easier notice what caused the issue to begin with.
I already noticed right away in the middle of the rebuild, and avoided the issue, but that same thing is what bricked your BIOS.
There is no program one chip then test, program both at once or your only putting on half the fixed BIOS.
Understood! I will report back later.
Awesome! It worked!!!
I flashed both files and the system posted and booted up as if nothing ever happened. The Bios Settings were gone and I had to reset everything, but now my system is back from the dead. I also updated to the latest BIOS from 12.2018 via USB method and my system is now fully up to date. I noticed that the DPK, Digital Product Key is now missing. But doesn’t make a difference WIndows is still active.
The Ch341A Programmer worked flawless! The hardest part is to ensure that the Testing Clip has a proper contact to the chip. It took me dozens of tries to get a good connection with the chip. The chip is too damn tiny. But once the clip is connected, the chip is identified instantly and flashing works flawless.
For further reference could you link to some tutorials on how you created the two good Bios files, becouse that was the key part in my case to get the system back running. All guides online just tell you to download from the manufacturer and flash the Bios, but in my case that was not so easy couse the manufacturer does not provide a complete BIOS and on top of that I had two chips to flash, something I have never head read in any guide before.
Without your help I wouldn’t have had a proper Bios to flash. SO it would be good if you link to or point out in some tutorial how you baked that good Bios without having a working BIOS to start.
BTW: I have also an M93p. Is there a way to make a complete backup within Windows of the binary image of the BIOS or in this case multiple BIOS’s so in order to make sure that I have a fully working Backup of the chips that I can flash if something like this happens again? I always thought that I’ll only need a download from the manufacturers site, but I was obviously wrong. Making a backup with the CH341A is difficult as I will have to disassemble the whole pc in order to reach the chips and putting the clip on is not easy and requires a lot of luck. Can a backup be done within WIndows on a working system?
Lost_N_BIOS Thank You very much. You have helped me a lot.
You guys are doing an awesome job here! Thank you very much!
@Spam00r - thanks for report back, I’m happy all went smoothly and fixed the system for you (I knew it should  )
)
DBX, DB, KEK, and PK are in the NVRAM, but maybe they were corrupt in your dump? We could try copying back in your dumped BIOS main BIOS volume/region and see if it’s still OK.
Since we know NVRAM x2 volumes were OK, that only leaves three other volumes to copy over, I could do them one at a time in another BIOS, then you could test all three if you wanted?
Once all was in, it would be back to original BIOS basically, except for the screwed up region alignments/512bytes extra at end that I mentioned in your dumped BIOS and what gets created with the linked stock BIOS when running it through Intel FITc too.
Did you unlock the FD as I mentioned before you programmed it in? If not, then I would have to do that for one BIOS for you, and then on all subsequent, but you’d only have to “Program” in one more time with programmer, then after that all further tests or reflashes could be done via Intel FPT software in windows or DOS
Sorry, there is no guide that I know of for this kind of BIOS rebuilding or compiling from stock and dumps etc. I only know it from experience and doing often.
It is easy to do, especially if you aren’t trying to copy back in board specific details (Serials, UUID, etc), but adding that to the mix it does get a little involved and you have to either already know that info so you can try to locate it via hex or other BIOS tools, or know where to look in the BIOS to pull/copy this data over into the new BIOS.
Mainly, to make a working BIOS from your two dumps, without considering serial or LAN MAC etc. I took your two dumps, and appended them in hex. Then open this combined image in UEFITool
Then in another UEFITool open stock BIOS (already pre-extracted from the ISO, or don’t download the ISO package) and extract body of the BIOS from capsule (right click capsule, extract body) - this is your main BIOS Region
Go back to the combined dump BIOS you have in other UEFITool, expand to find the main BIOS volume (BIOS Region) and replace as-is with the stock extracted from capsule BIOS region.
Then you are done here, unless you want to update/clean ME, which I did just in case the ME was messed up, guide for that is here in the ME forum section
For this instance, if you do that with ME, once done, extract the ME region and save that, go back to your finished BIOS above and replace ME region (Since output from clean ME process is broken due to stock issue I mentioned)
Once done doing everything, you open BIOS in hex and select first 8MB (800000h) and copy or cut and then paste into new file, save as your 8MB BIOS.
Back on the 10MB file again, if you copied previously, now select inverse, or select last 2MB of file (200000h) and then cut/copy paste into new file and this is your 2MB file.
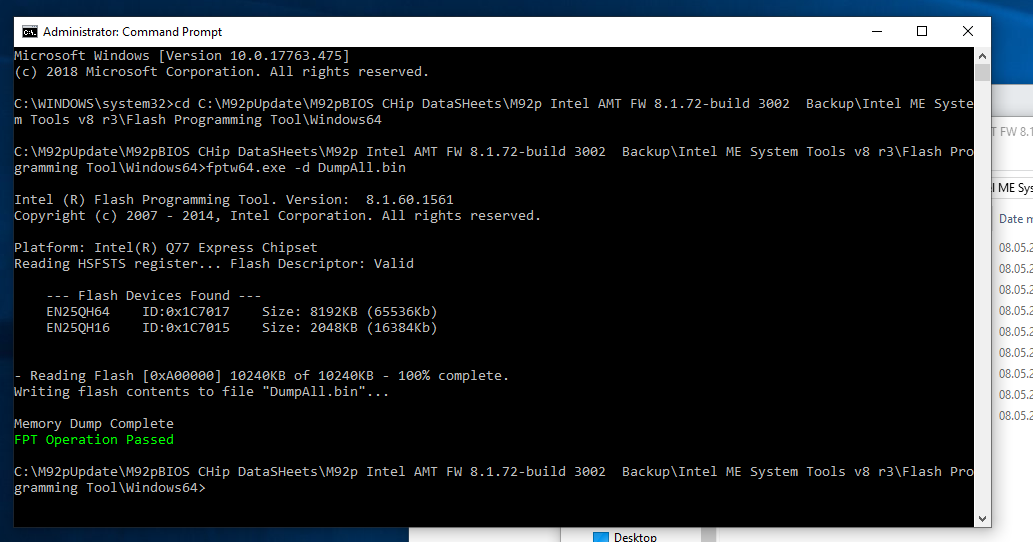
For the M93P, you can dump BIOS region using FPT (FPTw.exe -bios -d biosreg.bin) and then I can give you a 12MB file with FF’d out BIOS region, to put your BIOS region into, since I already have someone else’s dump of this model (BIOS region dump will be 6656KB).
Check BIOS main page and see if ME FW version is shown, if not then download HWINFO64 and on the large window on left side, expand motherboard and find ME area, inside that get the ME Firmware version.
Once you have that, go to this thread and in the section “C” download the matching ME System Tools Package (ie if ME FW version = 10.x get V10 package, if 9.0-9.1 get V9.1 package, if 9.5 or above get V9.5 package etc) - in BIOS dump I have on hand the ME FW is 9.1
Intel Management Engine: Drivers, Firmware & System Tools
Once downloaded, inside you will find Flash Programming Tool folder, and inside that a Windows or Win/Win32 folder. Select that Win folder, hold shift and press right click, choose open command window here (Not power shell).
At the command prompt type the following command to dump the BIOS region >> FPTw.exe -bios -d biosreg.bin
You’re welcome, and thank you too! 
I’m sorry I can’t provide easy to follow guides for this scenario, hopefully you can absorb some or all of how I mentioned to do the process above
With the binaries you provided, the Brick is nearly completely fixed.
The most important thing for me was that I can use the Hardware again, which is now possible thanks to your binary.
The only Issues I have encountered are:
1. Windows is not activated anymore.
As the DPK, Digital Product Key is missing form the BIOS, WIndows has today decided to display the “Activate Windows” Watermark. I don’t know how big of an issue this is wether this is just a cosmetical issue or at some point Windows will stop working properly. I updated from an Windows 7 install to WIndows 10, when the Update was available for free and WIndows never asked me for a Key. The WIndows Key is on the Sticker on the PC case I may try to activate windows manually via several means and I may have to read up how to generate the DPK and enter it. But also that does not stop me from using the hardware.
2. It seems that the LAN MAC Address in your baked Firmware is different from my original firmware.
Did you use the MAC address form the BIOS Backups I provided or did you just use a random MAC Address?
Also this is not a big issue either. I just noticed that my router recognized the M92p under new MAC address now. But for everyday work, it does not matter what the MAC adress is. Or does it?
So technically my problems are solved, but as it was kinda fun using the BIOS Programmer and reviving my Board, I’d like to procede the way you have proposed and try to fix the BIOS 100% with my old settings.
Unfortunately I did not unlock the FD before flashing with the BIOS Programmer and consequently FPTW wouldn’t let me dump ME and all regions. Only specific regions like DESCRIPTOR, BIOS and GBE. PDR Region did not exist btw…
The reason for this was: 1. I forgot to do it! 2. I read somewhere that for security reasons it is a good thing that the FD is locked, as some viruses may exploit it and brick your PC on BIOS level. Also I didn’t understand the advantages of an unlocked FD until now. If it lets me making full Chip baclkups without having to use the SOP8CLip, then I’d like to at least temporarily have an unlocked FD. Also I have some vPro Wirless cards not recognized issues that may require further flashing later on where it may be good to have FD unlocked and be able to flash from within windows. But i will adress that wifi issues later.
I did some reading and I think that my Board may have a jumper that disables ME and maybe that would also unlock the FD. I’ll try that and if it works, then I would be able to make flashes with the FPTW tool instead of the BIOS Programmer, which works fine if it wasn’t so difficult to get a good hold of the chip with the clip. But if that is necessary, I would do that again. It would be a pity to use the programmer just once. I waited since january for that thing to arrive.
I couldn’t figure out what the other abbreviations DBX, DB, KEK, and PK mean. But I understand that you used more generic code than it may have been necessary and thus some of my system specific information like the DPK, Digital Product Key and the other abbreviations may have been overwritten by the generic one and thus I’m having the Windows activation issue and a different MAC address.
You have already helped me a lot. If it isn’t too much work for you, I’d like to proceed the way you have proposed out of academic curiosity and fun and try flashing Binaries where you have replaced less code with Generic one in order get back a BIOS that is as close to my original as possible. Now that I have all the tools at hand that I need and have successfully revived the Board, I feel confident to flash the Board again.
Please provide the BIOSes as you mentioned and with the FD unlocked, in case I’m unable to do so with alternative means. Meanwhile I’ll test weather I’m able to get the FD unlocked via Jumper Method or other Methods as described in this post: [Guide] Unlock Intel Flash Descriptor Read/Write Access Permissions for SPI Servicing
So that I can do the flashing from DOS/Windows with FPTW instead of CH341A, which would be far easier and avoid the Chip/Clipping odyssey!
For the M93p: Can you please provide the 12MB Dump you have. I’ll do the FPTW dump of my M93p once I’m finished with the M92p BIOS recoveries.
BTW: After successfully flashing the BIOS files you had provided, I downloaded the Latest BIOS from Lenovo and updated the BIOS Version form 2016 you had used to the latest from 12.2018 via USB Method, so that both my BIOS and ME have the latest Version installed that Lenovo has released for the M92p. After that I did a BIOS region dump of the M92p with FPTW and compared it to the CAP file that I used minutes before for the flashing but they were not 100% identical but maybe around 50% of the code in Hex was identical. Is that how it is supposed to be?
Thank you for your help!
Don’t try to activate, just ignore that for now until we’re sure we can’t fix via BIOS. I will put together more BIOS for you to test out tonight, with more of your original BIOS contents in there and see if we can get the activation stuff fixed.
LAN MAC ID (4 Ethernet LAN) - 40:2C:F4:EB:8C:22, this is in your original dump, I left in place and carried over. Do you need it changed to something else? This may be all that’s breaking the activation, but probably not.
FD unlocked is fine, unless you’re super worried someone is going to be there at the computer and have physical access to the BIOS to reflash it and gain control via BIOS backdoor (That is only way this is possible, in person at system) - but yes, it is possible, usually in “Spy” movies
Yes, if you have a ME/FD/FDO/Service 2 pin jumper, that will disable ME and I believe allow you to also rewrite the FD (which you can do by itself via FPT >> Dump >> FPTw.exe -desc -d fd.bin >> Flash back >> FPTw.exe -desc -f fd.bin
Those abbreviations are just BIOS module names that usually hold the windows activation stuff, but it may not all be there, you’re main key file may be stored inside some other module I didn’t copy out from your backup region. Don’t worry, we’ll get this fixed, provided what we need from the backup isn’t part of the corrupted areas.
OK, I will work on BIOS tonight for you when I have more time. And yes, once you program in next one I send I’ll unlock the FD, so from then on you can FPT flash and not have to use programmer each time. And then once we’re all done, if you want, you can put back locked FD.
M93P I will send out tonight for you too.
comparing 2016 BIOS to 2018 BIOS, lots would be changed, so sounds normal to me. I used whatever BIOS you linked above (20MB ISO) as my source, sorry, I assumed you’d link latest BIOS.
You’re welcome! I will get you some files tonight, hand tight and don’t try to activate or it will try to tie that system to a new key and you’ll be screwed and have to call in and try to wrestle with them
Forget that MAC Address thing. I think I just mixed up the MAC Adresses in my Routers Log files. The Mac 40:2C:F4:EB:8C:22 is the correct one.
Regarding the BIOS Version: Yes I linked you to the 2016 BIOS that according to my examination of my original dumps was the BIOS that was originally flashed on the board before it was bricked. My thinking was, that I shall flash the exact BIOS that the Board expects and not a totally different/new one. I didnt want to make too many changes. But as I wiped the entire chip, we schould have used the latest BIOS available.
For ME, you used the latest Firmware that is available from Lenovo: https://download.lenovo.com/pccbbs/think…8.1.72.3002.exe
So in order to have everything updated to the latest Version, After I did the recovery with your 2 BIOS Binaries, I downloaded the latest BIOS from December 2018 from here:
https://download.lenovo.com/pccbbs/think…s/9sjt9cusa.zip
This is the USB Version and I updated to the latest BIOS vie Lenovos own USB method.
EDIT: The Version Missmatch in Intel AMT must have been a Brwoser Bug. It now also shows the 2018 BIOS verison in intel AMT Website. Maybe that information was cached?!? Just ignore this:
Everything looks good, the BIOS Menu shows the correct 2018 version, also CPU-Z reports this, except for the Intel AMT website, which strangely still shows the BIOS to have the 2016 Version. See the following Pic:
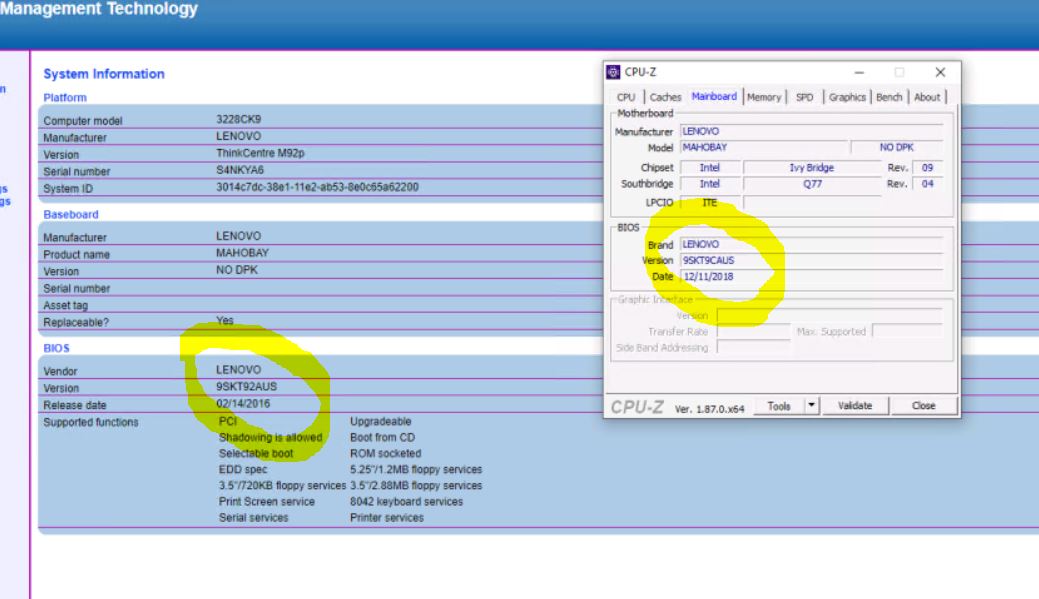
it looks like some part of the Firmware still has the old 2016 BIOS version inside it, that does not get flashed away when I updated to the latest BIOS version from Lenovo.
I think it would be best if you just use the latest BIOS instead of the 2016 one. Just take the BIOS from this file: https://download.lenovo.com/pccbbs/think…s/9sjt9cusa.zip
The Intel ME Version you used for the last files you created were already the latest ones that Lenovo is providing here: https://download.lenovo.com/pccbbs/think…8.1.72.3002.exe
The comparison that I made was after updateing to the 2018 BIOS, I dumped that BIOS Region with FTPW and compared it with the 2018 CAP file I just flashed and there were many differences which I did not expect. Please see this image:
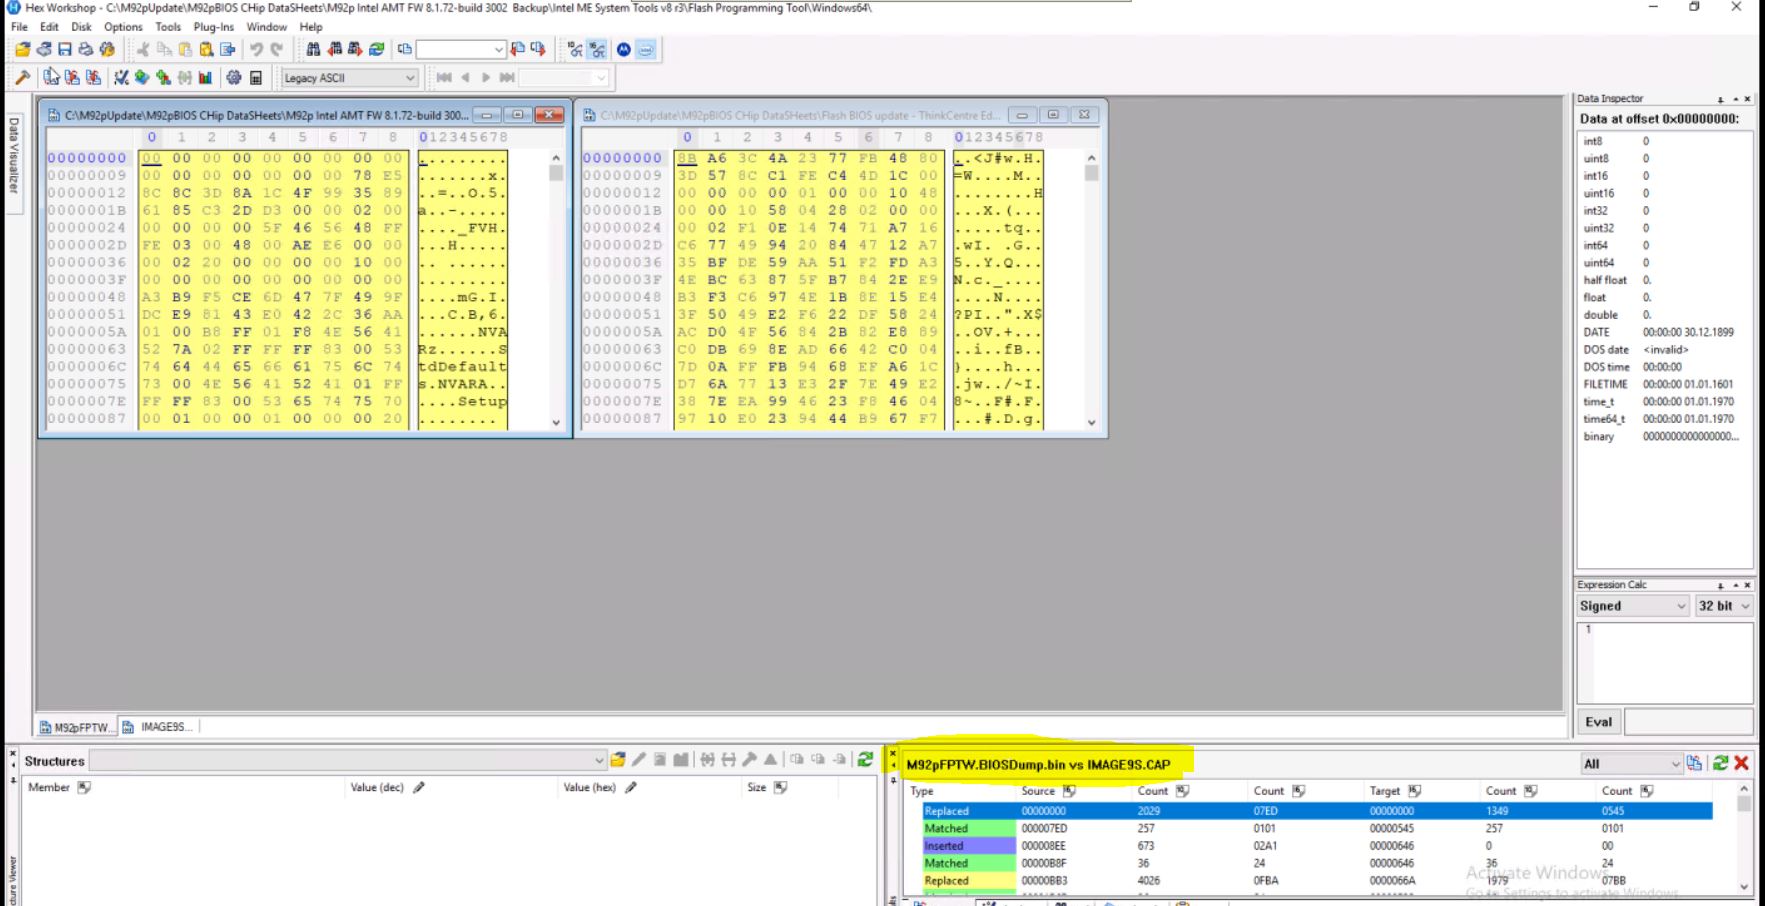
The BIOS Dump with FPTW and the cap file are sizewise identical except for the CAP header. And there are similiar regions containing code, but also many mismatching regions, which I did not expect becouse I was thinking I was comparing the same files, One before the flash and one dumped back from the Board after the Flash using FPTW dump method.
I have Unlocked Flash Descriptor via the ME Jumper Settings!
I just dumped the whole 10MB Binary from the two chips.
No need for the SOP Clip trouble. Flashing now will be easy!
Hint for others: You need to reboot twice after setting the jumper. After first boot nothing seems to have changed.
@Spam00r - For ME FW, I did not use Lenovo anything, that is latest Intel ME FW Base I used as clean base and transferred your MW FW settings into it using our clean/update ME Guide here, so that has nothing to do with BIOS or BIOS version anyway.
For now, it would be best if you reprogram the BIOS I sent you (Both files, and do not update anything until we’re done doing what we’re doing here). This way there is no mixed old and new BIOS modules while we try to get your windows activation corrected.
Usually it’s in modules I already put back in, so it’s possible I need to fix the ME with same exact version as a test in case that is part of the stuff it collects to encrypt and lock itself to a system (Which it would then update as you update BIOS/ME normally)
The last two volumes of your BIOS dump are what is corrupted initially, hopefully the missing activation stuff is not there. I was able to fix both, so we can use them now instead of stock ones!
AMT also has nothing to do with BIOS really, this is ME FW stuff too. Please stop inspecting and updating everything until we are done. Once we’re done, windows is back activated, and LAN ID"s are all correct (Serial too etc), then you can update whatever you want.
Again, comparing BIOS from 2016 and BIOS from 2018 is pointless and only waste of your time, there will be many changes even if you compare two BIOS from 2016 too
Especially due to how you are looking (via straight hex) and how the BIOS is compiled half of modules compressed mainly w/ Tiano other modules non-compressed and some might even be LZMA compressed I didn’t check them all, so overall file is (compression/non-compression)
Two BIOS from same day one minute apart even same BIOS will look different due to compression used would change the contents each time it’s recompressed.
Great you now know the FD can be unlocked via jumper. Did you dump the FD and edit, then flash back, then remove jumper?
If not, it’s OK, but that’s how you unlock the FD, or you can just use the jumper left in the on position, then update BIOS as needed, then once you are done remove jumper (this instead of unlocking FD, same effect in regards to what we’re doing)
Here, for now, test one on getting windows activation again, this is your original BIOS dump, fixed (I changed nothing except fixed the broken signature of the last volume, which in turn corrected the 2nd to last volume stuff that made me think it was corrupted too - so it never was, only last volume)
This may not boot, still may be broken, but I want you to check this first since our goal for now is to get windows activated and this is the best first thing to check, no actual BIOS changes only fixed the thing in original dump that broke it (4 bytes in the entire file)
So, if this boots, and windows is not activated, nothing further we can do, except you call in and hopefully the computer will reactivate you normally, if not speak to agent and tell them (same system, only one system = “windows activated on?” ), BIOS recovered and then activation failed
Do not edit these files, do no unlock the FD in these files, until we get this windows activation sorted don’t do any edits or updates on your end other than what I send you
http://s000.tinyupload.com/index.php?fil…678445169279136
Write both 2MB and 8MB BIOS files with this, or first >> with jumper on use FPT and 10MB file using this command >> FPTw.exe -rewrite -f 10MBFile.bin
Then, if after the above FPT write it fails to boot, then re-confirm it’s a fail by writing both 2+8 in with programmer as double-confirmation this does not fix the BIOS, then we’ll move on from there.
Once BIOS is OK, and windows is activated, then I can show you how to update ME the normal way using ME FW updater (Unless this ME FW is corrupted, remember I touched nothing in this BIOS so ME may be messed up, in which case we’ll update via FPT)
OK Thanks for the new files: I flashed that 10MB file with FPTw and the flashing completed successfully. I only got a yellow warning that there is no PDR Region.
System Booted with a 8/5/2015 BIOS Version 9SKT90AUS. The Windows Watermark is gone (for now), but the Bios and CPU-Z still says “NO DPK”.
Last time it took Windows a few hours to display the Activation Watermark. I guess Windows will show it again soon. I did a “slmgr /xpr” in command prompt and it tells me “Windows is in Notification Mode”. So its not activated but in “Grace Period”.
Sorry last time I updated to the latest BIOS, because I thought we were done and everything is back t normal. Because all I wanted was the latest BIOS and ME version installed. I didn’t expect the Activation troubles and only later saw the DPK missing message. Also the Windows Watermark appeared only later after a few hours. I’ll not update the system now until you say we are done.
I don’t want to and don’t need to unlock FD via Hex editing. As I now know that I can unlock the FD via the Jumper setting just fine, that’s the best solution for me. I will keep the system in unlocked FD mode until we are done here.
SO you say there is nothing else we can do to fix the Missing DPK info if that file that I just flashed didn’t fix it? Strange that DPK is missing even though you just changed 4Bytes. Did you also downgrade the ME Version to the one I had during the Bricking, which was: Intel ME Version is: 8.1.65.1586? I saw that the version you used is 8.1.0.1265, which is older than what I had at the time of bricking. I thought you just updated 4bytes?
So what do you suggest? Shall I leave it at that and try activating Windows via alternative means? For example manually with the Microsoft Sticker on the Chassis? Because the Activation is the only issue I see right now. And that can be fixed alternatively I think if the BIOS can not be restored 100%.
@Lost_N_BIOS Can you please advice wether you have any other suggestions for me?
If not I would update to the lates BIOS version and try to activate Windows alternatively.
Thanks!
@Spam00r - Very sorry! I just found this thread while looking at M92P dumps I had, and see you posted some replies I missed!
As to your question on post #15 about ME FW versions, I checked the file I sent you (in OGDump-Fixed package) and the file you originally gave me, both have ME FW version 8.1.65.1586 (you can confirm this in MEA tool)
Did you get activated? I checked the BIOS dumps you sent me, and I see this in regards to DPK, so looks like it never used DPK anyway (This is your dumped BIOS, already says No DPK in BIOS itself)
That may be from the BIOS update crash, or some interim thing is placed there and would have eventually replaced with your key if it had not crashed, I am not sure. Probably this, since it crashed mid-update and I simply fixed your BIOS by correcting a few bytes
@Lost_N_BIOS @Spam00r
Was the 10MB bios file modded?If so,run the fpt,it should get error 280.
So I am amazed that you flashed completed successfully.
@gloobox - this is old Aptio IV - probably safe to flash with AFU methods, I suggest the “Flash stock, then without reboot flash mod” method, before trying ES/GAN version
Spam00r was using flash programmer here, at first. But, this board has a 2pin service jumper, which unlocks it all, so that was also used later in this thread
So, you can put on jumper, dump BIOS, unlock FD, remove PRR lock, program back and then remove jumper and it will be all unlocked for FPT flashing provided you use that BIOS as your base moving forward it will remain unlocked.
To remove FPRR/PRR error, I posted the edit info here (may be different in your BIOS if it’s not -9SKT9AA-7-2018-9sjt9ausa) - Lenovo M92P SFF, no post/video, 2 beeps… (2)
@Lost_N_BIOS
Did you mean the services jumper is the ME_DIS jumper? (picture below)
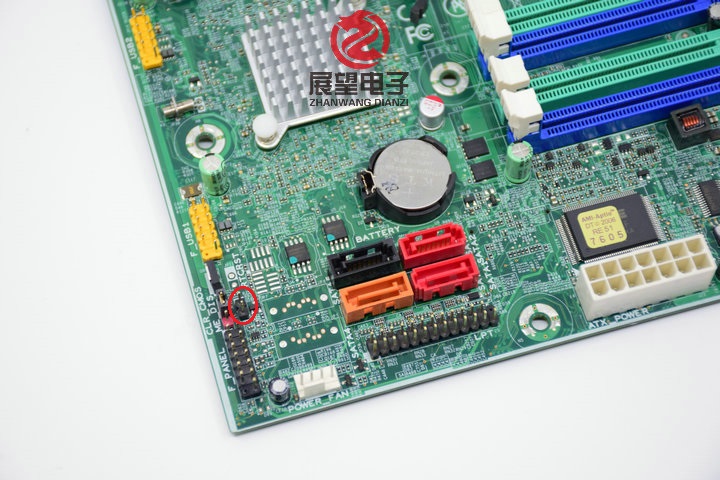
If so,I tried many times to put on the jumper(would it be unlocked FD and removed PRR lock after putting on the jumper?)
Then I dumped BIOS,modded BIOS,flashed it back by fpt.but it still showed error 280.
The bios version is 9SKT70AUS.