DELL BIOS MOD REQUEST:
Hi, I bricked my laptop while trying a basic reinstall of Windows 10, my USB device didn’t appear in the UEFI Boot Menu so I selected to try the Legacy Boot Option, the USB drive appeared I selected it, it loaded but said it couldn’t find a bootable image, I pressed the option to reboot and from then it has been bricked, I think I’m stuck somewhere between POST and the BIOS due to some bios settings enabling legacy but being blocked by boot guard/secure boot or similiar, it powers up for a while (10 sec) then the fan revs up and it shuts down. I can enter the BIOS recovery by pressing ESC and CTRL while plugging in the AC adapter, it reads a Bootable USB stick but I get nothing onscreen, i think the boot guard is blocking the drivers from loading.
I purchased a CH341A Flash Programmer with SOP8 Test Clip and have extracted the BIOS from both my bricked XPS 9550 and another operational XPS 9550 I have borrowed using Flashrom on a Raspberry Pi, these BIN files are in the same directory as the RW Everything Report below. I thought it would be best to reflash the bricked XPS bios chip with the image extracted from the operational XPS bios chip, but after reading about all the Device Id’s etc, I’m not sure how simple that is or if the normal SLIC process would be sufficient. Do i just need to reset the NVRAM?
I’m very well out of my depth in this regard, I have been doing a lot of reading but I’m still not feeling confident with what I have to do exactly, so if someone could help out it would be most appreciated.
-Manufacturer: DELL XPS 15 9550
-Motherboard Model: 0N7TVV
-Bios revision: 1.11.2
-Bios Type: Phoenix BIOS
-Bios Download Link: https://www.dell.com/support/home/a…5&oscode=wt64a&productcode=xps-15-9550-laptop
-RW Everything Report Download Link: Google Drive Folder
I cloned the SSD from the bricked XPS device in a PciE adaptor, the Windows 10 OS actually booted on my Desktop as it must have take boot priority.
The RW-Everything dump was from the new operational XPS, so i don’t know how useful that will be.
I have taken multiple reads from all three Winbond chips on both the old bricked and the New operational XPS 9550, they can be found in their respective Google Drive folders. I must be getting some read errors as UEFITool doesn’t find all the same info in all .bin files from the same device. Google Drive Folder
Thanks again ![]()
@coatman - What you mentioned would not brick BIOS, unless some rare glitch or a memory error/issue causing a glitch on save and mess up BIOS that way. Remove all USB and HDD/SSD etc, and then boot, you should be able to enter BIOS or see a boot menu screen.
You cannot make any changes in BIOS that would affect boot guard or anything like that, I mean at least none that would brick the BIOS or not let you enter BIOS due to the changes.
As mentioned, you can enter the BIOS, get into BIOS and load optimized defaults, then reboot
If you program in another boards BIOS, you will loose all your board specific info that’s in your current BIOS (Serial, Asset Tag, Service Tag, UUID, LAN MAC ID etc)<br />
From what you mentioned, I think you just need to enter the BIOS and reload optimized defaults as I mentioned above.
The 16MB chip is the BIOS, this is only one you need to read or write to, and this is only one that will open in UEFITool.
But I don’t think your system is bricked, since you said you can enter BIOS >> This = not bricked
I have not checked anything you linked above, it’s too much mentioned to try and sort through when I don’t need any of it but one file anyway, and I hate google (even when it halfway works for me, which is rare).
Upload your dumped BIOS ONLY, to this site and I will check it and fix for you if you think it must be fixed. - http://tinyupload.com/
@Lost_N_BIOS - Thanks for the quick reply, its most apprecaited.
I don’t know a whole lot about bios etc but i am quite confident it is bricked i cannot acces the BIOS, none of the keys such as F2, F12, Esc are doing anything. The only action i can get a response from is the Dell Bios Recovery, from power off holding Esc+Ctrl while plugging in the AC power, this gets the USB drive to read but i get nothing onscreen. I can also do a screen test, where the screen shows various colours.
I think you are right that it was a glitch during my use of the onetime boot menu, i selected to try the legacy boot option/disable secure boot, it found my usb drive but once selected it found no bootable image, it gave me an option to reboot, which i selected and since i have not been able to get any further than POST, no DELL or Windows logos etc. It actually seems pretty common with the models and these bios versions and DELL has been quite erratic with new updates to fix issues.
I think because i didn’t complete the normal onetime legacy boot menu process properly it’s stuck between settings, i think it’s set to Legacy but the secure boot has been reenabled blocking drivers from loading.
I have tried booting with the SSD and RAM removed and i still can’t access bios.
I thought maybe just clearing the NVRAM might be enough to clear the settings, but via external flashing this seems a bit risky as per your mention of board specific info.
Sorry for overloading you with files, i am just a little suspect of my dumps as there is some minor variation between the dumps from the same chip on the same device etc and i don’t have enough experience to tell whats usable. I used Flashrom on a Raspberry Pi as it’s suppposed to be more reliable, but i still got some variation between files, i couldn’t find an option to verify on read. I thought with several you could work out if they are consistent enough for modification. I have upload a zip with 3 files, the bricked7.bin is the one i think is best, they were are dumped with the SSD, RAM, Battery and CMOS removed.
TinyUpload Link: http://s000.tinyupload.com/?file_id=84337202589506763841
Thanks again for the help 
----------------
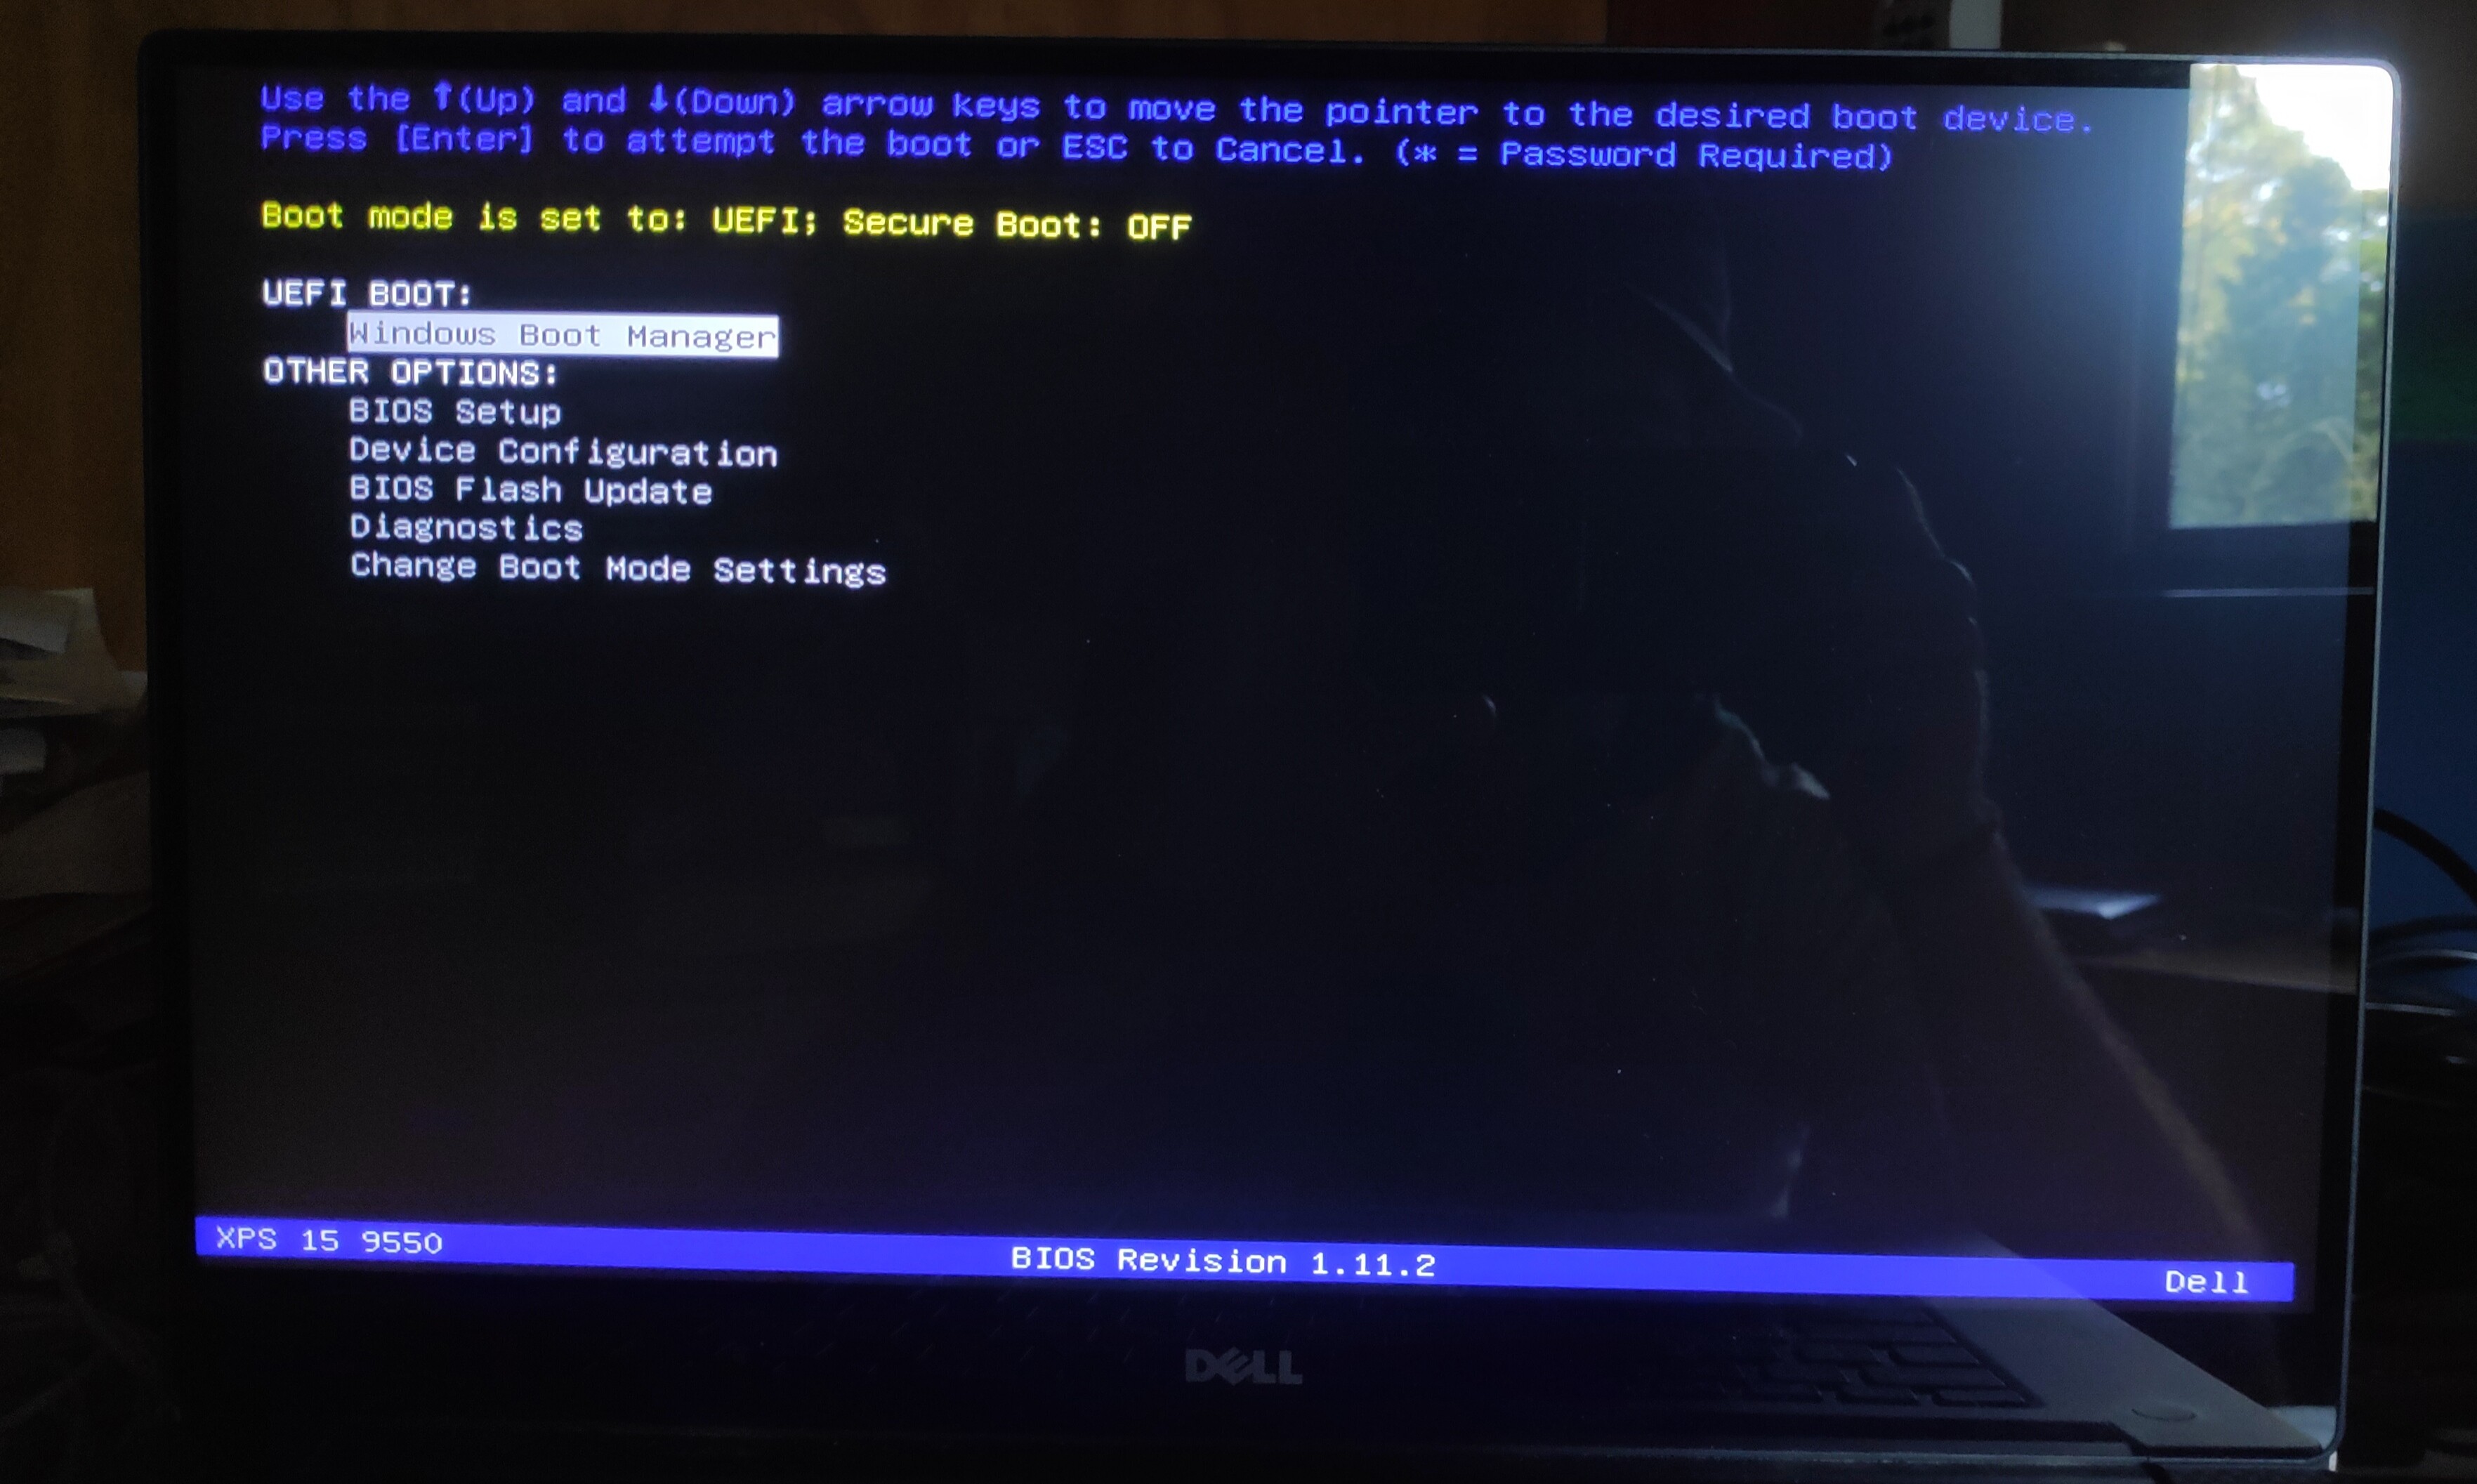
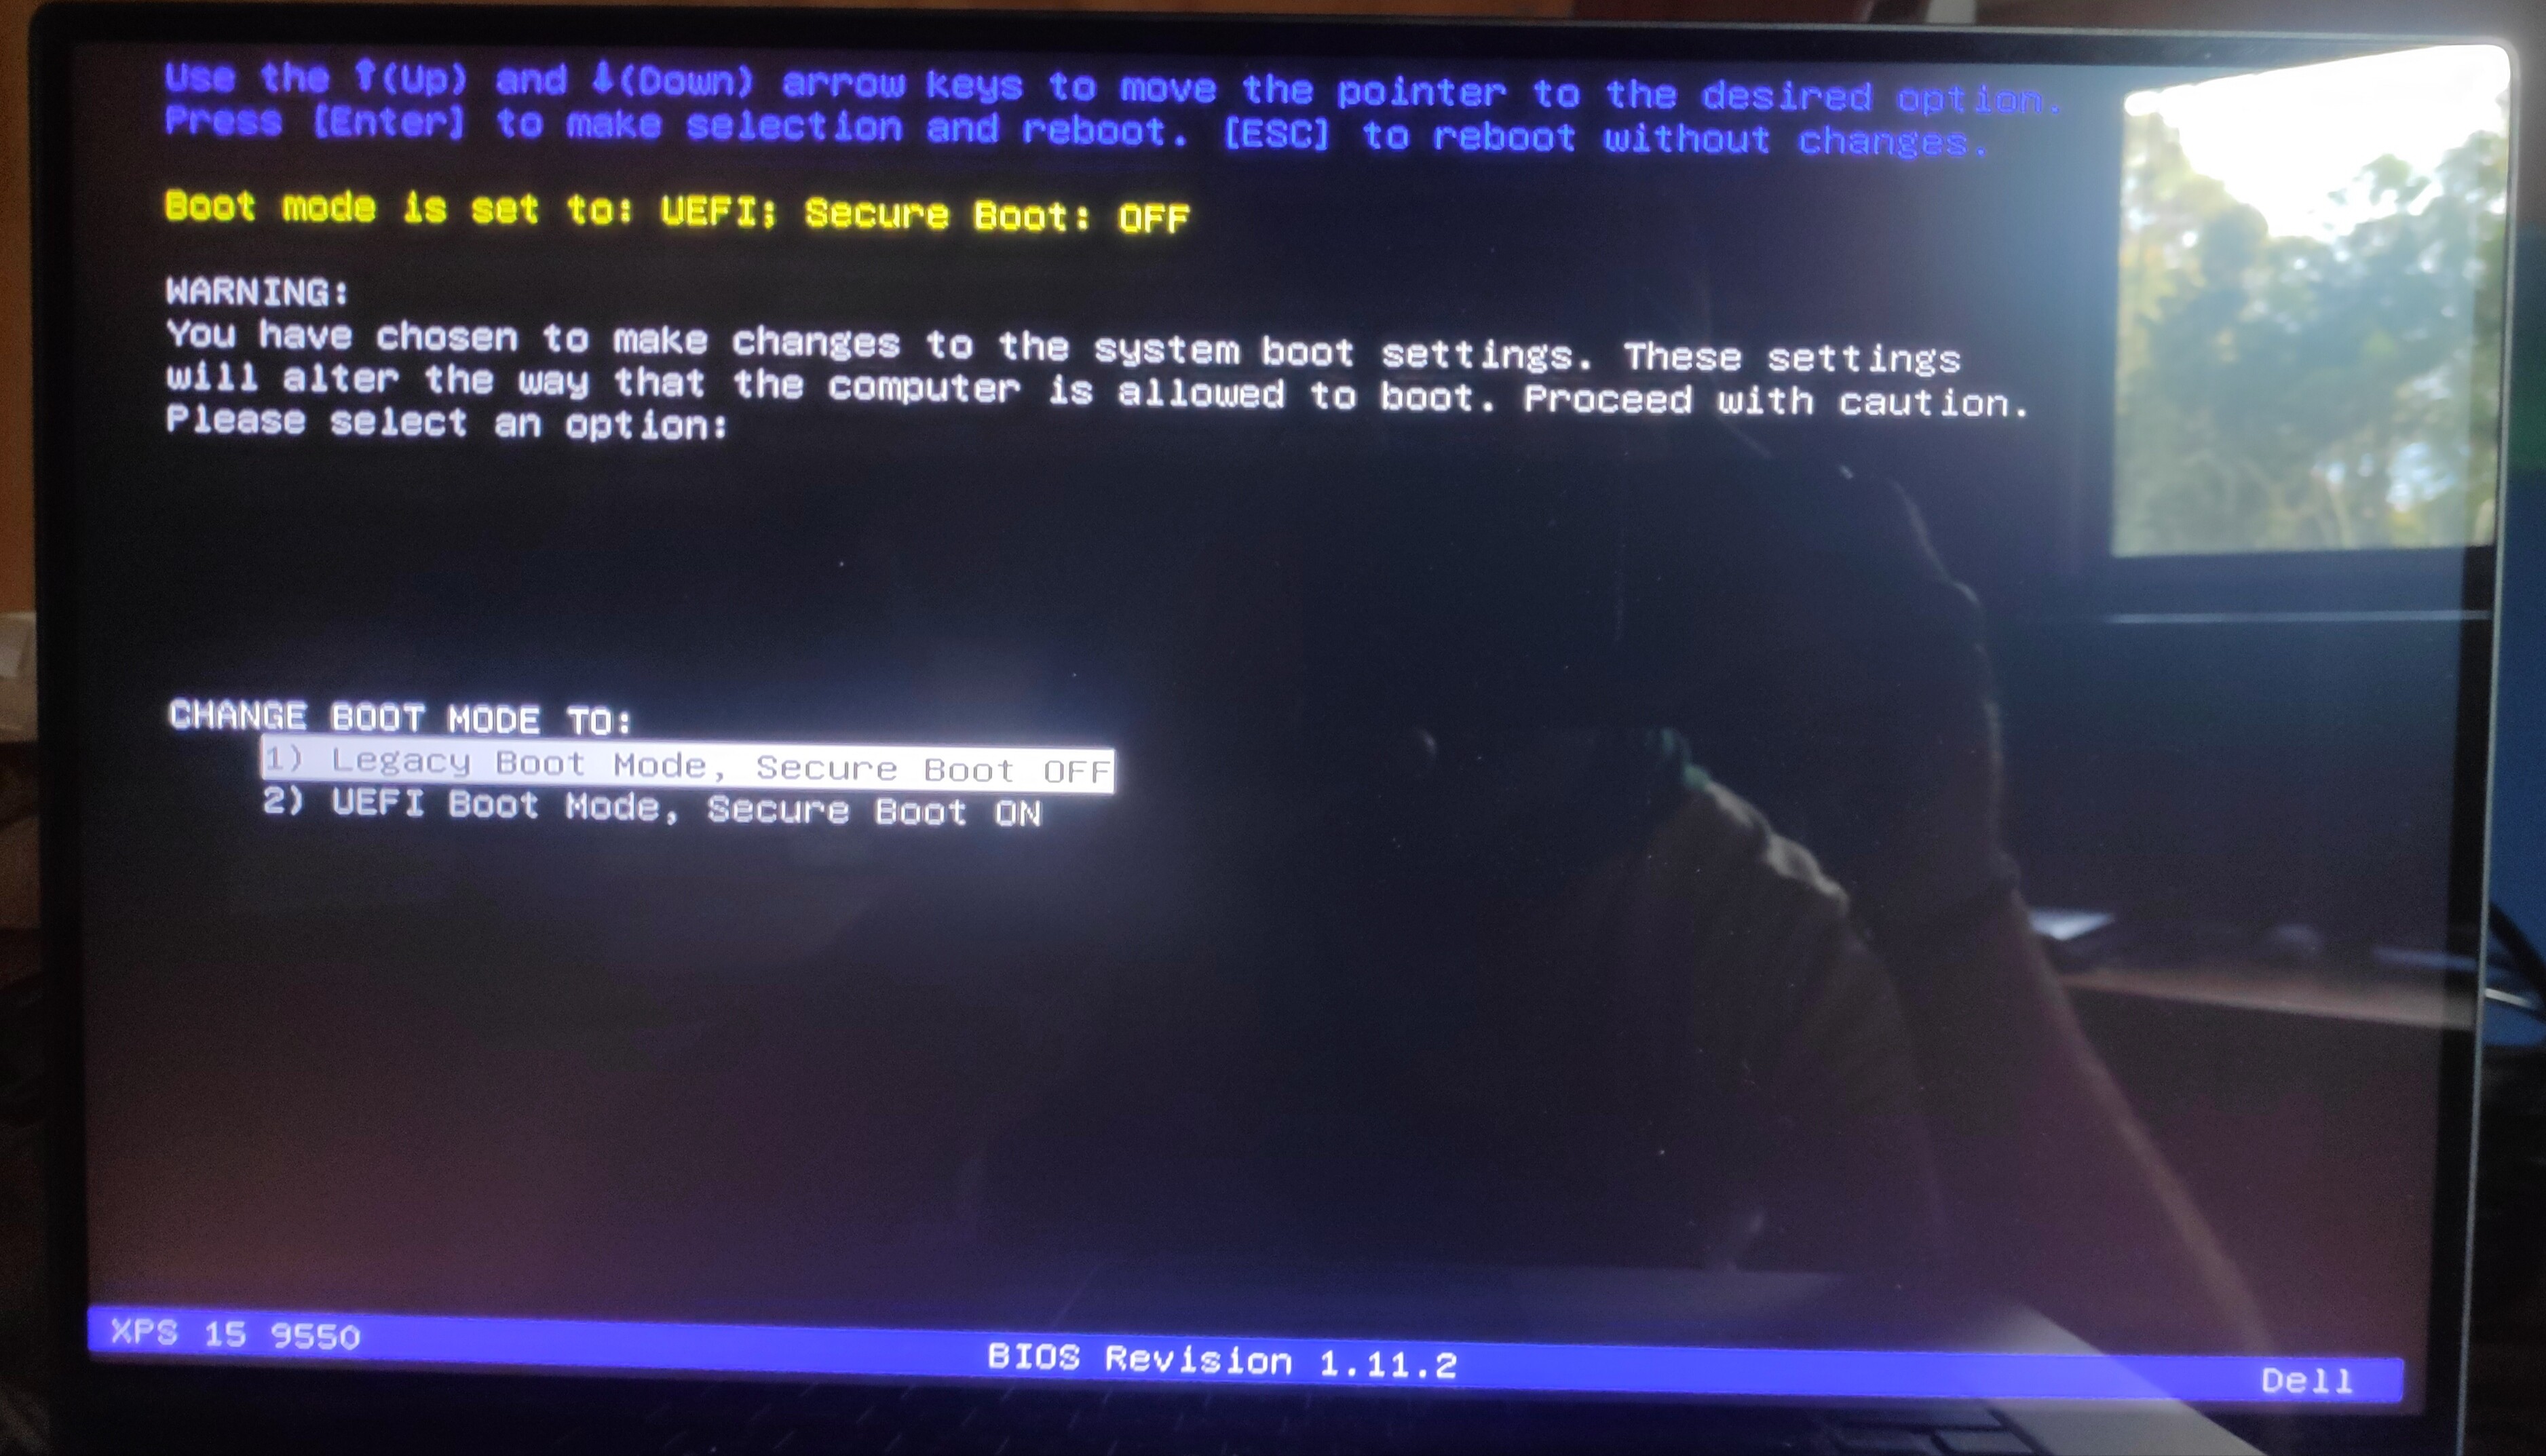
@Lost_N_BIOS attached are a couple of images of the Boot menu items I selected.
You said you could access the BIOS in your first paragraph though?? So, BIOS recovery, via USB, did you not try that? Put BIOS on root of FAT32 MBR initialized USB 2.0 stick and let it try to do it’s thing.
Did you remove all USB and HDD and then see if you can get boot menu and or BIOS again? If not, do that now. Stopping between boot menu choices wouldn’t cause any of this, unless a random glitch messed up the BIOS at that point in time (unrelated to what you were actually doing)
YOu can’t boot with RAM removed  I said remove USB and all HDD/SSD (hard drives, not memory)
Yes, external flash has to be done with a BIOS dump from your board, someone rebuild you a BIOS to use, otherwise you loose all your board specific data.
Clearing CMOS would fix the BIOS, if it was simply stuck due to some setting choice you made, but doesn’t sound to me like that’s the issue.
If you have variations between dumps of the same chip, on the same exact board, without trying to run the board between those dumps, then yes, probably both are bad dumps (Toss them out)
If you did try to run the board between dumps, then variation is expected. If you did not, then 1000+ dumps should match exactly.
What is your 16MB BIOS Chip ID, read it off the chip? I will tell you what software version to use (in windows) and what ID to use if you need to use other than exact.
Ahh! I see on download page, this one, correct >> W25Q128FV
SSD, RAM, Battery etc removed have nothing to do with dumps. Obviously this Flashrom is not working for your particular setup or BIOS Chip etc, lets do it from windows.
I checked, you are correct, dump7 is best one, but all are corrupted dumps (others much worse than 7)
For W25Q128FV you need to use 1.18 version CH341A software, or use ASProgrammer 1.41
Here is CH341A software package that has 1.18 - http://s000.tinyupload.com/index.php?fil…695330485827902
And here is ASProgrammer 1.41 - https://github.com/nofeletru/UsbAsp-flash/releases/
* On your images, the “Windows Boot Manager” option requires a hard drive with that on it (ie UEFI boot partition)
Second image, if you choose legacy, that simply means you wouldn’t be able to boot to your UEFI hard drive anymore, but if you remove all HDD/SSD/NVME/M.2 drives, then you can enter BIOS again and set it back to UEFI Mode.
@Lost_N_BIOS - Thanks again, thats definitely helping me understand it all a bit better.
Sorry, probably my lack of correct terminology, i could access BIOS before i think i bricked it.
I think i have tried booting with RAM in and NO SSD USB etc, but i will try it again tomorrow when i get a moment.
I have tried manually clearing the CMOS several times, disconnect AC, battery and CMOS and then hold power button for 30 sec, i get a new POST error from the LEDs relating to CMOS on the first restart, but nothing different otherwise. The same process on the operational XPS seems to clear things fine with a no time set popup on restart requiring reset prior to entering UEFI. I will retry this with the SSD and USBs removed prior to testing boot.
Yes thats the correct chip ID, the chip itself says Winbond 25Q128FVSQ.
Thanks i didn’t think it was reading right as much as Flashrom seemed to run fine, i will try the other programmers in the morning and repost the dump.
Okay, well hopefully the CMOS clear and an SSD/USB free reboot will get me back into the bios.
I actually enjoy learning about this stuff, I’m just afraid of destroying more expensive technology. DELL default quoted me AUS $1500 for a new MB to fix it.
Thanks again for all the help, it really is most apprecaited
Yes, maybe were just saying similar things different
Yes, definitely make a dump with 1.18 and ASProgrammer 1.41, do both without power on the system between each dump (I mean, make both dumps while system is off and don’t try to boot it between dumps). This way both should match.
I think you already cleared CMOS before and it didn’t help, but removing all the USB drives and all types of hard drives may help get you somewhere
Often UEFI is default and fast boot enabled, thus you can’t enter BIOS and if you switched to legacy but fast boot still enabled somehow, then no BIOS entry without hard drive and you can’t boot UEFI hard drive in legacy mode.
That’s why I said to see if you can get somewhere without any drives attached, it should give you a boot menu then or allow BIOS entry.
Unless, BIOS is indeed messed up, which is possible of course, but I’m not sure how badly that can be messed up while you can still see the recovery BIOS screen
Anyway, NO WAY @ Dell! New motherboard is probably $100 or around that on ebay, entire system isn’t worth $1500, they should be out of business giving people quotes like that!
You can fix this with $2 programmer and $3 cable, don’t worry 
@Lost_N_BIOS , I finally think I have some proper BIOS dumps, I have been messing around with different setups for most of the day and the problem seemed to be insufficient power supply via USB with the chip still on the MB.
I ended up powering the chip VCC pin from the Raspberry Pi and all the other pins all connected via the CH341A to the PC USB with windows, I got a 100% verification between the buffer and chip with the two programmers you sent yesterday. Hopefully they will work, they look a lot better in UefiTool to me.
I didn’t have much luck with the CMOS reset and booting with the SSD/USB etc disconnected, I still didn’t get anything on multiple reboots. I definitely think there is something going on in the BIOS or maybe as you said just a combination of Fastboot and legacy modes. Can Fastboot settings be altered directly via external flashing of the BIOS chip?
Just to clarify I haven’t seen the BIOS Recovery Screen on the “Bricked” XPS the only thing I have seen on the display since “Bricking” is the “Display Test” which is initiated by holding the “D” key while powering on the device, the screen then slowly cycles through some full-screen colors. I have also uploaded a couple of images and a video to show whats going on, also an image of the bricked XPS post testing the boot with SSD/USBs etc removed.
I also noticed some interesting content in the BIOS dumps, to me it seemed like a heap of EFI related errors etc, i have included a screen shot.
Sorry I couldn’t get TinyUpload to work today for some reason, i hope you don’t mind i have used my google drive instead.
Bios Dumps: https://drive.google.com/open?id=1zpeFLq…xPiP0xrFqOWSA1X
Images/Video: https://drive.google.com/open?id=1Idwxzc…FALarcQoMkAhTXY
I hope your day has been going well.
Thanks again for the help, if you need anything else please let me know ![]()
Yes, some boards you need to leave main power (24+8 pin) connected, others you must remove them or it wont work at all, all boards are different on this.
Anything can be done with external flashing. Thanks for clarifying about the recovery screen, until you mentioned that I did think you could get there on this problem system.
It’s not that I mind, it’s that I usually can’t download from Google (or mega.nz, dropbox, or box).
Please try again at tinyupload, or try one of these sites
https://uploadfiles.io/
https://www.filedropper.com/
And, I am on limited internet, I do not need to see images, videos or any of that. I only need your BIOS dump x2 (one from 1.18 and one from asprogrammer)
* Edit - Never mind, I was able to download the BIOS package. Please confirm what these are, what version software was used for the CH341A and Asprogrammer files?
Looks like all good dumps now, all match!
Please download ME System Tools v11 from here in section C.2
Intel Management Engine: Drivers, Firmware & System Tools
Once downloaded, inside you will find MEInfo folder, and inside that a Win32 folder.
Select that Win folder, hold shift and press right click, choose open command window here (Not power shell).
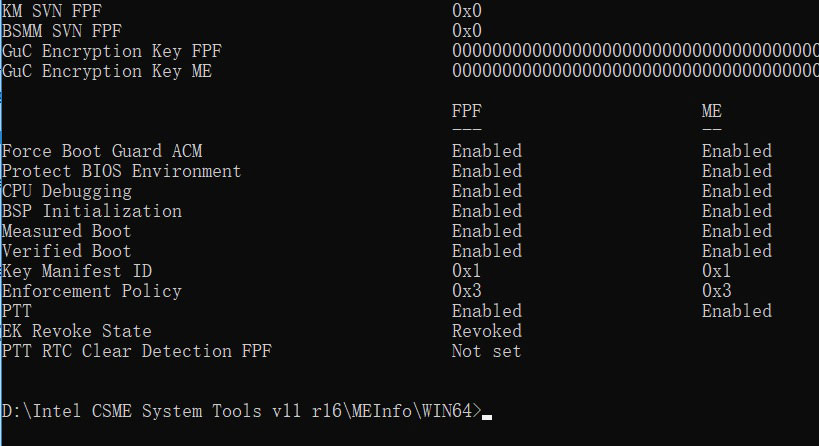
At the command prompt type the following command and send me and image of the bottom of the report (Image, not text/copy) >> MEInfoWin.exe -verbose
Do that on your working system
If you are stuck on Win10 and cannot easily get command prompt, and method I mentioned above does not work for you, here is some links that should help
Or, copy all contents from the Flash Programming Tool \ DOS folder to the root of a USB Bootable disk and do the dump from DOS (FPT.exe -bios -d biosreg.bin)
https://www.windowscentral.com/how-add-c…creators-update
https://www.windowscentral.com/add-open-…menu-windows-10
https://www.laptopmag.com/articles/open-…ator-privileges
Or here is simply registry edit that adds “Open command window here as Administrator” to the right click menu
Double-click to install, reboot after install may be required
http://s000.tinyupload.com/index.php?fil…134606820377175
@Lost_N_BIOS , Thanks, it’s nice to feel like we might be making some progress
I used the programmers that you sent me (quoted below) and the Flashrom from your CH341A_Tools just to confirm it was working.
[quote="Lost_N_BIOS, post:4, topic:34278"] CH341A software package that has 1.18 [/quote]
I have attached an image "MeInfoWin_Report.png" i tried to get as much as i could onscreen, i think i completed it properly, thankfully my CMD usage is getting better with practice. The 32 version is fine on a 64bit system?
The only difference I have noted in BIOS settings is that the bricked XPS was using AHCI and this operational XPS is using RAID. I also think the bricked XPS was on BIOS update 1.10.0 not the 1.12.2 that this operational XPS is using.
Hopefully, that will help. Thanks again for all this, it's most appreciated
Thanks. “Mod BIOS” cannot be done on this board, due to Measured AND verified boot both enabled at FPF (Burned into chipset) Only certain regions of the BIOS can be touched or instant brick on startup
This shouldn’t be anything you can cause to happen to fail due to BIOS setting changes, but it’s possible some glitch caused this to be invoked thinking it was a mod BIOS.
So, I cannot edit the settings changes you made back to defaults, the only thing that can be safely done here is to rebuild stock BIOS and insert your system details back into the areas not covered by Boot Guard.
Well, maybe I can, if the applied ones are only used by the stored variables in NVRAM. Please tell me the EXACT settings you changed right before this happened (if one, tell me one, if two tell me both)
Please tell me this systems MAC ID, Serial, Asset Tag, Service tag, so I can try to locate this in BIOS and see where it’s at and which can be moved back into BIOS safely and which you’ll have to do with Dell DSTTools
Haha, another hurdle along the road, Dell really seem to have their planned obsolesce worked out
The images i attached earlier of the boot menu show the exact settings. But that’s all I did, I think it’s just a combination between a faulty usb drive windows 10 image (From the windows creation tool) and a buggy Dell Bios update.
The service tag on the bricked XPS is: J1SLM72
I’m pretty sure 1.10.0 is the Bios update on the bricked XPS, https://www.dell.com/support/home/au/en/…-15-9550-laptop
In my searching i have noticed a lot of people recommend 1.5.1 as being stable.
I’m sure your aware of ME_cleaner etc, but it seems like their might be a slim hope, https://github.com/corna/me_cleaner/issues/34
If none of this works, would a replacement BIOS chip off ebay still be an option?
Thanks again for all this, I don’t think i would of got far alone
@coatman - USB drive/win10 have nothing to do with this, unless maybe you mean for that reason you were changing settings? In that case, properly user error  in how you setup/created the USB is all. I will help you with that once we get BIOS sorted out
ME Cleaner should only be used by paranoid users, that is not related to anything we’re doing here or that normal usage people should be using 
Anything done by that, if you needed, I would do properly and manually with the correct tools, but that has nothing to do with what you need here (it’s for paranoid users who want to disable ME FW and don’t know how to do properly or can’t etc)
No, you never need a replacement chip from ebay, if you want to loose your system details right now I can send you BIOS to program in that will have you up and running in 2-3 minutes.
But then you loose your ethernet LAN, asset tag, service tag etc.
So, please show me that meinfo report again so I can be sure, then give me all or some of the details requested above so I can locate the info and check if it’s possible for me to transfer in advance or if only you can do it later with DSTTools.
And, to clarify, you only changed ONE setting? >> UEFI boot mode >> To >> Legacy Boot Mode?
@Lost_N_BIOS , thanks for clearing that up, a little knowledge is a dangerous thing
Do you need a new MEInFo report? Or just the rest of the remainder of the one I already sent? The image still should be available on the earlier post.
How best can I find that info on the bricked XPS? I thought maybe my router might keep logs of my Mac Id etc? I can probably get the Ethernet lan Id off the the module itself?
Yep just one change on my part though the option involved setting Boot mode to legacy and secure Boot to Off.
-------------------------------
@Lost_N_BIOS
Bricked XPS Details:
Service Tag (S/N): J1SLM72
Express Service Code: 41467368350
WLAN (DW1830) MAC: 48E244F6D127
The following links are to two zip folders, one contains a few images I have taken of the device, one might interest you it has some stickers inside the back case relating to Intel ME. The other contains a few txt documents, one contains the full MEInfo32 Report that I shared an image of earlier, “Configuration” contains a txt copy of a full configuration list they supply in dell support page for the device, the last contains the “Fixes and Enhancements” for the last few Dell Bios Updates with most items relating to Intel ME etc.
Images: https://drive.google.com/open?id=1S-daV9…FQWWvHEYeQu3BoC
Text Documents: https://drive.google.com/open?id=1Z_miFM…4MHU6T2-63Gykn0
If you need anything please let me know, these are just areas I’m not so experienced with.
Thanks again, hope your day is going well
The image formatting was off is all, it’s not properly laid out, but I see same with mine too, so I think it’s this particular MEInfo version (or we both need to figure out correct CMD size that will spit it out properly?)
See, here is how it should look, so you can easily tell what is enabled on the Left/FPF side and what is set on the ME/FW side
Yes, your router may have logs of your MAC ID, if you can tell it apart from others (some routers might have the system name in the logs)
Sometimes the MAC ID will be on a sticker on the metal LAN Block on top, or on bottom/sides, check all around it. or sometimes it’s on the board near it.
Thanks for your confirmation of just that one settings change. I will find it and change it back by itself as a test, this way we know if that settings changed bricks the BIOS or if other changes were made then by glitch or whatever which then caused the brick
Thanks for details, I do not need WLAN info (This is wireless), I need the Ethernet MAC ID.
Maybe I will find it in your stickers package, if I can download from google today or not, if not you will need to reupload to somewhere else
You’re welcome! Yes, all going good, thank you
* Edit - I was able to get the images, thanks. Please look, and possibly take one more if there is a sticker under either memory stick (remove them and look, if not them OK)
@Lost_N_BIOS not sure if this changes anything, but the XPS 9550 doesn’t have an ethernet port, you can only use ethernet via the USB C/Thunderbolt port adapters.
The routers logs weren’t enabled, so no luck there. I will try to have a look at the bricked SSD tomorrow, windows 10 actually booted off it using a PCiE adapter on my desktop PC. Maybe i have a log or something there.
Yeah I have been thinking similarly, in my understanding and hopefully, the simplest thing is that legacy boot mode is for some reason still enabled while secure boot has been re-enabled, leaving no opportunity for legacy bios to pass the EFI security requirements to engage peripherals and hopefully the legacy settings are in NVRam.
I was wondering if it would help to have a proper BIOS dump from the operational XPS, I think I’m comfortable switching over to AHCI and rolling it back to 1.10.0. In comparison, it might narrow down the possible settings changes?
I will have another dig around on the shell, PCB etc for a MAC Id.
Thanks again, all the best with it ![]()
Yes, then no LAN MAC ID here. From your info, the only thing I found in dumped BIOS was the service tag in about 30 places. Lets just see if I can fix your dumped BIOS as is, that will be easier than trying to put all that back in 30 places and get around boot guard at same time (many are in there, so = brick if we try anyway)
No need for other dump, I will find setting change you made in NVRAM and set it back.
I see in stock BIOS, legacy is actually the default, so you must have changed it earlier (or they did before shipping out, but left setup defaults at Legacy)
Boot List, VarStoreInfo (VarOffset/VarName): 0xE15, VarStore: 0x1, QuestionId: 0xBA, Size: 1, Min: 0x0, Max 0x1, Step: 0x0 {05 91 09 13 0A 13 BA 00 01 00 15 0E 00 10 00 01 00}
One Of Option: Legacy, Value (8 bit): 0x0 (default) {09 07 E4 11 10 00 00} << Bold is the default set flag
One Of Option: UEFI, Value (8 bit): 0x1 {09 07 08 13 00 00 01}
So, I just find this in NVRAM, confirm it’s now 0x00 and set it back to what you had before 0x01
* Edit - Actually, yes, please setup the other system in the same way you had this one before this happened and then send me a dump
I’m finding ONLY, all areas of the NVRAM and BIOS all have this still set to 0x00, and I expected some would retain the previous 0x01 if this was what is being changed.
That setting is only one that is legacy or UEFI, aside from option rom type loading ones (like where you choose legacy or UEFI video roms to load, SATA rom to load etc)
Maybe it left Secure Boot Enabled, while forcing Legacy? Which would fail, similar to what you mentioned maybe?
You know, you could just program that BIOS onto the non-working system, then I can send you Dell tools to correct the Asset tag, if you wanted to do that instead?
@Lost_N_BIOS , Thanks.
Well that’s good about the MAC ID as I spent a few hours digging through registry and logs from the bricked XPS and found nothing, I did find a few other interesting files though, some dumps from BootGuard installations. Also some Dell logs with what looks like a full list of hardware ids etc, not sure if any of it has value to you?
Hmm, interesting… though still a bit over my head at the moment, reading hex is a whole new thing for me.
Okay, I will get that dump as soon as I find a moment, at least it should help to work out the stock to deployed values.
It’s just as likely looking at the BIOS Updates, it looks they have been having lots of issues relating to the various boot security elements. I don’t really have my head around the process, i’m just putting 2 and 2 together ![]()
I’m happy to setup the bios on the operational device to suit the bricked one, then collect a dump. Not sure if I am confident enough to do the Dell Tools/Asset Tag work, i think if it wasn’t overly complicated i would be alright, but maybe safer for me to mainly observe at this stage. You don’t think i would have the same issues having to change Asset tags in the locked regions? Or do you mean temporarily change the asset tag on the operational device to suit the bricked one?
Thanks again for all the help, it’s most appreciated ![]()
No, I don’t need to see any logs or Dell docs etc.
Dell tools to change asset or service tag are easy to use, it’s a DOS thing. Sometimes you can even change asset tag / service tag in BIOS, so we’d have to check if that’s possible first, you may not even need to use the Dell tools.
What I meant was dump BIOS from working system (once on same version as the bricked one was), and then program it to the bricked system. Then once running again we sort the asset/service tag out through BIOS itself or w/ Dell tools.
Nothing would be changed on the running system, except for you to downgrade BIOS (if it will let you)
@Lost_N_BIOS , Thanks, now I think I understand, that sounds like a good idea to me, if they are only using the Service Tag it should be far easier.
Thankfully the Dell Bios Recovery allows you to roll back to previous versions, I will probably just have to be cautious and disable secure boot etc. *Actually I found a Dell support article just using the .exe in windows.
I have a few busy days ahead, but I will try to get it done today or tomorrow.
I found this documentation on the new Dell Tool, not sure if my device is supported as it’s business-focused, https://www.dell.com/support/article/au/…nfigure?lang=en
It looks like they using two asset ids when they change it in the manual.
Thanks again for the help ![]()
------------------------
@Lost_N_BIOS , just a couple of queries relating to how close the operational XPS settings have to be to the bricked XPS?
Obviously I’m leaving Legacy mode disabled? But should Secure boot be enabled or disabled? Fastboot, I can extend POST for 5 or 10 sec?
Looks like you can only set the Service tag in BIOS if its already unset, same with Asset Id. Probably still have to use DELL tools after flashing.
Thanks, hope your day is going well ![]()
I’m talking about Dell Engineer Service tools, not something like Command & Configure, I’ll send it to you if/when we get there.
Yes, there is usually Asset Tag and Service Tag.
On the BIOS settings, they can be whatever you want once you program it into the bricked system, and they don’t need adjusted to anything before you dump from the other system. You can if you want, but it’s not necessary
Just enter BIOS, load optimal and save then reboot back to BIOS and change anything you need to whatever you know you need to boot to that ones system.
Yes, as I mentioned, you might not be able to change the tag in BIOS, we’d have to use tools.
Yes, thanks, all is good here, busy busy, but other than that all OK Hope you’ve been having an OK weekend too!