Google Drive
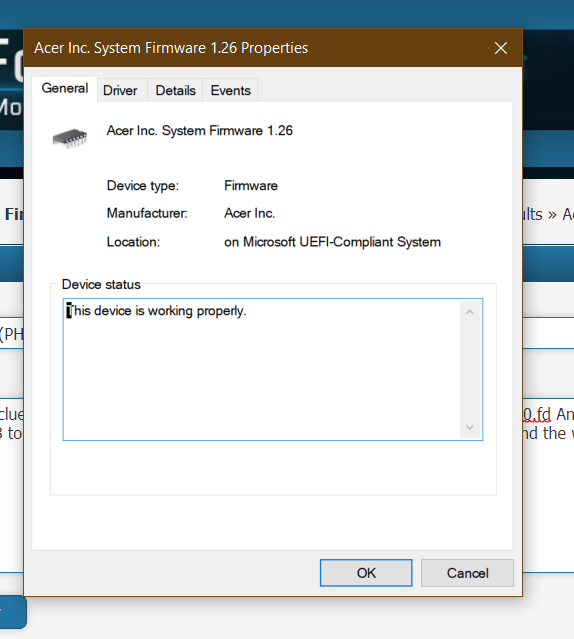
A while back I requested someone to mod my BIOS in order to unlock all available settings. They did so, I flashed it, and it worked. I had to get my laptop repaired at some point, in which case the motherboard was replaced, and the BIOS mod was lost.
I tried re-flashing the old modified BIOS back to the new motherboard; it worked, but POST took a good 1-2 minutes now (I’m assuming there was a checksum issue or some kind of timeout). I didn’t want to deal with this.
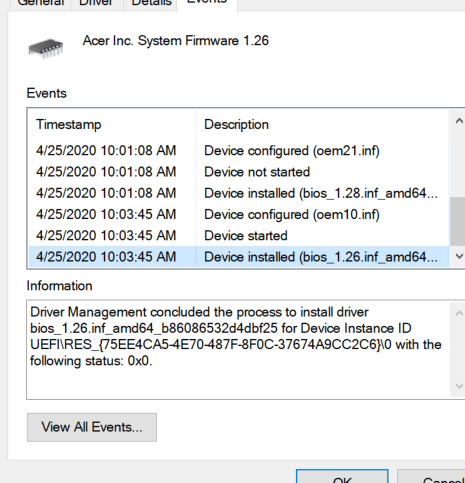
Did a little bit of digging yesterday, and found a copy of H2OEZE. I loaded up the old modded BIOS, and compared it against the new unmodded BIOS. Found that only the SetupUtility module was different, so I extracted it from the old modded BIOS, and replaced it on the new unmodded BIOS. I also ran it through me_cleaner (PR #282 required) to set the HAP bit. Flashed it, and all was well (POST was instant, and all settings were unlocked).
So I’m thinking this could be applied to any BIOS dump with similar firmware, or at the very least, any PH315-51 laptop.
On the Google Drive link, I provided 4 files:
1-old-modded.bin - The modded BIOS from the old motherboard
2-new-unmodded.bin - The unmodded/stock BIOS from the new motherboard
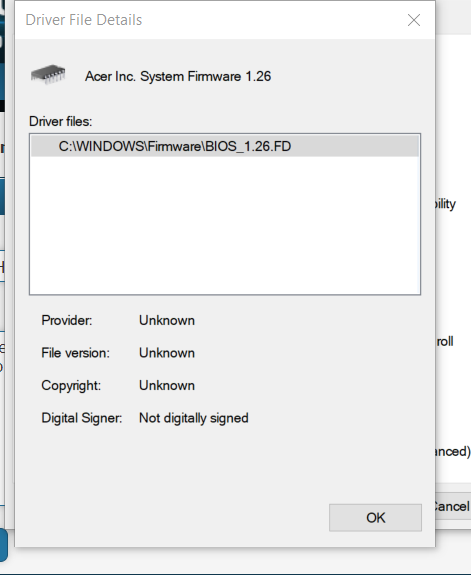
3-new-modded.fd - The self-modded BIOS for the new motherboard (with the SetupUtility module from the old BIOS)
unlocked-setuputility-module.ffs - The SetupUtility module (modded for unlocked settings from the old BIOS) extracted with H2OEZE
Perhaps the 3 BIOS files could be compared to see what was exactly changed for anyone interested.
Hello,
Appreciate since i have similar laptop but am totally unaware how to flash it. when i copy it to extracted acer bios it flash the bios but am getting in device manager an error abt signature and not having the advanced menu unlocked.
Can you please tell me how u flashed it?
Regards
Hello Again,
Man it did open the advanced bios menu but only for one time then it installed automatically both intel DTPF and HID filter then when rebooted all disappeared again!.
Any help on that?
Thanks
@hass1234 - The above BIOS would have ME FW disabled, did you know that?
Do you have flash programmer, or are you dumping BIOS region and flashing with FPT? You would need to first dump vars with H2OUVE and then edit x2 ares to disable BIOS Lock and FPRR, then write back modified vars, then you can flash mod BIOS with FPT
Otherwise, if you don’t do that, or use programmer instead, all your system specific details will be lost (serial, UUID, possibly LAN MAC ID too)
Unlock for this BIOS is easy, only two bytes to change to unlock menu (few more to unsuppress overclock menu if suppressed) , but it depends on BIOS version there exact hex location, so I can’t drop the info here without knowing what BIOS you are using (link me to stock BIOS)
Hello, not really and have no clue about what u r talking about. i did renamed the first file as DH53F_10.fd And used Acer bios tool and also modified .ini to not check version and it worked and reverted my system from 1.28 to 1.26 and opened the advanced setting but it last only for 1 reboot and the weird thing is the driver is unsigned though working normally but unfortunately with out advanced tabs.
THXS
@hass1234 - ME FW controls fan speeds, CPU functions like memory speed, timings, and other critical functions. I suggest not having this disabled in BIOS/ME FW, the initial posted did this for some reason (@Espionage724 would have to explain why he’s disabling ME FW), but this has nothing to do with unlocked BIOS menus.
Do you know how to edit BIOS, with tools like UEFITool and hex editor? if yes, I can tell you how to edit your BIOS to unlock menu always, if not you’ll have to dump your BIOS and send to me so I can edit.
Your method of flash may also not be flashing in the mod BIOS, may only appear so, hard to know for sure until you flash in mod BIOS like I would edit for you with proper unlocked menus.
I cannot find 1.28 BIOS at Acer site, only 1.26, so I can’t confirm or give info to edit 1.28 BIOS. Additionally, this stock exe contains TWO BIOS images, so I need to know which is your correct one first, or you need to send me BIOS dump via FPT
DH53F_1A.fd
DH53F_10.fd
If you do not have Intel ME drivers installed, install them now from your system driver download page, then start over here after reboot.
Check your BIOS’ main page and see if ME FW version is shown. If not then > DOWNLOAD HWINFO64 HERE <
Once HWINFO is open, look at the large window on the left side, expand motherboard, and find the ME area.
Inside that section is the ME Firmware version. Take note of the version. (ie. write it down or get a screenshot)
Once you have that, go to the thread linked below, and in the section “C.2” find and download the matching ME System Tools Package for your system.
(ie if ME FW version = 10.x get V10 package, if 9.0-9.1 get V9.1 package, if 9.5 or above get V9.5 package etc)
> DOWNLOAD " ME System Tools " packages HERE <
Once downloaded, inside you will find Flash Programming Tool folder, and then inside that a Windows or Win/Win32 folder (NOT x64).
Highlight that Win/Win32 folder, then hold shift and press right click. Choose “open command window here” (Not power shell! >> * See Registry file below *).
If you get an error, reply to this post with a screenshot of it, OR write down the EXACT command entered and the EXACT error given.
((If “open command window here” does not appear, look for the “Simple Registry Edit” below…))
Now you should be at the command prompt.
You are going to BACKUP the factory un-modified firmware, so type the following command:
Command: " FPTw.exe -bios -d biosreg.bin "
>> Attach the saved "biosreg.bin ", placed into a compressed ZIP/RAR file, to your next post!!! <<
Right after you do that, try to write back the BIOS Region dump and see if you get any error(s).
Command: " FPTw.exe -bios -f biosreg.bin "
^^ This step is important! Don’t forget! ^^
If you get an error, reply to this post with a screenshot of it, OR write down the EXACT command entered and the EXACT error given.
Here is a SIMPLE REGISTRY EDIT that adds “Open command window here as Administrator” to the right click menu, instead of Power Shell
Double-click downloaded file to install. Reboot after install may be required
> CLICK HERE TO DOWNLOAD CMD PROMPT REGISTRY ENTRY <
If the windows method above does NOT work for you…
Then you may have to copy all contents from the Flash Programming Tool \ DOS folder to the root of a Bootable USB disk and do the dump from DOS
( DOS command: " FPT.exe -bios -d biosreg.bin " )
HeY,
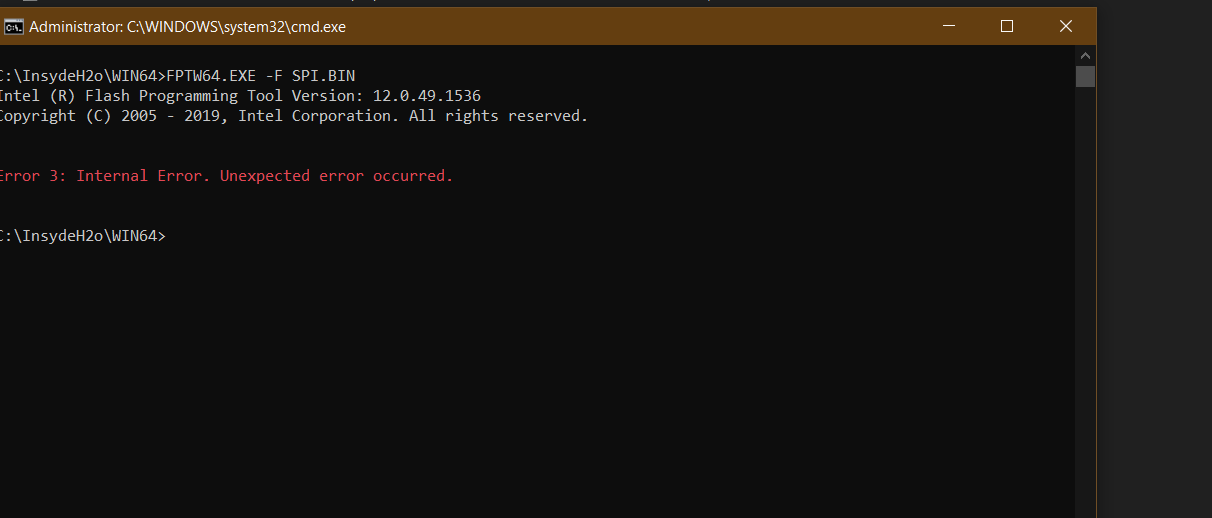
TRIED TWICE and got two different errors. c attached…
thxs
-----------
here is the first error msg…
-------------------
I EXECUTED FPTW AND GOT AN ERROR… ATTACHED PLS
THXS
See, that’s what I mean, and why it’s stopped you, from making many posts in a row. Please use edit button if you want to add more info and no one has replied, thanks. Merging now
--------------------
@hass1234
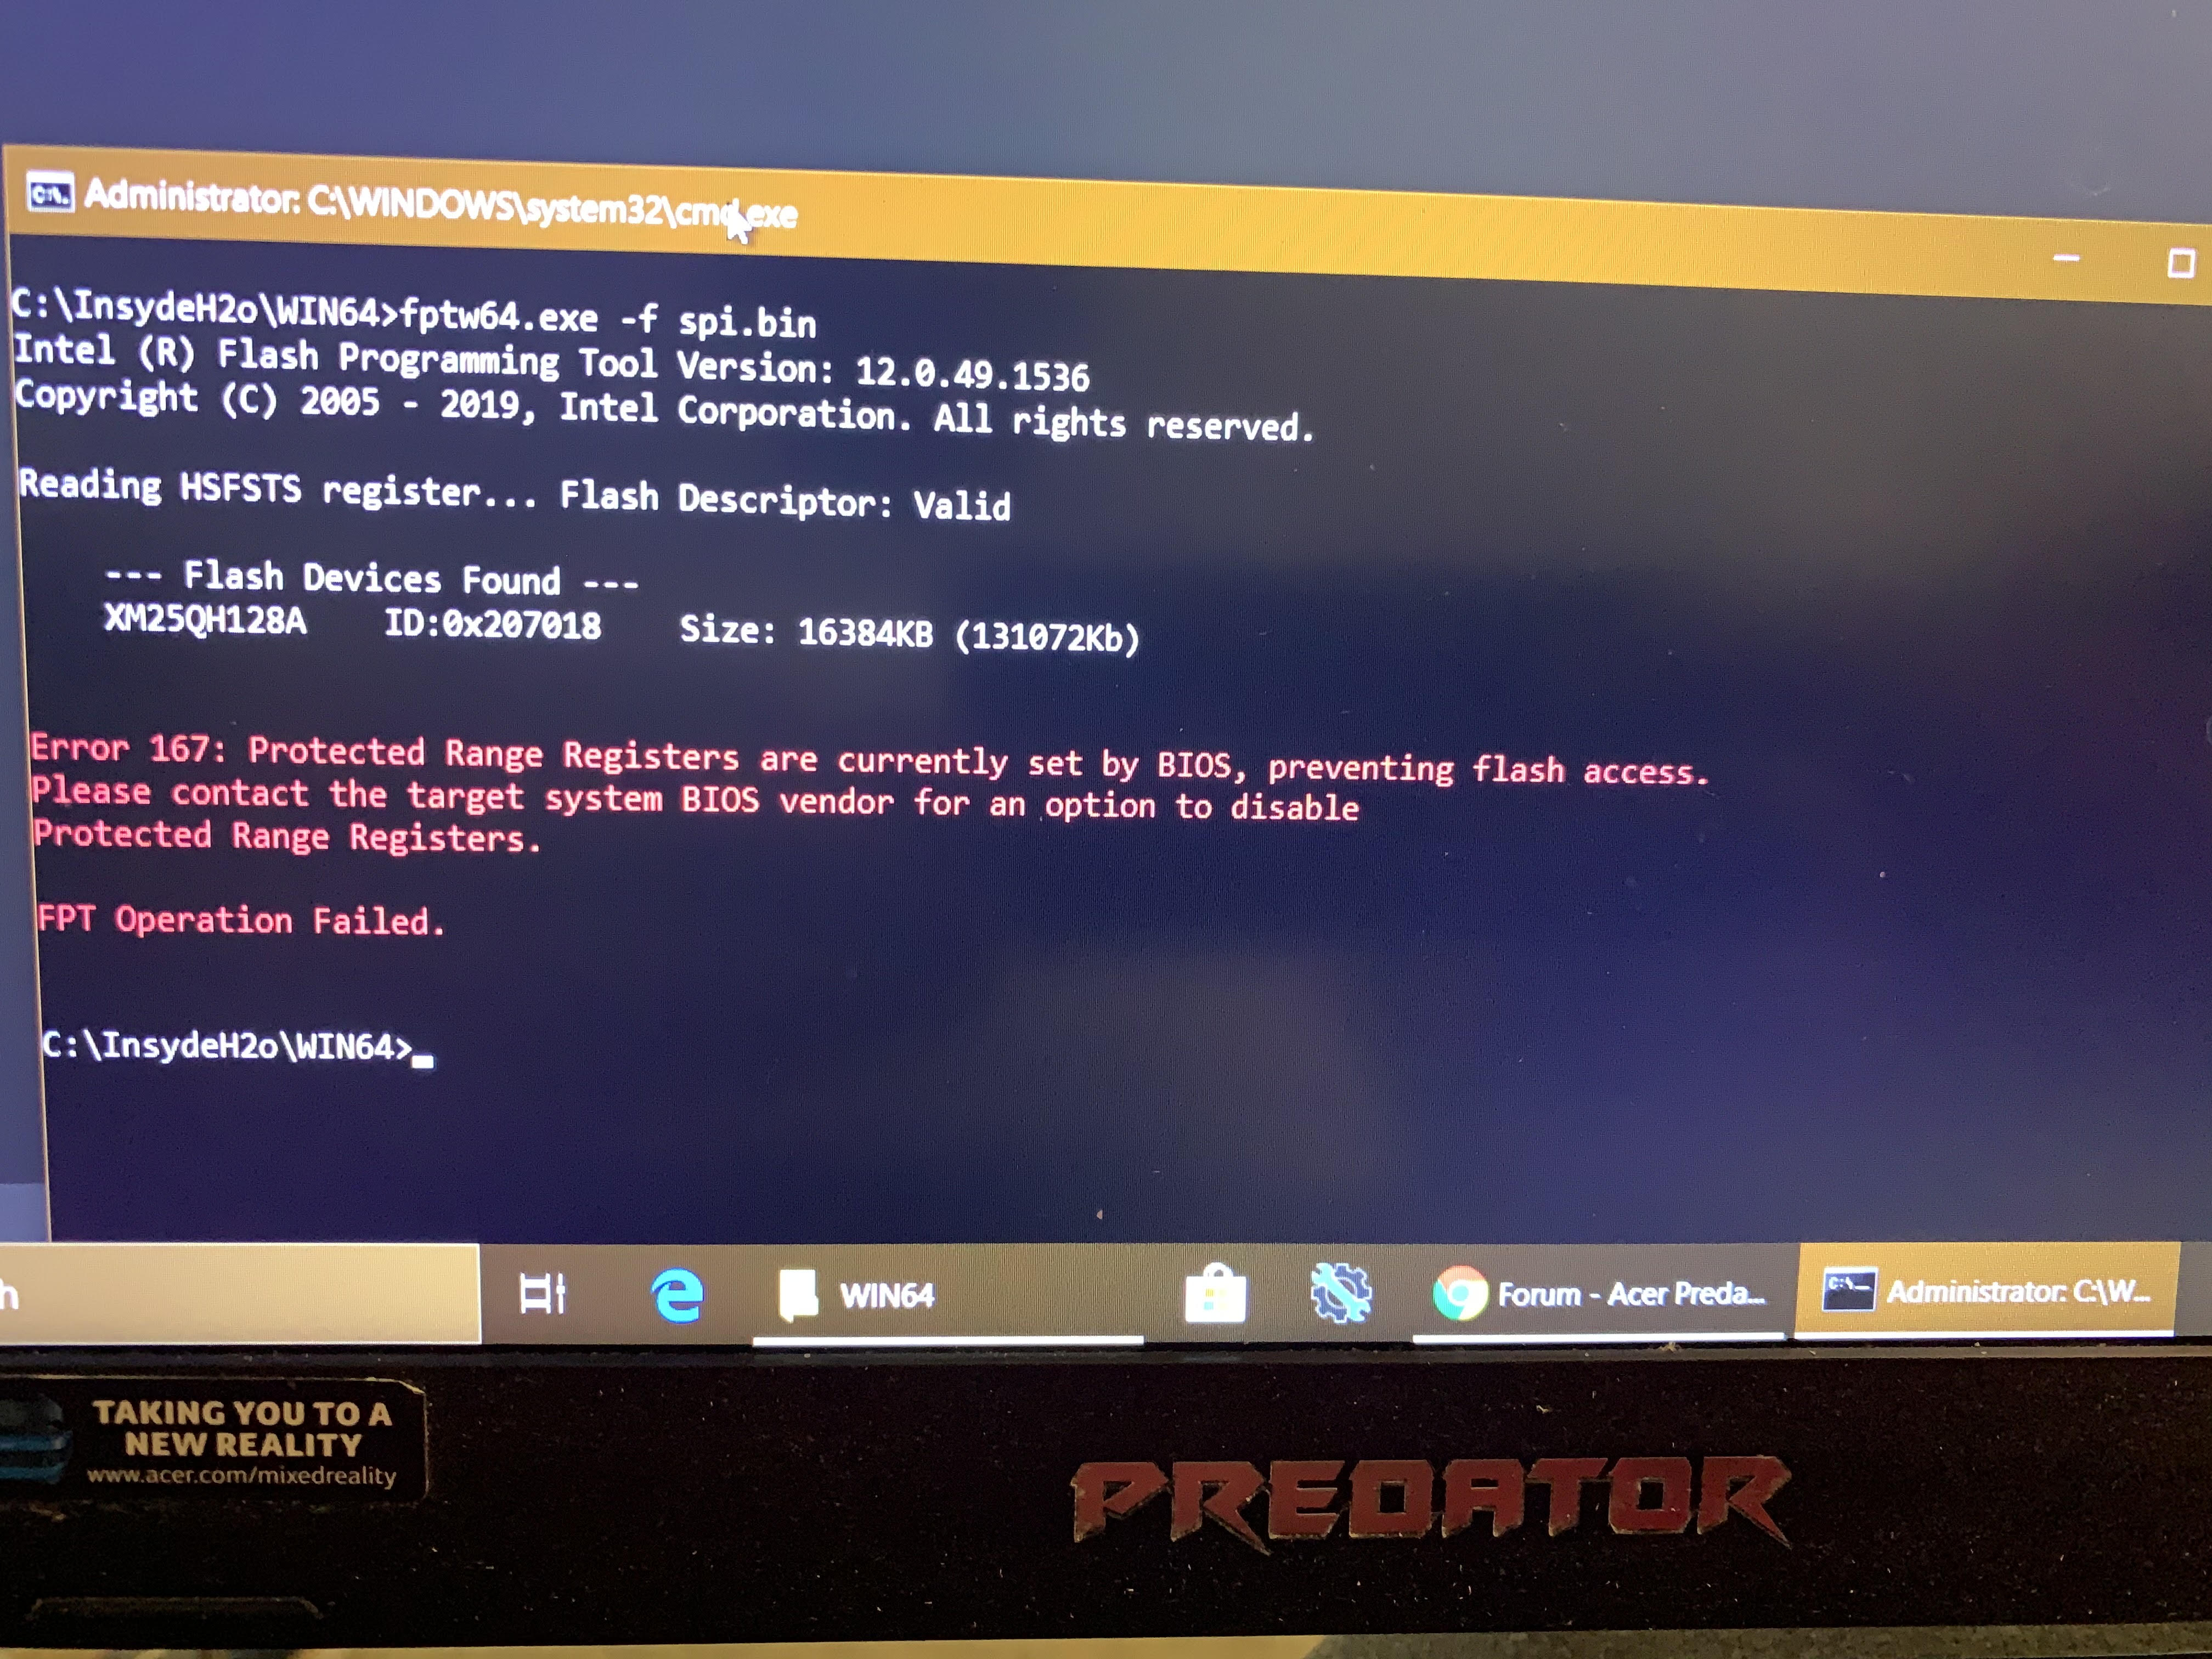
Stop, slow down now, before you brick your system!! FPT can brick your BIOS in one click with one wrong thing typed in, be careful, follow directions exactly and only as outlined.
First error is because two things, you can’t write (-f) entire BIOS so that would always error (plus you have no file to be writing anyway, nor should you), and you should not be using FPTw64 (specifically outlined and bolded in instructions)
Error 167 is expected, thanks!
Now, download this package, and run the command below from each folder that directly contains the exe for each version, leave all files in place and upload back to me once done.
Unless you are familiar with using CMD easily, suggest you download and install the Admin CMD Prompt registry file in above spoiler if you did not already. Then you can just right click each version folder that has the exe directly inside and choose open CMD Prompt here.
http://s000.tinyupload.com/index.php?fil…732875438124725
Command to run from each version >> H2OUVE.exe -gv vars.txt
Having two folders stuck on parsing variable information, shalli interrupt? the three others are ok got theit vars…
------------------
ok i have only 3 vars file and remaining 2 i cancelled them…
thxs
vars.txt (229 KB)
vars (3).txt (254 KB)
vars (2).txt (254 KB)
Yes, sorry, I forgot to mention, some may error and some may not work at all! Please put all vars into folders with their respective version # they came from, and then put all into one zip. This way when I send back I can tell you what version to use to write, it need to be same one that dumped it.
Also, please use edit button if you want to add more info, no need to double post, thanks 
I used a hardware programmer. Specifically, I used a Pomona 5250 SOIC8 clip, a Raspberry Pi (with Rasbian), had the SOIC clip connected on the Pi’s GPIO pins, and dumped and wrote the BIOS to the BIOS chip directly via flashrom on the Pi.
I don’t like the concept of ME and just HAP bit disable it on systems where I can. On the few Acer laptops I’ve had, ME didn’t control anything essential (Ethernet works fine after cold boot, memory timings, thermal sensors, and fan controls remain, basically I don’t notice any feature missing).
@hass1234 please do as I mentioned in post #8. You can alternatively copy the entire H2OUVE folder once done, to desktop, then delete everything inside except for the vars.txt (leave those in place, where they were created), then zip this and upload back to me
Hello Lost_N_BIOS, i was following this thread along with all the instruction you told hass1234.
I got 3 vars.txt files.
I have different laptop
Acer Predator Helios 300 PH315-51-59B6
H20UVE-Get_vars files.zip (132 KB)
@UrWorstNytmare06 - I either need your initial BIOSreg.bin dump, or a link to your current stock BIOS exe, before I can give you edited vars
@UrWorstNytmare06 - Flash this mod vars back, using the same version that created it, command below
http://s000.tinyupload.com/index.php?fil…581458656392676
H2OUVE.exe -sv modifiedvarsfilename.txt
There will be long list of success/fail, this is expected and normal, reboot once it’s done.
Then dump BIOS region again with new name (FPTw.exe -bios -d biosregnew.bin), and try to flash it right back (FPTw.exe -bios -f biosregnew.bin) , once success send me the new BIOS region to unlock
@Lost_N_BIOS - All the things went right as they should be and here is the requested new biosreg dump file
biosregnew.zip (3.76 MB)
@UrWorstNytmare06 - Thanks, here is your unlocked BIOS
http://s000.tinyupload.com/index.php?fil…432752304426095
Flash back via >> FPTw.exe -bios -f filename.bin
* Edit - @UrWorstNytmare06 - once you flash, please show me image of root of >> OverClocking Performance Menu
Few things may need further unsuppressed, I was not sure and wanted to wait to see what you see without me touching the rest there
*** WARNING - To ANYONE with laptop and unlocked BIOS!!!
DO NOT try to enable this graphics card or disable that card, switch cards etc. Otherwise you will end up with no display output (ie black screen) and no way to recover except by blind flash or with flash programmer.
You can change graphics related settings, like changing memory sizes, or core speeds etc, just don’t try to disable one card or change which is main etc.
Additionally, be very careful when trying to undervolt CPU, you can leave BIOS unbootable due to CPU voltage too low (Sometimes even 0.05 is too much)
WARNING *** - This BIOS is user specific! If you are not user UrWorstNytmare06 at Win-RAID.com forum, DO NOT USE THIS BIOS!!
If you do, and you are not UrWorstNytmare06, then you will loose your serial, UUID, OG NVRAM, and possibly LAN MAC ID as well.
You have been warned!!!
@Lost_N_BIOS - hey, i already flashed the bios file before your edited post and everything is working fine. Thank you Thank you very much for your time and help:star_struck:![]()
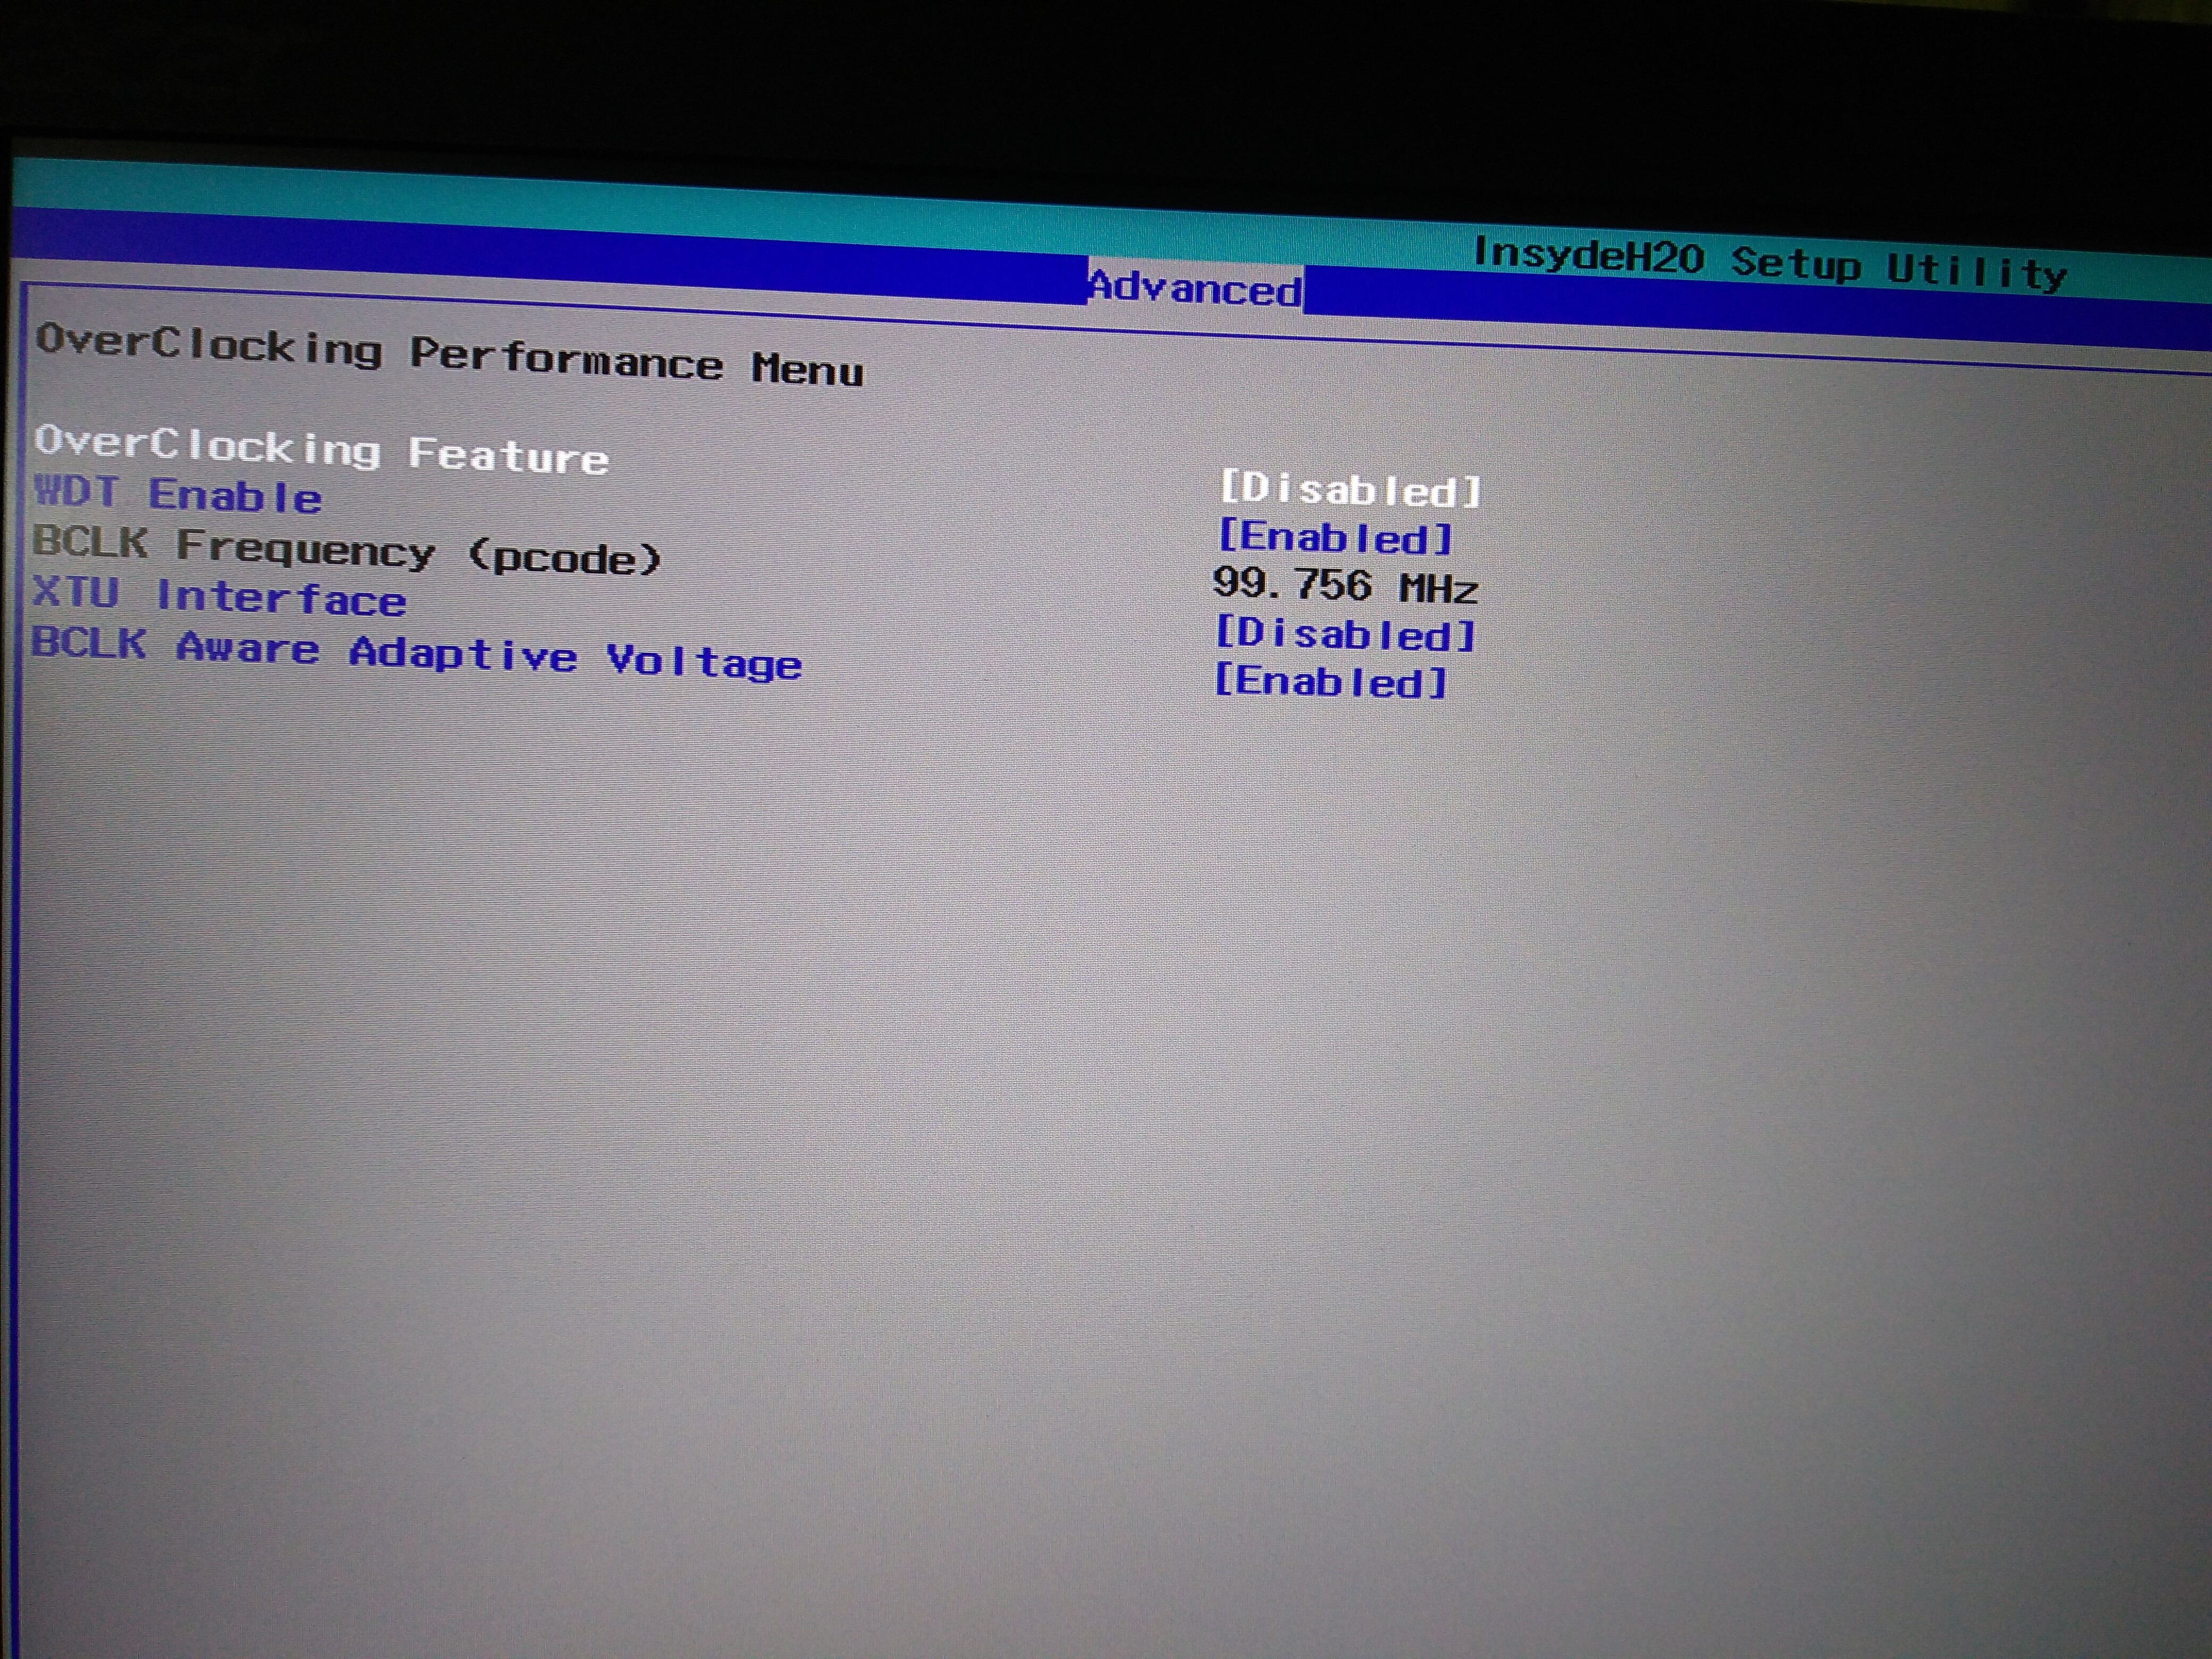
@UrWorstNytmare06 - Thanks! Yes, I assumed unlock was OK, but I see some settings and submenus that are probably still hidden from you, that’s why I edited that in.
Did you disable Overclocking Feature? I set that to enabled by default, but only in setup, not in vars. Anyway, can you please enable that and show me same area again after reboot, then I will unlock rest of missing items for this page.