hi everyone can anyone help moding my lenovo legion y520 bios to unlock all the features such like cpu overclock\underclock - power managment - enable virtualization and evry possible feature please . my pc is lenovo legion y520 running the factory defaults insydeh20 ver 5 bios.
* these information is written here as it showen in Hwinfo64 program : Product Name: 80WK Product Version: Lenovo Y520-15IKBN -motherboard : LENOVO LNVNB161216 -chipset : Intel HM175 (Skylake PCH-H) -bios date : 01/11/2019 -bios version : 4KCN45WW -system bios version : 1.45 -Embedded Controller Firmware Version: 1.45 Intel ME Version: 11.8, Build 3510, Hot Fix 55
cpu : Intel Core i5-7300HQ
*i already prepared the bios biosreg.bin file from reading previous threads.
note : i saw some riddets saying that there is a shortcut in legion y530 bios menu to unhide the advanced menu tab in the bios without the need to do any sort of moding this is the link to the riddet : https://www.reddit.com/r/Lenovo/comments…_the_insydeh2o/ is there anything similar to it in legion y520? or it is possible to reveal the secret shortcut order inside the bios cods ?
@zain.dev It all depends on the BIOS… Personally I would just get the BIOS modded so I didn’t have to go through "hoops" to unlock it every time I need to change something…
Did you already try to modify the BIOS yourself in any way? If so please flash the BIOS with freshly downloaded OEM BIOS files BEFORE making the "biosreg.bin" backup. To save the person that may be willing to help you some time, please attach the compressed ZIP/RAR file of your "biosreg.bin" backup to your post, and include some more information. (make, model, BIOS version, ME version, etc)
↓↓ Is this, more or less, what you followed? ↓↓
If you have already modified the BIOS in ANY way, you will need to re-flash it back to factory defaults!!!
Check your BIOS’ main page and see if ME FW version is shown. If not then > DOWNLOAD HWINFO64 HERE <
Once HWINFO is open, look at the large window on the left side, expand motherboard, and find the ME area. Inside that section is the ME Firmware version. Take note of the version. (ie. write it down or get a screenshot)
Once you have that, go to the thread linked below, and in the section "C.2" find and download the matching ME System Tools Package for your system. (ie if ME FW version = 10.x get V10 package, if 9.0-9.1 get V9.1 package, if 9.5 or above get V9.5 package etc) > DOWNLOAD " ME System Tools " packages HERE <
Once downloaded, inside you will find Flash Programming Tool folder, and then inside that a Windows or Win/Win32 folder (NOT x64). Highlight that Win/Win32 folder, then hold shift and press right click. Choose "open command window here" (Not power shell!).
If you get an error, reply to this post with a screenshot of it, OR write down the EXACT command entered and the EXACT error given.
((If "open command window here" does not appear, look for the "Simple Registry Edit" below…))
Now you should be at the command prompt. You are going to BACKUP the factory un-modified firmware, so type the following command: Command: " FPTw.exe -bios -d biosreg.bin "
>> Attach the saved "biosreg.bin ", placed into a compressed ZIP/RAR file, to your next post!!! <<
Right after you do that, try to write back the BIOS Region dump and see if you get any error(s). Command: " FPTw.exe -bios -f biosreg.bin " ^^ This step is important! Don’t forget! ^^
If you get an error, reply to this post with a screenshot of it, OR write down the EXACT command entered and the EXACT error given.
Here is a SIMPLE REGISTRY EDIT that adds "Open command window here as Administrator" to the right click menu. I suggest this method. It’s quick and simple. Double-click downloaded file to install. Reboot after install may be required > CLICK HERE TO DOWNLOAD CMD PROMPT REGISTRY ENTRY <
If the method(s) above do NOT work for you… Then you may have to copy all contents from the Flash Programming Tool \ DOS folder to the root of a Bootable USB disk and do the dump from DOS ( DOS command: " FPT.exe -bios -d biosreg.bin " )
hey @GooballDiesel thanks for the replay it was really helpfull! i edited my last post and i included every possible info i could . i havent done any sort of modding to the bios before, i just read some previous post on these subject so i have some basic information about it . * i was asking if there is a possibility to bo it in the y530 version so maybe there is a way to do the same thing in y520 too. also no doubt its safer to unlock these features without the need to install the modded version myslef , i will be doing it for the first time and there will be a little chance of breaking my system in some way or another using the Flash Programming Tool if needs too .
@zain.dev FYI - Depending on your system/BIOS…the methods, that you used to make a backup of your BIOS, may not be the correct method for your machine. I am not at all certain if a feature like that exists in your BIOS or not. It may, it may not. It is likely a LOT easier to modify your BIOS so everything is unlocked ALWAYS. Again, I suggest that you wait for someone to offer you their assistance with this, before doing anything else. There are PLENTY of super helpful, very knowledgeable, people on here that, I am sure, will help you out shortly.
@zain.dev - You may need flash programmer for this system (CH341A + SOIC8 test clip w/ cable, let me know if you need linked examples) To see if we can flash in mod BIOS without that, please download the following and From CMD Prompt at each folders location, run the following command, leave all files in place then zip back up and reupload However, if no "vars.txt" is created, in any of the versions folders, then no need to upload files back to me
hey @Lost_N_BIOS thanks for the reply ! -yes please , its my first time doing these things , if you provide me some linked examples its gonna help me understand it more . however iam looking forward to succeed moding the bios without the need of any external tools!
-honestly i didnt get exactly what should i do and run using the CMD can you explain further more please ?, or maybe just send me some links and i will follow and provide you the needed files. it is the same steps as what i just did to run this command " FPT.exe -bios -d biosreg.bin " …?
Install CMD prompt tool, extract H2OUVE, go to folder that you extracted H2OUVE.exe into, right click in empty space, select “open admin CMD prompt here”, type " H2OUVE.exe -gv vars.txt " Check in the folder that H2OUVE.exe is in. If vars.txt exists , ZIP/RAR the entire folder, and attach to your reply. You may need a different version…I’m sure @Lost_N_BIOS will confirm if proper version.
@GooballDiesel thanks for the reply ! sry i followed the steps without noticing the last part of wich version should i chose ,so i did run the H20UVE_100.00.16.08 using the cmd (i installed it before at windows explorer) its runs and told me that its succeed but after that my laptop keyboard freezed (keyboard keys not responding at all) and i needed to restart the windows to get it works again …is this normal ? should i include the zip file here now or i should wait for Lost_N_BIOS to tell the right version ?
i uploaded the file here anyway , this vars file done using H20UVE_100.00.16.08 :
Do that from ALL the versions I sent you, then re-upload package for me as-is, do not move anything. Yes, if error or freeze, reboot and try next version. Once done with all versions, zip the entire package back up using max compression and send to me.
Here is examples of what you may need on ebay, this is shipped using slowest speed, cheapest method etc. You may find in kits, or from other sellers that ship faster or closer to you, or from other stores like Amazon etc. These are just to show you what you need, if you order from these links, wait will be 3-5 weeks or so from China shipment https://www.ebay.com/itm/303430287760 https://www.ebay.com/itm/183425731977
@Lost_N_BIOS thanks for the reply! - i did run the same command for these two versions and its succeed : *H2OUVE_100.0.9.2 *H20UVE_100.00.16.08 *but the third one “H20UVE_x86_WIN_1.0.0.11-beta4” shows me an invalid command massage , i clicked on the exe file inside it but nothing happend… couldnt do anything else
-here is all the files anyway as what you told me.
note : the two versions did the same keyboard error when i runs them .
- here is some link from local stores in my country for the same tools ,iam pretty sure they are the same ,but please feel free to check it out if its right to go with:
@zain.dev - Errors with some versions are expected, that’s why I send set with several versions. Great you were able to dump vars with some, I will look at both, and whichever is most complete we will use. They keyboard freeze may be due to drivers or how your KB is connected to or set in the BIOS etc. Once you flash modified vars back, you will see errors during the flashback >> this is normal and expected, due to some areas can’t be written, which we don’t need to update anyway, so ignore that and reboot
For the items you linked 1. First link, OK, this what you need (contains both items) 2. Second link - OK, but ONLY if you choose Third/Bottom option in drop out menu (image one, full set, picture 1) << So, this one looks cheaper priced, but be careful and be sure you choose the correct thing from the dropout menu (as you linked it, that is not correct, link goes to second image/ second option = programmer only (no cable))
But, wait to order, lets see if you need first! You may be OK without, if we can unlock via vars edit
Wait a second, sorry, I see I didn’t include link for you above to download the tools package I wanted you to have (not sure where you grabbed this one, but it’s not current one I use) Please download this package and run it all again, from each version folder as you’ve been doing, then reupload this for me (sorry, I meant to drop this link for you at post #5, not sure how I missed that) You can delete the two versions you already send me dumps from (100.0.9.2 + 100.00.16.08 + 1.0.0.11-beta4) just do the dump and reupload the other remaining two versions (100.00.16.11 + 100.00.18.04), if they create vars.txt. I added complete package here instead of just these two, in case someone needs link later http://s000.tinyupload.com/index.php?fil…732875438124725
@Lost_N_BIOS thanks for the reply! -luckly all the versions succeed to run and did created vars file except the version “InsydeH2OUVE_x86_WINx64_200.00.01.00” when i runs the command i got windows warning screen says : " this app cant run on your pc . to find a version for your pc , check with the software publisher " … also it says “access denied” at the cmd screen.
-yeah the second tools link is a little bit cheaper also with the cargo price its more cheaper too , yeah iam aware of it but didnt notice that i selected half of the package in the link i sent before , thanks for reminding me of that anyway! i will hold on the ordering until you tell me i should have to .
-No problem at all ,forgetting is a normal thing , although i really appreciate all the help that you already offering ! plz check your private messages !
@zain.dev - You’re welcome! Great to see you had good luck with most versions, I will see which one gave most complete result and get back to you soon Hopefully, once we make a few changes with this, you will be able to dump BIOS region and reflash it, then we can do mod BIOS flash in without a programmer
Give me a few minutes and I will edit and send you back one of these packages with new instructions to reflash a modified vars.txt. Once you do that, reboot and do the following FPT dump/reflash below. Don’t do this until I send you modified vars and you’ve flashed it back in and rebooted * Never mind, I forgot I don’t have BIOS region dump from you already, please go ahead and do step one only in the spoiler below
About the PM, I just read it, and it’s same one I replied to earlier tonight, did you get my previous reply???
If you have already modified the BIOS in ANY way, you will need to re-flash it back to factory defaults using factory method (NOT FPT)!!!
If you do not have Intel ME drivers installed, install them now from your system driver download page, then start over here after reboot. Check your BIOS’ main page and see if ME FW version is shown. If not then > DOWNLOAD HWINFO64 HERE <
Once HWINFO is open, look at the large window on the left side, expand motherboard, and find the ME area. Inside that section is the ME Firmware version. Take note of the version. (ie. write it down or get a screenshot)
Once you have that, go to the thread linked below, and in the section “C.2” find and download the matching ME System Tools Package for your system. (ie if ME FW version = 10.x get V10 package, if 9.0-9.1 get V9.1 package, if 9.5 or above get V9.5 package etc) > DOWNLOAD " ME System Tools " packages HERE <
Once downloaded, inside you will find Flash Programming Tool folder, and then inside that a Windows or Win/Win32 folder (NOT x64). Highlight that Win/Win32 folder, then hold shift and press right click. Choose “open command window here” (Not power shell! >> * See Registry file below *).
If you get an error, reply to this post with a screenshot of it, OR write down the EXACT command entered and the EXACT error given.
((If “open command window here” does not appear, look for the “Simple Registry Edit” below…))
Now you should be at the command prompt. You are going to BACKUP the factory un-modified firmware, so type the following command: Command: " FPTw.exe -bios -d biosreg.bin "
>> Attach the saved "biosreg.bin ", placed into a compressed ZIP/RAR file, to your next post!!! <<
Right after you do that, try to write back the BIOS Region dump and see if you get any error(s). Command: " FPTw.exe -bios -f biosreg.bin " ^^ This step is important! Don’t forget! ^^
If you get an error, reply to this post with a screenshot of it, OR write down the EXACT command entered and the EXACT error given.
Here is a SIMPLE REGISTRY EDIT that adds “Open command window here as Administrator” to the right click menu, instead of Power Shell Double-click downloaded file to install. Reboot after install may be required > CLICK HERE TO DOWNLOAD CMD PROMPT REGISTRY ENTRY <
If the windows method above does NOT work for you… Then you may have to copy all contents from the Flash Programming Tool \ DOS folder to the root of a Bootable USB disk and do the dump from DOS ( DOS command: " FPT.exe -bios -d biosreg.bin " )
my bios isnt showing my intel ME firmware version so i used HWINFO64 and its shows the following :
Intel ME Version: 11.8, Build 3510, Hot Fix 55 Intel ME Recovery Image Version: 11.8, Build 3510, Hot Fix 55 Intel ME FITC Version: 11.8, Build 3399, Hot Fix 50
so i extracted the file using Intel CSME System Tools v11 r30 and i included it with post !
-about the PM sorry i’m not used to this site notification system yet , but i figured it out later, i will reply there…
Here, download this, run same as before, but use this command below this time to write back in the modified varsM.txt Then reboot, and redo the above FPT BIOS region dump (send me this new file), and then do the BIOS region write attempt at step #2 in spoiler and see if you get error or not If you do get error, show me image of the entire window so I can see what you typed and the error, show title bar of window too.
@zain.dev Thanks! Now, try to re-write that BIOSreg.bin file and see if you get error or not >> FPTw.exe -bios -f biosreg.bin Wait a minute!! << Please note the -f there, this means “Flash”, what you mentioned above should be -d there to "Dump" So since you did not do that yet, please throw away the above attached biosreg.bin zip and any biosreg.bin you have in folder, start over basically Because it looks like you wrote in old BIOS region, thus erasing the vars changed we made. So, please write back the varsm.txt again and reboot, since you flashed BIOSreg.bin in above example, I assume that means you flashed in your old previously made BIOSreg.bin file
So, do the following in order 1. H2OUVE.exe -sv varsM.txt 2. Reboot 3. FPTw.exe -bios -d biosreg.bin 4. FPTw.exe -bios -f biosreg.bin << If error here, show me image of there, so I can see what you typed in and so I can see entire CMD window (Title bar at top I need to see). This is only time I wanted to see image, and only IF error here.
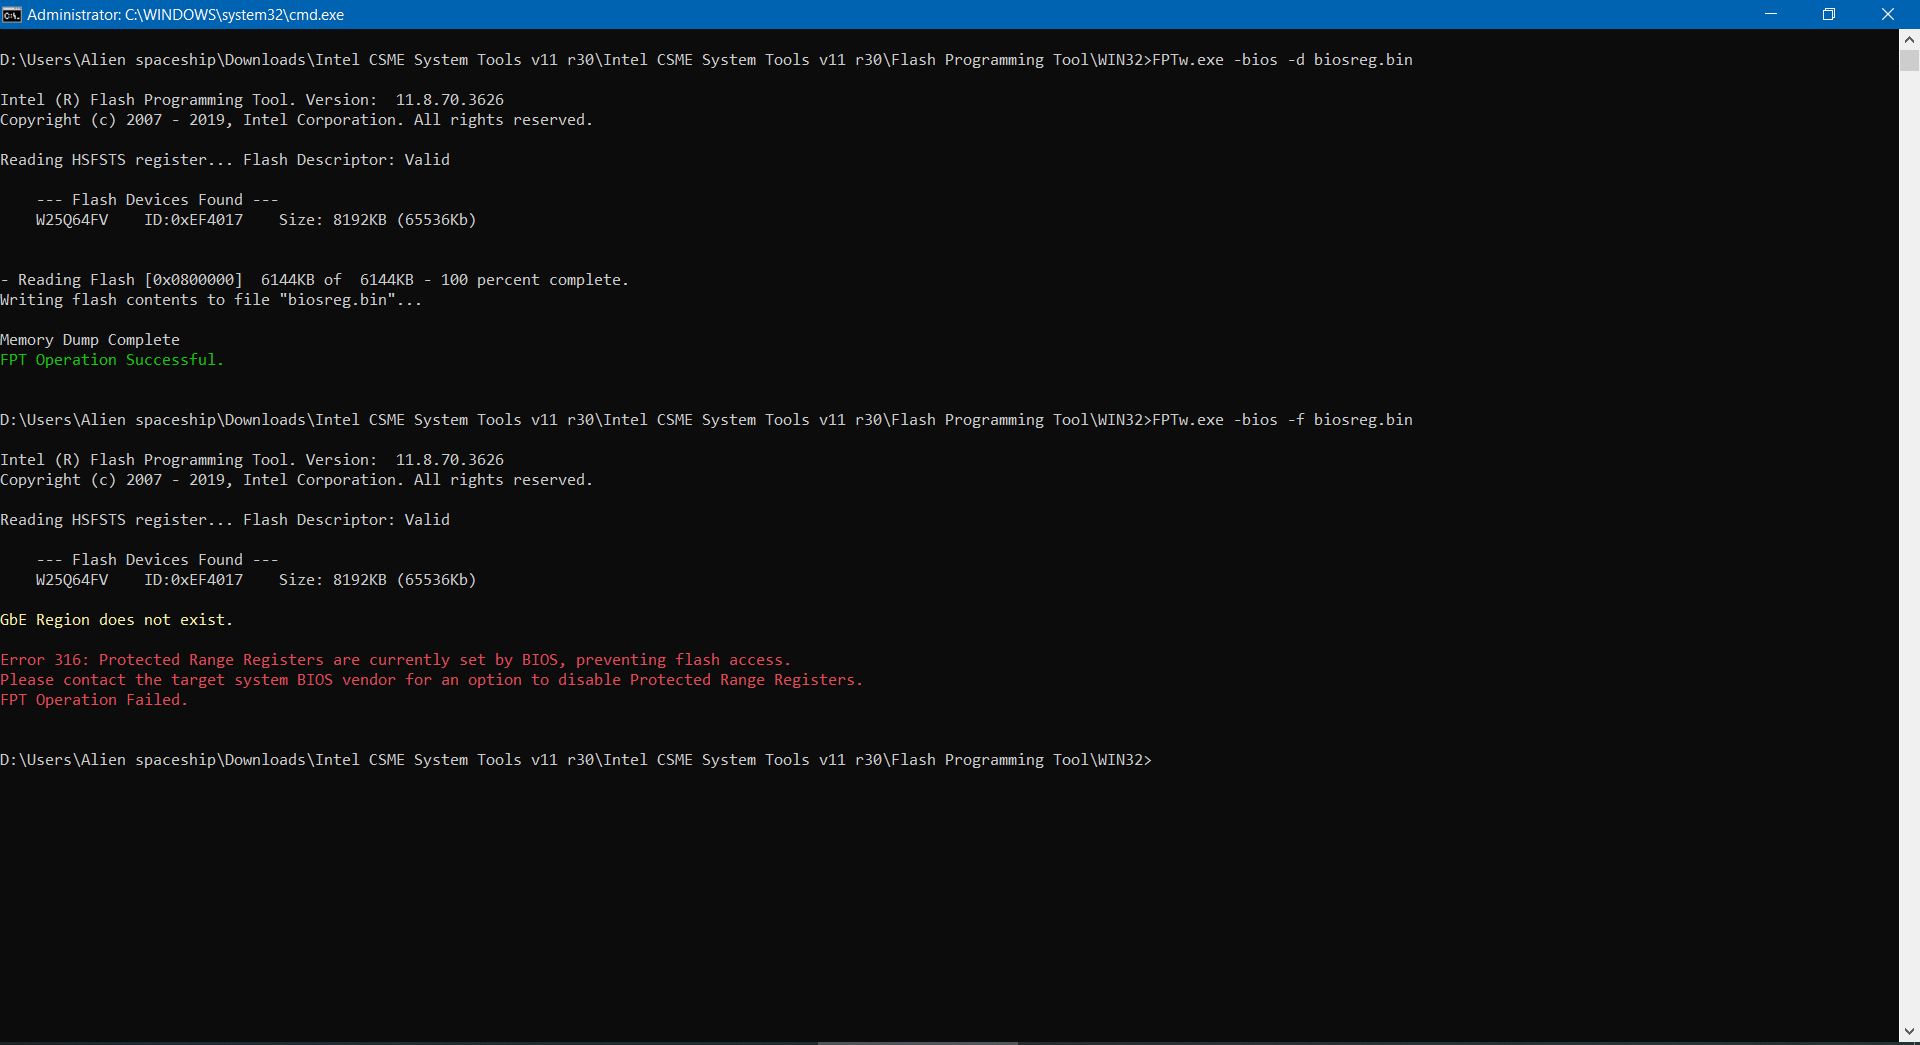
oh the steps seems a little bit complicated but i hope i did it right this time ! i redone everything as the orders and i got this error on the last command :
H2OUVE.exe -gv vars2new.txt ^^ Send me that in a zip ^^
If all is OK in the new vars dump, meaning the changes I set are there still, then you will need flash programmer (CH341A) + SOIC8 test clip with cable
yes its succeed , check the following attachment below
*note : i forgot to mention at my last post that i took a copy of the messages that CMD shows when i did the first order at post #17 here is what it shows me :
C:\Users\Alien spaceship\Desktop\zain.dev-H2OUVE_100.00.16.11\H2OUVE_100.00.16.11>H2OUVE.exe -sv varsM.txt Now Parsing File From varsM.txt. Succeed to read varsM.txt file. Variable Index[001]: Set failed! Variable Index[002]: Set failed! Variable Index[003]: Set failed! Variable Index[004]: Set failed! Variable Index[005]: Set failed! Variable Index[006]: Set failed! Variable Index[007]: Set failed! Variable Index[008]: Set failed! Variable Index[009]: Set successfully! Variable Index[00a]: Set successfully! Variable Index[00b]: Set successfully! Variable Index[00c]: Set successfully! Variable Index[00d]: Set successfully! Variable Index[00e]: Set successfully! Variable Index[00f]: Set successfully! Variable Index[010]: Set successfully! Variable Index[011]: Set failed! Variable Index[012]: Set failed! Variable Index[013]: Set failed! Variable Index[014]: Set successfully! Variable Index[015]: Set successfully! Variable Index[016]: Set successfully! Variable Index[017]: Set successfully! Variable Index[018]: Set successfully! Variable Index[019]: Set successfully! Variable Index[01a]: Set successfully! Variable Index[01b]: Set successfully! Variable Index[01c]: Set successfully! Variable Index[01d]: Set successfully! Variable Index[01e]: Set successfully! Variable Index[01f]: Set successfully! Variable Index[020]: Set successfully! Variable Index[021]: Set successfully! Variable Index[022]: Set failed! Variable Index[023]: Set successfully! Variable Index[024]: Set successfully! Variable Index[025]: Set successfully! Variable Index[026]: Set successfully! Variable Index[027]: Set successfully! Variable Index[028]: Set successfully! Variable Index[029]: Set failed! Variable Index[02a]: Set failed! Variable Index[02b]: Set successfully! Variable Index[02c]: Set successfully! Variable Index[02d]: Set successfully! Variable Index[02e]: Set successfully! Variable Index[02f]: Set successfully! Variable Index[030]: Set successfully! Variable Index[031]: Set successfully! Variable Index[032]: Set successfully! Variable Index[033]: Set successfully! Variable Index[034]: Set successfully! Variable Index[035]: Set failed! Variable Index[036]: Set successfully! Variable Index[037]: Set failed! Variable Index[038]: Set failed! Variable Index[039]: Set failed! Variable Index[03a]: Set failed! Variable Index[03b]: Set successfully! Variable Index[03c]: Set successfully! Variable Index[03d]: Set successfully! Variable Index[03e]: Set successfully! Variable Index[03f]: Set successfully! Variable Index[040]: Set failed! Variable Index[041]: Set successfully! Variable Index[042]: Set successfully! Variable Index[043]: Set successfully! Variable Index[044]: Set failed! Variable Index[045]: Set failed! Variable Index[046]: Set successfully! Variable Index[047]: Set successfully! Variable Index[048]: Set failed! Variable Index[049]: Set successfully! Variable Index[04a]: Set failed! Variable Index[04b]: Set failed! Variable Index[04c]: Set failed! Variable Index[04d]: Set failed! Variable Index[04e]: Set failed! Variable Index[04f]: Set successfully! Variable Index[050]: Set failed!


 , but i figured it out later, i will reply there…