[OFFER] Gigabyte GA-Z87X-OC BIOS vF10a : NVMe mod, EFI, & microcode 28

@DJFliX @Fernando @Lost_N_BIOS

as requested


NVMe module inserted as per Fernando’s instructions:

[Guide] How to get full NVMe support for all Systems with an AMI UEFI BIOS

Gig_Z87X_OC_module detect.png


EFI ROM updates:

Gig_Z87X_OC_EFI_ROM.png


microcode update v28:

Gig_Z87X_OC_microcode_v28.png


as usual back up your existing drives before flashing.

Enjoy NMVe booting, via UBU 1.77 and UEFITool v0.28

All brought to you courtesy of Win-RAIDers

JackRackham.png


Remember to set CSM in bios to DISABLED and convert all existing MBR hard drives & SSDs to GPT (Gui Partition Table)


Cheers and enjoy.

Z87XOC.rar (5.71 MB)

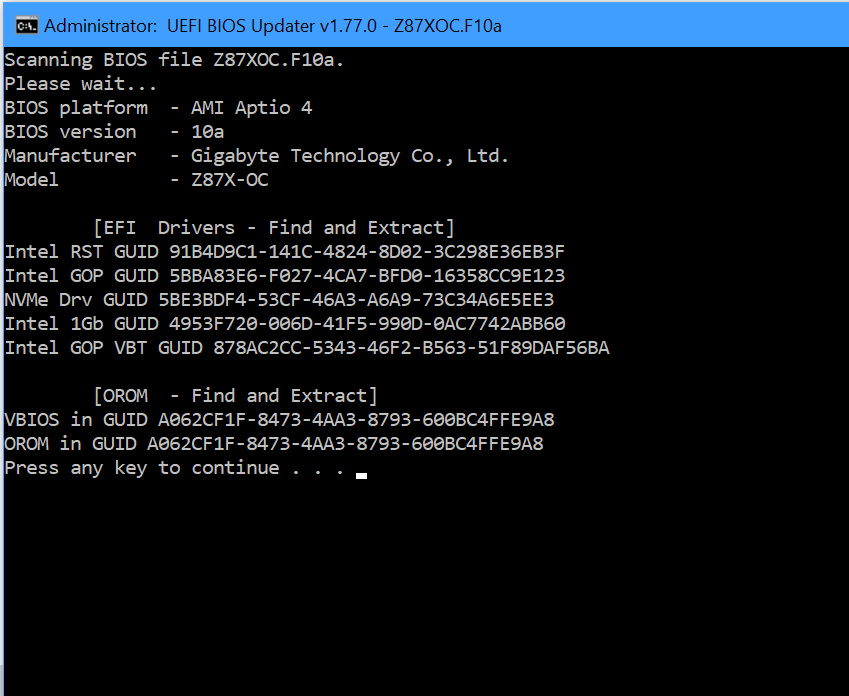
@hancor Thank you so much! I’ve just successfully flashed it and everything seems to work fine. I even got hi-res boot screen now for some reason :). I wonder, where did you get the F10a bios? Gigabyte does not list it under the support section of this motherboard

@DJFliX

You are correct the latest on the “official” gigabyte website is F9c which is listed as beta.

However, when you go to the following website for Gigabyte support you occasionally find later dated bioses which didn’t make it to the “official website” even though they are final release quality.

Hi res boot screen…ahh the joys of being thorough

eg. https://forums.tweaktown.com/gigabyte/28…-beta-bios.html

If you take the time to look around a bit, you sometimes find a gem or two…like bios F10a


Cheers, enjoy and Happy Mother’s Day!

hi, anyone have the firmware for gigabyte z87x-oc , need to used it to run a nvme ssd

Hi Hancor, do you have the firmware for gigabyte z87x-oc as i want to it on my new nvme ssd
the file on the link : [OFFER] Gigabyte GA-Z87X-OC BIOS vF10a : NVMe mod, EFI, & microcode 28
after download is damage . thanks

@wtleong - Update your Winrar or Winzip, file is not damaged

Hi manage to download and unzip the file but still unable to detect my Adata nvme ssd during boot
run as storage D: working fine


thanks

@wtleong - To boot to NVME follow this guide exactly at step #4 in the “This is what you should do” section - [Guide] How to get full NVMe support for all Systems with an AMI UEFI BIOS
I also suggest you do the following to the NVME first (This will wipe everything on the drive, so copy anything you need first)

Use diskpart in windows from OS with the NVME connected as secondary drive (Direct from any CMD Prompt), or from Win10 installer ISO (press Shift + F10 on the first setup screen where you pick language)
Remove all other drives, so only the NVME is there, and any other disk you will recognize by size/name etc - so you don’t accidentally wipe wrong things.

At CMD Prompt >>

>> Diskpart
>> List disk << Here, identify by size, and then note the number which disk you will be wiping to raw here (If in windows, this #'s will match what you see the drives shown as in Disk Management) - Be sure you do not select your USB or main OS drive if in OS
>> Select Disk # << here, replace # with NVME # you want to wipe to raw.
>> Clean
>> Exit

If you want to clone your current Win10 install, here is my method - Installing Clean Win7x64 on M2.2280 PCIe Gen3x4 SSD A-DATA SX8200 Pro
And here is Fernando’s method - [Guide] How to get full NVMe support for all Systems with an AMI UEFI BIOS (330)
And here is another user Shawn’s method - [Guide] How to migrate Windows 7 64bit boot drive from MBR SATA to UEFI NVMe without data lose