Hi,
Would it be possible to mod the AMI UEFI BIOS color theme on Z97 Asus motherboards? Many of these motherboards basically have identical UEFI, but Asus (and other motherboard vendors as well) only changes the color theme of the UEFI to match the color theme of the motherboard. E.g. Maximus Impact VII has red theme, and it’s UEFI has red theme. Z97i-plus has somewhat gold theme, and so forth.
I am guessing the Asus engineers just edit the values for the text color, menu color, etc, somewhere in the BIOS code.
Would it be possible for us to edit these somehow?
Thanks very much for any input or solution on this.
@ Mackan:
Welcome at Win-RAID Forum!
I am pretty sure, that it is possible, but I don’t know
a) how to do it and
b) if it is worth the efforts, because you will loose the modification after each BIOS update (unless you repeat the procedure).
Happy New Year!
Fernando
Hi Fernando,
Maybe it’s possible to edit some of this in a hex editor? I’ve started to look at some tools, but would be great if someone already knows what to look for.
It would be worth the effort for me. ![]()
Happy new year too!
This is what you will have to do:
- (Easiest part) Extract all files, which are within the mainboard BIOS. You can do it by using the tool named UEFIExtract, which is part of the UBU tool.
- Search for the file, which contains the ASUS UEFI BIOS theme. Note: I was not able to find it within the latest BIOS of my ASUS P8Z77-V.
- Modify the file according to your wishes.
- Correct the checksum of the file. I am not sure, if this is required, if you use the UEFITool for the re-insertion of the file.
- Replace the original by the modded file. You may try to use CodeRush’s UEFITool, which is part of the UBU tool.
I have extract all the files with UEFIExtract, and there are a lot of folders showing up. At random, I went into 0 Intel Image -> 3 BIOS Region -> and into some subfolder and then I found something called 92 PEbiosinterface -> 1 Compressed Section -> 1 User Interface Section -> (body.bin header.bin info.txt).
Looked at the body.bin in a hex editor, but that doesn’t reveal much. It was only 32 bytes.
When you say you weren’t able to find the file containing the ASUS UEFI BIOS theme, are you sure there is a single file for that? What do you think it’s called? I’m a programmer myself, though not in C. I guess the task is to find where the user interface related code reside, somehow. I guess they can code this in a lot of ways, if they use C. But maybe there is a standardised library for that in AMI BIOS coding? Maybe they define many of these color related properties in certain header files. They must also have image assets they use.
So, where to look and what to search for… hmm. I will continue to look. Any more hints and tips are deeply welcomed.
I was reading up on some basic things, knowing that UEFI 2.1 defined something like HII (Human Interface Infrastructure"), which I guess AMI has built upon. Guessing Asus as an OEM modifies or extends whatever API they need there in terms of the graphics, but after looking through most of the extracted BIOS image folders and files, I don’t see any clear clue as to what folder/module could have responsibility for setting up this.
Feels like looking for a needle in a haystack. Folders that start with ASUS or OEM could be a good start, but found nothing meaningful so far. I did find some png images, but it’s in unnamed GUID folders.
This page talks a bit about UEFI, and HII: http://uefi.blogspot.se/2009/09/uefi-hii-part-2.html
@Mackan
I will start with a few questions:
- Why do you need a change? Is it worth the risk or do you have a way to return to normal state if something goes wrong? For me is just hex editing and some UEFI packaging, but for you is the hardware at stake.
- What motherboard you use and what BIOS version?
- What exactly do you want to change? Remember that this is not a “pimp my UEFI” forum, so no dragons spitting fire or fractals. At first, let’s change the background and then I can leave you to change the rest, if it works.
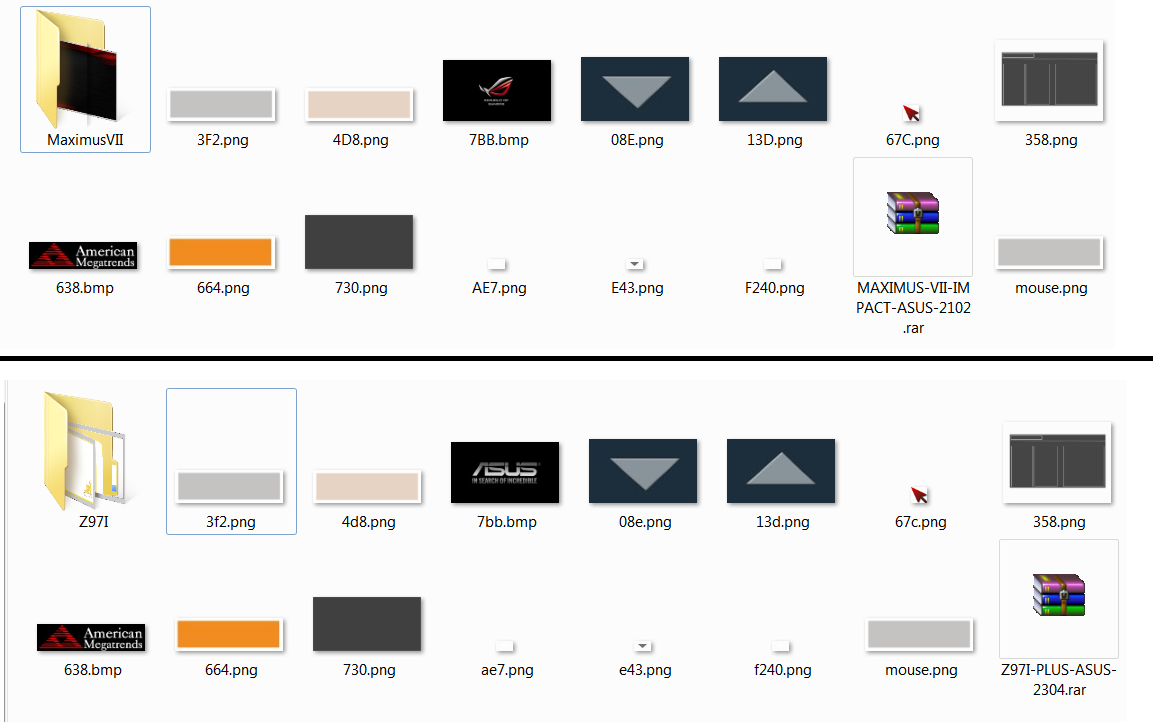
It should be possible to do that. But don’t expect something as simple as changing a few bytes. I’m not sure if it is possible to change hue/saturation/brightness without re-encoding. And it doesn’t matter, because it would be time consuming to do so in UEFI/BIOS. OEMs just use the usual block/layers scenario with multiple small images. For instance, this is for those two models you mentioned:
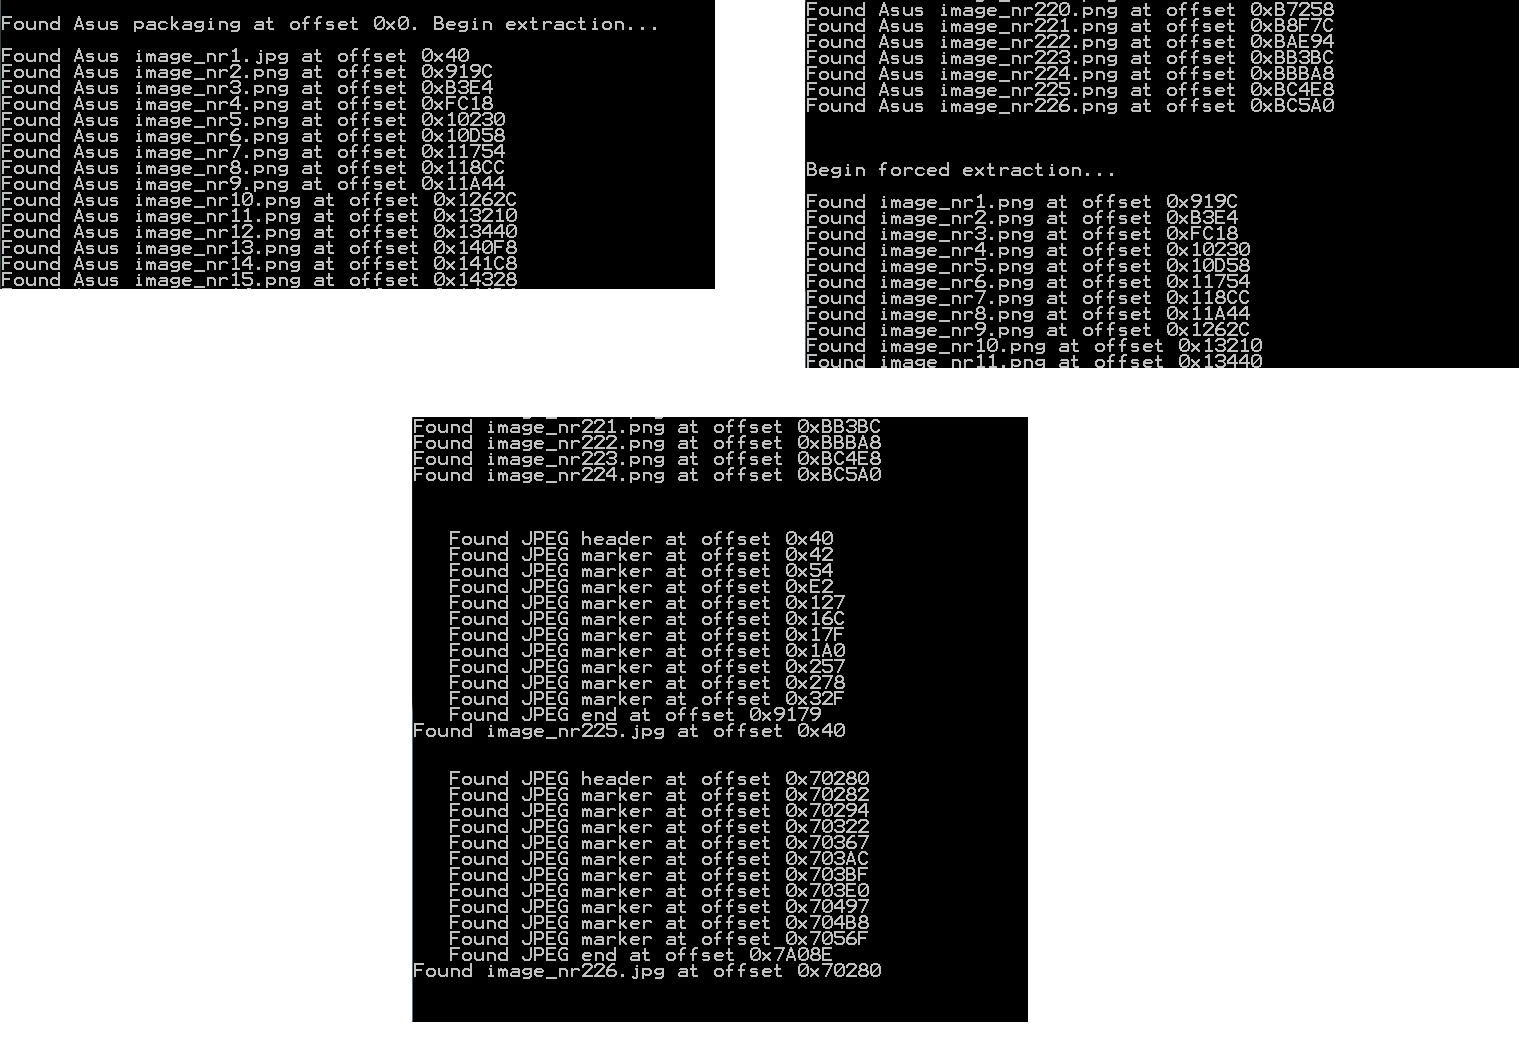
Using a little script of my own I have found 226 small images in one ffs alone. There are 14 more that I have found in raw sections:
And if you think they are the same, here are just two examples :
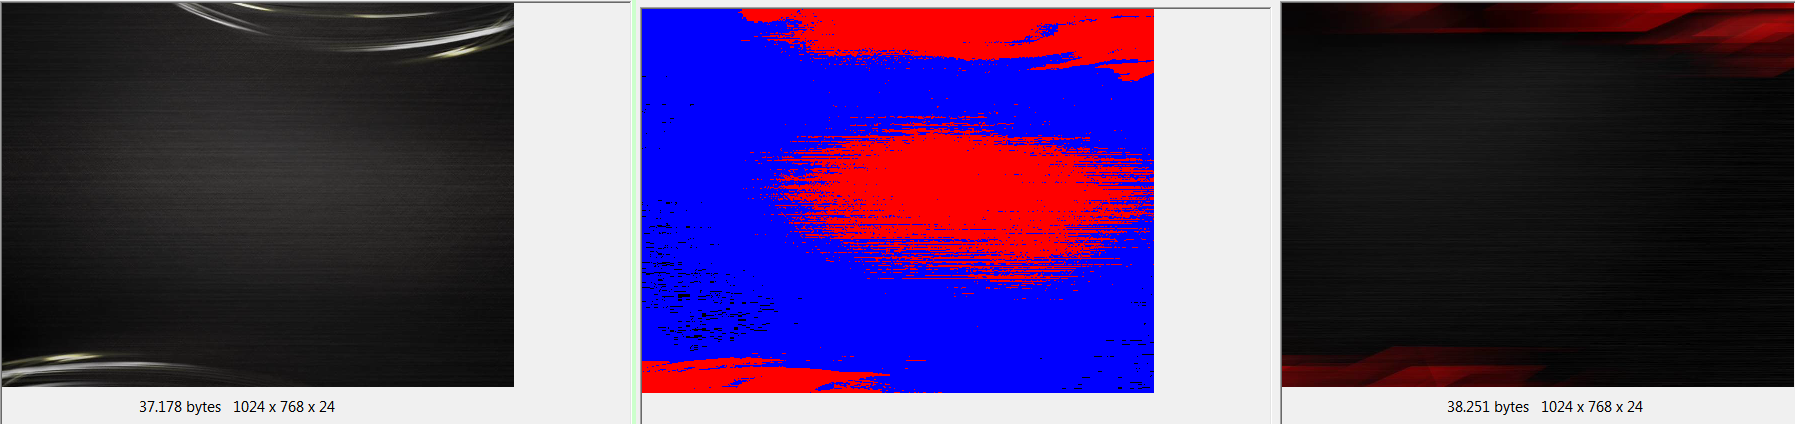
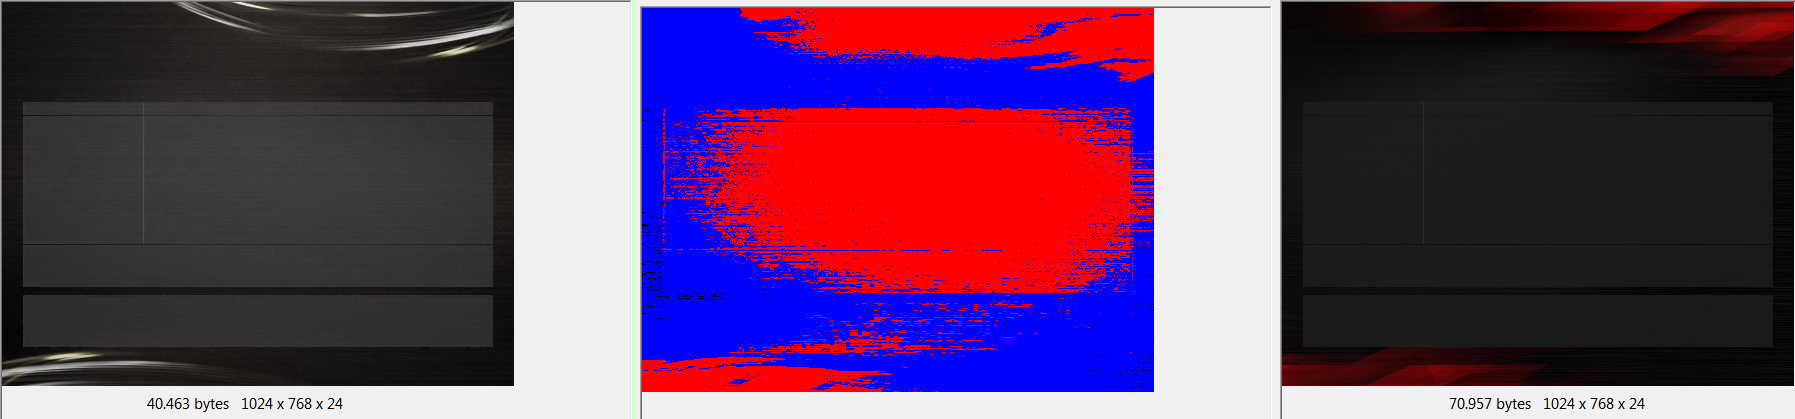
It is obvious they use different images with similar composition.
Warning!!!
This is NOT a guide or a do-it-yourself, nor any other helper. I always like to share my findings, even when it has a high chance of bricking your system, since I don’t like being a “keep it to yourself” person. It was also a request. I will not provide any support, nor will I be blamed for any damage. I will only assist on the first attempts, just out of curiosity, but I don’t plan to be a part of any “beautify UEFI” request.
The images:
- I will assume you are using UEFITool for the search, so […] will mean any byte match.
- png seems to be the easiest one, since it starts with 89504E470D0A1A0A and ends with 49454E44AE426082
- jpg starts with FFD8FF and ends with FFD9, which is not very reliable. It is easier to search for the common JFIF marker, FFD8FFE0…4A46494600
- bmp starts with 424D…00000000…28000000
- gif starts with either 474946383961 or 474946383761 (GIF89a | GIF87a) and ends with 003B
- tga might end with 54525545564953494F4E2D5846494C452E00 (TRUEVISION-XFILE), but other than that, no way to determine its presence.
- pcx has many variables, but a good pattern is 0AXX01…00…ZZ00…0000000000000000000000000000000000000000 [continue on next page]
00000000000000000000000000000000000000000000000000000000000000000000 where XX can be 00 to 05 (version of PCX) and ZZ can be 00 to 02 (color, b&w or grayscale). The easiest way is to use XX = 05 and reduce the number of searches.
- ico starts with 00000100 or 00000200, which is nothing useful for UEFITool. I can easily extract it from uncompressed files.
- if there should be any other image format used, please add it here.
Compression:
If the UEFI image has compression per module, there is no other way besides using UEFIFind.exe with the helpers attached. Drop UEFI image on UEFIFind.bat and type i for images or whatever you like. You will need UEFIExtract.exe and UEFIExtract.py for this to work.
If the UEFI image has compression per volume, you can just extract its body, if you want to take a quick look at the images contained within. It is also recommended to do this because I use more relaxed patterns in my scripts, so it is easier to find and extract images. However, for replacing, you must extract individual ffs files using UEFIFind.exe/bat
Packaging:
- Asus, MSI and Gigabyte seem to use a packer, but also images in raw sections. UEFIFind.bat can be used, which will produce around 10-20 ffs files.
- Asrock and EVGA seem to use one image per raw section. UEFIFind.bat can be used, but it will produce 100+ ffs files, depending on UEFI screen complexity.
- Gigabyte and EVGA can use up to 300-500 images, so let the scripts run for a few seconds. You will see a lot of messages.
Extract:
Well, there is no point in locating the images if you don’t know how to extract them, or if it takes too long to parse each 100+ files. This is where #imageext.bat and #imageext.py come in place. With a few minutes on reading the specs of each image format and a lot of trial and error, it produced a nice result. Just drop the files containing images on the .bat file, it will display and extract the images. So far I got: Asus packer, MSI packer, Gigabyte packer, png, jpg, bmp, gif, ico, pcx, tga, tiff, wmf. Only png and bmp are safe, the rest can produce false positives, because I have to parse the image. JPEG in particular is quite a beast, with all those markers.
MSI packer:
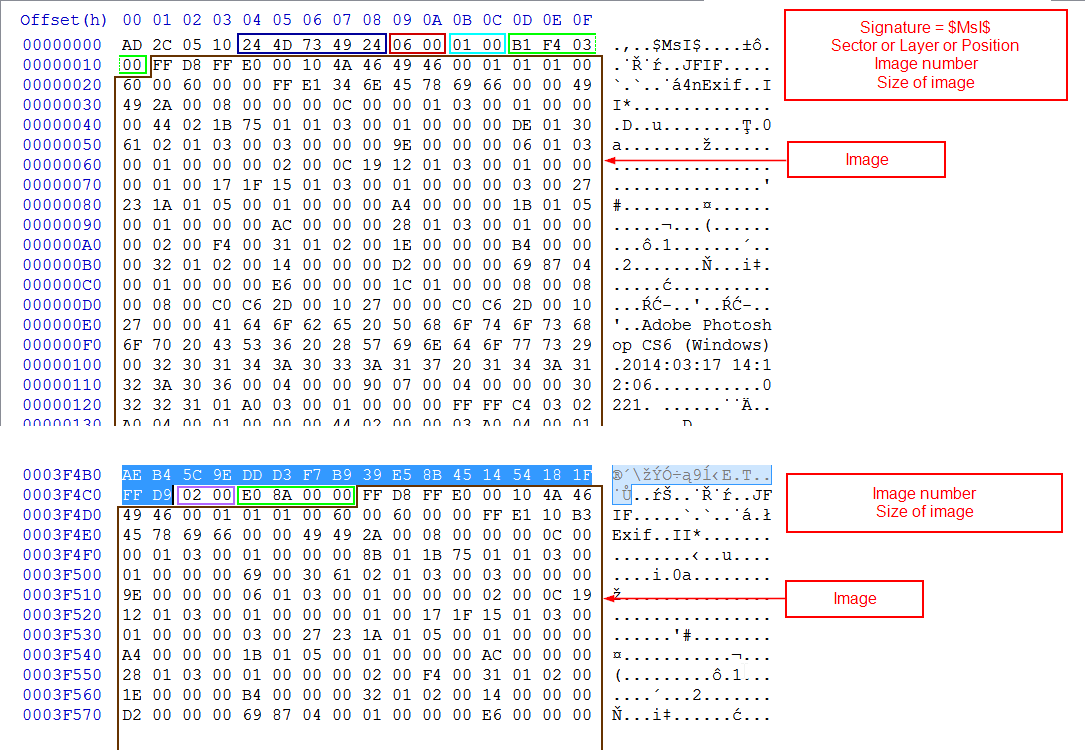
Asus packer:

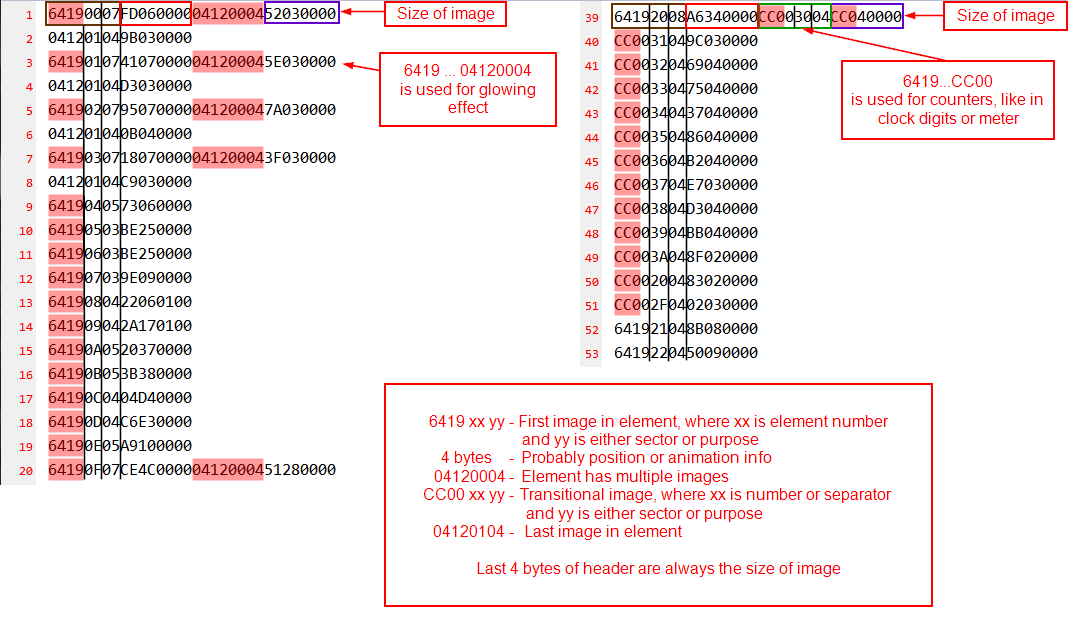
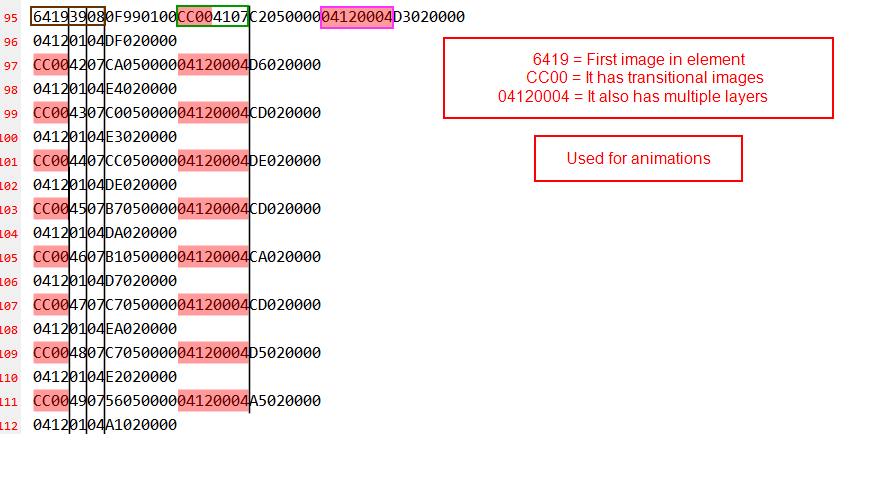
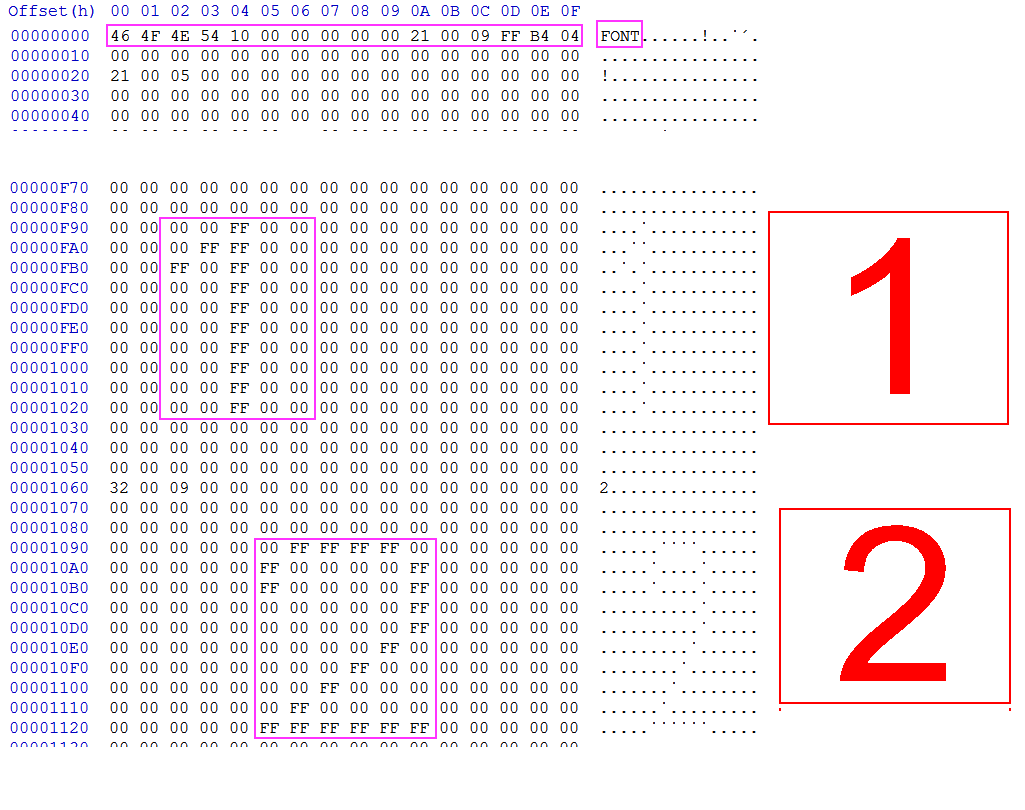
Gigabyte is a little complicated:
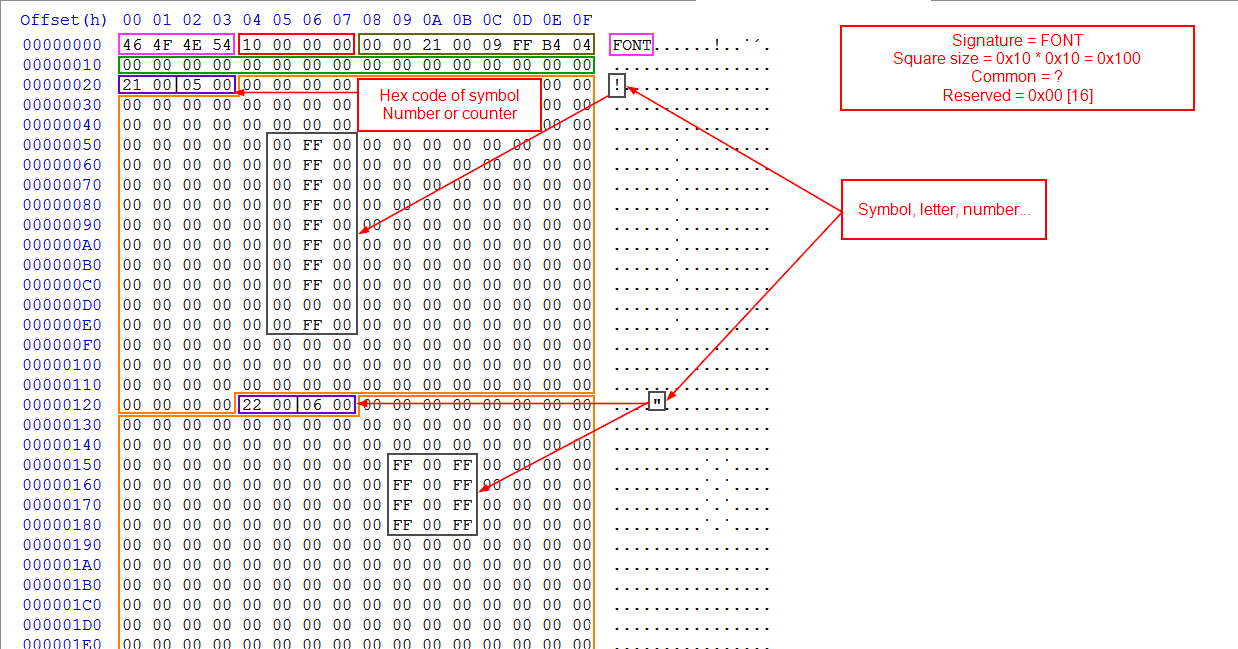
Gigabyte also has interesting "font" images:
When replacing the images, have in mind their location. If it is just one in raw section, use UEFITool. If it is in a pack, replace old image and fix the size in the image header. But also watch for:
- Asus padding
- preserve image resolution.
- preserve image properties. Replace with same type, bit-depth, complexity.
For viewing use IrfanView or XnViewMP or your favorite choice. If you want thumbs for all images, go for SageThumbs. For editing, pick your favorite.
In the end, let’s not forget that this would not have been possible without the tools from CodeRush. When using good software, you easily forget about its importance.
UefiImageExt.rar (1.66 MB)
- Added an Insyde packer. Still not sure if it is OEM dependent.
- PNG brute extraction, but disabled since it is not needed. Honestly, I love png more and more: clean header, clear structure, CRC, lossless, what can you ask for more?
- fixed GIF extraction. Misread the header.
- added a PCX brute extraction. I just can’t seem to get a 100% accurate extraction all the time. Must be something with padding at end of scan line. Anyway, not important since PCX will most likely be in a raw section, which was already covered.
- added TGA extraction, but only from raw sections. I tried everything, but the pattern still shows a lot of false positives. Users should comment lines 614-616 to prevent flooding of messages.
- TIFF extraction, but I don’t think we will find one in BIOS.
UefiImageExt_fix.rar (6.65 KB)
So I found a faster approach to searching for the images anyone might need to find in their bios rom. If you open your bios in phoenixtool263. It will dump the extraced files into a “DUMP” folder in the same directory as where you pointed phoenixtool263 tool to open your bios rom. Inside the dump folder you will see a ton of *.rom files and a folder labeled “bios”. Ignore the bios folder, you will not need anything in there. Now highlight all the *.rom files and rename them to anything you want. Windows will automatically rename all the files in a chronological fasion. with all the files names starting with the label you assigned it and a number after it. Now if you highlight and drag 20-30 files at a time onto the #imageext.bat it will extract any images in the rom files you dragged onto it into separate folders with the name of the file it extracted the image from. Also you will have to keep hitting the enter key as it searching each file, But once it’s done you can browse thru each folder and search for the image you are looking for. In my case I have an ASRock Z97X Fata1ity Motherboard. will experimenting with #imageext.bat I found that ASRock had use Paint.net you edit or make all the images in the rom. Now the Image I was after was the background in the bios menu screen. there are two different resolutions of the same image. As my bios has a HD mode of sorts but only if you are running it in full EFI mode. This worked out well cause I was able to compare both files in a hex editor. and look at the areas listed as replace until I found one that was very small like 6-8 bytes long. and search that hex string in UEFITOOL. I then extracted the file from with in UEFI tool and then dragged the file onto the #imageext.bat. the image was extracted and it matched. The only problem I have now is editing the image and saving it in the same files size or lower.
and I haven’t figured out how to insert it back into the rom yet. as the original is a raw file!?! so still working on that. any suggestion are welcomed! hope that helps someone! ![]()
phoenixtool263.rar (4.83 MB)
I don’t see how this could be faster. The extraction will be faster on OEMs such as ASRock, that pack the (many) images in separate ffs, but the search will take longer, considering that you have to process each file, hundreds of them. The only advantage of this method is that you can catch all images, as I can use more relaxed patterns in Python as compared to UEFIFind search. But it is not as bad as it seems. Here are some differences:
- with UEFIFind I can search JPG with common JFIF or EXIF marker (as found in BIOS/UEFI), with ImageExt I can process any (hopefully) JPG image. For the purpose of this thread, the result should be identical.
- with UEFIFind I can search for common PCX headers, with ImageExt I can process any (hopefully) PCX image. For the purpose of this thread, the result should be identical.
- with UEFIFind I can only search for TGA 2.0, with ImageExt I can process TGA 1.0/TGA 2.0 and extract them under specific conditions. From my tests, only Insyde uses TGA and packs them in RAW sections, which is fully supported by ImageExt.
- with UEFIFind I can NOT search for ICO images due to ambiguous pattern, with ImageExt I can process ICO images after parsing every match and detect ICO structure. Only Gigabyte seems to use ICO images, but you can extract them with the trick I will explain later.
- TIFF returns many false positives with UEFIFind search, with ImageExt I can rule out false results such as TIFF pattern in JPG images. Not sure if they are used in BIOS/UEFI.
- WMF is added only in ImageExt, but unlikely to be found in BIOS/UEFI.
From the above differences, it would seem that only Insyde needs a second look. But there is a simple trick for that: Insyde usually compresses everything in one Volume image, thus it is easy to extract its uncompressed body with UEFITool and use that with ImageExt. The images won’t be extracted in separated folders based on GUID/UI, but you can open the needed ones in hex editor and search a portion of them with UEFITool, to determine their location. The same trick can be applied to all OEMs that don’t use compression per ffs. The ideal situation is to run both methods and compare the results, determine which serves you better. As for the editing, use any tool you want. Just keep the resolution and format, the size is relative - just don’t go overboard. For replacing, if there is no special packaging, just use UEFITool and replace body of relevant section.
I was using the search strings you identified and was still un able to locate the background image i was searching to change. so this is kind of a work around for that situation is all.
So doing the extraction using Phoenixtool263 extracts the files all with the GUID names, and using the #imgext.bat from lordkang as he instructs, You can the parse 40-50 files at a time. Ximgext.bat will extract the images into a folder with the naming scheme of " Image *GUID fo the file". once you find the image you need, Edit or replace keeping the file size and resolution as close as possible. now it’s time to reinsert the files(s). Open the bios rom you want to change in UEFItool.exe. go into the folder where the images you extracted are find the one you want to start with. the folder will be named after the GUID as mentioned above. Goto rename the folder. But instead of renaming it, highlight and copy just the GUID portion. Go back to UEFItool.exe goto search. On the search popup, click the GUID tab and paste the GUID that you copied into it and click search.
Copy GUID into the search tab
Click down to the raw section
Replace as body
This is how it should look when done. then save the rom.
Here’s is just a quick example i whipped up.
Final version:
Does anyone know where can I find "UefiImageExt_fix.rar"? The links expired :(.
@jcorrea :
I had no problem to download the attached file from the start post of this thread.
Please try it again. If the download should fail again, I will attach it once more.
does it work on a asus maximus vii gene z97
I know this is an old post, but I got everything I need to mod the graphics of my UEFI BIOS, except that I’m on gigabyte and it uses a packer, there was no information on how to pack the folder back to the ffs file to be able to then replace it on UEFITool.