Hello. Please help me modify the firmware to support NVMe SSD.
https://mega.nz/file/aKhwkbxL#9qR9DrXe38…5KDzLDfiQ58pJho
Edit by Fernando: Thread title customized
@zokir - Is that programmer dump?? If not, please do below, and send me file from #1 (ONLY)
Once I send you back mod BIOS, you will put system to S3 sleep (not hibernate), then wait one minute, wake it up, then flash back the mod BIOS via step #2
If you have already modified the BIOS in ANY way, you will need to re-flash it back to factory defaults using factory method (NOT FPT)!!!
Additionally, please remove all BIOS passwords, disable secure boot, and disable TPM or Encryption if you have enabled. Do this before moving on to below
If you do not have Intel ME drivers installed, install them now from your system driver download page, then start over here after reboot.
Check your BIOS’ main page and see if ME FW version is shown. If not then > DOWNLOAD HWINFO64 HERE <
Once HWINFO is open, look at the large window on the left side, expand motherboard, and find the ME area.
Inside that section is the ME Firmware version. Take note of the version. (ie. write it down or get a screenshot)
Once you have that, go to the thread linked below, and in the section “C.2” find and download the matching ME System Tools Package for your system.
(ie if ME FW version = 10.x get V10 package, if 9.0-9.1 get V9.1 package, if 9.5 or above get V9.5 package etc)
> DOWNLOAD " ME System Tools " packages HERE <
Once downloaded, inside you will find Flash Programming Tool folder, and then inside that a Windows or Win/Win32 folder (NOT x64).
Highlight that Win/Win32 folder, then hold shift and press right click. Choose “open command window here” (Not power shell! >> * See Registry file below *).
If you get an error, reply to this post with a screenshot of it, OR write down the EXACT command entered and the EXACT error given.
((If “open command window here” does not appear, look for the “Simple Registry Edit” below…))
Step #1
Now you should be at the command prompt.
You are going to BACKUP the factory un-modified firmware, so type the following command:
Command: " FPTw.exe -bios -d biosreg.bin "
>> Attach the saved "biosreg.bin ", placed into a compressed ZIP/RAR file, to your next post!!! <<
Step #2
Right after you do that, try to write back the BIOS Region dump and see if you get any error(s).
Command: " FPTw.exe -bios -f biosreg.bin "
^^ This step is important! Don’t forget! ^^
If you get an error, reply to this post with a screenshot of it, OR write down the EXACT command entered and the EXACT error given.
Here is a SIMPLE REGISTRY EDIT that adds “Open command window here as Administrator” to the right click menu, instead of Power Shell
Double-click downloaded file to install. Reboot after install may be required
> CLICK HERE TO DOWNLOAD CMD PROMPT REGISTRY ENTRY <
If the windows method above does NOT work for you…
Then you may have to copy all contents from the Flash Programming Tool \ DOS folder to the root of a Bootable USB disk and do the dump from DOS
( DOS command: " FPT.exe -bios -d biosreg.bin " )
The BIOS was copied by the TL-882 programmer.
Have you wrote to this BIOS chip on this board, with that programmer, and it was OK? I mean, you have erased and written to chip on this system, with that programmer, so you know it works?
If yes, OK, I will unlock BIOS menu and do NVME mod for you, please confirm, thanks
Dump worker 100%
@zokir - Here is your mod BIOS - https://ufile.io/lzooqqn1
*** WARNING - To ANYONE with laptop and unlocked BIOS!!!
DO NOT try to enable this graphics card or disable that card, switch cards etc. Otherwise you will end up with no display output (ie black screen) and no way to recover except by blind flash or with flash programmer.
You can change graphics related settings, like changing memory sizes, or core speeds etc, just don’t try to disable one card or change which is main etc.
Additionally, be very careful when trying to undervolt CPU, you can leave BIOS unbootable due to CPU voltage too low (Sometimes even 0.05 is too much)
WARNING *** - This BIOS is user specific! If you are not user zokir at Win-RAID.com forum, DO NOT USE THIS BIOS!!
If you do, and you are not zokir, then you will loose your serial, UUID, OG NVRAM, and possibly LAN MAC ID as well.
You have been warned!!!
Thank you so much. Tomorrow I will program the BIOS and write about the results.
@zokir - You’re welcome! If you are not already familiar with NVME/OS setup etc, please see this guide and do step #4 in the “This is what you should do” section exactly as outlined
Everything is working. Only I could not find how to turn on NVMe
I flashed the BIOS with a modified firmware. The laptop stopped turning on. So the firmware is not working. I flashed with the TL-882 programmer
----------------
For verification, I returned the native firmware. Everything works with native firmware. I flashed with the TL-882 programmer
@zokir - You said working at post #9?? Only you could not find out how to use NVME (For which, I say you need to check the link I gave you at post #8, you don’t “Turn on NVME” it’s on already, but you do have to install OS to it a certain way)
Then you said not working at #10?? Which was it?? Did the BIOS I send you boot, or not? If not, why did you say it was working at post #9?
I have already made same edit for this user, minus the NVME insert and all is fine, so something with your write possibly? - Acer VN7-791G Advanced BIOS
Did you erase, then blank check, then write/verify? If not, that may be the problem.
I did change one extra byte in your edit that I missed when doing megan’s BIOS, at above link, but same outcome would appear (unlocked menus).
If you want, I will remove that byte edit and you can test to see if it’s then bootable?
* Edit - @zokir - Here, please test, this has that one byte changed back, this makes it a dirty edit, should fail (but megan said working and showed image of menus, so it works)
Ideal proper edit is the one I sent you before, with this byte properly changed
https://ufile.io/jdqcg5f5
Hey. It’s okay. When I first wrote the firmware with the programmer, it did not write correctly and did not work. I flashed the firmware again, then it worked. Tomorrow I will install Windows and check. Thank you for answering my topic.
@zokir - Ohhh, OK!! So good, the first BIOS I sent you works then, correct? If yes, good, and I thought it should 
About NVME, be sure you follow link at post #8 to guide on how to install to NVME
Hi, today I wanted to install Windows on NVM and nothing works for me. The hard disk is not detected in the BIOS and the installation program cannot detect it at the beginning of the installation.
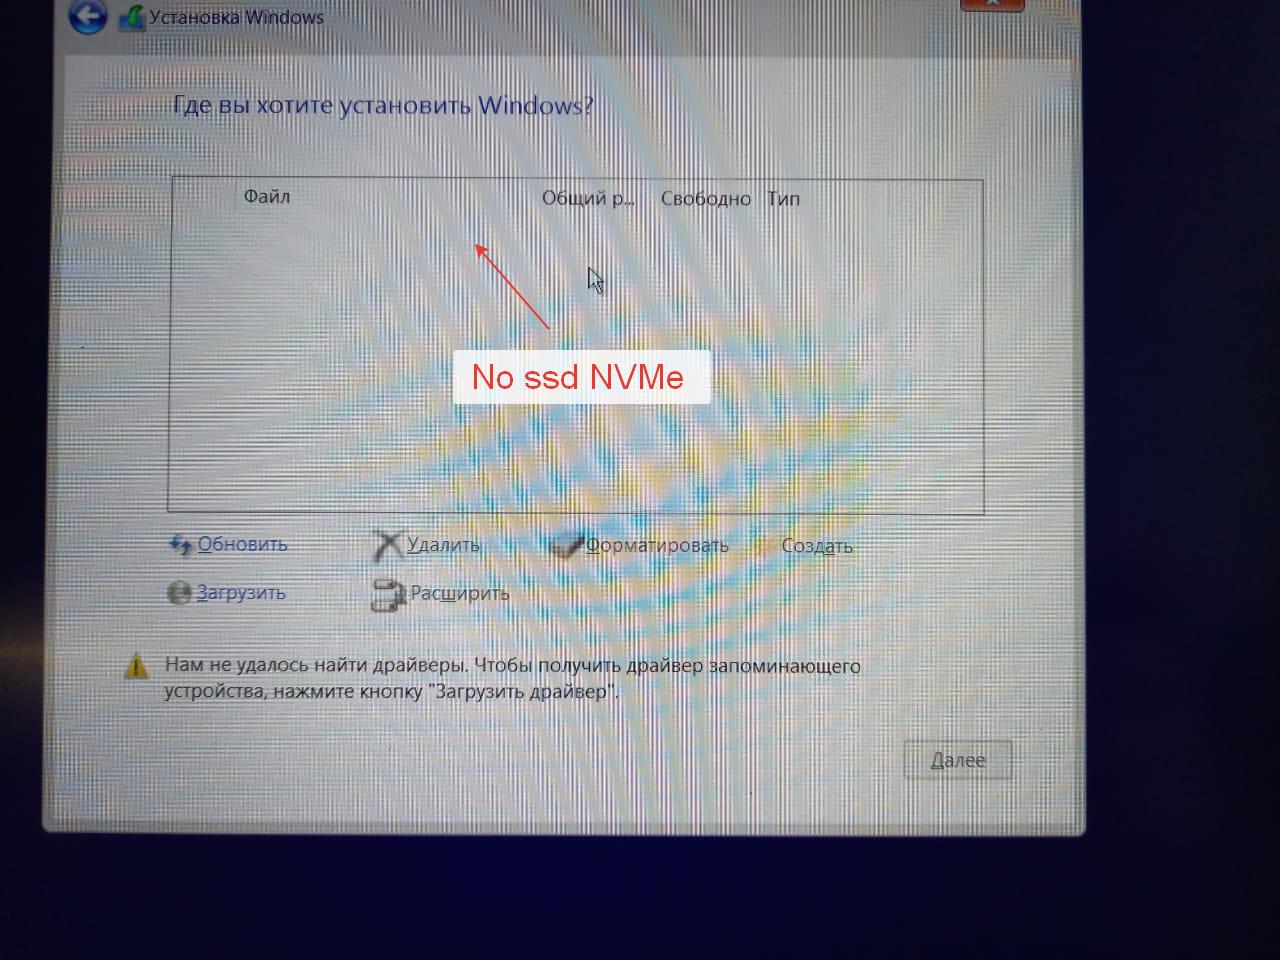
First, if you want to show me images of windows or BIOS, set everything to English please What does that error message say at the bottom?
Do you see PATA SS in BIOS, at boot priority or BBS selection page etc? You will never see NVME in the BIOS, this is mentioned in the guide I linked you to at step #4 - You will only see PATA SS or Windows Boot Manager once windows is installed.
BIOS should be set to UEFI mode (and or OS Type Win7-10 etc), CSM can be enabled or disabled.
This M2 port may not be compatible with NVME? But, didn’t I link you to some thread at Acer forum where user showed it working? If yes, please find and send me that link again so I can look at his image
USB installer should be GPT formatted USB, and I find Windows DVD media creation tool to do this best, sometimes Rufus causes issues, so try this (Ignore Win8 in specifications, I use for Win7-10 all the time)
https://www.microsoft.com/en-us/download…s.aspx?id=56485
Info/FAQ - https://www.microsoft.com/en-us/download…d-download-tool
And, NVME should be RAW or GPT only, here’s how to make RAW - You can use diskpart in windows from OS (Direct from any CMD Prompt), or from installer ISO (press Shift + F10 on the first setup screen where you pick language)
Or from repair/troubleshoot options in the installer/setup. Remove all other drives, so you have only USB and target win10 drive. Then from CMD prompt do the following
1. Diskpart
2. List Disk << Here, identify what your target disk is by size/name etc, and make note of it’s #, you will use it’s # next - (If in windows, these #'s will match what you see the drives shown as in Disk Management) - Be sure you do not select your USB or main OS drive if in OS
3. select disk # << Here, instead of #, put target disk #, example >> select disk 0
4. clean
5. Exit
Reboot and run the installer again, then point it at the raw/blank drive, do not load any drivers or create any partitions etc, just select drive and click next
Hello, there is already a different thread about the same thing. I am basically trying to enable NVMe on this laptop. I think it should work as there is M keyed M.2 slot and I’ve seen some posts where this has been done and NVMe was then enabled. But I didn’t find any complete tutorial how to do it. I am following this post: /t7303f16-Acer-VN-G-NVMe.html as my baseline. I think enabling the Advanced options in Bios should do it and there should be an option to enable NVMe, as far as I know. If not, correct me, please.
My Bios dump is here: mega(dot)nz/file/IroGzKqB#Hvw1gEi9looQD30qFb9JY0LvI4AjiidEqPyMaCgmmWA
Writing back the original bios resulted in error 28, screenshot here: mega(dot)nz/file/4uxCSKwR#j80EGCPKCEDZ_n6ILlWEedt6zRPq0LY7LUb2vEsOSwQ
I would like @Lost_N_BIOS to assist me, if possible.
I am sorry for circumventing your links protection for new members, but I think this is the only way to proceed.
Thank you.
--------------------
I tried to test if my laptop has the S3 sleep bug as presented in post #5 here: /t7272f54-Acer-VN-G-Advanced-BIOS.html and the write worked, no error 28 this time. What should I do next?
@bajticzek - There is never any option in any BIOS to "Enable NVME"
No worries about breaking the links, we only do that to stop spammers, so any way actual user with quality post/question posts a link is OK by us  I think you need 3 or 7 posts, then you can post links.
Great to see your BIOS has S3 sleep bug, may or may not be needed, but it’s easier for you so we can use that.
As you can see in the other thread, no luck for that user, but maybe it was something he was doing? Merging this post to that thread now
I will edit this post shortly with menu unlocked BIOS + NVME edit
* Edit @bajticzek - Here you go - http://s000.tinyupload.com/index.php?fil…471154856279222
*** WARNING - To ANYONE with laptop and unlocked BIOS!!!
DO NOT try to enable this graphics card or disable that card, switch cards etc. Otherwise you will end up with no display output (ie black screen) and no way to recover except by blind flash or with flash programmer.
You can change graphics related settings, like changing memory sizes, or core speeds etc, just don’t try to disable one card or change which is main etc.
Additionally, be very careful when trying to undervolt CPU, you can leave BIOS unbootable due to CPU voltage too low (Sometimes even 0.05 is too much)
WARNING *** - This BIOS is user specific! If you are not user bajticzek at Win-RAID.com forum, DO NOT USE THIS BIOS!!
If you do, and you are not bajticzek, then you will loose your serial, UUID, OG NVRAM, and possibly LAN MAC ID as well.
You have been warned!!!
@Lost_N_BIOS Thank you. I made it work this afternoon (GMT+1). I had to mod the motherboard slightly. Could you grant me image/linking privileges so I can make a tutorial for this laptop - motherboard tomorrow when I am at the machine again?
@bajticzek - Great you got it working! So, you had to mod the board itself? If yes, great, I’m sure users would appreciate a tutorial, thanks!
I’m sure @zokir would appreciate it, since he could not make it work, and probably @megan would appreciate too
You should be able to post images, either via advanced reply and attach, or use img tags and upload image to image host, then put the direct URL to image inside the image tags
Hopefully complete tutorial
So basically this whole process began when I started to wonder whether my Acer V17 Nitro supports NVMe SDD or not. After disassembling the machine I found out there is a M keyed slot for M.2 drive. That means both SATA and NVMe drive can be inserted into it. I bought a 1TB Samsung 970 Evo M.2 NVMe SSD for this purpose and started to gather some information. I found out that application HWInfo64 can report if the board supports PCIe. Some questions were raised on Acer community forums, but were quickly dismissed by some people with answers like “If the HWinfo doesn’t report at least 2 lanes on a PCIe 3.0 Root Port, then NVMe is not supported!”. Funnily enough, I tried to remove the WLAN card from its miniPCIe slot and the Root Port completely disappeared from the HWInfo. Well maybe this is the problem as I have a SATA SSD in the M.2 slot running the Windows 10 so the PCIE Root Port doesn’t show up. I tried to insert the NVMe drive into the slot, but it wasn’t detected by the BIOS. It also wasn’t detected by the Windows installer which I ran from the USB drive. So, to my knowledge this board doesn’t support NVMe natively. First thing how to progress - I tried to read BIOS and send it to a lovely person @Lost_N_BIOS to have it edited, so the NVMe would be enabled. Also Advanced tab in BIOS would then show up.
Exact process was like this - based on post #2 in this thread Acer VN7-791G NVMe. :
1. Enter BIOS (keep mashing F2 key after powering the system ON) and set Supervisor password on Security tab. ‘abc’ is good example.
2. Switch to Boot TAB and disable Secure Boot. Switch back to Security tab, enter current password ‘abc’ and both fields for new password leave blank. Press enter. Save and Exit.
3. Open HWInfo64 and under Motherboard-ME area find out which version of ME is on the system (mine is 9.1).
4. Download corresponding ME System Tools Package from THIS LINK (section C.2) and unpack it to Windows desktop.
5. Run Command line as admin, navigate to unpacked folder and then to the Win32 folder.
6. Type command “FPTw.exe -bios -d biosreg.bin” (without quotes) to read and backup the BIOS content to a file.
7. Type command “FPTw.exe -bios -f biosreg.bin” (without quotes) to try writing this content back to the BIOS.
8. Fail with Error 28.
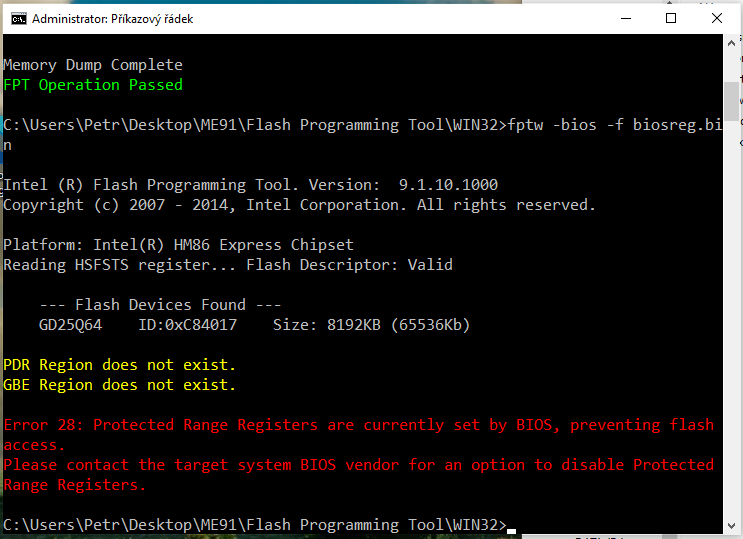
9. Try the S3 sleep bug, which allows writing the content to BIOS after the machine has been in sleep state for more than a minute. So I just put my computer to sleep (not hibernate) and woke it a minute later.
10. It worked and now I know I can write the BIOS without an issue. If it doesn’t work on your machine and it cannot be exploited via the S3 sleep bug, search function and google is your friend. Contating @Lost_N_BIOS might be an option too.
11. Make a ZIP archive with the read BIOS (file biosreg.bin), upload it to some cloud service (mega.nz for example) and nicely ask @Lost_N_BIOS to edit your BIOS.
– big ! The modified BIOS you receive is applicable ONLY to your specific machine, not to any other ! –
12. Copy the received biosregm.bin file to Win32 folder you still have open in your Command line and type in command “FPTw.exe -bios -f biosregm.bin” (without quotes).
13. Done, the modified BIOS now lives in your machine. Reboot the machine and access the BIOS via F2 key to confirm the Advanced tab shows up.
So what now? It should work, right? Well, no. I tried to insert the NVMe drive instead of the SATA one. I couldn’t find the new drive in BIOS and I couldn’t find it in Windows install either. Something must be wrong. But I won’t give up! After a little bit more googling I found two videos that show some hardware modding to enable the PCIe lanes reaching the M.2 slot. I was expecting all the hardware to be there but I was clearly wrong. So here we go! This video is applicable to VN7-591G machine, which I do not have. I have VN7-791G. So I searched for schematics for both machines to compare what need to be done. I would also like to point out I removed the NVMe SSD from its slot.
Links to videos follow:
Video one with description, what needs to be done
Video two
Schematics here:
VN7-591G schematic
VN7-791G schematic
The VN7-791G schematic is for slightly different motherboard than I have.
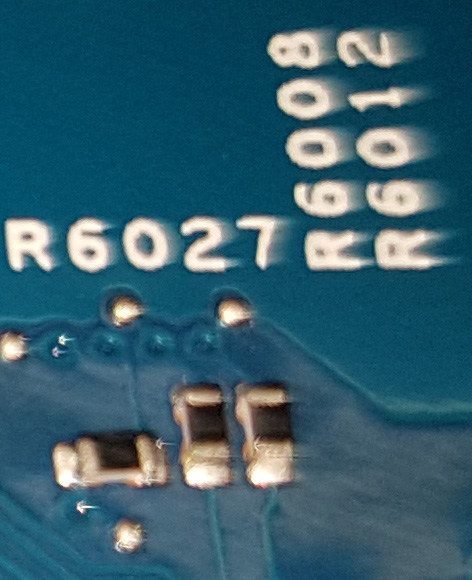
Nevertheless I took the gamble and put my faith in it. I compared the differences between the video and schematic for my board and I found out that some resistors present on VN7-591G board are not at all on VN7-791G, there are no empty pads for them and they are not mentioned in the schematic at all. So I omitted these. Some others, which should be added, are already present - R6008, R6012 and R6027.
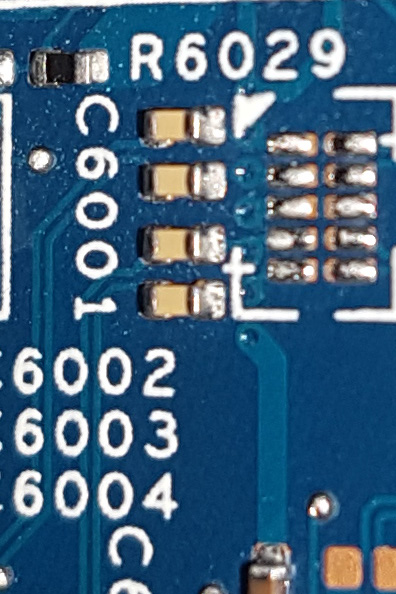
Next step is to desolder 4 capacitors C6001, C6002, C6003 and C6004 which look like this:
It should look like this after the procedure:
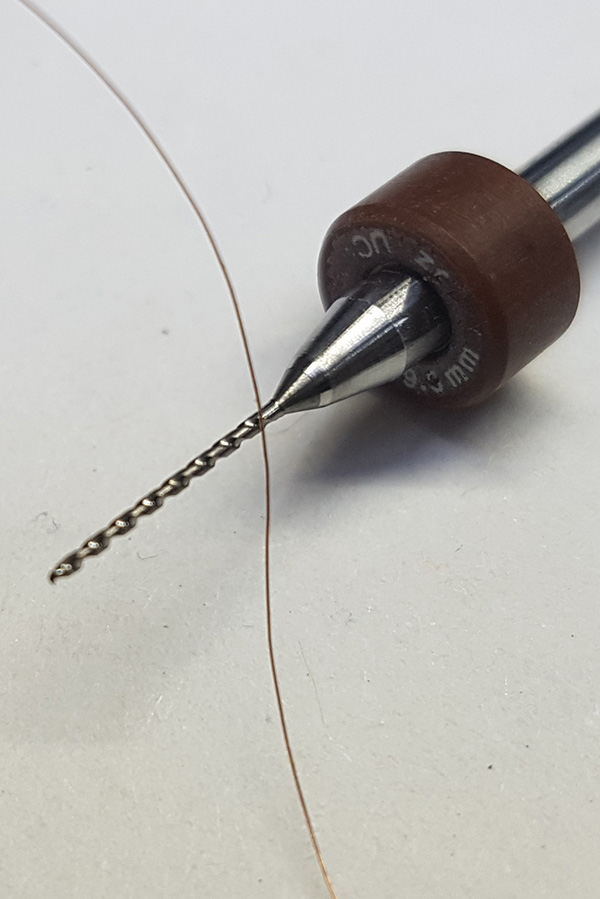
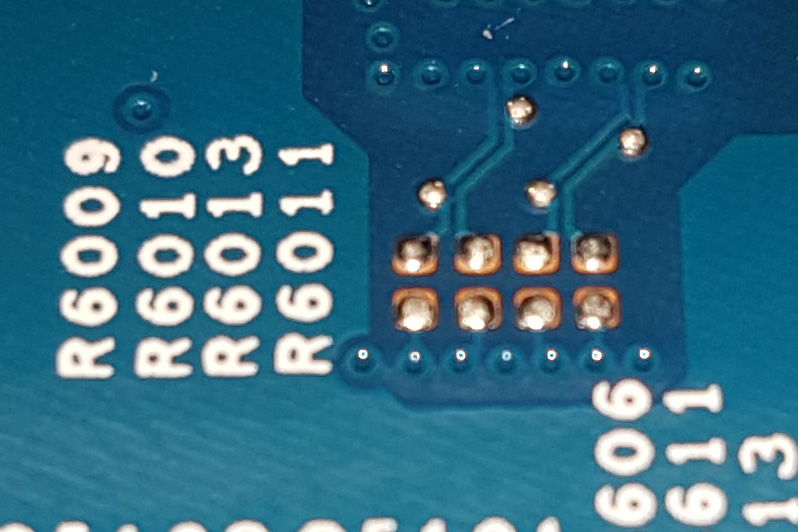
Finally there are 4 resistors missing. All of them should be 0 ohm resistors in tiny package, so basically just some jumpers. I used a very fine enamaled wire instead. The thinner the better. The diameter of the drill for reference is 0.6mm.
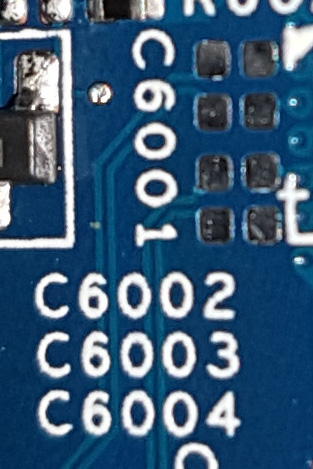
The pads are empty now:
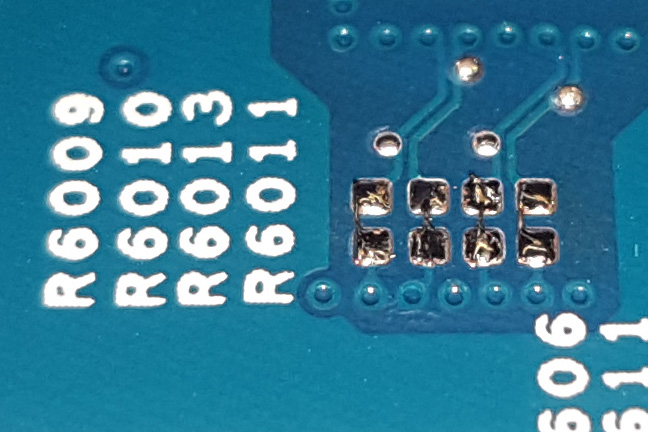
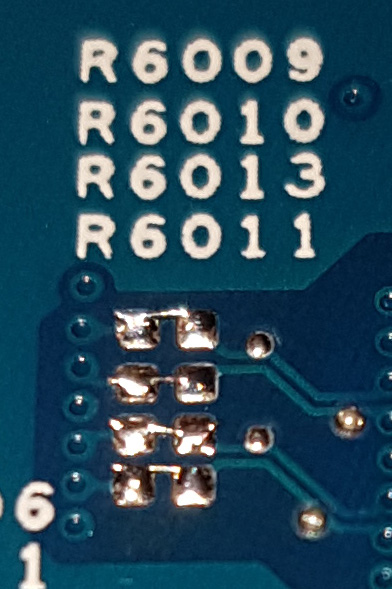
And after (same resistors, photo taken twice from different angles):
Now comes another fun part - configuring BIOS. I disabled all the SATA ports except the ones occupied by DVD drive and 2,5" HDD. Just to be sure.
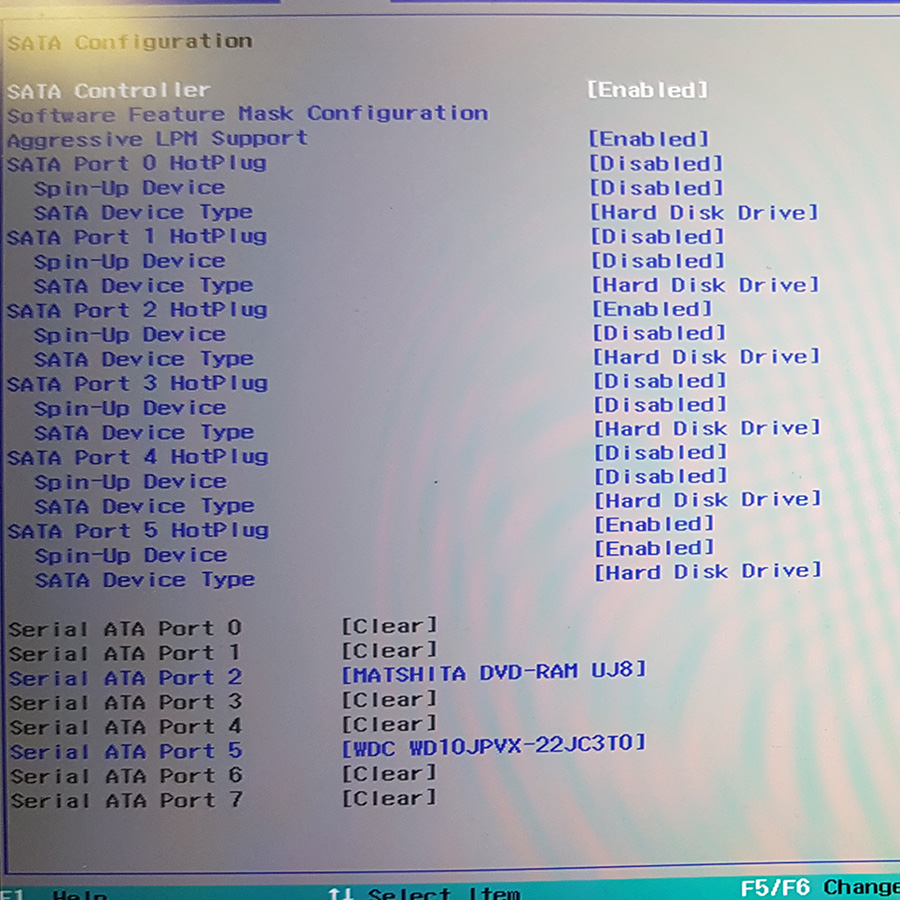
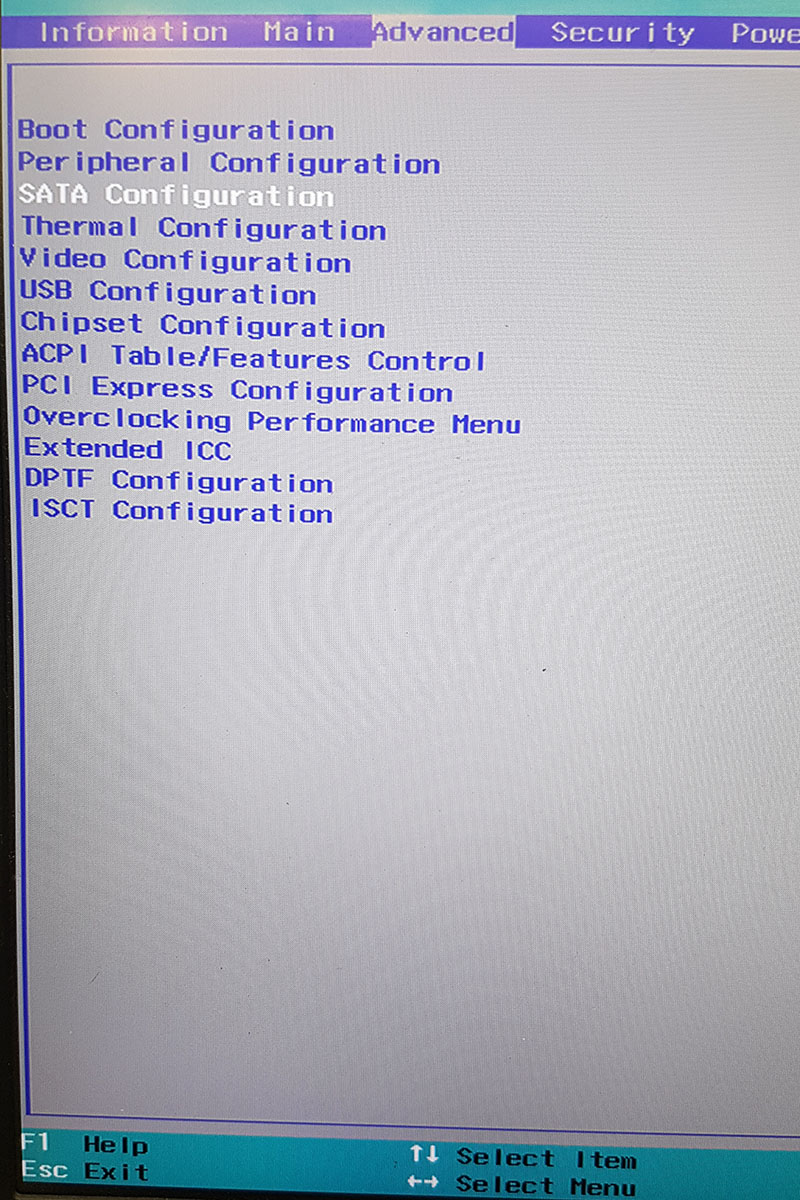
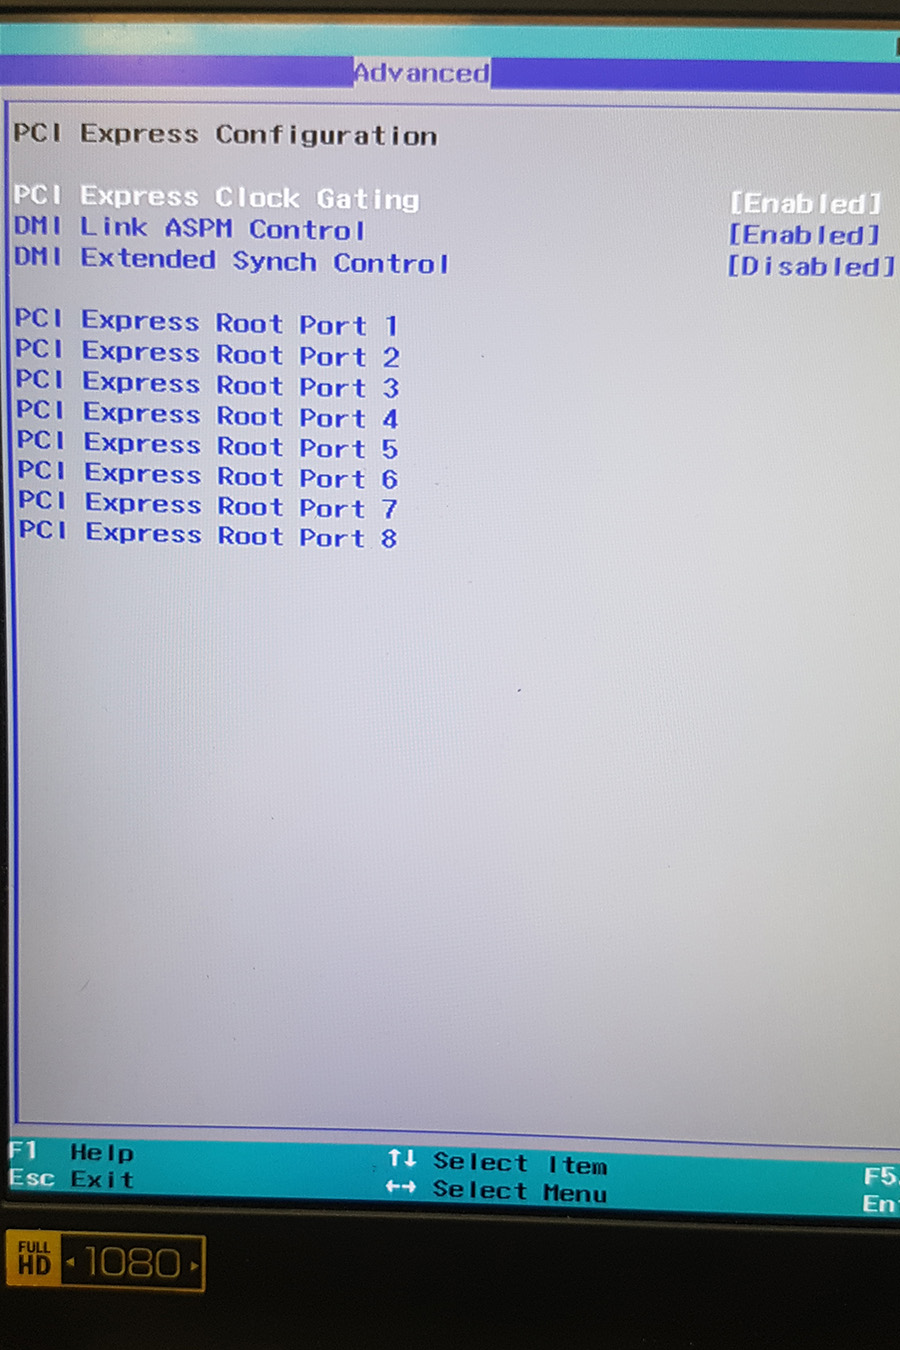
At PCI Express Configuration screen I made sure to go through each Port settings and I enabled any that was disabled.
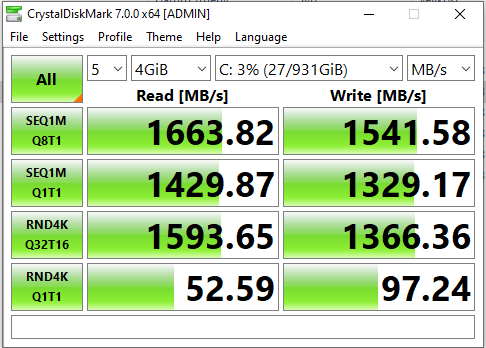
Save and Exit and power the machine down. Well and that’s all. Now put your NVMe drive back to the M.2 slot and USB thumb drive with Windows 10 install image into the USB port. Boot from it, go through first few screens and you should see the NVMe drive there, empty, ready to be formatted and to have Windows installed on it. Speeds are not reaching its theoretical maximum limits (i7-4720HQ and older chipset surely doesn’t help much), but I think it’s much better than having just a SATA SSD. Also the 970 Evo NVMe variant is $40 cheaper than its SATA counterpart now here in Czech Republic, although the form-factor and physical interface is the same.
Good luck!