I’m crossposting this from /r/thinkpad/ (can’t post full link, since I’m new) where a user pointed me to this forum.
The situation: I have ThinkPad T480 with a failed BIOS update. It beeps a few times when turned on (can’t remember the pattern), the display backlight turns on, the keyboard backlight turns on, but otherwise nothing happens, no output, not even the fans spinning.
What I’ve tried so far After a lot of research I got myself a CH341A, dumped the chip with the BIOS on it and I’m now trying to replace the BIOS section with a downloaded version from Lenovo (n24ul26w).
I thought I could get away with ifdtool, but no:
1 2 3 4 5
$ ifdtool -i bios:firmware.bin chip2.bin

File chip2.bin is 16777216 bytes
File firmware.bin is 9455008 bytes
Region BIOS is 9437184(0x900000) bytes. File is 9455008(0x9045a0) bytes. Not injecting.
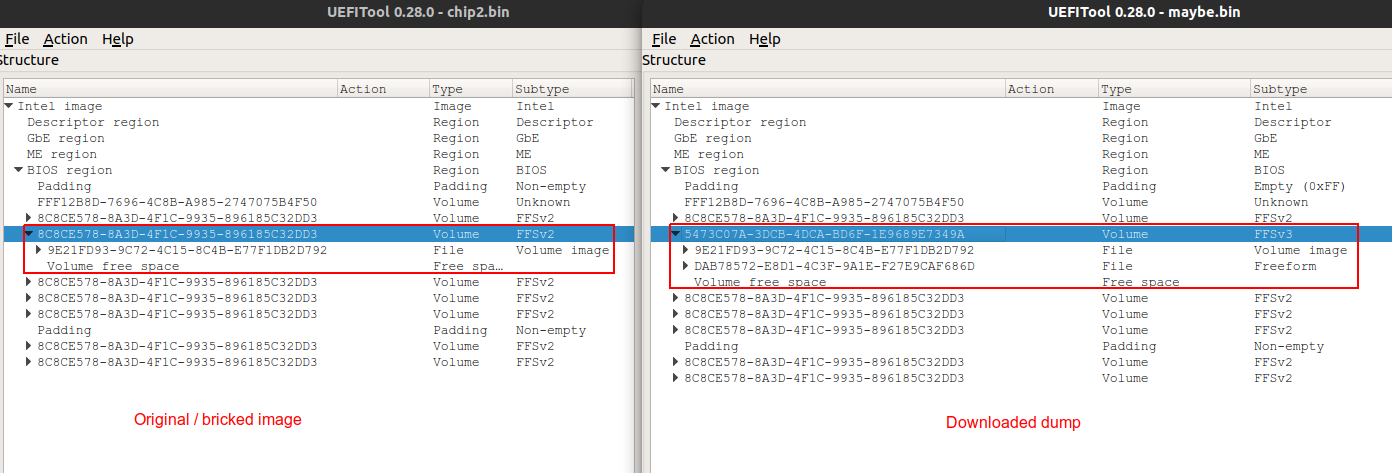
So I had a look at the dumps with UEFITool:
The overall structure of the BIOS section looks mostly identical on both sides, except for an extra padding on the current dump (left). So I figured I could just grab everything else from the downloaded firmware and overwrite it in the existing one.
So i did Right Click -> Extract as is on each section with the same name in the downloaded firmware, and then Right Click -> Replace as is within the current firmware.
After playing the edited image back onto the chip with
...Nothing happens. The beeps are gone, and the keyboard backlight turns off after a second. Otherwise nothing happens.
After writing the bricked firmware back on it, it at least beeped again.
So, my questions are:
- Am I doing something wrong or misunderstanding something? To be fair, I'm a software guy and have no clue about low level hardware stuff. - Could it possibly work if somebody dumped the firmware from their working T480 and I just wrote it onto my chip? - Is there something else I could try or to be aware of? - How to tell if the laptop is dead for good and I'm just wasting my time?
Thanks!
Edit by Fernando: Thread title customized and shortened
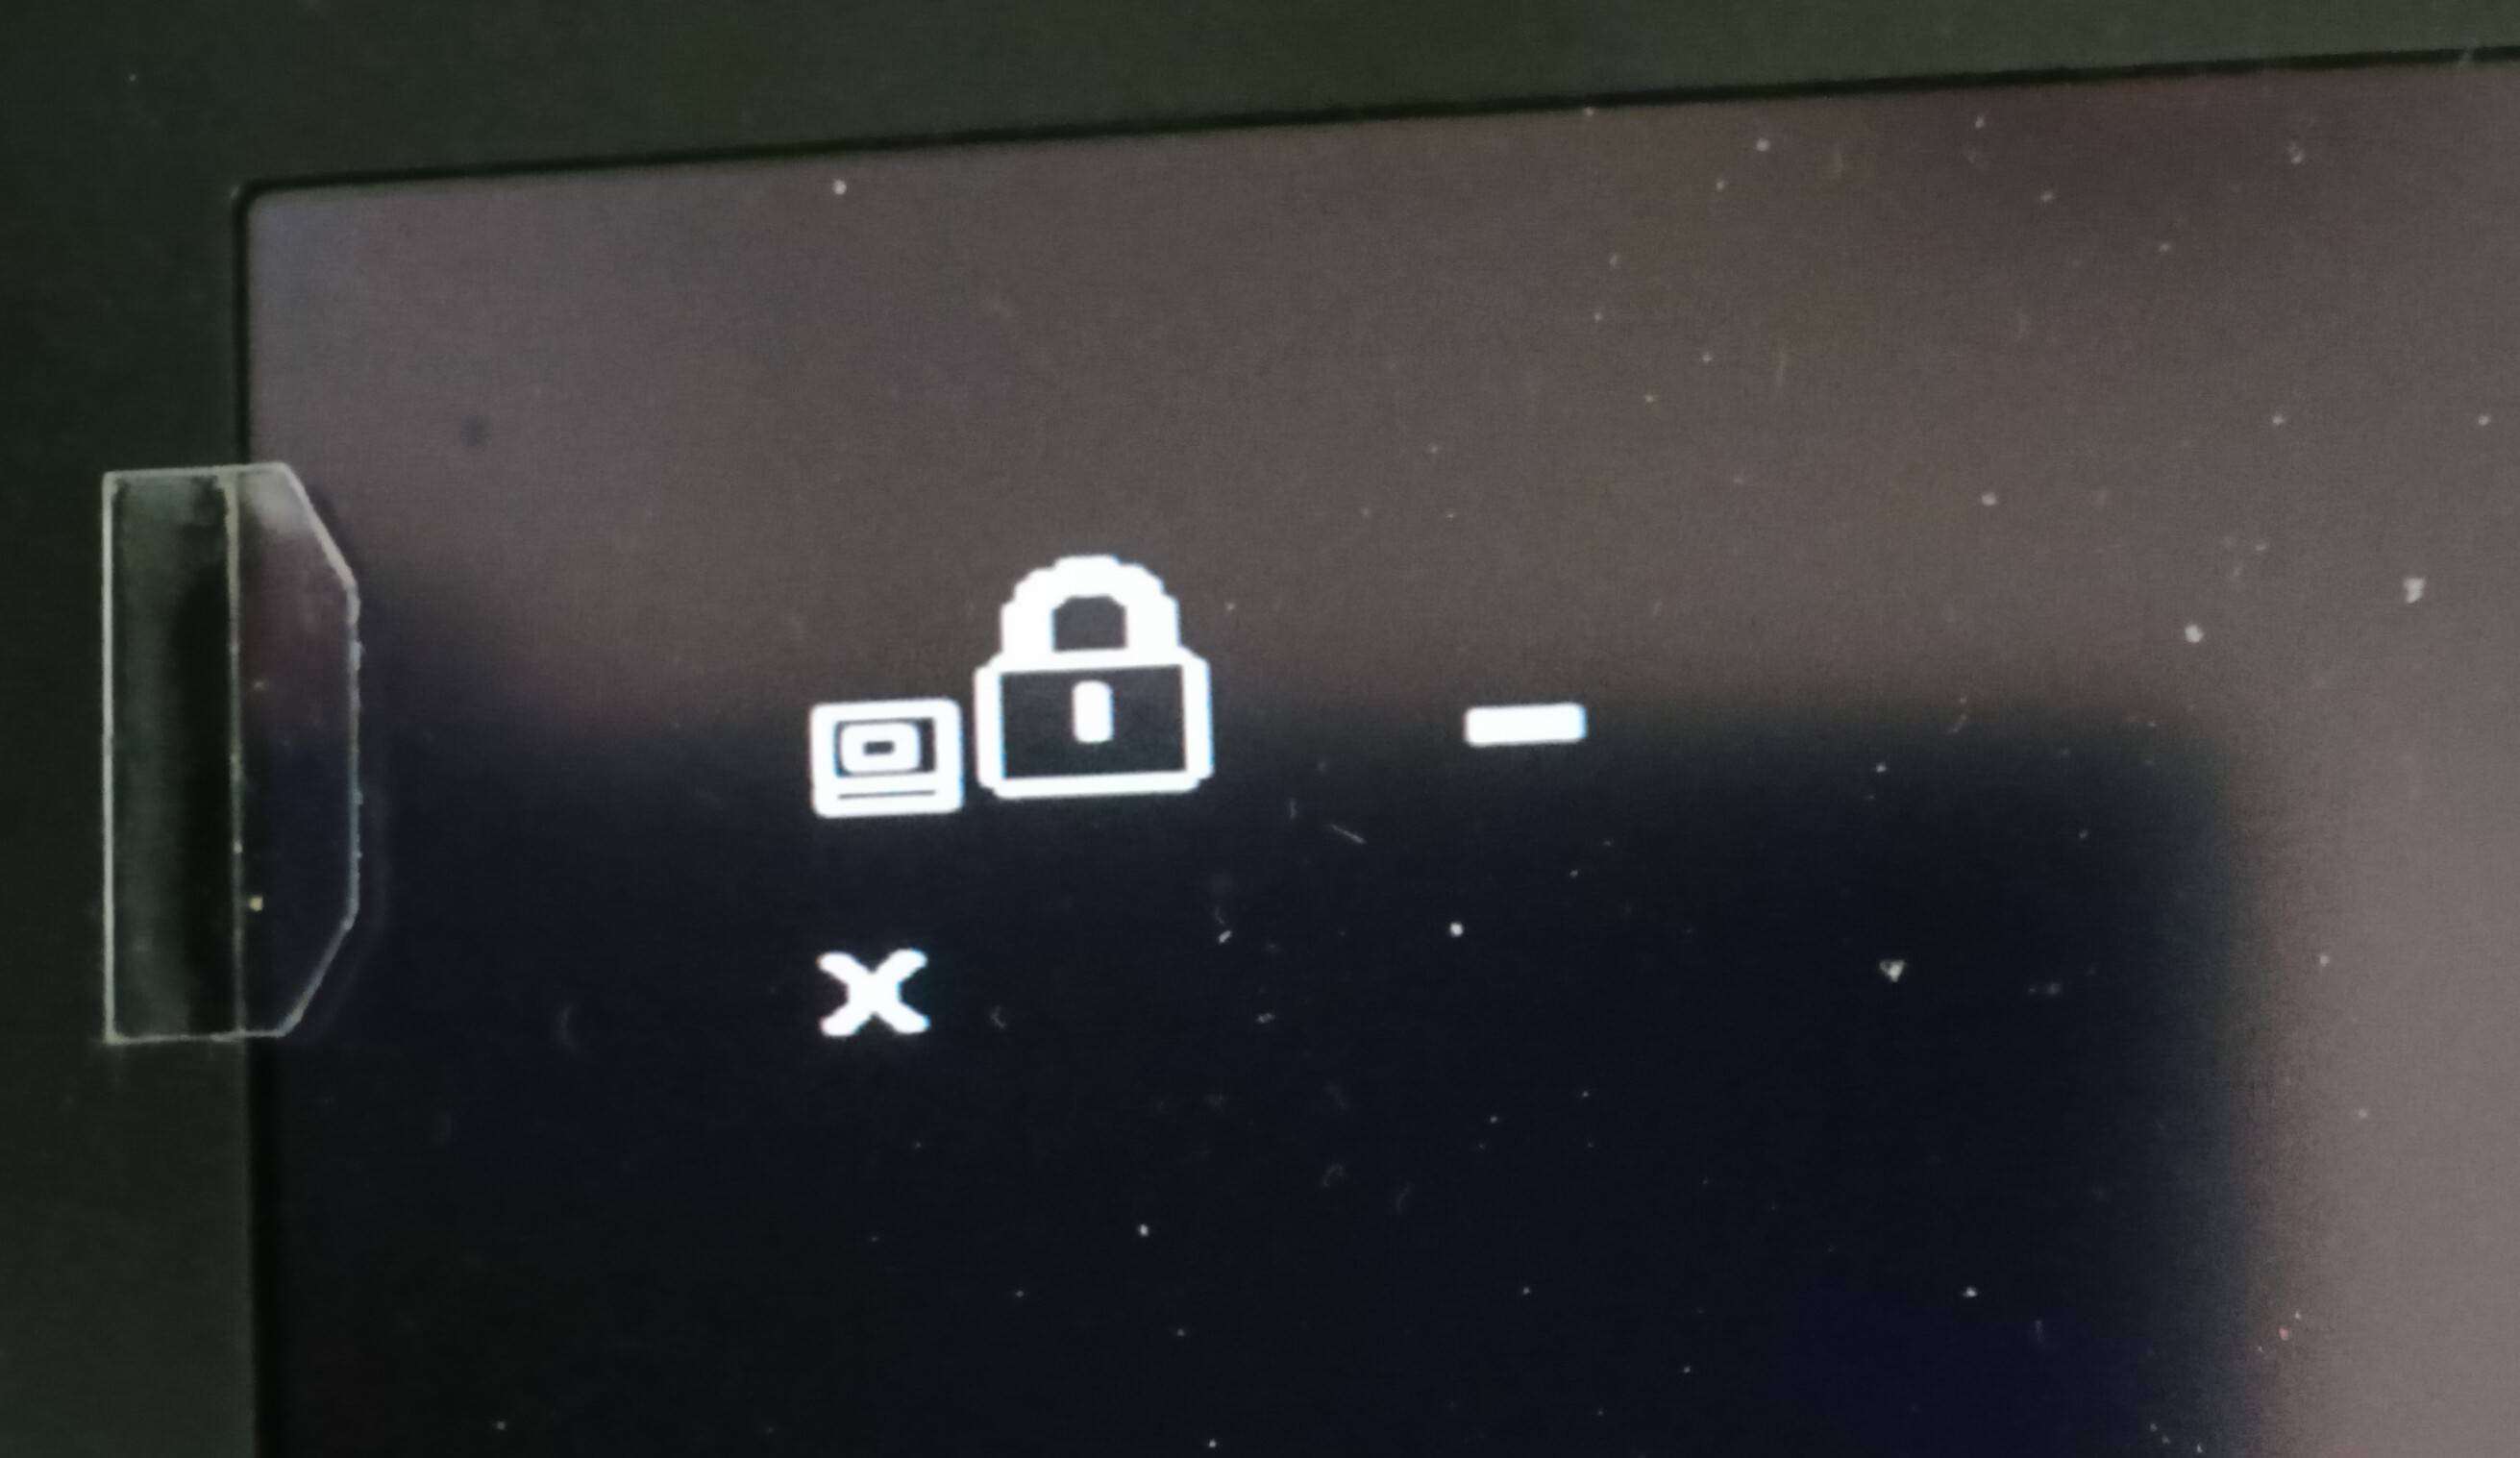
Well, sort of… It does seem to start normally. I get a splashscreen with the Lenovo logo and a text saying "To interrupt normal stratup, press Enter".
Then I get this output:
So my guess is, I’ll have to swap some parts of the original image to the new one until it works, right? But is there a way to triangulate what those parts could be?
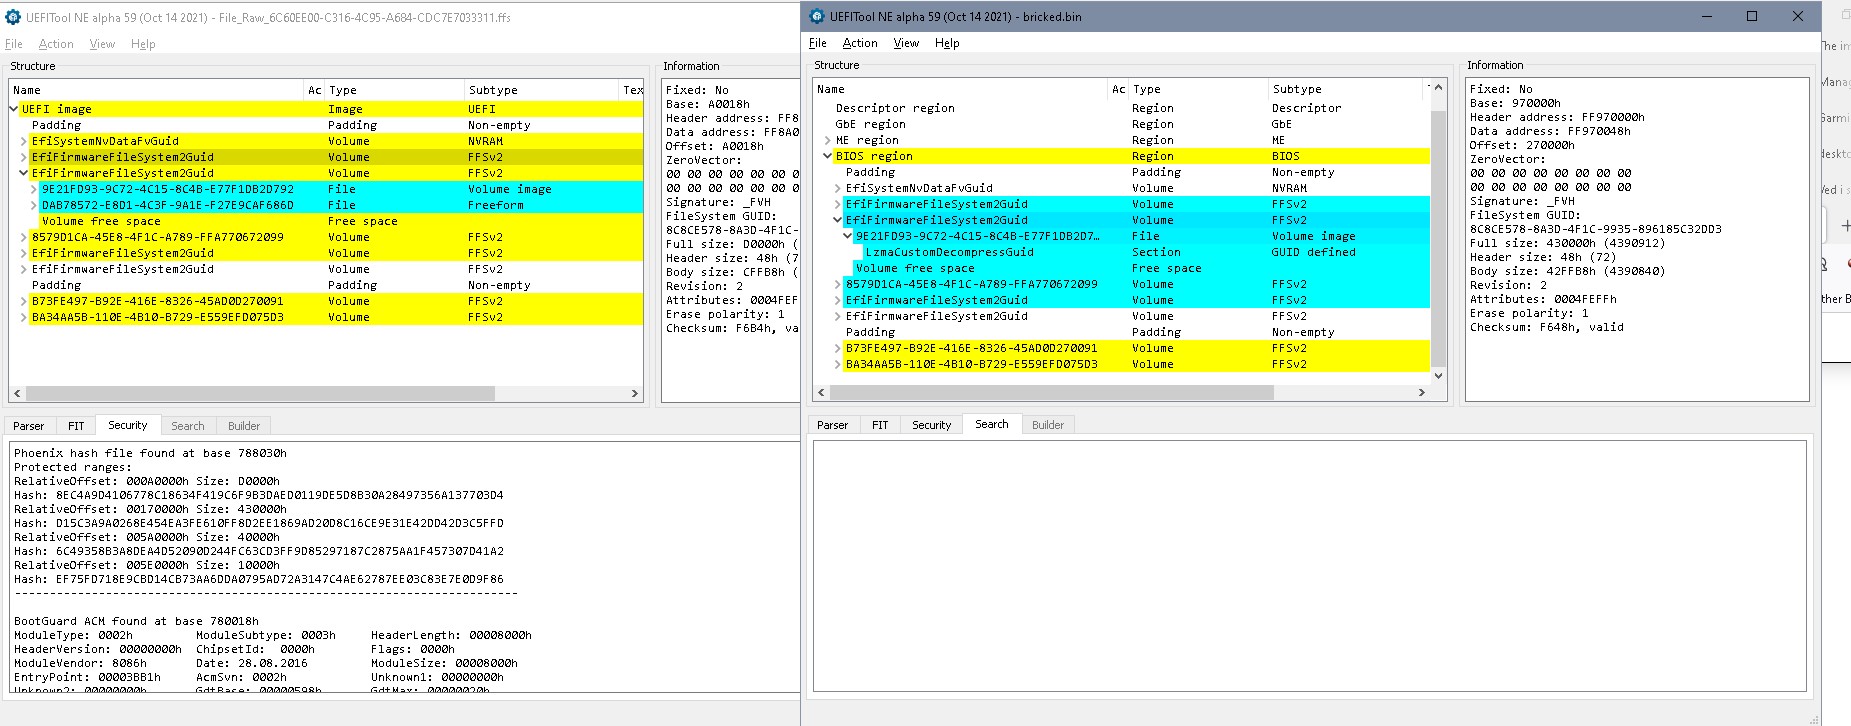
From looking at it with UEFITool, there’s one obvious difference:
You really should swap one module (FFF12B8D…), but it’s not that important. Among these three error messages, the major one that prevents boot is 1802. But why does it appear at all? Was the wireless module currently installed in the device replaced? Or you don’t know because you own the device only recently?
It’s a company laptop that they let me keep after it got bricked. I’ve been using it for a year now, but during that time no parts were replaced, so I’m not sure why it would complain about that.
Maybe I should mention that it has additional security measures like BitLocker and a BIOS password (if I remember correctly), but I do know all the passwords so that shouldn’t be an issue (I guess).
I removed the wireless module and tried again. The 1802 error is now gone, but the other 2 are still there. Is there maybe a way to get rid of the 0183 error, or shouldn’t that be the one causing the issue?
Did you do your ‘volume by volume’ replacements with same version bios region? Different version won’t work. It’d be helpful to look into the bricked bios, find the place where the brick happened and repair instead of trying randomly.
Take the bios SweetKitten provided and ‘replace as is’ the volume he mentioned. That will (possibly) give you your ‘settings’ and ‘machine identity’ back and resolve the errors (if NVRAM isn’t corrupted) or post the dump of the bricked bios to repair your own firmware.
I did that @Sweet_Kitten / @lfb6 , with "Extract as is" on the bricked image and "Replace as is" on the image you linked. But it stays dead with that modification.
What I noticed though: When I remove the WiFi module, the system is not halted anymore after the errors, but I can "Press F1 to enter settings" - I did that, but I get prompted for a password, which is none of the ones I know.
OK, you really got a bricked update here. You lost structure in the second static uefi colume in the bios region- left update bios region, right your bricked bios.
Which version were you updatng to and which version were you updating from? EC firmware is first padding in bios region, separate file in lenovo updates (*.fl2). Version is N24HT36W, according to Lenovos bios update page this would be bios 1.36 or bios 1.37. Comparing the static bios volumes up- down shows they’re identical for bios 1.36 (W) to the bricked area, looking for the not- updated part it’s version 1.19, you find a hint for N24ET44W in the lower part.
So either you replace EC firmware and bios static volumes with old or new versions. EC firmware is normally copied from bios padding into the separate controller chip, but since the firmware you got by Sweet Kitten has an even older EC- firmwar and starts, it possibly won’t matter.
Rename the attached files to unb.zip.001 unb.zip.002 unb.zip.003, the zip will contain 2 files- one everything back to old version (1.19) and one version everyting to the newer version (1.36).
Thanks @Sweet_Kitten , that didn’t work though. I get the same result as with the bricked one (same beep pattern etc.)
I don’t know @lfb6 - it’s a company laptop, so the update happened automatically.
But: Both of your images seem to work! The errors are gone, except for the "Check Date…" one. But when I press F1 for the settings, I get prompted for a password, which i assume is supposed to be the BIOS password?
It was not there before, so I’m not sure what to enter here. Is this related to the new image or is this some other guard that is not happy about the change? Is there a way to get rid of it or find out what it is?
I don’t know @lfb6 - it’s a company laptop, so the update happened automatically.
I found out myself as written already in #10.
Yes, both images were expected to work. As explained, I just repaired the static parts of the bios region, and transfered your NVRAM settings, complete EFI- volume. That should’ve put back your system to the state before the update.
But you tried a ‘foreign’ bios in between (without transfering your machine specific settings first), and you got an error about the security settings:
Some newer business machines store such passwords outside bios, too, so that it should be harder to overcome. The foreign dump you tried worked in the original thread, or it’s not mentioned that it contained a password? Maybe that is kinda interference between those 2 bioses? ‘Foreign’ one had a supervisor password which got stored into the security chip and is still there? I don’t know!
There are lots of pages regarding Lenovo bios passwords, for example that page, seems it covers several generations, CMOS battery is quite old, ‘shortcut security chip’ seems for newer machines. Be aware: Resetting the TPM/ security chip might destroy your data. If you for example use BitLocker resetting the TPM will make your data unaccessible if you don’t have the recovery key.
I read the information that the swap of the ME region to updated version helped someone, but it did not do you any good. Here is a BIOS in which I tried to remove erros only: BIOS.bin. Unfortunately, I can’t offer anything more.
Are you kitten kidding me? You pointed me to a (sort of) working firmware, that’s way more than I had hoped for and it did help a lot! So thanks a ton for your effort!!! @Sweet_Kitten
Sorry @lfb6 I guess that was a little too technical for me so it flew over my haead.
Sweet Kitten had linked to the source - it doesn’t mention anything about a password.
In case the security chip is the other one on the board with 8 pins and a firmeware of 1048576 Bytes - I’ve got that backed up. Maybe I’ll try to flash that back.
Alright, that about matches what I found, too. The approach looks quite ‘adventurous’, but might give it a shot if everything else fails. I don’t really care about the data on the hard drive, since it’s basically just the operating system to manage all the cloud services and network drives. So there is no sensitive data there. But thanks for the heads up, and also thank you so much for bearing with me! I’ll let you know how it worked out!
So I downloaded that tool and pretty much followed the instructions lined out in the thread using the unbricked_old.bin that @lfb6 had uploaded. So basically:
1. Run the tool on the unbricked image 2. Flash that image to the chip 3. Boot up and follow instructions ← this gets rid of the supervisor password 4. Flash the original unbricked image to the chip again 5. Factory reset BIOS (which is now accessible without a password!)
It does look a bit shady though, ngl, so I’m not sure yet what to think of it and if it didn’t introduce some unwanted guests or something.
But: It did work. After that, the machine did boot normally without any errors or warnings. Bonus: BitLocker was still in place and accepted my old password, so I was able to recover everything and everything is working as if nothing ever happened!
i don’t know the tool, but would introduce some malware to the bios that affects the windows boot and injects some paylod, alredy happen in some gigabyte an or asus motherboards.
i would not use windows any more in that machine for securety reasons