I wish to unlock certain hidden (sub)menus for the Asus ROG GL703GS bios.
Mainly these (checked with AMIBCP): -Under Advanced menu → CPU Configuration → Power & Performance -OverClocking Performance Menu
I tried setting these menus and sub-menus to USER, and Supervisor through AMIBCP, but neither worked. I don’t know what I’m doing wrong…
I dumped the bios region using FPTWIN (see attached file: GL703GS_310_BIOSREG_DUMP.zip) and I know how to reflash (unlocking BIOS lock with setup_var) I also attached the unsuccessful modded bios I made, if you want to see which menus/submenus/options I’m trying to unlock. (see file MOD.zip)
Hello I was wondering if someone could help me out with a modded bios. I have used these these instructions to get to where I am at right now: [REQUEST] Asus FX504GM Bios Unlock Hidden Options I have gotten the 167 error code after trying to execute FPTw.exe -bios -f biosreg.bin. I am now on post #4 of the thread and need the “Here is mod BIOS test, changed one byte in BIOS region” modded bios for mine Im assuming. I did download the one on the post but I am assuming this won’t work for mine and dont want to risk trying it. Attached are pictures from HWInfo64 for Motherboard and Intel Management Engine pictures, Extracted bios file from AFU called extracted.rom, fresh copy of bios gl703gs-as.310, and extracted bin from FPTW called biosreg.bin and error log. Thanks @Lost_N_BIOS for the useful instructions you have provided to get me where I am at.
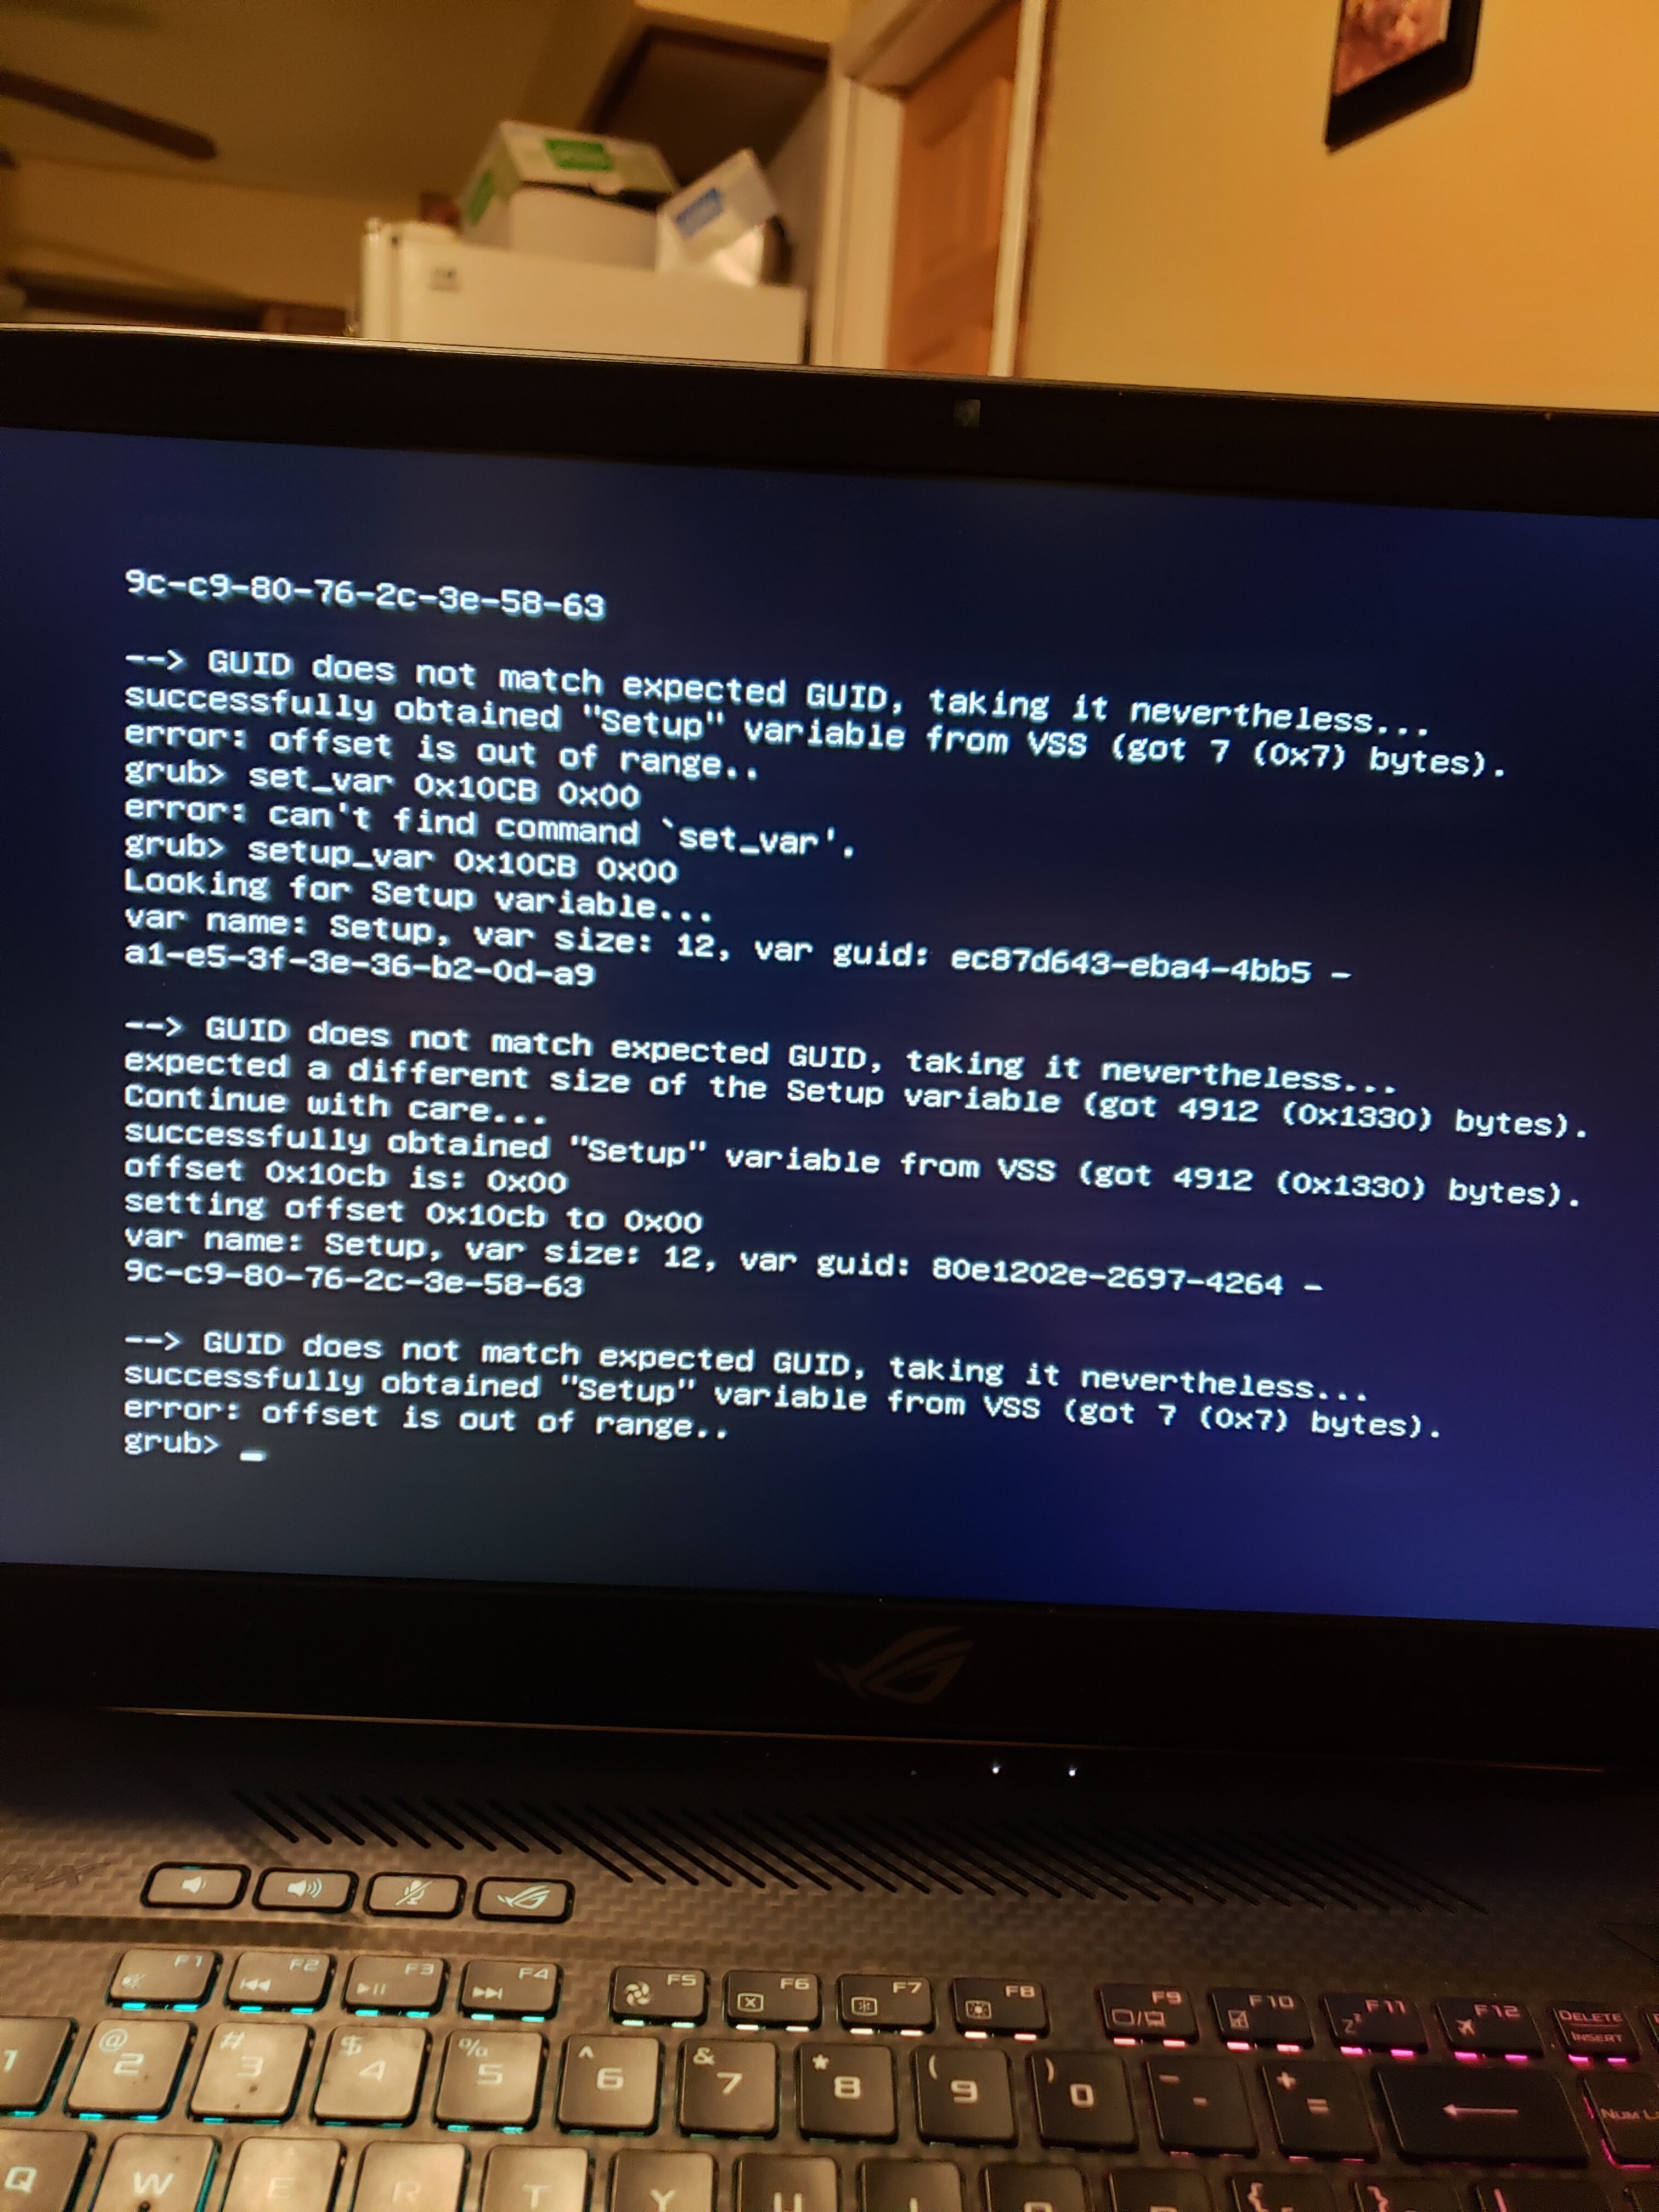
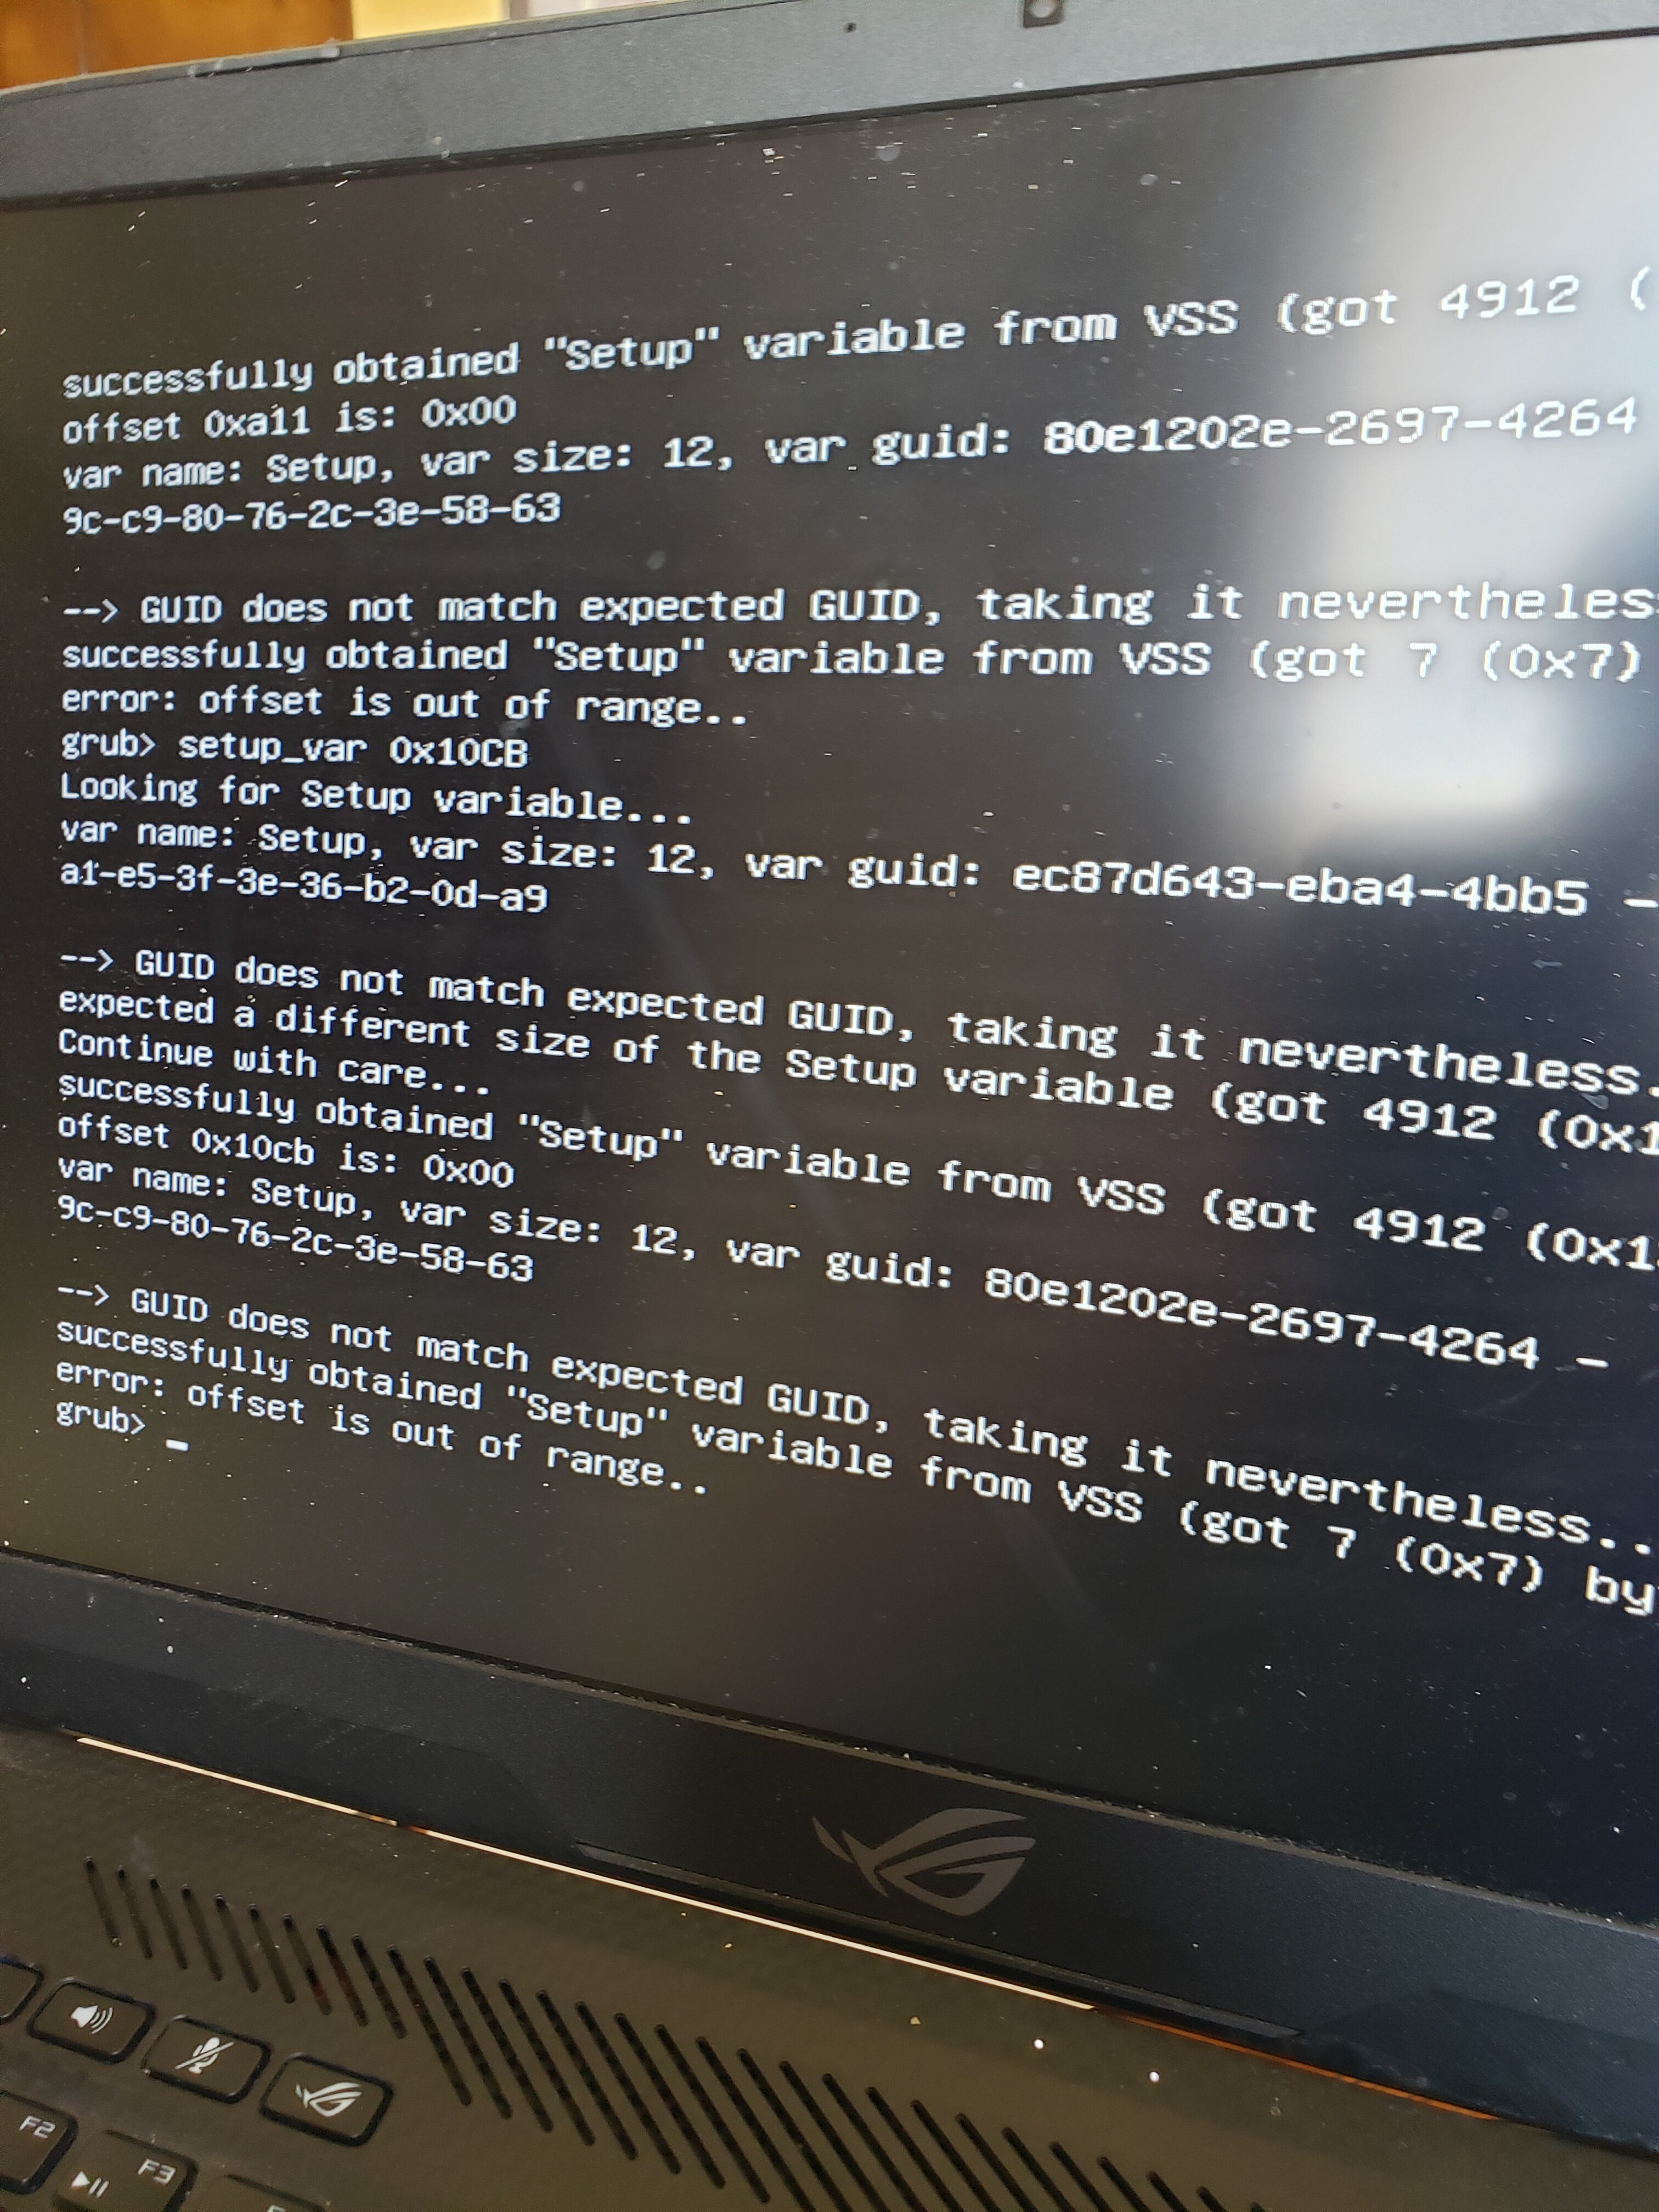
BIOS Lock variable to change >> 0xA11 FPRR variable to change >> 0x10CB
So, at grub prompt, you will type the following one line at a time, enter between each (case sensitive) setup_var 0xA11 0x00 setup_var 0x10CB 0x00 << If error here, or it’s already 0x0, then ignore and move on
Once done with the above, do below step #1 and #2 with FPT again, once success with FPT step #2, send me that new biosreg.bin file (This is the only file I want you to upload)
If you have already modified the BIOS in ANY way, you will need to re-flash it back to factory defaults using factory method (NOT FPT)!!!
If you do not have Intel ME drivers installed, install them now from your system driver download page, then start over here after reboot. Check your BIOS’ main page and see if ME FW version is shown. If not then > DOWNLOAD HWINFO64 HERE <
Once HWINFO is open, look at the large window on the left side, expand motherboard, and find the ME area. Inside that section is the ME Firmware version. Take note of the version. (ie. write it down or get a screenshot)
Once you have that, go to the thread linked below, and in the section “C.2” find and download the matching ME System Tools Package for your system. (ie if ME FW version = 10.x get V10 package, if 9.0-9.1 get V9.1 package, if 9.5 or above get V9.5 package etc) > DOWNLOAD " ME System Tools " packages HERE <
Once downloaded, inside you will find Flash Programming Tool folder, and then inside that a Windows or Win/Win32 folder (NOT x64). Highlight that Win/Win32 folder, then hold shift and press right click. Choose “open command window here” (Not power shell! >> * See Registry file below *).
If you get an error, reply to this post with a screenshot of it, OR write down the EXACT command entered and the EXACT error given.
((If “open command window here” does not appear, look for the “Simple Registry Edit” below…))
Now you should be at the command prompt. You are going to BACKUP the factory un-modified firmware, so type the following command: Command: " FPTw.exe -bios -d biosreg.bin "
>> Attach the saved "biosreg.bin ", placed into a compressed ZIP/RAR file, to your next post!!! <<
Right after you do that, try to write back the BIOS Region dump and see if you get any error(s). Command: " FPTw.exe -bios -f biosreg.bin " ^^ This step is important! Don’t forget! ^^
If you get an error, reply to this post with a screenshot of it, OR write down the EXACT command entered and the EXACT error given.
Here is a SIMPLE REGISTRY EDIT that adds “Open command window here as Administrator” to the right click menu, instead of Power Shell Double-click downloaded file to install. Reboot after install may be required > CLICK HERE TO DOWNLOAD CMD PROMPT REGISTRY ENTRY <
If the windows method above does NOT work for you… Then you may have to copy all contents from the Flash Programming Tool \ DOS folder to the root of a Bootable USB disk and do the dump from DOS ( DOS command: " FPT.exe -bios -d biosreg.bin " )
I did not think that was going to be as hard as it was. If you have an Asus computer and you cannot boot shell and you have extended all other options format your flash drive to FAT. I have successfully completed all of the steps you told me to take and more. Read and Write were successful I did catch a "No Gbe Region" or something like that while it was writing but it still went through. Attached is the biosreg.bin. I had to compress it to a rar file. I am not sure if that matters or not.
So I got to thinking about seeing if the offset changed in UEFI tool so I compared the biosreg.bin file I posted to a clean copy of the bios file. The values are the same. I am not sure if this is of concern or not. I also remember when doing the command lines I got an "error: offset is out of range" for both command lines. Pictures are attached. When I read both command lines though they both show up as 0x00 so I dont know.
@ShaneT1265 - Nice! So if you can dump and write back with FPT, then no changes needed at grub, sorry I assumed you’d need that first, we should have tested the FPT stuff before getting into that Wait! You said before doing the grub stuff, you’d get error 167, so the grub changes are necessary (at least one of them, FPRR may already be 0x00). I cannot view your images, they are WAY too large for me to download for a simple look, and are sideways If you check values after making the changes, they will be 0x00, only before you made it would they be 0x01 (at least BIOS lock would be)
GbE error can be ignored, we’re only writing BIOS region here anyway
If the above attached BIOSreg.bin file is after you did the grub, then you shouldn’t have to redo that again next time, unless you’ve reflashed stock BIOS again after that. If you did reflash stock BIOS, then you need to redo the grub stuff again, otherwise error 167 when you try to write back mod BIOS with FPT
Here, lets quick test chipset menu before I do full unlock, this will give me a few answers on method needed for this BIOS possibly (if first one works, then other test BIOS may be needed later before full unlock) Please test these BIOS in the order below, once you see chipset stop (no need to test further) and let me know which one shows it. Write each of these in using >> FPTw.exe -bios -f filename.bin 1. SetO 2. SetAMITOBRO 3. SetAMITSDSBRO 4. SetAMITOBRAdd 5. SetAMITSDSBRAdd
I started reading everything else in the Grub form and everything is good. What do you mean by "once you see the chipset stop"? Edit*** I tested all of them, all of them flashed successfully with no changes to chipset via device manager. I even changed the 4 and 5 to bin files and still nothing.
---------------------
SETAMITOBRAdd.rom worked! I finally realized I was supposed to looking in the BIOS Menu
@ShaneT1265 - Yes, you’re supposed to be looking in the BIOS, that’s why we are here Please start over, test all BIOS one by one in the order I mentioned, stop once you see chipset in BIOS and let me know which one that is first from the list in that order (Contents inside do not matter right now) rom/bin same/same, sorry if that caused any confusion, I meant to name them all .bin
Well you wanted BIOS mod, so I assumed you’d been looking at the hidden BIOS sections OK, thanks for testing report
Please give me images of all your BIOS content now, all pages, all submenus, ALL settings everywhere. Please put those in a zip with max compression, and if you can set camera to take small images before you take them that would be great. I don’t need to see 2-6K images here, I will only be looking at them for a few seconds at a glance, small 800px wide or 100KB or so images are more than plenty.
Those are too small, and quality is not good enough for me to read anything highlighted This may be due to you resize, or JPEG, or just image quality overall, not sure. 800px wide is more ideal, and don’t save as low quality, try PNG maybe that may help with the highlighted stuff so you don’t have to retake the images. How big is the package if you don’t crop and resize, with max compression? 10-15MB or so is OK, I just don’t want to download 50-100MB to look at images.
Here they are at 800! Its 225MB total without decompressing them. My next option is to convert them to a PDF. I dont have a program to convert them all to png.
Wow, yeah 225MB way too much for this. PDF is not ideal, so we wont go there In the direct images, can you read what is highlighted? If yes, maybe batch convert website can do them to PNG at smaller size but still good quality, if this aren’t OK I mean. Like this maybe, but I’m sure there may be other better ones -http://www.imverter.com/ I forgot to tell you, I don’t need to see ANY of the “EZ BIOS” Most of those I can’t read the highlighted item either, and none of them are 800px wide (450 only) Try the site above, do 800PX wide at PNG
@Lost_N_BIOS I have retaken the pictures, exposure was set to high but I have now changed it to where you can see the highlighted better and the grayed out options better. Converting them does not work for me or I just don’t know what I am doing, it went from a 200mb jpg to a 400mb png file. I have uploaded them to my drive. https://drive.google.com/open?id=1bPQVQ9…OJR1M–KM0LvUvM its the best I can do.
OK, good you made highlighted more visible at least. Please remove EZ BIOS images if you have not already, resize like you did before but to at least 800 wide this time, instead of 450 wide like last time. Then upload to tinypload.com or uploadfiles.io, I cannot download from google
@Ren1 - Sorry this got missed back in December!! Please update to 311 BIOS, then do the following and once you can pass step #2 send me your BIOS region dump (disable BIOS lock before you make the dump) Below is just my saved copy/paste, you already know how to do this, but dropping just in case Also, merging this thread to the other GL703GS request thread Haha, now that I merged the threads, your post is first, and then it looks like I ignored you and helped the other user instead - sorry, I just missed your post I think!
If you have already modified the BIOS in ANY way, you will need to re-flash it back to factory defaults using factory method (NOT FPT)!!! Additionally, please remove all BIOS passwords, disable secure boot, and disable TPM or Encryption if you have enabled. Do this before moving on to below
If you do not have Intel ME drivers installed, install them now from your system driver download page, then start over here after reboot. Check your BIOS’ main page and see if ME FW version is shown. If not then > DOWNLOAD HWINFO64 HERE <
Once HWINFO is open, look at the large window on the left side, expand motherboard, and find the ME area. Inside that section is the ME Firmware version. Take note of the version. (ie. write it down or get a screenshot)
Once you have that, go to the thread linked below, and in the section “C.2” find and download the matching ME System Tools Package for your system. (ie if ME FW version = 10.x get V10 package, if 9.0-9.1 get V9.1 package, if 9.5 or above get V9.5 package etc) > DOWNLOAD " ME System Tools " packages HERE <
Once downloaded, inside you will find Flash Programming Tool folder, and then inside that a Windows or Win/Win32 folder (NOT x64). Highlight that Win/Win32 folder, then hold shift and press right click. Choose “open command window here” (Not power shell! >> * See Registry file below *).
If you get an error, reply to this post with a screenshot of it, OR write down the EXACT command entered and the EXACT error given.
((If “open command window here” does not appear, look for the “Simple Registry Edit” below…))
Step #1 Now you should be at the command prompt. You are going to BACKUP the factory un-modified firmware, so type the following command: Command: " FPTw.exe -bios -d biosreg.bin "
>> Attach the saved "biosreg.bin ", placed into a compressed ZIP/RAR file, to your next post!!! <<
Step #2 Right after you do that, try to write back the BIOS Region dump and see if you get any error(s). Command: " FPTw.exe -bios -f biosreg.bin " ^^ This step is important! Don’t forget! ^^
If you get an error, reply to this post with a screenshot of it, OR write down the EXACT command entered and the EXACT error given.
Here is a SIMPLE REGISTRY EDIT that adds “Open command window here as Administrator” to the right click menu, instead of Power Shell Double-click downloaded file to install. Reboot after install may be required > CLICK HERE TO DOWNLOAD CMD PROMPT REGISTRY ENTRY <
If the windows method above does NOT work for you… Then you may have to copy all contents from the Flash Programming Tool \ DOS folder to the root of a Bootable USB disk and do the dump from DOS ( DOS command: " FPT.exe -bios -d biosreg.bin " )


 Well you wanted BIOS mod, so I assumed you’d been looking at the hidden BIOS sections
