I see another post that also have two advanced menus like me, it is regarding the ASUS VivoBook S15 S510UNR Yet, I was lost trying to follow any guides to mod the BIOS on similar ASUS VivoBooks. Unfortunately, due to the current world events, I cannot order a programmer. Can anyone please help compile a BIOS or gather some information so that ASUS laptop users who has hidden advanced menu can follow this guide? Thank you very much BIOS dump by FPTW64.exe -d dumpTP410UF.rom is attached.
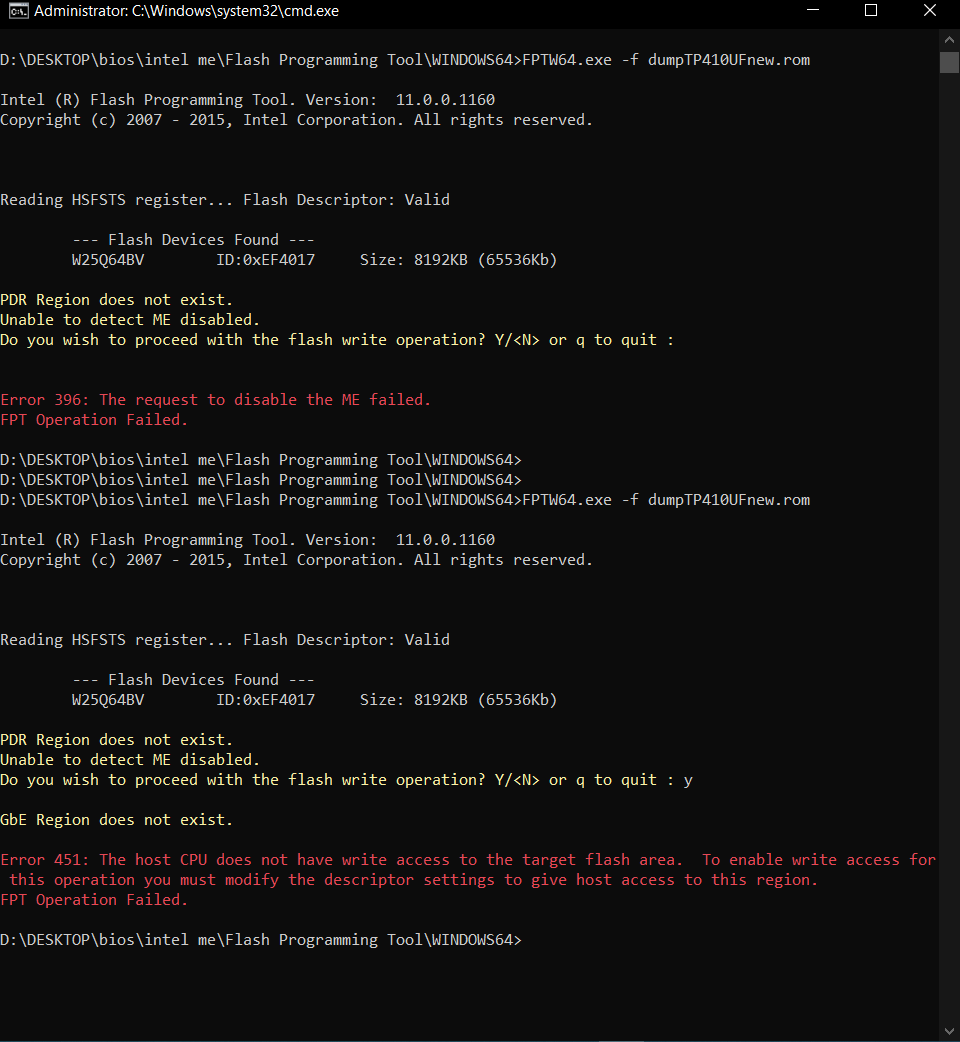
I do see Error 368: Failed to disable write protection for the BIOS space. FPT Operation Failed.
I see there are methods related to "RU" to bypass this error previously somewhere on the internet. I have the patience, willpower and the ability to accurately follow instructions to fix this error.
Here, you can do using grub and setup_var, or yes, RU as you mentioned. Before doing either of the below methods, disable secure boot (UEFI Boot, etc, you want legacy mode if possible), remove any BIOS password, and disable TPM/encryption if you are using
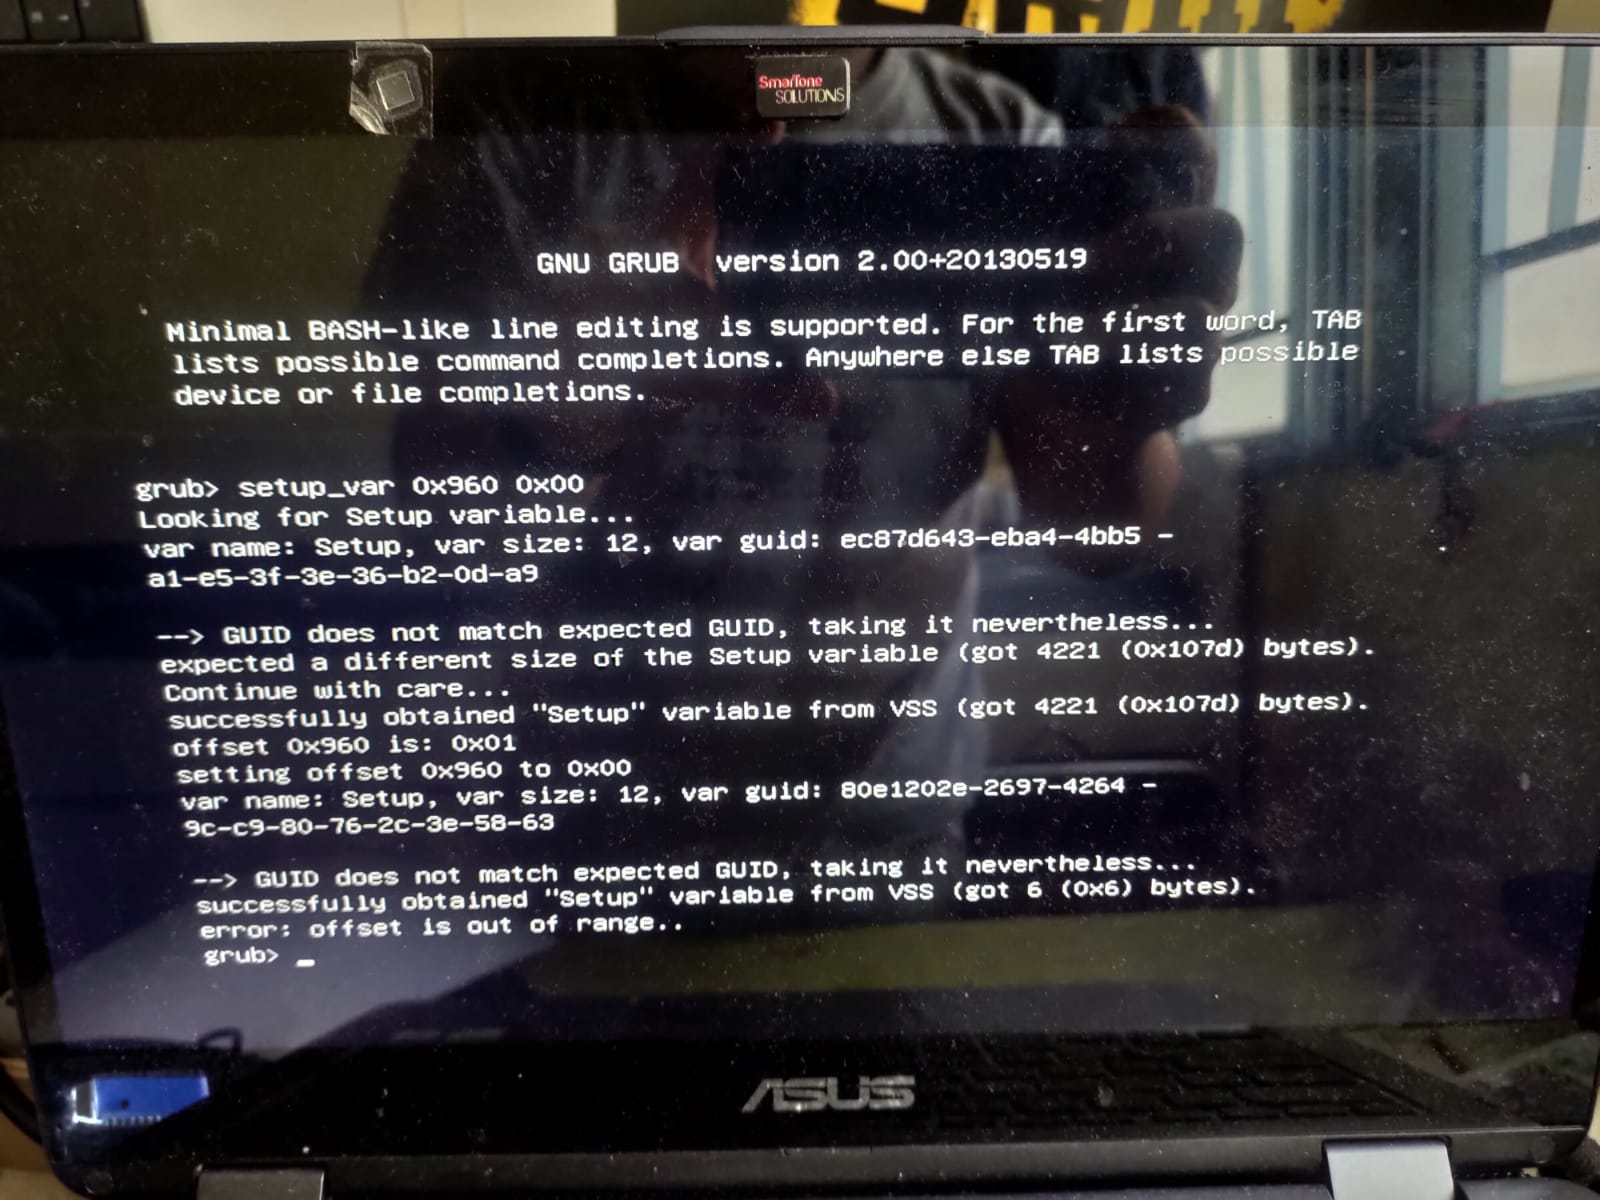
So at grub prompt you will type the following and hit enter (case sensitive) setup_var 0x960 0x00
For RU method - Go to section 2.2 and make bootable USB with RU program, then read 2.3-2.5 and use variable info above to change BIOS Lock inside “Setup” with GUID EC87D643-EBA4-4BB5-A1E5-3F3E36B20DA9 http://forum.notebookreview.com/threads/…-issues.812372/<br /> Then after either, reboot to windows and make a NEW BIOS region dump, toss the old one out, or use new name, so there is no confusion. Then this is what we edit, and you can now do write back without error 368. Send me the new BIOS region dump after you unlock as outlined above.
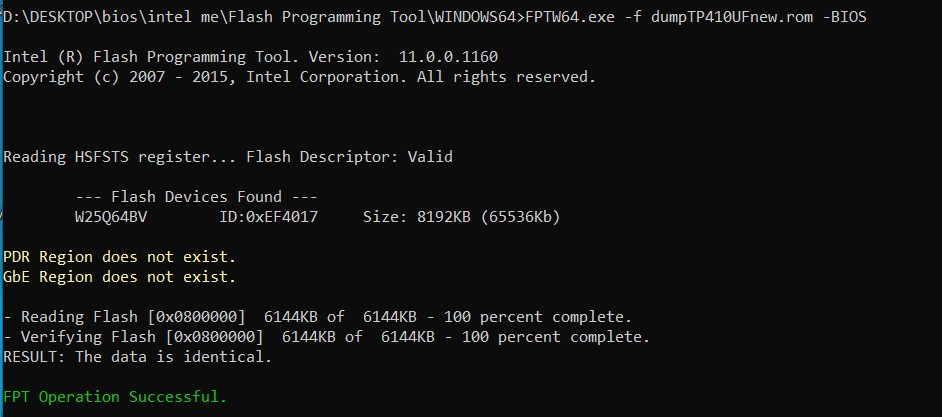
I have looked elsewhere and learnt that you need an extra -BIOS option for flashing it. Now the flashing works. Attached below is the new dumped BIOS. Please modify it to expose the hidden Advanced menu. Thanks
Finally: dumpTP410UFnewBIOS.zip is made using FPTW64.exe -BIOS -f dumpTP410UFnewBIOS.rom This fils is slightly smaller dumpTP410UFnew.zip is made using FPTW64.exe -f dumpTP410UFnew.rom This file is slightly larger Both can be flashed back normally
@evnchn - Please use edit button if you want to add more info and no one has replied yet, thanks
For your first post / new error images, sorry I don’t know what you did to cause that, looks like you changed some incorrect things and or somehow messed up ME FW etc. Try reflashing stock BIOS, using stock method, then follow my FPT spoiler exactly as it’s written (use DOS if you do not have ME drivers installed in windows
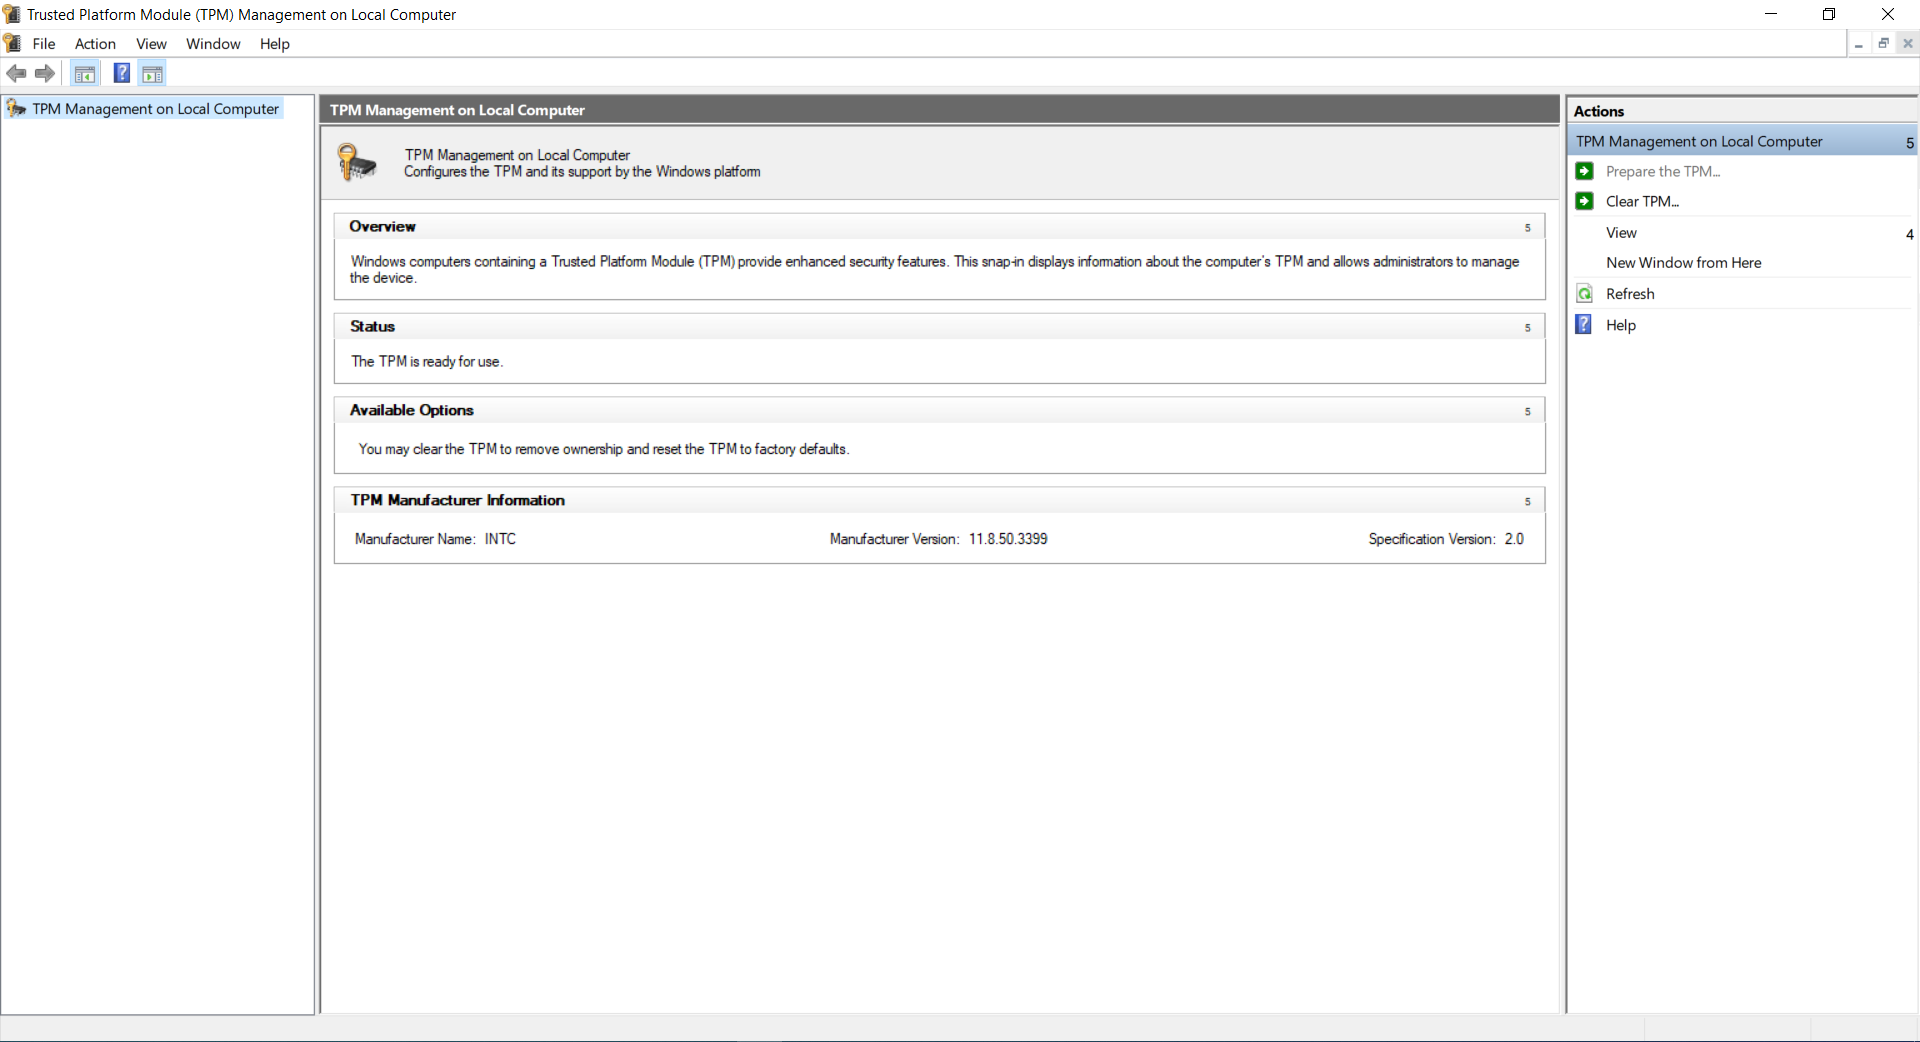
TPM is a BIOS setting, find and disable, if you cannot find then you are not using so it’s OK
Yes, -bios flag should always be used here, that is all we are trying to flash! Sorry, I thought I gave you FPT spoiler above, but I see I didn’t now, I guess I assumed you knew how all this worked since you were using FPT already. Here, this is what you need to do. Step #1, do this after RU changes I outlined above (setup_var will not work, per your image). Then you can pass step #2, once you pass step #2, give me the BIOS region dump you created that you successfully flashed back at step #2
If you have already modified the BIOS in ANY way, you will need to re-flash it back to factory defaults using factory method (NOT FPT)!!! Additionally, please remove all BIOS passwords, disable secure boot, and disable TPM or Encryption if you have enabled. Do this before moving on to below
If you do not have Intel ME drivers installed, install them now from your system driver download page, then start over here after reboot. Check your BIOS’ main page and see if ME FW version is shown. If not then > DOWNLOAD HWINFO64 HERE <
Once HWINFO is open, look at the large window on the left side, expand motherboard, and find the ME area. Inside that section is the ME Firmware version. Take note of the version. (ie. write it down or get a screenshot)
Once you have that, go to the thread linked below, and in the section “C.2” find and download the matching ME System Tools Package for your system. (ie if ME FW version = 10.x get V10 package, if 9.0-9.1 get V9.1 package, if 9.5 or above get V9.5 package etc) > DOWNLOAD " ME System Tools " packages HERE <
Once downloaded, inside you will find Flash Programming Tool folder, and then inside that a Windows or Win/Win32 folder (NOT x64). Highlight that Win/Win32 folder, then hold shift and press right click. Choose “open command window here” (Not power shell! >> * See Registry file below *).
If you get an error, reply to this post with a screenshot of it, OR write down the EXACT command entered and the EXACT error given.
((If “open command window here” does not appear, look for the “Simple Registry Edit” below…))
Step #1 Now you should be at the command prompt. You are going to BACKUP the factory un-modified firmware, so type the following command: Command: " FPTw.exe -bios -d biosreg.bin "
>> Attach the saved "biosreg.bin ", placed into a compressed ZIP/RAR file, to your next post!!! <<
Step #2 Right after you do that, try to write back the BIOS Region dump and see if you get any error(s). Command: " FPTw.exe -bios -f biosreg.bin " ^^ This step is important! Don’t forget! ^^
If you get an error, reply to this post with a screenshot of it, OR write down the EXACT command entered and the EXACT error given.
Here is a SIMPLE REGISTRY EDIT that adds “Open command window here as Administrator” to the right click menu, instead of Power Shell Double-click downloaded file to install. Reboot after install may be required > CLICK HERE TO DOWNLOAD CMD PROMPT REGISTRY ENTRY <
If the windows method above does NOT work for you… Then you may have to copy all contents from the Flash Programming Tool \ DOS folder to the root of a Bootable USB disk and do the dump from DOS ( DOS command: " FPT.exe -bios -d biosreg.bin " )
@Lost_N_BIOS everything is fine now. Some previous errors were because I misread some other information, forgetting the -bios tag was one of them, and the Intel ME version was another one. I have quadruple checked that BIOS password is not set, TPM is not found in BIOS whatsoever, and Secure Boot is off. I have double checked that the BIOS can be dumped and reflashed now, and that setup_var has somehow worked despite its minor error. Here comes the final confirmed BIOS dump.
* edit: I didn’t modify the BIOS in any way, this dump is stock right now
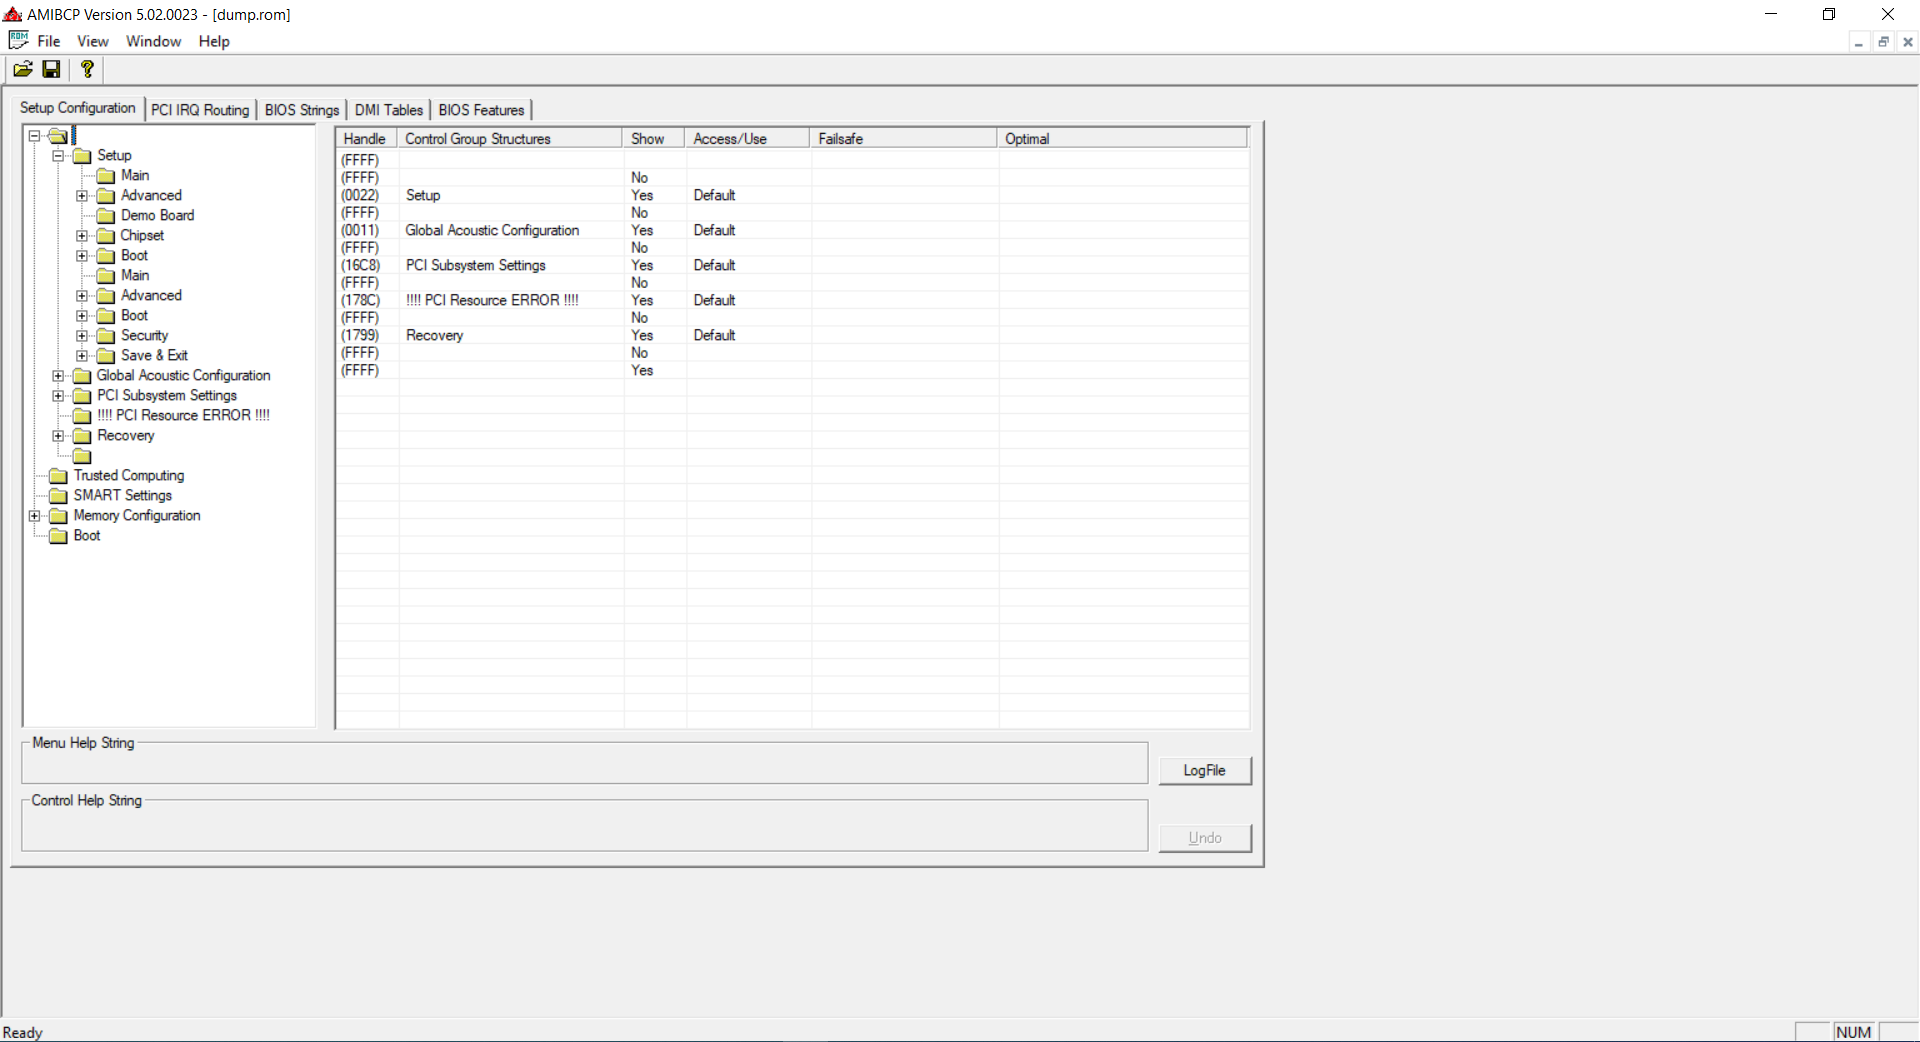
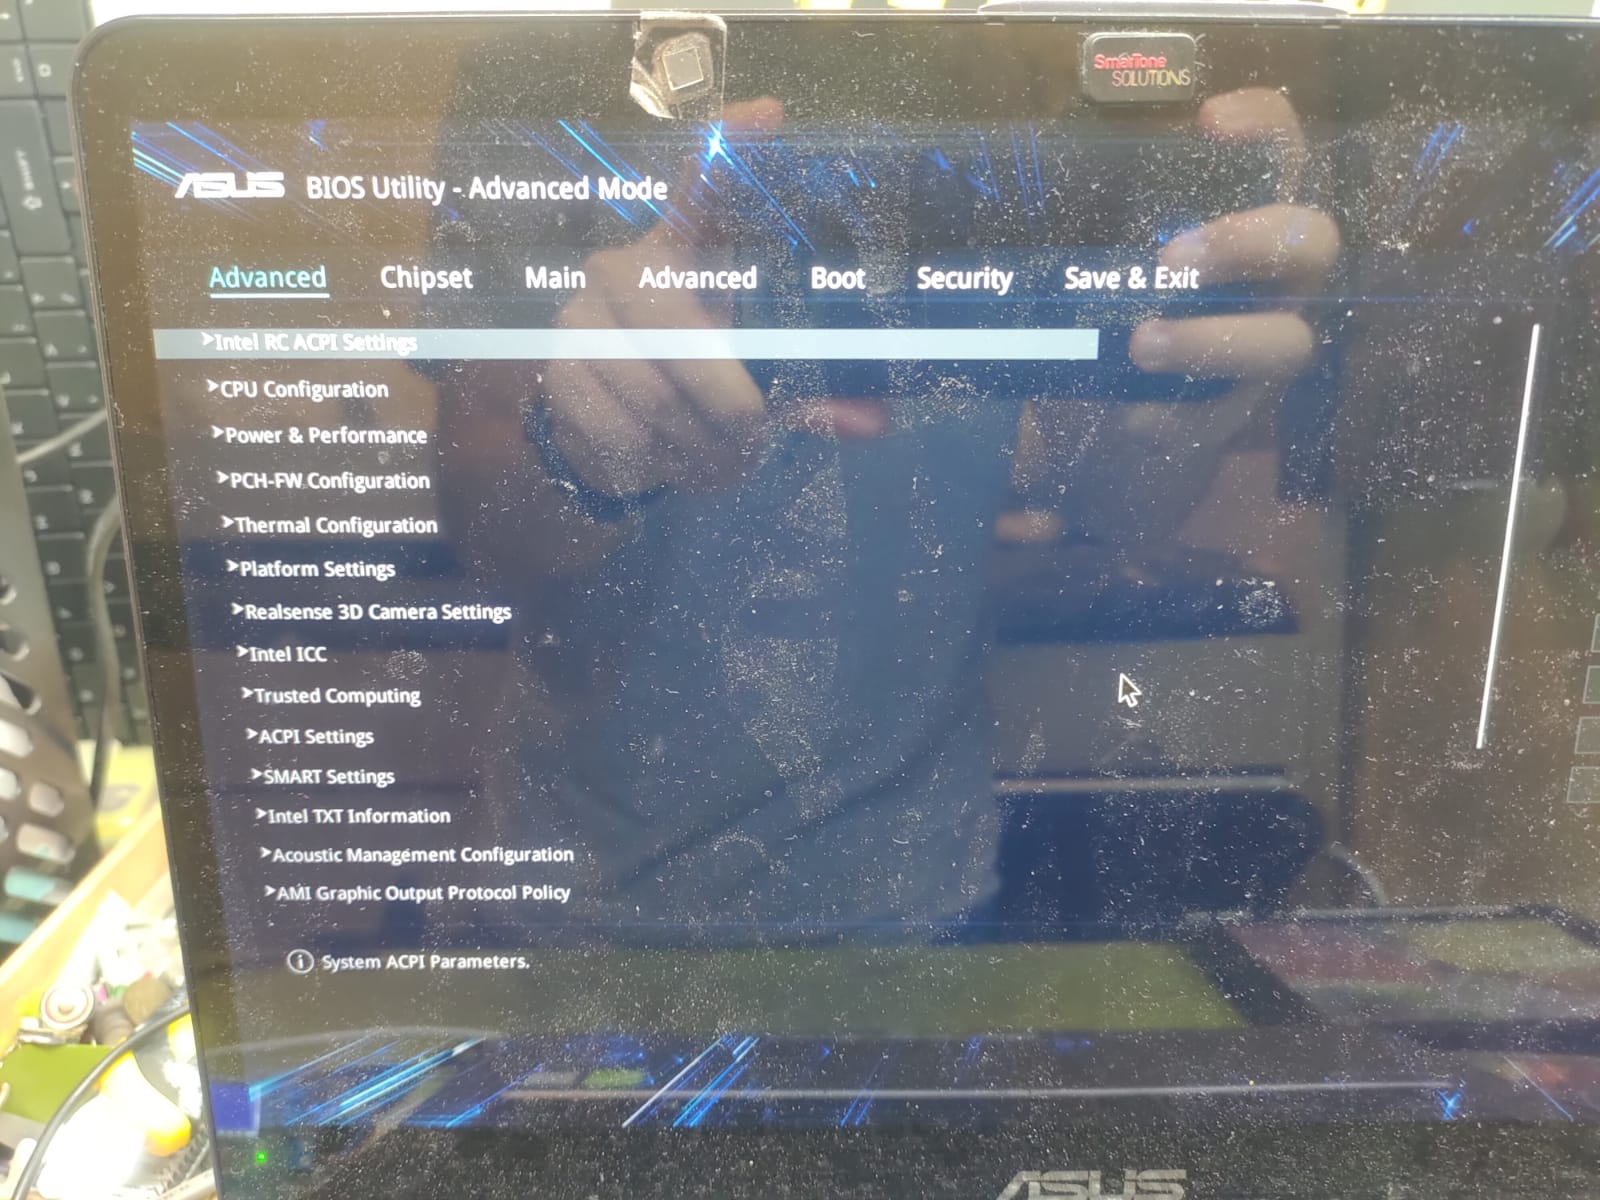
Chipset menu its good to have Hidden Advanced menu its good to put it inside the real one, if not, swap it, if not, just the CPU power management
Note: I have zero idea what the Chipset menu does, it would be great if you can manage to include it, but if not, it is perfectly fine. The main spotlight is the “hidden” advanced menu where goodies such as power limits can be set. I see that for my CPU, the nominal TDP is 15W yet there is a configurable (by manufacturer) TDP-up of 25W. Now that I have extra cooling for my laptop it would be nice to have it. In [REQUEST] Asus Laptop UX550VE and [SOLVED] How do I get hidden menus shown within IFS “Form Sets” I see potential signs for Two advanced menus or putting the other hidden advanced menu into the current advanced one, albeit with some bugs and require some tricky maneuvering of menus which I am OK with. If this is not possible, swapping the advanced menus would be fine. Some options in the current advanced menu is also there in the hidden one, so swapping should be alright. In the case that I do need options in the real advanced menu, I have the ability to flash back to the stock BIOS (sacrifice some power settings) to use those settings that I need
* edit: I can find every single option that the current advanced menu offers in the Chipset menu and the hidden Advanced menu. The existing advanced menu is completely redundant.
* edit 2: I can barely access Taobao, the shipping will be slow. There seem to be plenty of CH341a boards, some look pretty nice and have a lever chip socket. There are also some XTW100 boards, same level chip socket. There are adapter cables for SOP8 to connect to those boards, but no SOIC8 that I can find. I have a second computer to operate the flashing of BIOS in the case that it goes wrong.
@evnchn - I’m not moving any menus around, speaking about your Advanced comments. There would either be two Advanced menus (cannot be renamed, or numbered),if you wanted both, or there would be only one (swap hidden in place of orig) On Chipset, look at the contents in AMIBCP, if you do not need to change any of that, we can leave it hidden
Many laptops TDP and or fans etc are controlled by EC FW, not the BIOS settings. So what you mention may not currently be enabled or used. What is the exact location of the setting you are talking about (TDP-Up 15W/25W etc)
Ohh, and for any hidden options in the original advanced, if you end up wanting both to be enabled, please show me image of your current Advanced menu, so I can see which items need to be made visible Some settings there in original Advanced may not be in hidden advance, so this is why sometimes people want both Advanced visible. So, you checked this out, and ALL settings you needed or care about, are either in Hidden Advanced or Chipset? If yes, then we’ll remove original Advanced and just give you hidden Advanced + Chipset
Show me what cable you are looking at, it may be same one with different name. CH341A is cheap programmer, generally that is what you need + Cable with clip However, don’t worry, this kind of edit I do all the time, it’s not one I consider risky so there will be near 0% chance of bricking your BIOS
So I guess, just confirm you want Hidden Advanced ONLY + Chipset, correct?
@Lost_N_BIOS I have mapped out every menu item in the original advanced menu in the hidden advanced menu and the chipset menu. You may look at the attached biosmenuguide file.
Therefore this is OK. I will later the original photo of BIOS and the cable and the programmer that I intend to buy
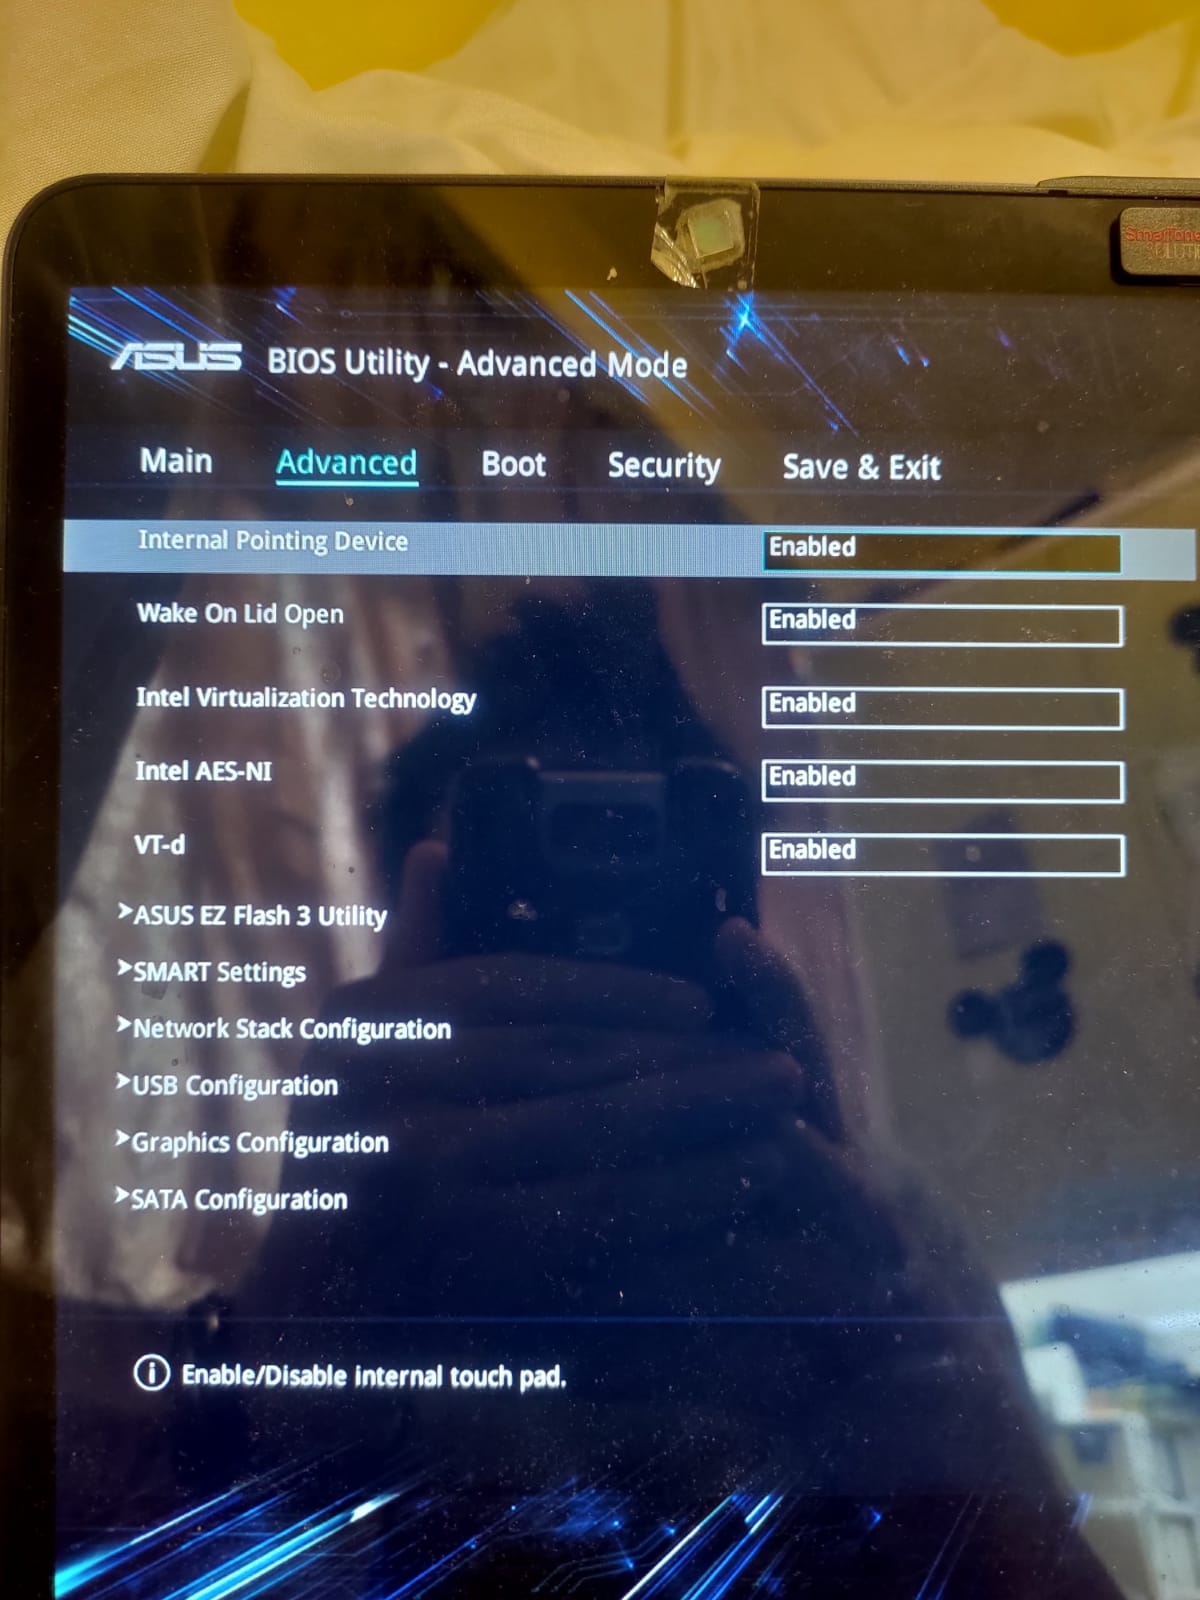
* edit: Cable photo attached below. it says CH341A programmer + SOP8 programming clip. There are more options in the advanced menu than those included in the biosmenuguide In the AMIBCP, I did not manage to find substitutes for Internal Pointing Device, Wake On Lid Open, Intel Virtualization Technology, Intel AES-NI, VT-d, ASUS EZ Flash 3 utility, nor SMART settings. It could be that they are hidden somewhere deep and my manual searching is not sufficient, or that they are not in the hidden advanced or the hidden chipset. You can perhaps take a look, I tried my very best. The existing settings and the default settings for those missing options are exactly what I want and there is no way that I need to change it. If those settings are preserved when flashing a new modded BIOS, then I am OK with having the hidden advanced and chipset. If not so, then I am perfectly fine with having two advanced menu.
@evnchn - Yes, that is the kit you’d need if you had to recover from bricked BIOS, SOIP8/SOP8/SOIC8 same/same
On the Advanced menus, your comments outline why I often leave original advanced too, unless user specifically look and decide they don’t need (or don’t need to change away from default) any of those settings in original that are not in hidden advanced Yes, if I remove original ADV, swap in new one only, all settings there will be left at their default. So, please re-confirm now that you know this, do you need original advanced or OK to swap new advanced in it’s place leaving only new hidden advanced + Chipset?
Please test in the following order and STOP once you see new Advanced + Chipset. Some may not have either, this is possibly expected w/ 1-2, but please test in order as mentioned - let me know which you stop on, thanks! Flash via >> FPTw.exe -bios -f filename.bin 1. SetAMITO 2. SetAMITSDU 3. SetAMITSDS
*** WARNING - To ANYONE with laptop and unlocked BIOS!!! DO NOT try to enable this graphics card or disable that card, switch cards etc. Otherwise you will end up with no display output (ie black screen) and no way to recover except by blind flash or with flash programmer. You can change graphics related settings, like changing memory sizes, or core speeds etc, just don’t try to disable one card or change which is main etc. Additionally, be very careful when trying to undervolt CPU, you can leave BIOS unbootable due to CPU voltage too low (Sometimes even 0.05 is too much)
WARNING *** - This BIOS is user specific! If you are not user evnchn at Win-RAID.com forum, DO NOT USE THIS BIOS!! If you do, and you are not evnchn, then you will loose your serial, UUID, OG NVRAM, and possibly LAN MAC ID as well. You have been warned!!!
@Lost_N_BIOS Thanks. First file named SetAMITO somehow had two advanced menus plus a chipset. I have no idea why and I am not kidding. I am now able to set the CPU PL1 PL2 to higher and make the fan run earlier.
Also some regards to setup_var method, in the message after running the setup_var command, it will firstly say what the value of that offset is, and then write to it. To know if setup_var actually worked (mine looks like it didn’t but it actually did), you can run the command twice.
@evnchn - Sorry about that, I checked my edit notes and I see I actually forgot to add the original advanced into the block lists as I swapped the ADV’s around in the visible lists. So #1 is OK, good to know. If you want I will re-edit and remove the original advanced, or you can use like that, let me know?
On setup_var, you can also run the command like this, without value, and it will give you current value >> setup_var 0x99 But yes, it is a bit confusing how it’s output looks when changing something, until you get used to seeing it. Generally, as long as there is not error, or “can’t set EFI” then it’s going to change it.
@Lost_N_BIOS extremely sorry for late reply. Can’t set the CPU to a higher power since cooling is just enough and no extra room after accommodating for the GPU. I do not need to edit away the original advanced, it is a happy accident. Thank you very much. Maybe you can share how to swap the menus if you have time so that me or others can piece together a followable guide for ASUS and MSI users who have hidden menus.