Hello All,
I’m trying to use a PCIe NVMe SSD drive in Dell Optiplex 3020.
I’ve prepared a modded BIOS according to the awesome description : [Guide] How to get full NVMe support for all Systems with an AMI UEFI BIOS.
Now I’m suffering from beeing unable to flash the BIOS, because the flash tool ( https://www.dell.com/support/home/hu/hu/…?driverid=v5pjd ) offered by Dell does not recognize the format of the prepared file.
Does anyone have experience with Dell BIOS flashing or a solution for this problem?
Send me link to original BIOS exe that you modified BIOS from, and upload your modified BIOS in zip folder to any file host, thanks. I will either repack the exe for you, or give you tool or method to flash.
Thanks
@komara Where is link to BIOS download from Dell, and upload link of your modified BIOS? - I found your PM, thanks! Will update soon
This BIOS you modified is HDR, not BIOS .rom file, that may be why flash tool does not work for you?
Normally for those you have to use Dell client configuration utility (DDCU) or Dell Client Configuration Toolkit (CCTK), but I have no experience with those type of programs since I do not have Dell systems to test them in windows with.
I will re-modify the rom with the NVRAM file you inserted, then give you methods to flash, still looking into this, so will update again soon
*Edit 3
Download this Intel System Tools v9.1 package
https://mega.nz/#!uQV12IxD!KGAUutQZrdL7T…SugQhzGkt5K5EWU
From the MEINfo thread, at win/win32 folder open command prompt and run the following, then upload image here and attach
meinfowin.exe
Then at the Flash Programming Tool folder, at the Windows folder, open command prompt and run the following
fptw.exe -bios -d backup.bin
This is what we will modify ^^ should be 6144KB, I have that file here now from the exe, but best to grab current from your board to modify.
I think it’s easiest way for you without a flash programmer, unless you can get one of the above mentioned tools to work for you with the HDR file.
You did already try this correct? >> Flash64W.exe /b=O3020A18_nvme.rom
If you have, and it failed, try this also now, since this is a HDR file not a .rom file >> Flash64W.exe /b=O3020A18_nvme.hdr
The program is looking for the .exe though anyway, so nothing may work except that exe. I can’t repack your mod into there either because I can’t find tool to work with the half compressed file like I have for other Dell packages 
To be honest I’m very new to BIOS modding - the lack of this kind of support from Dell made me a bit upset …
Anyway the full story:
I tried fptw -bios -d already. First I got Error 366: Fail to load driver (PCI access for Windows). Then I put the PC to service mode (jumper on MB). After I got an other error (~ Unable to read BIOS), I think it is write protected.
So I switched to another approach. I used this python tool to extract the hdr file from the original BIOS.exe, then modified it according to the mentioned guide, and tried to flash it again - and here I stuck completely.
As I saw the BIOS.exe is a digitally signed updating tool containig the zipped .hdr image. I think it wont be easy to repack because of the signature …
An other info (maybe it’s only new for me ![]() that the flashing procedure seems that the BIOS.exe first writes the image to somewere else (NVRAM?) and after reboot occurs the bios update. I assume fptw flashes the spi device directly …
that the flashing procedure seems that the BIOS.exe first writes the image to somewere else (NVRAM?) and after reboot occurs the bios update. I assume fptw flashes the spi device directly …
I tried meinfo it gave the same error that fptw64 (i will try it in service mode also and get back with the results). However I tried to determine the type of flash device visually, its a MX25L6473E if I’m right.
I tried renaming the .rom file to .hdr, it gives the same error: Unable to locate a BIOS Update Payload in …
Uptade:
I run meinfo.efi from efi shell and it gave the following errors:
- Communication error between app and Intel ME device
- AMT device unavailable
It’s OK, we all have to start sometime, sadly for many it’s after there is an issue
Are you using the correct FPT? From the package I linked? What is your current ME, maybe it’s not 9.1, and if not then you need a different package. Here in section C2 is all the versions, you need package matching your current ME to use FPT or Meinfo from
Intel Management Engine: Drivers, Firmware & System Tools
Service mode jumper disables ME and unlocks flash descriptor sometimes, but we would want that in default position (Not service mode enabled). But we may need in service mode anyway, some boards are different. What is the error number you got when it was enabled?
Sometimes error 366 simply means either no ME driver installed, or you need to use DOS version to do what you are doing, so we may need to move to USB DOS Bootable stick, please set one up now if you don’t have already.
Here is quick guide if you don’t know how to do that - <Request> Flagship X470 Gaming 7 Wifi Motherboard BIOS Fix
On your update error, likely OS issue, or drivers not installed as mentioned. See if you see ME in device manager, and check with HWInfo linked below too (Service jumper must not be enabled for ME to function, put to default if you have not already)
Yes, you can only flash HDR using special Dell methods like I mentioned above, not sure which of those programs are for your board/BIOS type, but one of them will work as that is their designed intention.
You cannot rename HDR to rom either, HDR is not a rom file and much larger than the rom file itself. Slow down before you break it BIOS flashing is not something to rush through or try to force in etc. be careful!
Please download HWInfo64 and lets get you right Intel tools to be using for your current ME version - this will not work in service mode jumper is enabled due to ME will be disabled, so check with it in default not enabled position.
When you run, just click run when it asks, make no changes. Then once it opens close all the little windows and on the main larger window on left side go to motherboard, expand and then to ME section. What is the ME version? Show image of the top two sections
https://www.hwinfo.com/download.php
Now I got everything working (a forgot the admin privileges, what a shame ![]()
The meinfo and the rom extracted by fptw:
meinfo+rom.zip
Here are the ME info screenshots:
ME.zip
Nice! I’ll check this and edit back to you! So your ME is fine, and it’s ME 9.1 as suspected, so yes must have been just the admin issue causing hold up initially.
I’ll edit this rom with your NVME mod file and upload shortly, then you can flash this via FPT! I don’t know how critical it is, but you have the NVME inserted in wrong position (two above where it should be)
Did you choose “Small” one for a reason? I assume not due to size?
Uploading file now, with large NVME Module since small one was not necessary
@komara - Here is modified BIOS, if you need other mods you can do this same way post mod, if you need help doing another mod let me know I can probably do for you or help you learn how to do it.
http://s000.tinyupload.com/index.php?fil…831065953378362
Flash with FPT using this command
FPTw.exe -bios -f o3020a18M.rom
Maybe I misunderstood the guide, it said insert it after the last dxe driver - I had the doubt … wrong choice ![]()
Yes, small is because of the size considerations, no other reason.
I tried to flash it: Error 280: Failed to disable write protection for the BIOS space.
The guide does not say after last DXE driver, read it again slow and you’ll see it only looks that way if you read quickly I used to think that too when I first read it. Thanks for reply about size, larger one fits fine is why I asked.
On the BIOS lock, here is how to get around the lock you mentioned, use this guide and instead use these variables >> 0x74 and 0x75 (unlock both of those)
[GUIDE] Grub Setup_Var Guide - Fix Intel FPT Error 368 - BIOS Lock Bit Set HSFS W/ Asus Z170 or Other Mod BIOS
Follow guide starting at step #6 Also, hover over “Boot to efi shell” in your BIOS and see if it gives you a description of the file name it wants.
If it does not specify, which it should, leave file name as it is in the package, and a copy rename like I mentioned in the guide too, that way both will be there in case it’s one or the other.
Sorry but I stuck again (I read very, very slowly ![]()
First I did not find the “Setup” DXE, I guess I have to figure out which driver is responsible for the BIOS lock in the Dell Optiplex 3020 A18 ROM …
But the bigger problem is that IFR Extractor (the v0.7 you included in the GUIDE) does not recognize the protocol of the .sct file. I tried with both UEFItool, on various entries, extraxt as-is, extract body, nothing worked.
Can you please try it on the .rom file? I can’t figure out what I’m doing wrong
Update:
I’ve uploaded an extracted .sct, please check it too!
Update2:
I think I see the problem: PE32 is under a compressed section
Offset: 3A7480h
Type: 01h
Full size: B86h (2950)
Header size: 9h (9)
Body size: B7Dh (2941)
Compression type: 01h
Decompressed size: 16D4h (5844)
Compression algorithm: Tiano
Compressed: Yes
Fixed: No
the entry is a Tiano type compressed image, now I’m searching for decompressor …
I gave you the variables to use in post #10, so you did not have to follow most of that guide, I said start at step #6 - and I gave you the variables in paragraph before that >> 0x74 and 0x75 (unlock both of those)
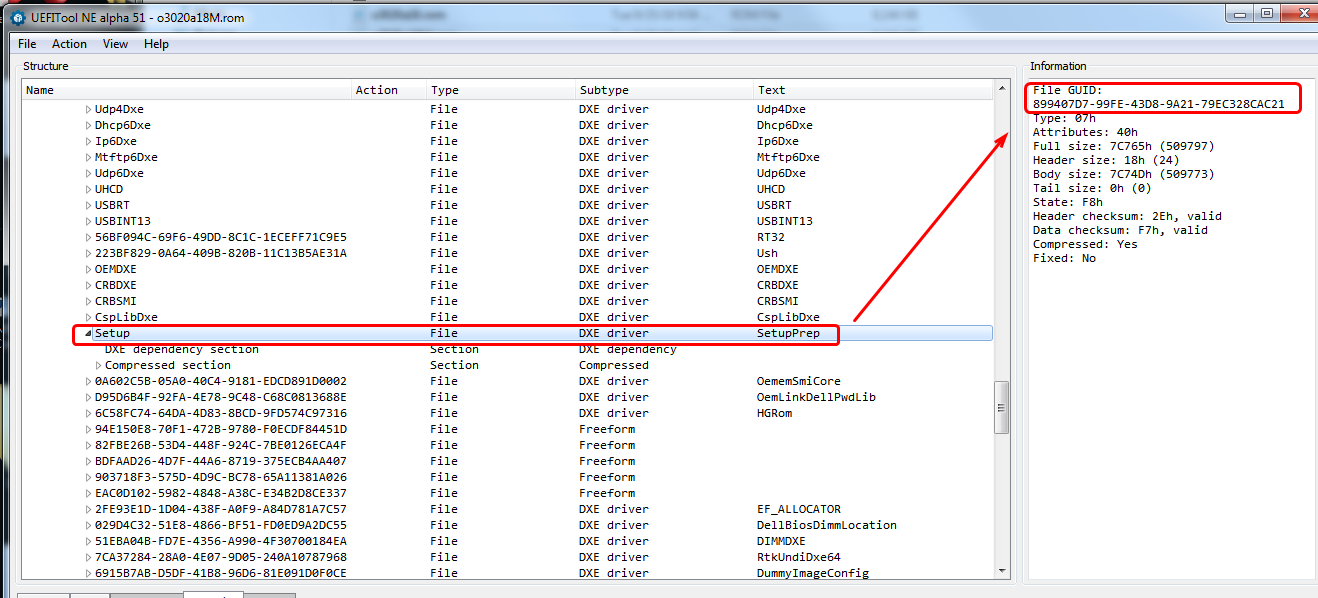
The IFR extractor works (0.7 version), that is how I got the variables to give you. In your particular BIOS you do not use the PE32 module, but the SetupPrep.ffs (entire GUID @ 899407D7-99FE-43D8-9A21-79EC328CAC21)
Which I would have explained to you, except I already gathered the variables for you since I was in the file right then, see above so no need for you to do any of that
@Lost_N_BIOS - UR the best! You made my day or better my whole week! 
So this time I read too much
And I also managed to find the BIOS lock and SMI lock offsets in the file. The only thing what wont let me sleep tonight is from where the GUID: 899407D7-99FE-43D8-9A21-79EC328CAC21 came, but it’s another story … Say, thats a kind of magic! 
So many thanks thanks again for your help, and the lot of patience …
to extract from some DeLL bios .exe files, you have this switches :
-factory : Resets the BIOS to factory settings
-forceit : Forces the BIOS updates even if a laptop is not plugged into an AC power source
-forcetype :Forces and BIOS file to any Dell model machine
-jabil : Force the BIOS updated even though the system says it is the wrong BIOS version
-nopause : Prevents the BIOS update from prompting when executing
-norburesults : No remote BIOS update results (no-rbu-results)
-noreboot : Prevents the PC from rebooting after the BIOS is flashed
-prgboot : Most likely is used to disable windows features when flashing from a bootable DOS media
-rburesults : Remote BIOS update results (rbu-results)
-reportstatus : Writes a dat file containing the current installed BIOS version
-verbose
-wipeall : Cleans the DMI Data Area, Password, Service Tag, and Asset Tag
-wipeclean : Clears the ESCD and DMI data tables. This is commonly used to resolve conflict issues and corrupted BIOS settings
-writehdrfile : extracts the hdr (header) file to be flashed to the BIOS
-writehexfile : extracts the hex (hexadecimal) format file to be flashed to the BIOS
-writeromfile : extracts the ROM (Read Only Memory) file to be flashed to the BIOS
Yes, BIOS Lock and SMI Lock is the variables I gave you 0x74 and 0x75 - You’re welcome, and thank you too
Here, so you can sleep , this is where you find GUID for the Setup module on this particular BIOS
@Doze - yes, thank you, but unfortunately in this case not worked. Maybe someone thought at DELL its not a good idea to give such tools to the users and they omitted this from the newer releases … that was the first point made me upset
However, thanks to @Lost_N_BIOS the problem is solved.
I see, so the GUID itself is only important because it’s easier to search the Setup part or I can use it in case the UEFItool cannot name the section correctly. And I assume it can vary in case of different types/vendors.
Yes, GUID search was easy way for you to find it, and for this particular extract you want to extract the entire GUID (Setup) GUID or name for each thing is not always same in different BIOS, so anything mentioned here is only for this BIOS.
Some BIOS show GUID where name is, others only where I showed you in the image, all depends on how they created the BIOS
Hello,
after successfully cloning a PC (GUID, service Tag, and don’t know yet what else) , I’m back  .
.
The mistake: I backed up the bios from one Optiplex 3020, and flashed back the modified (with the added nvme driver) one to another one. I’m trying to flash more PC-s of the same type.
Now I’m thinking about only flashing the neccessary part (volume) of the BIOS (fptw64.exe offers such possibility with the -a and -l options). In this case the area is 0x0f0000 and ends at 0x4fffff. Can it work? Or even to flash the inserted module only? I know it sounds as a precision surgery done by a mad doctor 
I tried to back up the area of the whole volume, I get: Error 26: The host CPU does not have read access to the target flash area. To enable read access for this operation you must modify the descriptor settings to give host access to this region.
While I was able to back up the area of the inserted module only.
update: I experienced that I can backup the rom from address 0x200000 without any problem. What does that descriptor settings in the error mean and how to modify it?
Ok I realized that the BIOS area starts at 0x200000.
An other approach can be to find the location for the unique IDs and insert them to the rom file or write them back after flashing. I assume that the flashing tool provided by the manufacturer does in some of that ways. Do someone has experince with these GUID’s?
@Lost_N_BIOS - May I have a question : Did you only inserted the NVME driver to the .rom, or did something extra modifications?
I’ve compared the o3020a18.rom and o3020a18M.rom files and saw additional differences in the last volume approximately at File GUID: 221D6760-4AC0-4C12-BA96-9C63E4D9C1C8 (PeiHwmInit).
I made a fresh bios backup, inserted the nvme driver, and after comapring the two rom images, there was only one difference where I expected. So is it enough to insert the driver or do the rom file need extra modifications?
Ahhh, I see what you’re doing now! Maybe should have mentioned first, we could have blanked out service tags. What tool are you using for Service tag anyway, can you send me link (In PM is fine if you want).
I have one and need this for another user here, but reading it’s “Read Me” file tonight I see it seems to mainly be mentioning laptops. So I’m not sure if it works on desktops or not.
If this is something you need, then I can send you version I have, then you test and see if it works, if not I’ll try to find us desktop version if you do not have already.
I am not sure about using FPT how you mention, where is the service tag stored in the BIOS? I know you can use FPT to flash -bios region only, but that’s probably containing the service tag.
If you know where it is we can blank (FF), then test and see if that works properly. If you don’t know where it is, send me the service tag value for the BIOS dump you sent and I’ll find it in BIOS and then blank and send back and you can test.
On your Error 26, are you using a flash programmer? If yes, dump description (FD) with FPT using this command >> FPTw -desc -d FD.bin and edit that following this guide (second spoiler shows what to FF) - [Guide] Unlock Intel Flash Descriptor Read/Write Access Permissions for SPI Servicing
Then flash it back via FPTw -desc -f FD.bin
If you have programmer, best to do this edit on entire BIOS file before flashing any of them, it’s (FD region) right at the top of the BIOS usually.
I only inserted the NVME, not same one you did remember, and not same location you did previously either. So any changes you see may be either due to one of those (Not same NVME, or location).
Any changes to PeiHwmInit would be done by UEFITool on rebuild (Maybe it’s checksum or location value, usually in the header)
Yes, I know should have telled the whole story, but I didn’t think the serial numbers located in the bios region … it was a surprise
Now the problem is that I don’t have (didn’t find) a tool, and don’t know the location of the Service tag (and the serial number of the mainboard is also affected ![]() I found https://www.dell.com/community/Desktops-…10/td-p/4643926 refers the ftp://ftp.dell.com/utility/asset_a209.com and contains the description of the hidden functions of the utility, but the system did not allow to change the service tag, only the asset tag. I also tried it with removed BIOS lock and SMI lock.
I found https://www.dell.com/community/Desktops-…10/td-p/4643926 refers the ftp://ftp.dell.com/utility/asset_a209.com and contains the description of the hidden functions of the utility, but the system did not allow to change the service tag, only the asset tag. I also tried it with removed BIOS lock and SMI lock.
Regarding FPT and denied access for the region below 0x200000, I realized that its not relevant, I don’t need it. Using the -BIOS option has the same effect as -a 0x200000 -l 0x600000. I checked the modified ROM image: the volume that contains the NVME driver starts at offset 0x0f0000 and has a length of 0x410000 (ends at 0x4fffff). I had a theory that the service tag and/or the asset tag is not on the same volume as the drivers, which is now successfully tested with the asset tag:
I’ve made a fresh extract of the original BIOS region then changed the asset tag with the utility mentioned above. I’ve added the NVME driver to the image and extracted asis only the volume containing the new NVME driver, and finally flashed it with fptw -a 0x2f0000 -l 0x410000 -f vol.bin (maybe -l can be omitted?). And it works and the asset tag remain unchanged.
So now I have to find the Service tag location and/or figure out how to modify it.