Dell Optiplex 3020 BIOS flashing

I have one package, but surely could find another, of Dell DST/DSCTD (asset and service tag) which says laptops, but I don’t know if it’s only working on laptops or not, you will have to try and see. If it doesn’t work for your model let me know, surely I can find desktop package too

SVCTAG.EXE

**********************************************************
Dell Internal Use Only
NOT FOR EXTERNAL DISTRIBUTION
**********************************************************


What does this utility do?
----------------------------------------------------------------------
This utility is used to re-program the system service tag on certain
Dell Portable systems. The utility may only work on systems which
already have a service tag programmed. If no service tag currently
exists, the utility may return an error message and fail.

To program the service tag on a system that does not already have one:

- For Value-line systems:
Run EE-Value.exe /S=XXXXXXX, where XXXXXXX is alphanumeric and all
letters are capitalized.

- For SmartStep/Smart PC 200N/250N:
Run STAG_W1.EXE /W XXXXXXX, where XXXXXXX is alphanumeric and all
letters are capitalized.

- For Molokai:
Run SERTAG.exe /W XXXXXX, where XXXXXX is alphanumeric and all
letters are capitalized.

- For all other systems:
Run ASSET.COM /S XXXXXXX, where XXXXXXX is the new service tag.


USAGE:
----------------------------------------------------------------------
Boot from the diskette and follow the on-screen prompts to erase and
program a new service tag.

See the comments in AUTOEXEC.BAT on how to automate the process.


General Information:
----------------------------------------------------------------------
This diskette contains 6 main programs or program types:
1. SVCTAG.EXE
2. 6 varieties of EE-ERASE
- EE-CP.EXE
- EE-CPA.EXE
- EE-CPB.EXE
- EE-LS.EXE
- EE-LS2.EXE
- EE-VALUE.EXE
- STAG.EXE
- STAG_W1.EXE
3. 3 varieties of ASSET
- ASSET.COM
- EE-VALUE.EXE
- STAG_W1.EXE
4. NICSET.EXE
5. FDD_RCL.EXE
6. SVCTAG.INF

1. SVCTAG.EXE is called from autoexec.bat. It is a utility that
determines if the system on which it is being executed is supported
by the disk. If so, it determines which type of system it is, using
the system ID byte. This information is gathered from either SMBOIS
calls or XBIOS calls, if SMBIOS fails. The utility also uses these
calls to determine if a service tag is currently programmed on the
system. If one isn’t programmed, there is no need to run EE-ERASE
so the utility goes directly to the ASSET program.

2. Based on the information gathered, SVCTAG.EXE launches the
appropriate version of EE-Erase.

Each of these utilities can be run stand-alone. For EE-CPA.EXE, the
-forcetype command line switch may be required.

3. The appropriate version of ASSET program is then launched.
SVCTAG.EXE first asks the user the enter the new service tag (twice
for verification) then passes that value to ASSET when it is
launched.

The ASSET programs can be run as a stand-alone utilities as noted
above.

4. NICSET.EXE is launched by SVCTAG.EXE after EE_ERASE if the system
is a Latitude C610 or Inspiron 4100. NICSET is needed in order to
unhide and enable the onboard NIC, which is disabled by EE-ERASE.

5. FDD_RCL.EXE is the launched from AUTOEXEC.BAT after SVCTAG.EXE. It
performs a Recalibrate operation on the floppy diskette drive.
The purpose of this utility is to ensure the FDD head is moved to
track 0 in preperation for transport.
It is important to power off the system immediately after this
utility is run in order to guarantee the head remains at track 0.

6. SVCTAG.INF is the text file contains vendor name, system id, ee-erase,
erase options, asset and asset options. This file is processed
by svctag.exe. The program goes through this file line by line
and searches for system id and BIOS vendor string which match the
system ID and BIOS vendor string read from the system on which
the utility is being run. If a match is found, the corresponding
line will be parsed and the executables and command line options
from that line will be used to erase and program the service tag.


Supported Systems

All Dell Portable Systems


readme.txt
updated 07/10/03

https://www119.zippyshare.com/v/8Zp3LWzL/file.html

So you got the NVME mod added and working now, correct? Just have to find way to change asset/service tags? If this tool above does not work, and I can’t find desktop version, I can find these values in the BIOS for you and change.
If we get to that you’ll send me asset/service tags and I can change to whatever you want or FF them out, or show you via hex and UEFITool where they are etc.

Yes, that is the situation, the nvme is working fine. If I can change the service tag, I can restore the “overcloned” PC, and can make a final test of the flashing method, and be sure that it doesnt’t affect the service tag.

I’ve tried these tools: SVCTAG, ASSET /S already, they are not working. May I give a try to the others.

The asset tag was empty, but for that I already have a tool to change (ASSET.COM).

The service tag is 9D8Q212. First I tried to find it according the method you showed me in case of BIOS lock and I found an offset 0x3a1. I used the “grub” tool to verify the content, change it / fill it with 0xff -> no success. Then I made a unicode search, and found it too many times but only in the first two volume of the rom image.

Good your BIOS NVME mod is working!

Sometimes the tag is duplicated many times, often in NVRAM area of the BIOS. I would try all of the EE-ERASE, and read into the SVCTAG.INF to see all the options it mentions, maybe something will catch your eye. And notice #3 info about EE_Erase, it says -forcetype may be needed?
In the end, I may need to find desktop version, going to look now, since there is another user here too getting a bunch of shipments of Dell’s in so we need to find anyway.

CCTK and DDC is an option too, but since I do not have Dell systems here I am not sure how easy this is to use
https://www.dell.com/support/article/us/…it-cctk?lang=en
https://www.dell.com/support/article/us/…systems?lang=en

Also, see this, it’s old now but may still work on some systems, second download link works I grabbed the file. Then read down for steps to run the service tag utility
https://community.spiceworks.com/how_to/…nspirion-laptop


Here is ATAG_A209 (Asset is included in the previously linked package I uploaded DSTCD, unsure if same or same version) I think all same files in above link too, same CD ISO, but I see ATAG_209 and Asset in CD.ISO are different sizes, so probably different versoins too
https://www.dell.com/support/home/us/en/…?driverid=h3mvy

I also read this about the ISO I uploaded previously, for using ASSET
Usage:
ASSET new_asset_tag Specify new asset tag
ASSET /d Delete asset tag
ASSET /o new_owner_tag Specify new owner tag (if applicable)
ASSET /o /d Delete owner tag (if applicable)
See also, all the Dell belong to YOU open in firefox or FTP app
http://ftp.us.dell.com/utility/

Breaking news: i did it
I have enough adventures for a novel now … but in short:

I went back to the roots and started to compare the rom image extracted from the original bios update and the one extracted from the PC. I found that the first 4 volumes of the original image are almost empty (0xff), and the last 3 sections are almost identical. After some searching I finally found that the padding section (offset: 0x40000, length: 0x50000, volume 3 and volume 4 in the original image) of the extracted rom contains both the service tag and the SN only one time. So I modified that volume with the original service tag and SN, flashed it back and voila, everything is back, even the GUID of the machine (I read somewhere that it is derived from service tag).

So here is a method to modify the service tag and SN of a Dell Optiplex 3020:

0. Doing that you might lose warranty!
1. Extract the bios region (fpt -bios -d bios.rom) from the PC you want to change!
2. Open the image with UEFItool, locate the padding region in the middle, calculate it’s offset and write it down (it’s: 0x40000 - an easy method for calculation is to add the lengths of each preceding section, it is shown upon clicking the section)!
3. Extract the padding section asis (padding.bin)!
4. Open it with a hex-editor (eg: xwvi32), locate the service tag you want to modify with text search, and change it!
5. You can repeat step 4 with the SN also.
6. Save, and flash it back with fpt -a 0x240000 -l 0x50000 -f padding.bin (the bios region starts at 0x200000, add the offset of padding section. You may also need to unlock the BIOS for flashing, see the description in post #10 of this topic)!
7. Restart and enjoy!
8. You might want to revert the BIOS lock, to avoid security issues.

Thanks for posting your method, and good you solved it outside of the box without software.
Another way to flash your mod, put padding back in same way and same location you removed it from, then >>> FPTw -bios -f bios.rom

Yes, you’re right, the method is easier as you suggested: there is no need for UEFItool, just (maybe search and) edit only the correct location of the image.
This time I just wanted to be sure that I don’t modify any other section, and wrote down the steps before I forget it.

Yes, that too, no need to extract if it’s not in compressed section, you can probably direct hex edit at location you know is the one.
All the others toward beginning of BIOS, are what’s stored I NVRAM I think, you can extract NVRAM section with UEFITool NE Alpha and see all the times they are stored in there, but most of that is like a “log” file so I think they can be ignored in there.
Or you could use hex and find/replace all in one action with a proper hex editor with this function

Just an info regarding the descriptor lock discussed in post #19: I found that for Dell Optiplex 3020 it can be easily unlocked with the service mode jumper on the mainboard (if you have physical access :). After installing and power cycling the 0x0-0x1fffff region is readable.

May I have another question? Do you have any deeper knowledge about UEFI variables? I understood in case of BIOS lock and SMI lock how to read/modify these variables with the setup_var command in the “grub” (i don’t have better name for this) tool via memory offset. And I can list variables with lsefivar command. Are these the same things? And i saw that they have GUID too. Where are they stored (in flash)? Do you know any tool can be used to manipulate them directly from windows? Sorry for the many question, this whole UEFI topic is far more interesting than I thought, and I’m getting more and more thirsty …

I always forget some boards have those jumpers!

I am not sure about lsefivar, if I need to find a setup_var to edit, I extract that module, or it’s PE32 file, or it’s Sub-GUID under PE32 with UEFITool, then get an IFR output with universal IFR extractor. From there, search for the setting you want to change and then you’ll find it’s variable to use.
They can’t really be edited from windows that I know of, but you can edit them in the actual module and put back into the BIOS and flash it (Like change default disable to default enabled).
https://github.com/LongSoft/UEFITool
https://github.com/LongSoft/Universal-IFR-Extractor

Here’s a guide I wrote not long ago about how to unlock BIOS/SMI lock for some boards, reading over that will give you a general / perfect example of how to do what I described above.
[GUIDE] Grub Fix Intel FPT Error 368 - BIOS Lock Asus/Other Mod BIOS Flash

So now that you guys made progress, how do we go about changing the Dell splash logo some something else?

I currently have a 7010 optiplex and from what i read i need to extract the HDR file then what?

@blaze2051 - you can try this Dell program, but I think maybe it’s too dated
https://www.dell.com/support/home/us/en/…driverid=R35826

Dump your BIOS region using FPTw from Intel ME System Tools package v8, from here in section C.2 - Intel Management Engine: Drivers, Firmware & System Tools
FPTw.exe -bios -d biosreg.bin

Then upload here so I can take a look.

hey bro, could you tell me how to extra dell bios into rom file??
i had watched
How to extract contents of this Dell BIOS package?

and now I only know how to extra exe file into hdr file,and how to extra hdr file,but anyway i never find the rom file~~~

and i extra hdr file and found several 5MB size files,they were not 4MB or 8MB normal size.
i think it lack of me model?

by the way,i wanna try afudos to backup bios,the mod and flash it tonight.
just try and i will tell you anyway

oh,my god.i used afudos and fpt in dos,and they can’t backup bios in dell motherboard.
so i think the only way to mod dell bios is extracting the exe files downloaded from the dell website~

my laptop is Latitude E5450, and i used “fpt -bios -d dell.bin”,and it went wrong

* Edited by Lost_N_BIOS to combine multiple posts - please edit your post instead of replying many times, thank you

@gloobox - Please edit your posts if you need to add more thoughts, no need to make many posts in a row, thanks!

What is the issue you are having, or what are you trying/needing to do? That will help me give you best answer
This is your BIOS correct, A20 - https://downloads.dell.com/FOLDER05276083M/1/E5450A20.exe

To use Intel FPT you have to find your ME version so you can download the correct FPT version, if it applies to your system. And this only applies if you have Intel CPU (and only modern CPU)
What is your current ME FW version, check either on BIOS main page, or with HWInfo64 in large window on left side, expand motherboard and then go to ME section and find ME FW version.
Then let me know what ME FW version it is and I can link you to correct package to use FPT from.

1.BIOS correct! A20 - https://downloads.dell.com/FOLDER05276083M/1/E5450A20.exe
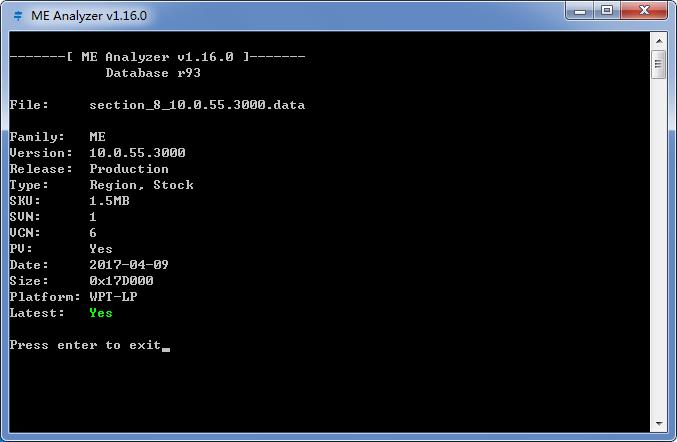
2.The ME version is 10.0,and I had tried the correct fpt dos version but fail. But i tried the fptw later.oh!!!I did the trick!

me.jpg


3.what if i only add nvme module in the bios extracted from the ftpw?will it run well except lacking of service tag and SN?

@gloobox - You need to run MEInfoWin on your system, not on a file like you did. That only checks the file you input, not what is actually running on the board.
That or check in BIOS main page, or with HWInfo64 software (in large window, on left in motherboard section, expand and see ME area, then you will see ME FW Version)

If you dump BIOS region with FPT >> FPTw.exe -bios -d biosreg.bin
Then you can edit that, add NVME module, and then reflash back edited BIOS region >> FPTw.exe -bios -f NVMEbiosreg.bin
If the flash back of edited BIOS region gives you error 368 then see this guide to unlock BIOS Lock - [GUIDE] Grub Fix Intel FPT Error 368 - BIOS Lock Asus/Other Mod BIOS Flash

Service tag and serial will remain in place if you do that way.

im stuck this section and i cant do it :frowning: im new on bios upgrade and its hard to me understand

@rashid_delloptiplex3 - download this package >> https://mega.nz/#!CF1l1LJK!K2l6_74FPsGig…Rvp8Efj8a5drZSc

Inside you will fine Intel Flash Programming Tool folder, inside that you will find “Windows” folder. Select the “Windows” folder, hold shift and press right click, choose "Open command window here"
Then run the following command, and zip up the file it creates and send to me to check for you
FPTw.exe -bios -d biosreg.bin

Then Shut down system, put on “Service Mode” jumper, and boot into windows and run the following command, same way as above
FPTw.exe -d biosfull.bin

Once done with that, remove jumper again until we ready to reflash

Hi. Thanks you want help me

When run cmd inside folder
"Error 284: Fail to load driver (PCI access for Windows).
Tool needs to run with an administrator priviledge account."

when open cmd with administrator
"Error 201: [FPTw.exe] cannot be run on the current platform.
Please contact your vendor."


after service mode jumper also same error
"Error 201: [FPTw.exe] cannot be run on the current platform.
Please contact your vendor."

Check with HWInfo64 on the large window, on left, inside motherboard section, what is your ME Firmware version?
Second, you did not start command using process I described did you? If you did, then go into start menu, find command prompt, run as admin, then navigate to Flash Programming Tools/Windows folder, then run the FPT commands
But, wait to do that until you tell me your ME FW version, sounds like you are not using latest BIOS/ME, since I linked you to tools for V8 version per previous users on ME FW V8

https://ibb.co/7ywPpTn
https://ibb.co/Jc2JHRW

Its motherboard versions :frowning: i thinks its not old. And also i cant conneect my user and for that i opened new user