@rashid_DellOptiplex1 @rashid_delloptiplex3 (Why two user accounts now?) Thanks for images, you have ME 9.1, so you need this package instead, then run two commands from post #37 again - https://mega.nz/#!uQV12IxD!KGAUutQZrdL7T…SugQhzGkt5K5EWU
I do not understand your text comments about motherboard version and user?
Hello, the provided file can not be unzipped. My ME Version ist 9.1 too. Would you please provide the zipped file again. Thanks.
EDIT: SORRY… on another system i’m able to unzip the file…
I wanted to make an account and thank Lost_N_BIOS and komara for this thread. I recently acquired an Optiplex 3020 and an NVMe drive from work and was frustrated to find-out that NVMe-bootable drives were not natively supported on this computer. Doing some research, this thread seemed to provide the only possible way to get the functionality I wanted out of the computer.
I had never flashed a custom BIOS before, but considering I got this PC for free, I figured I could accept the risk of bricking the board. I was able to piece-together all of the instructions you both provided and was able to flash the modified A18 BIOS; I can now boot from an NVMe drive and have a nice, snappy little media PC now.
This was a few weeks ago, but I thought I would outline the steps I took in-order from what I recall.
- Encountered same BIOS lock error that komara did (Error 280: Failed to disable write protection for the BIOS space.)
- After checking steps in attached thread by Lost_N_BIOS, created an EFI-bootable flashdrive containing bootx64.efi file from the EFI-Setup-FPT-Universal-IFR-Extractor package provided.
- Ran following two commands:
setup_var 0x74 0x00
setup_var 0x75 0x00
- Created a DOS-bootable drive containing the Intel ME 9.1 version of FPT and included the modified ROM provided by Lost_N_BIOS in the directory. (I use Linux and thought this would be easier than installing Windows on a separate hard drive)
- Booted drive and flashed using command fpt.exe -bios -f o3020a18M.rom
And voila; Can now install an OS on an NVMe drive and boot from it.
Thank you guys again!
I meet the same issue of Error 280: Failed to disable write protection for the BIOS space.
I read the document of [GUIDE] Grub Fix Intel FPT Error 368 - BIOS Lock Asus/Other Mod BIOS Flash
And got the information of the code 0x74 for SMI Lock and 0x75 for BIOS Lock
0x68BE0 Setting: SMI Lock, Variable: 0x74 {05 A6 B8 01 B9 01 79 00 02 00 74 00 10 10 00 00 00 00 00 00 00 00 00 00 00 00 00 00 00 00 00 00 00 00 00 00 00 00}
0x68C06 Default: 8 Bit, Value: 0x0 {5B 0D 00 00 00 00 00 00 00 00 00 00 00}
0x68C13 Option: Disabled, Value: 0x0 {09 0E D7 03 00 00 00 00 00 00 00 00 00 00}
0x68C21 Option: Enabled, Value: 0x1 (default MFG) {09 0E D6 03 20 00 01 00 00 00 00 00 00 00}
0x68C2F End of Options {29 02}
0x68C31 Setting: BIOS Lock, Variable: 0x75 {05 A6 BE 01 BF 01 7A 00 02 00 75 00 10 10 00 00 00 00 00 00 00 00 00 00 00 00 00 00 00 00 00 00 00 00 00 00 00 00}
0x68C57 Option: Disabled, Value: 0x0 {09 0E D7 03 00 00 00 00 00 00 00 00 00 00}
0x68C65 Option: Enabled, Value: 0x1 {09 0E D6 03 30 00 01 00 00 00 00 00 00 00}
0x68C73 End of Options {29 02}
But I really don’t know how to do next…
I don’t know where I can use the code and how to use…
The 6 step: rename boot64.efi… what’s the file for where can I get it…
Dell 3020 and the bios version is A19 now…
Hello,
I’ve uploaded the grub tool here: http://s000.tinyupload.com/?file_id=02263035454801781684
1. Unzip it and write the content to a pendrive.
2. Boot it via uefi.
3. Use the command lines: setup_var 0x74 0x00 and setup_var 0x75 0x00 to unlock the BIOS.
4. Now you will be able to flash your modified BIOS image.
BR
Hi Komara,
Thank you so much! It works now!!
You welcome!![]()
Hi, is there anyone can help to extract the Optiplex 9020 BIOS so that i can mod the BIOS for NVMe support. The link to the BIOS is here: https://www.dell.com/support/home/ae/en/…ex-9020-desktop
Thank you
@a4cheong - You need to dump BNIOS region with Intel FPT and then mod that, and then flash that back via FPT. Stock BIOS or it’s contents are not used for what you want, at all.
Check BIOS main or Info page and see if ME FW version is shown, if not then download HWINFO64 and on the large window on left side, expand motherboard and find ME area, inside that get the ME Firmware version.
Once you have that, go to this thread and in the section “C” download the matching ME System Tools Package (ie if ME FW version = 10.x get V10 package, if 9.0-9.1 get V9.1 package, if 9.5 or above get V9.5 package etc)
Intel Management Engine: Drivers, Firmware & System Tools
Once downloaded, inside you will find Flash Programming Tool folder, and inside that a Windows or Win/Win32 folder. Select that Win folder, hold shift and press right click, choose open command window here (Not power shell).
At the command prompt type the following command and send me the created file to modify >> FPTw.exe -bios -d biosreg.bin
Right after you do that, try to write back the BIOS Region dump and see if you get any error, if you do show me image of the command entered and the error given >>
FPTw.exe -bios -f biosreg.bin
If you are stuck on Win10 and cannot easily get command prompt, and method I mentioned above does not work for you, here is some links that should help
Or, copy all contents from the Flash Programming Tool \ DOS folder to the root of a USB Bootable disk and do the dump from DOS (FPT.exe -bios -d biosreg.bin)
https://www.windowscentral.com/how-add-c…creators-update
https://www.windowscentral.com/add-open-…menu-windows-10
https://www.laptopmag.com/articles/open-…ator-privileges
Hi @Lost_N_Bios, thanks for your prompt reply. will try that. thanks
Has anyone here on the forum managed to use a Kaby Lake (or Coffe Lake) processor on a Dell 3040 SFF? I am considering getting a i5 or a 7th generation i7. It comes standard with SkyLake and does not support new generation processors from the factory. It has a 100 Series chipset, as does the Dell 3050, which supports Kaby Lake.
https://www.intel.com/content/www/us/en/…-H30410809.html
@Lost_N_BIOS
Hi,
I am trying to flash a modded BIOS on my Dell Optiplex 7010. I am stuck right now at the same part as @komara in post#5. In CMD when flashing the modded ROM with FPTW64 I receive this error:
"Error 280: Failed to disable write protection for the BIOS space!"
I have gathered all the information you needed when you were helping @komara and created a .zip folder with images and files you need.
Information you need:
- Download link for the latest Dell Optiplex 7010 BIOS .exe file: https://www.dell.com/support/home/us/en/…e=optiplex-7010
- MEInfoWin64 can be found in the folder, filename: MEInfoWin64.png
- IntelME can be found in the folder, filename: IntelME.png
- An image of the error I receive when I try to flash the modded BIOS can be found in the folder, filename: FTPW64_FLASH_ERROR.png
- I am using the correct Intel ME System Tools, which is v8 r3, according to my IntelME.
In the .zip folder you will find four different modded .rom files. Let me explain to you why:
First I tried to follow this guide: [Guide] How to get full NVMe support for all Systems with an AMI UEFI BIOS
As you now you need the “pure” (completely extracted) source BIOS file. For Dell BIOS we only have a .exe file. So I tried this commands in CMD:
.exe -writehdrfile
.exe -writehexfile
.exe -writeromfile
and also:
.exe /writehdrfile
.exe /writehexfile
.exe /writeromfile
No matter if I use CMD as Admin or wihtout Admin, no matter where I put the Dell BIOS .exe file, I can’t extract the .rom or .hdr file from the .exe file. When I press enter after typing the command, there is a loading circle next to my mouse cursor and then nothing happens. The command does get executed but no file is created.
Do you know why this is the case? Could you try if the commands work for you on your PC with the .exe BIOS file and tell me if it works.
So I kept looking for solutions and I saw people who use PhoenixTool to get the “pure” (completely extracted) source BIOS files for Dell.
So I downloaded PhoenixTool v2.66 and v2.73 and used it with a tutorial and got different files in the DUMP folder. I put the original files and the modded files in the .zip folder for you. They are called:
ORIGINAL_BIOS.hdr (This is the original .hdr file I extracted with PhoenixTool v2.66, the size is 13.888 KB)
MOD_BIOS_FROM_HDRFILE.rom (This is the modded “ORIGINAL_BIOS.hdr” file) (#1 of 4 modded .roms)
ORIGINAL_PT266 (This is another file I extracted with PhoenixTool v2.66, the size is also 13.888 KB)
MOD_BIOS_FROM_PT2.66.rom (This is the modded “ORIGINAL_PT266” file) (#2 of 4 modded .roms)
ORIGINAL_PT273 (This is another file I extracted with PhoenixTool v2.73, the size is also 13.888 KB)
MOD_BIOS_FROM_PT2.73.rom (This is the modded “ORIGINAL_PT273” file) (#3 of 4 modded .roms)
Are this all the same files? I have no clue if this were the correct ones so the next thing I did was this:
In post#4 here in this thread you said: "Then at the Flash Programming Tool folder, at the Windows folder, open command prompt and run the following command “fptw.exe -bios -d backup.bin”"
So I did that and I received a file that was 6.144 KB in size. I put it in the .zip folder also, it is called "BIOS_ORIGNAL_BACKUP.bin"
The modded version is called “MOD_BIOS_FROM_FTPW64.rom” (#4 of 4 modded .roms).
I first tried to use MMTool 4.50.0.23 but when inserting the NvmExpressDxe_4 module I get an error about the file size exceeded. Even when I try the NvmExpressDxe_Small module I get that error.
In MMTool 4.50.0.23 inserting NvmExpressDxe_Small module only works when inserteded compressed.
So I gave up on MMTool 4.50.0.23 as I want to do everything exactly as explained in the tutorial.
So I downloaded UEFITool.exe and using this program now I can suddenly insert NvmExpressDxe_4 module without any problem or error. Which is really strange…
So all the modded .roms file you see in the .zip folder are modded with UEFITool and NvmExpressDxe_4 module.
Now which of these files is the correct one to use and flash? The small 6.144 KB file or one of the 13.888 KB files?
How should I continue now? Can you help me or maybe even provide a modded file, completely correct which I only need to flash? I would like to learn it myself too, but if it is easier for you to just send a file completely ready that’s also ok.
DOWNLOAD LINK for the .zip folder: https://ufile.io/m52wdi4i
EDIT: Sorry for the big wall of text. I couldn’t find a way to explain it shorter and simpler 
@Koven - Look your board over and make sure there isn’t a 2pin jumper labelled ME/FD/Service, or anything like that, be sure to look above/below memory thumb tabs, sometimes pins hide there.
If you find such a jumper we can write via FPT without error. Here, in post #3, user says this model has “Service_Mode” jumper - Optiplex 7010 and VPro/AMT/ME
See also this thread, user desribes where the jumper is locations - RE: How to extract contents of this Dell BIOS package?
To get past error 280 you need to boot to grub and use setup_var, use the .efi grub attached to this guide (OR Use Service_Mode Jumper!)
[GUIDE] Grub Fix Intel FPT Error 280 or 368 - BIOS Lock Asus/Other Mod BIOS Flash
Alt boot to grub method when no boot to EFI on exit page - [Help needed] Hidden Advanced menu Bios HP Z1 J52_0274.BIN (2)
See posts 43-45 on page 3 of this thread also, users have already noted what exactly you need to do to get into grub (Also above linked threads too)
For your 7010 variables, you need to unlock the items below
SMI Lock, VarStoreInfo (VarOffset/VarName): 0x3F
BIOS Lock, VarStoreInfo (VarOffset/VarName): 0x40
So at grub prompt you will type the following, one line at a time, enter between each (case sensitive)
setup_var 0x3F 0x00
setup_var 0x40 0x00
You cannot use anything from the exe/HDR for what you want to do. What you need to do is dump the onboard BIOS region via FPT (FPTw.exe -bios -d biosreg.bin), and then flash that back via FPT (FPTw.exe -bios -f biosregmod.bin)
You should NEVER use stock BIOS with FPT, unless you are stuck in a recovery situation with no resource and no previous backup of the boards BIOS, otherwise you will loose all board specifics such as serial, UUID, asset tag, service tag, LAN MAC ID etc
So, summary of what you need to do if you do not user Service_Mode jumper
1. Unlock BIOS/SMI lock in grub
2. Dump BIOS region with FPT with FPT (FPTw.exe -bios -d biosreg.bin)
3. Mod that with NVME
4. Flash back BIOS region with FPT (FPTw.exe -bios -f biosregmod.bin)
OR, you can put on Service_mode Jumper and do the following instead, if you don’t want to mess with disabling SMI/BIOS Lock
1. Put on Service mode jumper, reboot to windows twice
2. Dump BIOS region with FPT (FPTw.exe -bios -d biosreg.bin)
3. mod BIOS
4. Flash back BIOS region with FPT (FPTw.exe -bios -f biosregmod.bin)
If you need me to do the NVME mod for you, please upload ONLY your newly created biosreg.bin file after step #1 above, this way BIOS/SMI lock is already disabled so you can flash and it’s disabled in the BIOS I edit for you and thus will be disabled next time around for you too.
Also, go ahead and upload your biosreg.bin for me (even if you use jumper and don’t disable BIOS/SMI locks), this way I can see if I can insert the normal NVME mod for you, or if you really have to use the small one only like some others have noted (I may be able to get around issues they ran into and didn’t know how to do properly)
Warning! - Do ONLY and EXACTLY as I’ve stated above with FPT, or you can brick your system or loose important details, FPT is very powerful tool and must be used carefully.
1
I found the Service Mode and Jumper! I took a picture of it. Can you take a look at it and tell me what I need to do with the blue jumper? The position of the blue jumper in the picture is at the original position as I found it when I opened the case. I did NOT move/touch the blue jumper yet. It seems like the blue jumper is on PSWD right now.
LINK: https://imgur.com/4GWTd0O
NOTE: I removed the power switch connector (PWR_SW) so you can read the text more clearly on the motherboard.
Also here is the dump BIOS region I got with FPTw.exe -bios -d biosreg.bin.
LINK: http://s000.tinyupload.com/index.php?fil...519530279351175
EDIT: I also tried to insert the NvmExpressDxe_4 module with MMTool 4.50.0.23 using the same biosreg.bin file as you will get from the tinyupload link (don't worry the file in the link is UNTOUCHED), but again when inserting the NvmExpressDxe_4 module I got the same error "file size exceeds the volume size" no matter if I select "Insert As is" or "Insert Compressed". So I tried once more to insert the NvmExpressDxe_Small module and again I get the same error "Error in Inserting file" when using "Insert As is".
Again I only succeeded to put the NvmExpressDxe_Small module in by using "Insert Compressed".
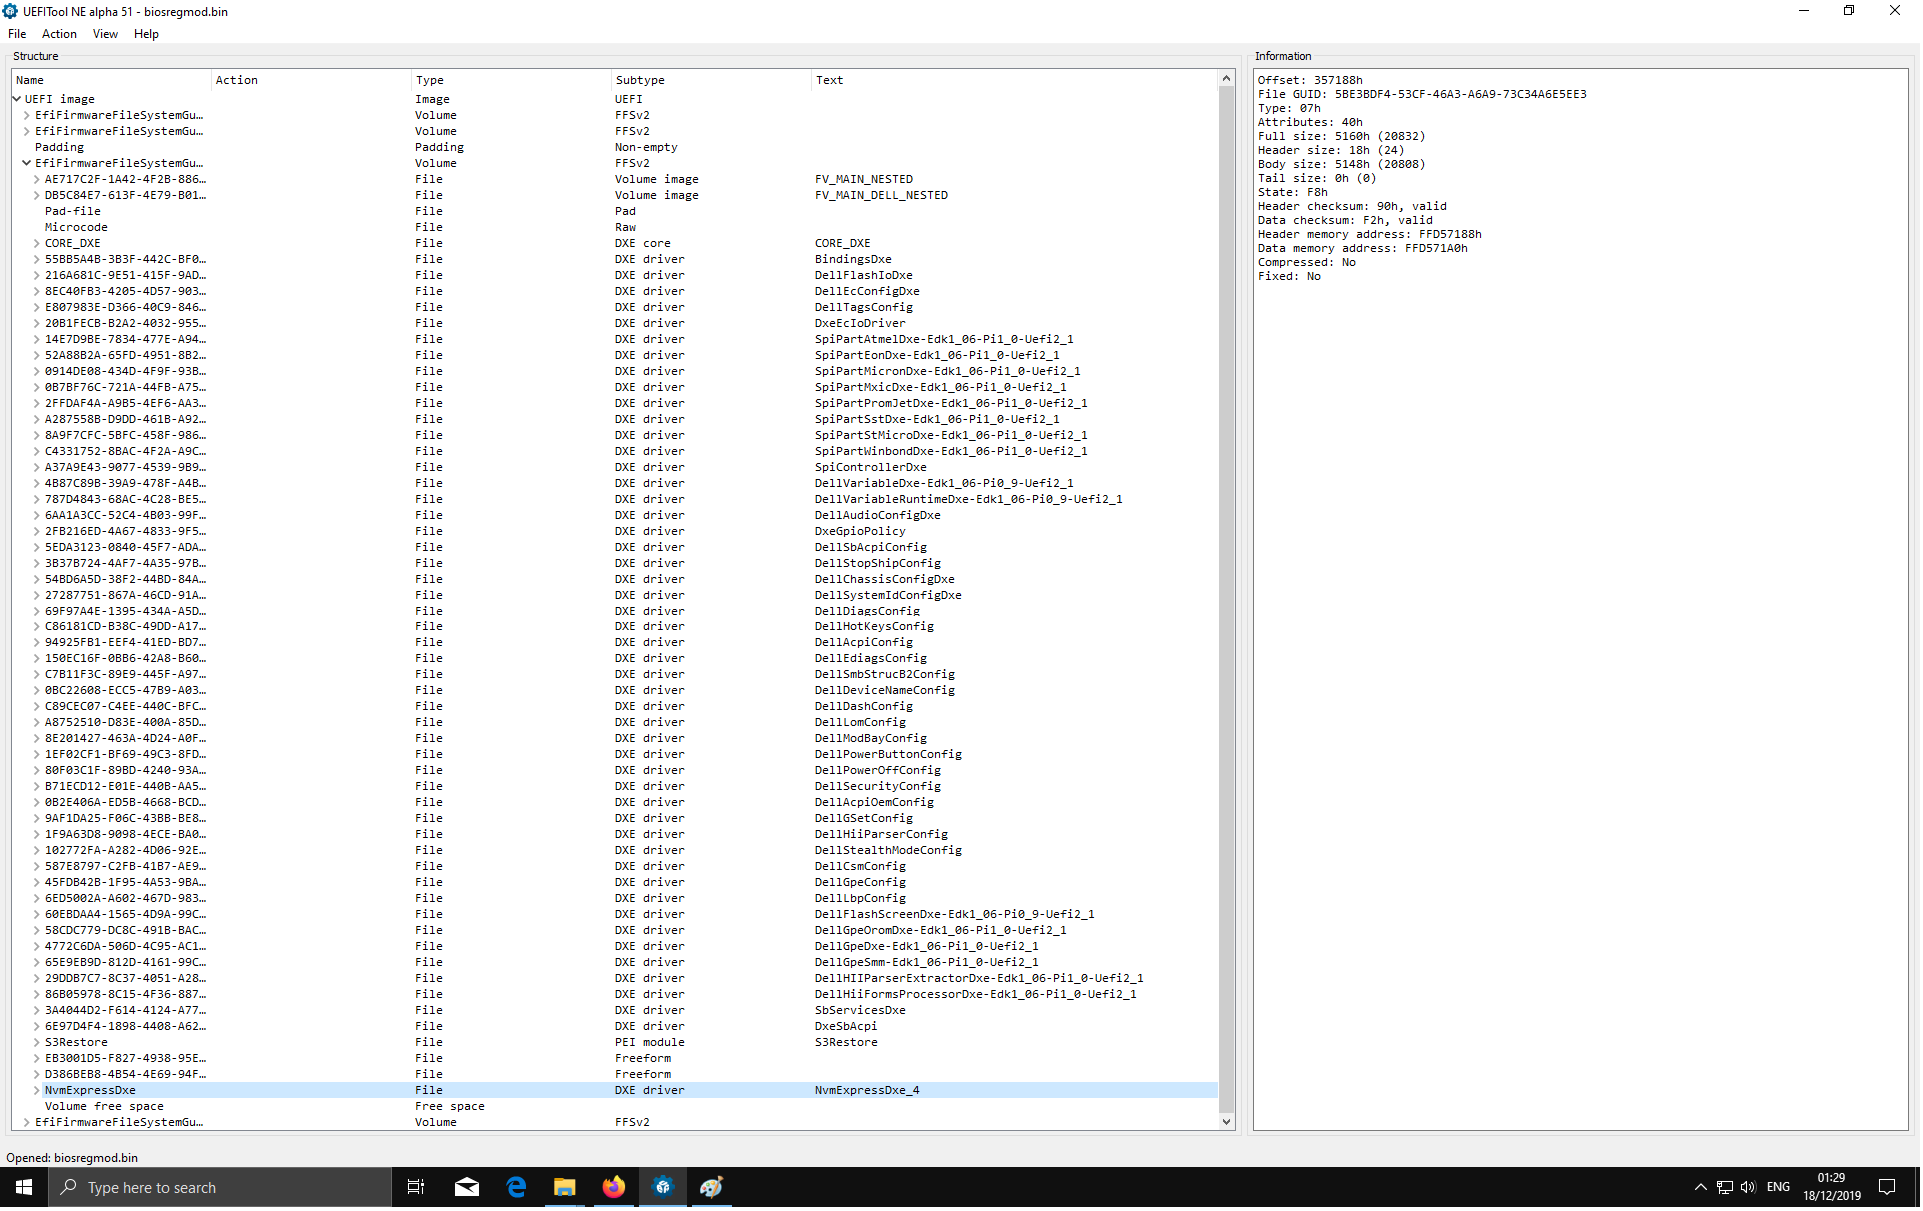
And again, in UEFITool.exe it worked just fine when I used the normal NvmExpressDxe_4 module. I attached an image below to show you where I put the module.
Can you tell me what method you used to insert the module?
Thank you so much!
(Sorry I have no idea how to display the image in small size here and make it clickable so it opens in a new tab in full size.)
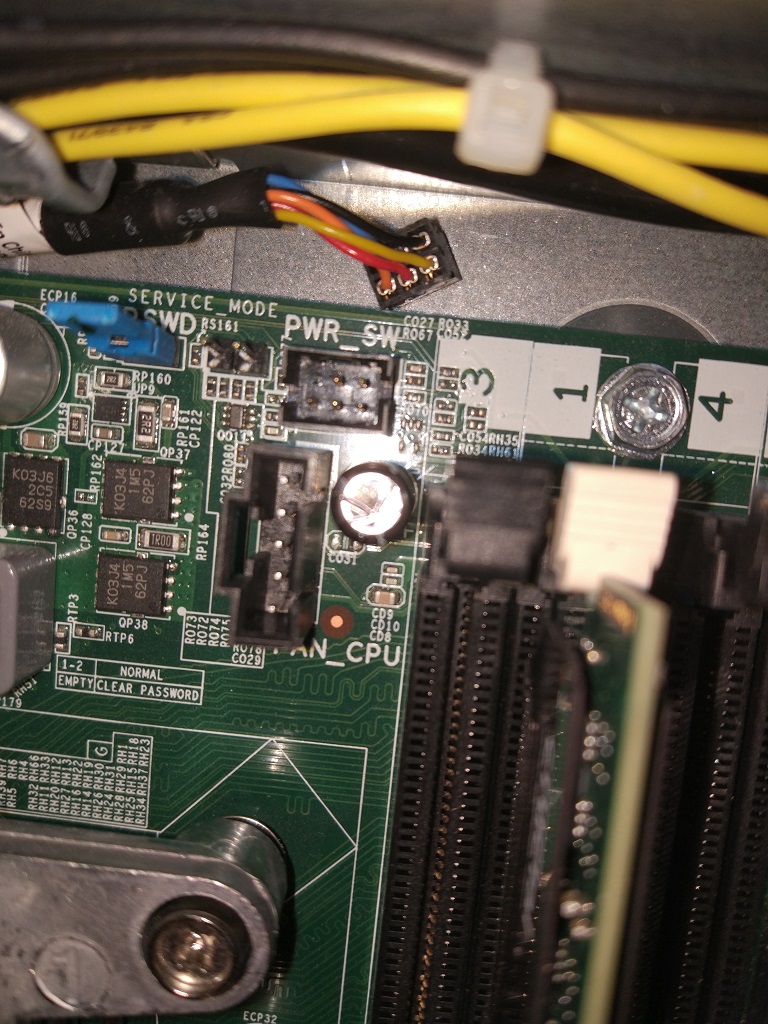
@Koven - You will need another jumper, or use the PWD one if you do not have a BIOS password (or reset it later if you do). Put jumper on Service_Mode pins, and then you can write back mod BIOS without getting error 368
You can use any old jumper you have laying around, or borrow one from another board for a little bit, if you don’t want to use the PSWD one.
To attach small image here, use advanced reply >> On right >> Then attach image and once done uploading/attaching, click insert and leave on "Auto"
Here’s a guide about it Fernando made - [Guide] How to insert pictures or attach files to a post
How I will do the mod is involved, in-depth editing/dance, around the size issue  Removing several modules and inserting the NVME then put all back, or put all back at same time.
Actually, nope, that was not needed here  Simple insert with UEFITool V25 and it’s done (you put in wrong location in above image, but it may work there too, I asked someone to test before but I can’t remember if they did or not)
MMTool 5.02 will do the insert too, but it breaks BIOS most likely, due to removing a padding file above microcode volume.
Here is your NVME Mod BIOS region, put jumper on service mod pins and flash it back like this >> FPTw.exe -bios -f biosregnvme.bin
http://s000.tinyupload.com/index.php?fil…141853363214057
@Lost_N_BIOS - I will just use the PSWD jumper. So what do I need to do after I moved the blue jumper on the service_mode? You wrote something about rebooting to windows twice, why?
Where did you put it in your file? I can’t find any Text with "NvmExpressDxe_4" in your file. Maybe you can attach a screenshot from UEFITool.exe with the file you made for me open on the location where you inserted it.
Edit: In the link you posted in your previous reply: RE: How to extract contents of this Dell BIOS package? the user also has an Optiplex 7010 and he is talking about dumping the whole BIOS, because it has 2 chips, one with 4mb and another with 8mb. I have the same 2 chips. Is it not needed to get the whole 12.288KB file instead of only the 6.144kb file we used till now?
What is the difference and is the 6.144kb file enough to flash the NVMe module?
See post #53 above and do my "OR, you can put on Service_mode Jumper " steps
I put NVME Mod where it belongs, in the main DXE volume, the one that contains CMSCore, it’s above where you showed in your example image, in FV_Main (one of those, I don’t remember which, only that it’s the one with CMSCore)
No, you do not need to dump both BIOS chips, you are using FPT and he was using programmer (apparently he didn’t know there was a jumper, or had programmer, wanted to use, or we were fixing something else with his BIOS (ie recover bricked BIOS etc)
FPT knows what part of both chips is the BIOS region, grabs them and we edit, then it knows how to flash it back across both chips. Since you know there is jumper now, you can dump entire 12MB with FPT if you want, we can edit, then you can flash it back, but it’s unnecessary for what you want to do here.
I just found it. It is under FV_MAIN_NESTED and then under EfiFirmwareFileSystemGuid at the bottom. Now I understand why you put it there, it is the only volume with a CMSCore.
Ok I will just use the 6.144kb file you already gave me. I will report back soon if it worked!
-------------
@Lost_N_BIOS
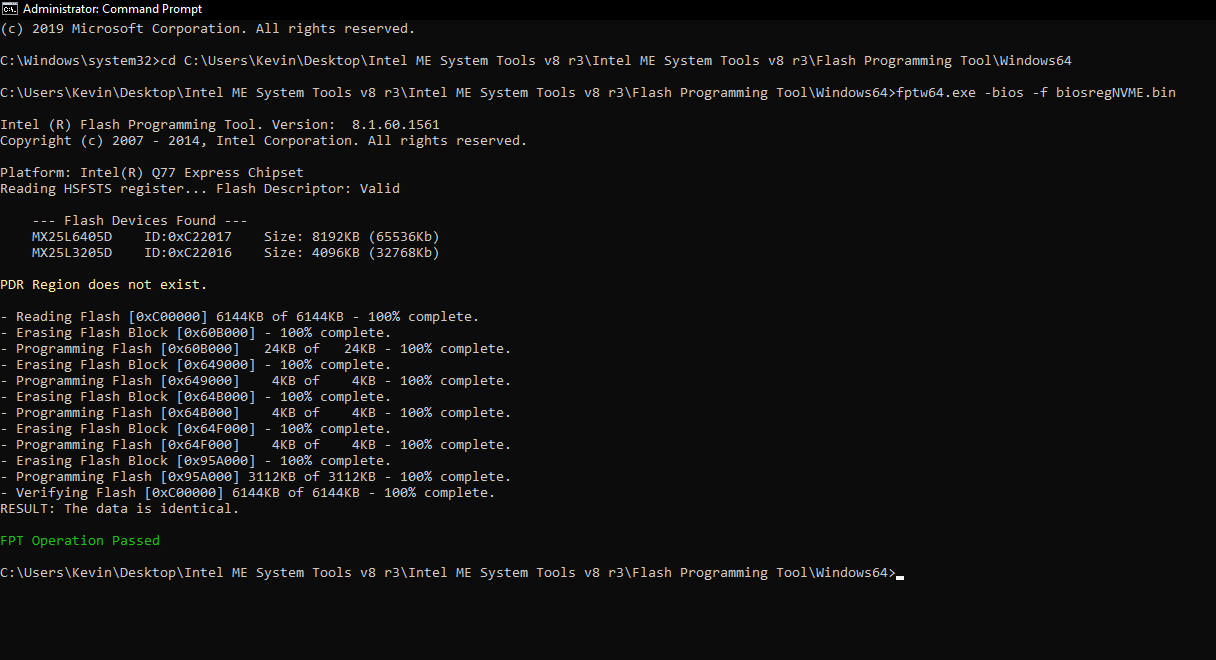
I think it worked!
I will probably write a full guide for every other Dell user who might faces the same problems as I did. Do you know a good forum section to post it?
Yes, that is why I put it there, usually we put in volume with CMSCore, and normally where you put it is where CMSCore would be, there usually isn’t those two “nested” Volumes. So, where you put it may also work too, but I’m not sure no one has tested and let me know yet
Great to see you got the BIOS flashed without issue! Now, remove jumper and you are done, and I’d enter BIOS, load optimal defaults, save and reboot back to BIOS then make any changes you need.
Then, to install to NVME you need to follow this guide iat step #4 of the “This is what you should do” section exactly as shown - [Guide] How to get full NVMe support for all Systems with an AMI UEFI BIOS
If you want to make a guide, this forum would be best (BIOS Modding Guides and Problems - the one we’re in now)
HI, all
Please Help!
I would like to bott from my M.2 NVME SSD, bu the Dell 3020 MT is not support booting from this.
I found an article which is show me how can I hack my bios. The problem is, I cannot extract bios files from the dell executable file, oand cannot dump from the machine. Please help me to cretate a new BIOS to Dell Optiplex 3020 MT.